Indulge in the rich flavor of Vanilla Bean Crème Brûlée, a dessert that impresses everyone. You’ll love creating its creamy custard and caramelized top. In this guide, I'll share key ingredients, easy steps, and handy tips for perfecting this classic treat. Whether you're a baking novice or a pro, you'll find joy in this decadent delight. Let’s dive in and elevate your dessert game!
Why I Love This Recipe
- Decadent Flavor: The combination of heavy cream and real vanilla bean creates a rich and indulgent taste that is simply irresistible.
- Elegant Presentation: The caramelized sugar crust adds a beautiful finish, making it a show-stopping dessert for any occasion.
- Simple Ingredients: With just a few basic ingredients, you can create a gourmet dessert that impresses without the fuss.
- Make Ahead: This dessert can be prepared in advance, allowing you to enjoy the company of your guests without last-minute stress.
Ingredients
Key Ingredients for Vanilla Bean Crème Brûlée
To make a perfect vanilla bean crème brûlée, you need:
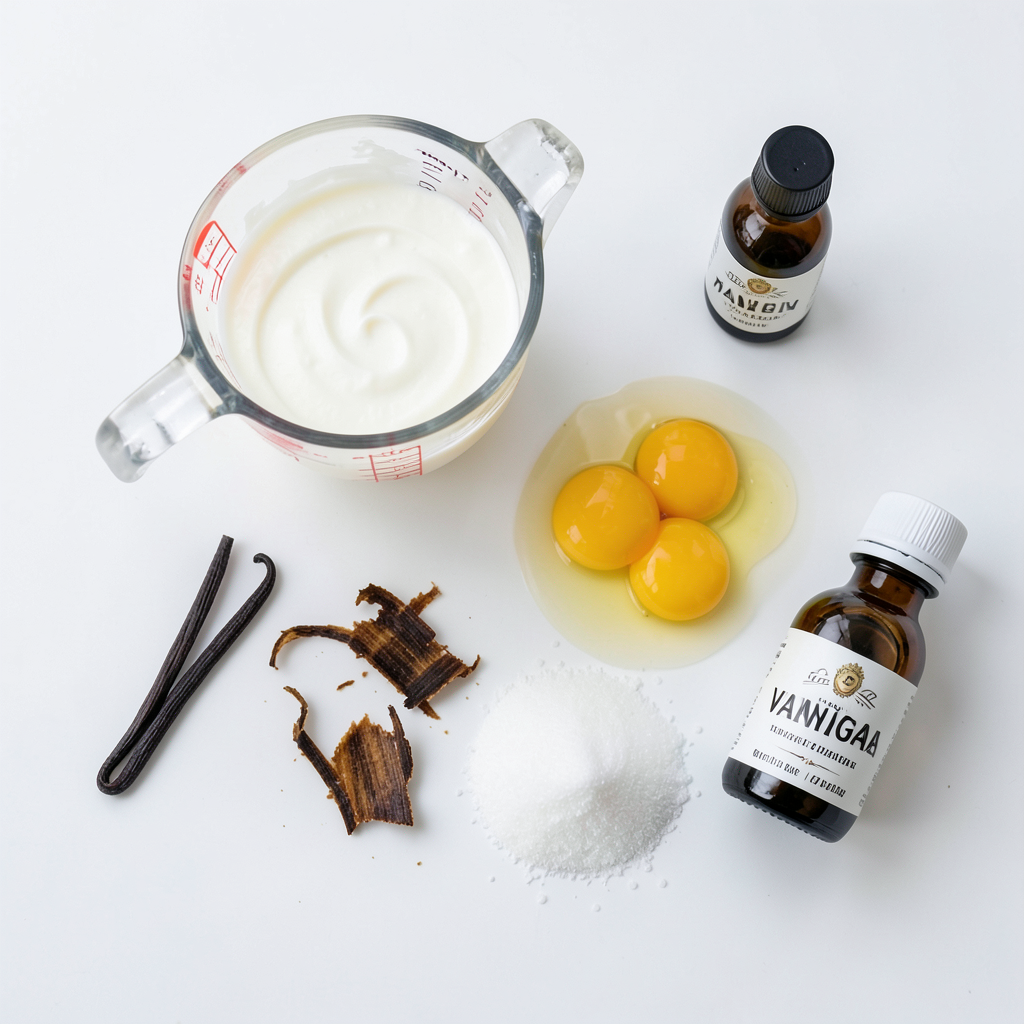
- 2 cups heavy cream
- 1 vanilla bean, split with seeds scraped out
- 4 large egg yolks
- 1/2 cup granulated sugar (plus additional for caramelizing)
- 1 teaspoon pure vanilla extract
- A pinch of salt
These ingredients create a rich, creamy dessert with a smooth texture. The heavy cream provides the base, while the egg yolks add richness.
Measuring Tips for Accurate Ingredients
Accurate measuring is key for this recipe. Here’s how to do it right:
- Use a liquid measuring cup for heavy cream. Fill it to the 2-cup line.
- For sugar, use a dry measuring cup. Scoop and level off for precision.
- When measuring vanilla beans, split and scrape them carefully. Ensure you get all the seeds.
These tips help ensure your crème brûlée turns out just right.
Importance of Quality Vanilla Beans
Quality vanilla beans make a big difference. They add depth and flavor to your dessert. Here’s why you should choose them:
- Look for plump, moist beans. They should feel soft and flexible.
- The aroma should be strong and sweet, which means they are fresh.
- Using pure vanilla extract can work, but real beans give the best taste.
Investing in good vanilla beans elevates your dish. Your guests will taste the love and care you put into it.
Step-by-Step Instructions
Prepping the Custard Mixture
To start, gather your ingredients. You will need:
- 2 cups heavy cream
- 1 vanilla bean, split with seeds scraped out
- 4 large egg yolks
- 1/2 cup granulated sugar
- 1 teaspoon pure vanilla extract
- A pinch of salt
First, preheat your oven to 325°F (160°C). In a medium saucepan, combine the heavy cream, vanilla seeds, and the empty pod. Heat gently over medium heat until it just simmers. This step brings out the vanilla flavor. Once it simmers, remove it from the heat. Let it steep for 15 minutes to infuse the cream.
While the cream cools, take a mixing bowl. Add the egg yolks, sugar, and salt. Whisk them together until the mixture turns pale and thickens a bit. This shows that the eggs and sugar are well mixed.
Now, slowly pour the warm cream into the egg mixture while you whisk. This step helps prevent the eggs from cooking too fast. Once mixed, toss the vanilla pod and add the pure vanilla extract. Mix until combined. For a smooth custard, strain the mixture through a fine-mesh sieve into a pitcher or bowl.
Baking in a Water Bath
Next, arrange six ramekins in a deep baking dish. Carefully fill each ramekin with the custard mixture, leaving some space at the top. Pour hot water into the baking dish until it reaches halfway up the sides of the ramekins. This water bath helps the custard cook evenly.
Place the baking dish in your preheated oven. Bake for 30-35 minutes. The edges should be set, but the centers should still jiggle a little. This indicates a creamy texture. Once done, carefully lift the ramekins out of the water. Let them cool at room temperature. Then, chill them in the refrigerator for at least 4 hours, or better yet, overnight. This allows the flavors to meld.
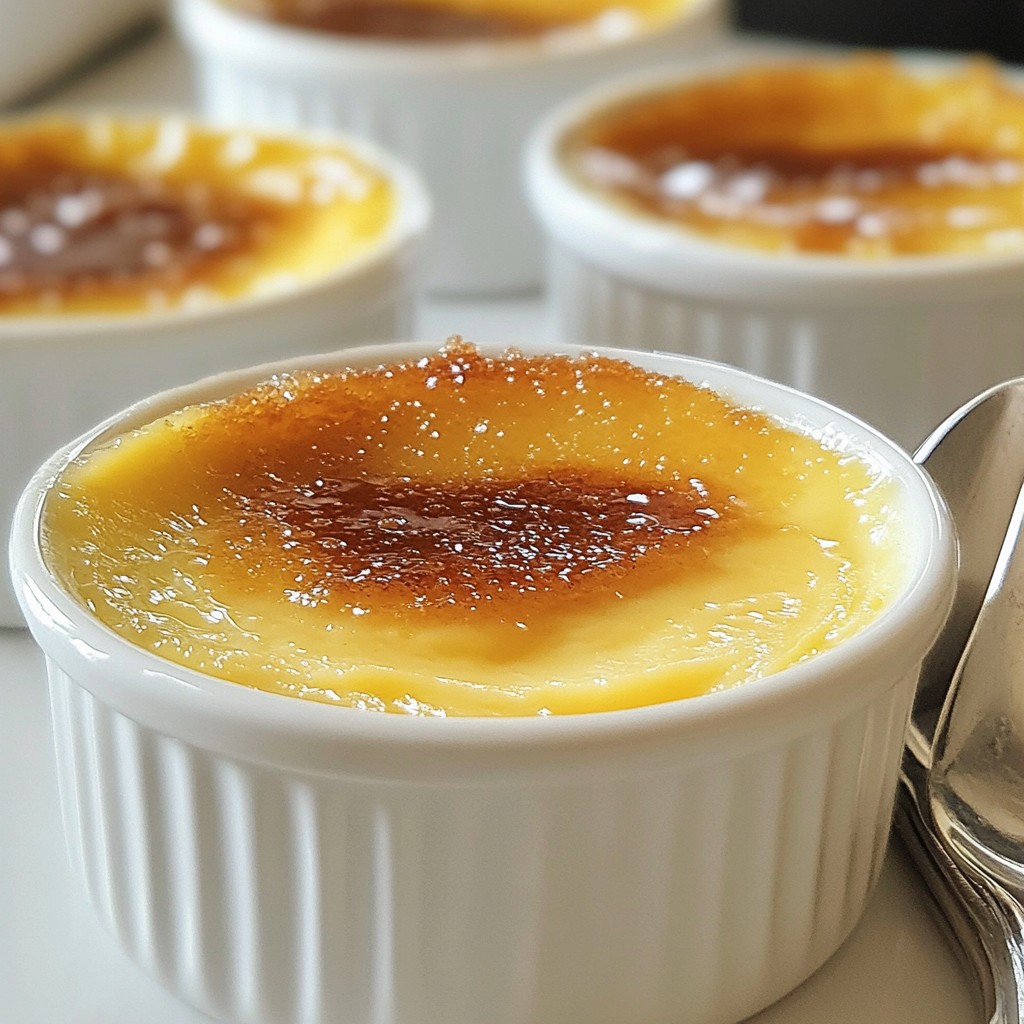
Caramelizing the Sugar Topping
When you are ready to serve, sprinkle about a teaspoon of granulated sugar on top of each chilled custard. Aim for an even layer. Using a kitchen torch, lightly pass the flame over the sugar until it melts and caramelizes into a golden crust. If you lack a torch, place the ramekins under the broiler for 1-2 minutes. Watch them closely to avoid burning.
Let the caramelized sugar set for a couple of minutes. This forms a crunchy layer over the creamy vanilla custard. Enjoy this rich treat!
Tips & Tricks
Achieving the Perfect Custard Texture
To create a silky custard, you need to control the heat. Heat the cream gently until it simmers. This helps blend the vanilla flavor nicely. When mixing the egg yolks and sugar, whisk until pale and thick. This step is critical for a smooth texture. After combining the cream and yolks, strain the mixture. This removes lumps and gives a velvety finish.
Preventing Egg Curdling During Mixing
Eggs can curdle if you add hot cream too fast. To avoid this, pour the warm cream slowly into the egg mixture. Whisk continuously as you pour. This method keeps the eggs from cooking too quickly. If you see any lumps, strain the mixture again. This step ensures a creamy custard without any bits.
How to Use a Kitchen Torch Safely
Using a kitchen torch can be fun, but safety is key. Always keep the torch at least a few inches away from the sugar. Move it in a sweeping motion over the surface. This helps caramelize the sugar evenly. Avoid staying in one spot too long, as it can burn. If you don’t have a torch, use your oven's broiler. Just watch closely to prevent burning. Always have a fire extinguisher nearby, just in case.
Pro Tips
- Use Fresh Vanilla Beans: For the best flavor, opt for fresh vanilla beans instead of vanilla extract. They will infuse your crème brûlée with an unbeatable richness and aroma.
- Control the Water Bath: Ensure the water bath reaches halfway up the sides of the ramekins. This helps to cook the custard evenly and prevents the edges from overcooking.
- Chill Thoroughly: Allow the custards to chill for at least 4 hours, or overnight if possible. This step is crucial for achieving the right texture and letting the flavors develop.
- Caramelize with Care: When caramelizing the sugar, keep the torch moving to avoid burning. If using the broiler, watch closely as it can quickly go from perfectly caramelized to burnt.
Variations
Chocolate Vanilla Bean Crème Brûlée
You can add a rich twist to vanilla bean crème brûlée by mixing in chocolate. Start by melting 4 ounces of dark chocolate. After you heat the cream, add the melted chocolate to the mix. Whisk it in until smooth. This creates a deep, chocolatey flavor that pairs well with the classic vanilla. It’s a perfect choice for chocolate lovers!
Citrus-Infused Crème Brûlée
For a bright flavor, try citrus-infused crème brûlée. Add the zest of one orange or lemon to the cream while it heats. This brings a fresh, tangy note to the dish. You can even mix different citrus fruits for a unique twist. Orange and lime together can create a delightful balance with the creamy custard.
Nutty Flavored Options
If you enjoy nuts, consider adding a nutty flavor to your crème brûlée. You can use toasted nuts like hazelnuts or pistachios. Chop them finely and mix them into the custard before baking. The nuts will add a nice crunch and flavor that complements the creamy texture. You can also use nut extracts like almond or hazelnut for a more intense taste.
Storage Info
Best Practices for Storing Crème Brûlée
To keep your crème brûlée fresh, store it in the fridge. Place it in a container with a lid. If you use ramekins, cover them with plastic wrap. This keeps the custard moist and stops it from absorbing other odors. Remember, don’t add sugar until you are ready to serve. The sugar layer will stay crunchy this way.
How Long Can You Keep It?
You can keep your crème brûlée in the fridge for up to three days. After that, it may lose its creamy texture. If you notice any change in smell or texture, it's best to toss it out. Always check before you eat!
Freezing Crème Brûlée: Is It Possible?
Freezing crème brûlée is not ideal. The texture can change when thawed. If you must freeze it, do so without the sugar on top. Wrap each ramekin tightly in plastic wrap and then foil. When you’re ready to eat, thaw it overnight in the fridge and then add sugar before caramelizing.
FAQs
What If I Don’t Have a Kitchen Torch?
If you lack a kitchen torch, don’t worry! You can still create a lovely caramel crust. Place the ramekins under your oven's broiler. Set it to high and watch closely. Broil for 1-2 minutes. Keep the oven door slightly open to check on the sugar. It should melt and turn golden brown.
Can I Make Crème Brûlée Without a Water Bath?
Yes, you can make crème brûlée without a water bath. However, the texture might change. The water bath helps cook the custard evenly. It keeps the edges from getting too hot. If you skip it, lower the oven temperature and watch closely to avoid overcooking.
Why is My Custard Not Setting?
If your custard does not set, it may be due to three main reasons. First, you might not have cooked it long enough. The edges should be firm, while the center jiggles slightly. Second, make sure you mixed the eggs and sugar well. Lastly, avoid overcooking. Too much heat can lead to a grainy texture instead of a creamy one.
You now have all the tools to make a perfect vanilla bean crème brûlée. We covered key ingredients, measuring tips, and the significance of good vanilla beans. The step-by-step instructions guide you through preparing, baking, and caramelizing. Remember the tips to avoid curdling and achieve the right texture. Variations let you experiment with flavors, and proper storage keeps your dessert fresh. With these insights, you can confidently create this classic dish that impresses every time. Enjoy crafting your crème brûlée masterpiece!