Get ready to dive into a fun and sweet treat: No Bake Birthday Cake Truffles! With just a few ingredients, you can whip up these delicious bites that taste like birthday cake in a ball. Whether you're celebrating a special day or just craving something sweet, these truffles are simple to make and absolutely delightful. Join me as I guide you through the easy steps to create these festive treats!
Why I Love This Recipe
- Quick and Easy: This no-bake recipe requires minimal effort, making it perfect for last-minute celebrations.
- Fun and Festive: Colorful sprinkles and creamy truffles create a vibrant treat that's sure to delight at any birthday party.
- Customizable: You can easily swap out the chocolate chips or sprinkles to suit your taste or theme.
- Decadent Flavor: The combination of birthday cake mix and cream cheese results in a rich, indulgent flavor that everyone loves.
Ingredients
Main Ingredients
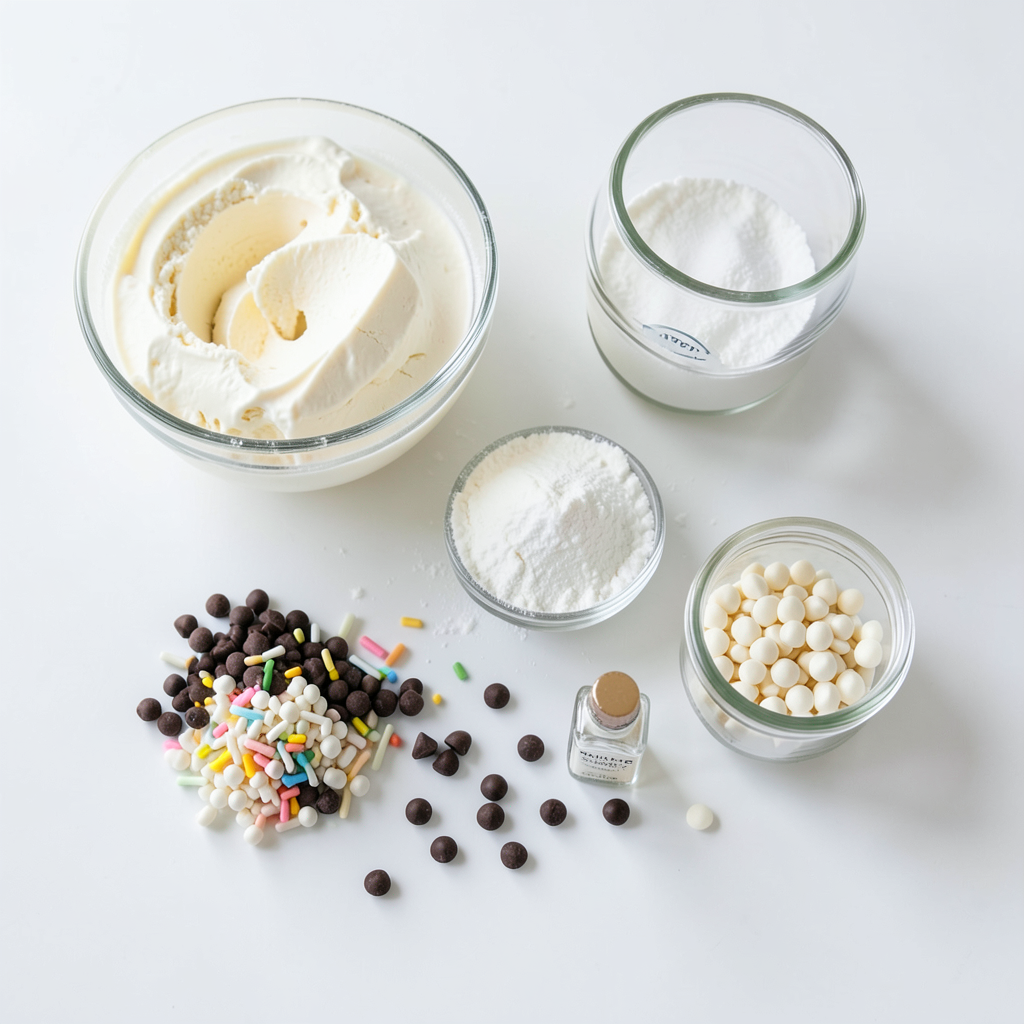
- 1 cup birthday cake mix (dry)
- 1/2 cup cream cheese, softened to room temperature
- 1/4 cup powdered sugar
- 1/4 cup colorful sprinkles (plus additional for coating)
- 1/4 cup mini chocolate chips
- 1/2 teaspoon pure vanilla extract
- 1 cup white chocolate chips (for coating)
The star of this recipe is the birthday cake mix. It brings that sweet, fun flavor everyone loves. Cream cheese adds a creamy touch and helps bind the mixture. The powdered sugar adds sweetness, making these truffles a real treat.
Colorful sprinkles give the truffles a festive look. These sprinkles are perfect for birthdays, or any celebration. Mini chocolate chips add a delightful crunch and extra chocolate flavor. Don’t forget the white chocolate chips for coating. They create a smooth, sweet layer that completes the truffles.
This blend of ingredients makes a fun and tasty treat. The mix of textures and flavors will wow your guests. Each bite is creamy, sweet, and bursting with color. Enjoy making these delightful truffles!
Step-by-Step Instructions
Preparing the Mixture
Start by gathering your mixing bowl. Combine the dry birthday cake mix with the softened cream cheese and powdered sugar. This mix creates the base for our delightful truffles. Use a hand mixer or spatula to blend until the mixture is smooth and lump-free. You want it creamy and easy to work with. No lumps should remain, so mix well.
Forming the Truffles
Next, gently fold in the colorful sprinkles and mini chocolate chips. These add fun and flavor to your truffles. Ensure they are evenly mixed throughout the batter. Now, scoop small portions of the mixture and roll them into bite-sized balls, about 1 inch wide. Place each ball on a baking sheet lined with parchment paper. This makes for easy cleanup later.
Coating and Setting
While the truffles chill, it’s time to melt the white chocolate. Place the white chocolate chips in a microwave-safe bowl. Microwave in 30-second intervals, stirring in between, until the chocolate is smooth. After the truffles have chilled for about 30 minutes, dip each one into the melted white chocolate. Use a fork or your fingers to ensure they are fully coated. Let any extra chocolate drip off.
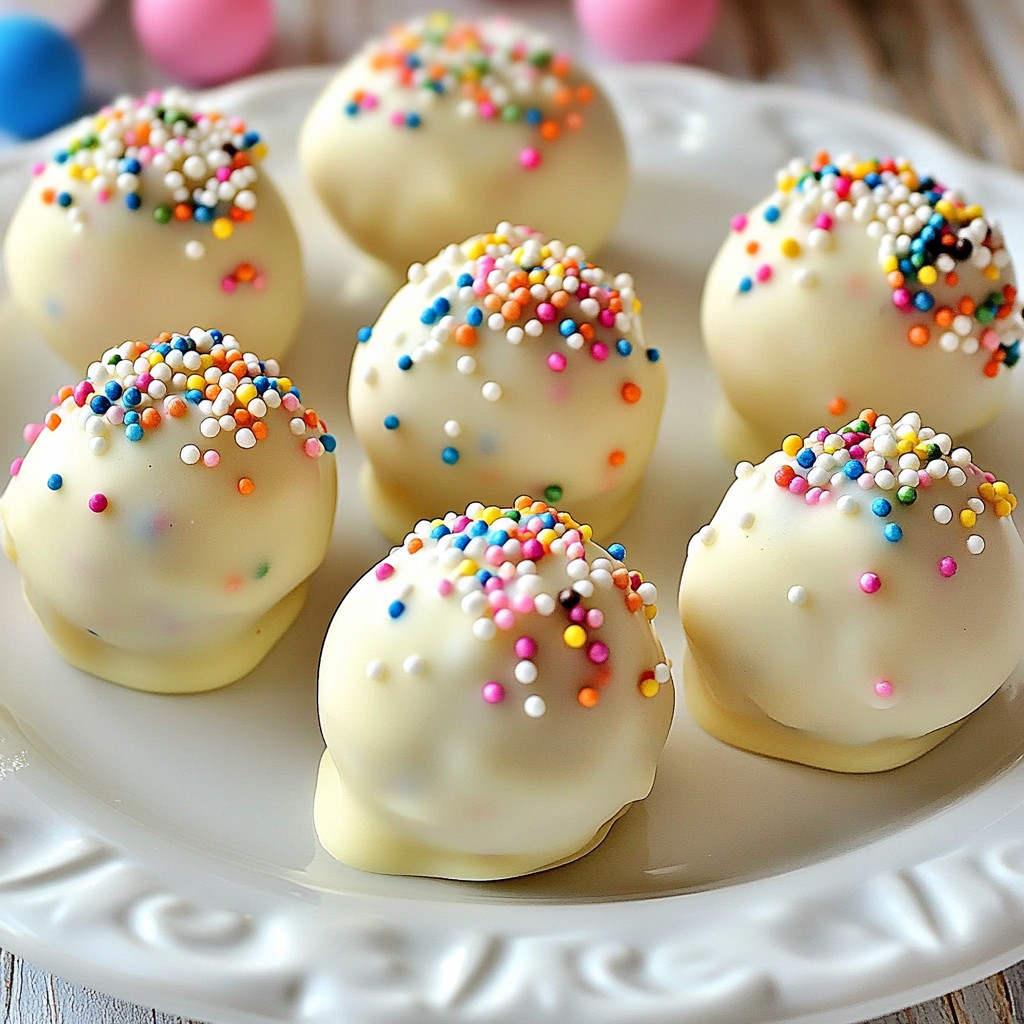
Immediately roll the chocolate-covered truffles in extra colorful sprinkles. This adds a festive touch that makes them pop! Place the finished truffles back on the parchment-lined baking sheet. Let them set at room temperature for a few minutes or chill them for 15 minutes. This will help the coating harden nicely. Enjoy your fun and tasty no-bake birthday cake truffles!
Tips & Tricks
Perfecting Your Truffles
To make the best no bake birthday cake truffles, start by ensuring a smooth texture. Mix the dry birthday cake mix, cream cheese, and powdered sugar well. Use a hand mixer or spatula until there are no lumps. This step is key for a creamy truffle.
Next, chill the truffles for optimal firmness. After rolling them into balls, place them in the fridge for about 30 minutes. This helps them hold their shape when you dip them in chocolate.
Chocolate Melting Tips
Melting chocolate can be tricky. Use a microwave-safe bowl and heat the white chocolate chips in 30-second intervals. Stir between each interval to avoid burning. This will keep the chocolate silky and smooth.
To avoid chocolate seizures, make sure no water gets into the bowl. Even a drop can cause the chocolate to clump. If your chocolate does seize, try adding a tiny bit of vegetable oil to help it smooth out again.
Decoration Ideas
Make your truffles fun and festive with creative serving suggestions. Arrange them in a colorful box or on a tiered stand. This adds a special touch for any birthday party.
To enhance visual appeal, sprinkle extra colorful sprinkles around the truffles. This makes them look vibrant and inviting. You can also try using different colors of chocolate for coating, like dark or milk chocolate, for a unique twist.
Pro Tips
- Chill for Better Shape: Chilling the truffle mixture for at least 30 minutes helps them hold their shape better when rolling into balls.
- Use High-Quality Chocolate: Opt for good quality white chocolate for coating; it melts better and will enhance the overall flavor of your truffles.
- Experiment with Sprinkles: Feel free to mix and match different types of sprinkles for a unique look and texture on your truffles.
- Storage Tips: Store the truffles in an airtight container in the fridge to keep them fresh and firm for longer.
Variations
Flavor Variations
You can have fun with different cake mixes. Try chocolate or red velvet for a twist. Each flavor brings its own fun taste. You can also switch up the coating. Use dark chocolate or milk chocolate instead of white. This adds depth and richness to your truffles.
Add-Ins and Mix-Ins
Want to jazz up your truffles? Add nuts like almonds or walnuts. Dried fruits such as cranberries or raisins also work great. They add chewiness and flavor. You can mix in flavored extracts too, like almond or lemon. A touch of icing can also enhance sweetness. These little changes keep your truffles exciting and unique!
Storage Information
Storing Truffles
To keep your No Bake Birthday Cake Truffles fresh, store them in the fridge. Use an airtight container to avoid drying out. Place a piece of parchment paper between layers if stacking them. This keeps them from sticking together.
If you want to save them for later, you can freeze the truffles. Place them on a baking sheet and freeze for about an hour. Once firm, transfer them to a freezer-safe bag. This way, they stay fresh for up to three months.
Shelf Life
In the fridge, these truffles last about one week. Keep an eye on them; if they start to look dry or hard, it’s time to toss them. For signs of spoilage, watch for changes in color or an off smell. If you notice either, don’t eat them. Enjoy your treats when they are at their best!
FAQs
Can I make these truffles ahead of time?
Yes, you can make these truffles a day or two before your party. Just store them in the fridge. This helps the flavors blend better. Plus, it saves you time on the big day. Just remember to keep them in an airtight container. This keeps them fresh and tasty for your guests.
How do I troubleshoot if my truffles are too soft?
If your truffles are too soft, there are easy fixes. First, try chilling them longer in the fridge. This can help them firm up. If that doesn’t work, add a bit more cake mix. Just mix in a tablespoon at a time until you find the right texture. You want them firm enough to hold their shape but still soft when you bite in.
What can I use instead of cream cheese?
You can use dairy-free cream cheese for a vegan option. There are many brands that taste great. You can also use Greek yogurt for a lighter twist. Just keep in mind that it may change the taste slightly. Experiment to find what you like best!
These truffles are easy and fun to make. You mix cake mix, cream cheese, and sweet treats. Then, shape them into balls and coat with white chocolate. Use tips to get smooth and firm truffles. Try different flavors and toppings to make them your own.
Remember to store extras well, so they last longer. Your friends will love these tasty bites at parties. Make them ahead of time for a stress-free treat. Enjoy creating and sharing these delightful truffles!