If you’re craving a snack that’s both tasty and easy to make, look no further! These Zucchini Corn Fritters pack a delicious punch with fresh veggies and simple ingredients. They’re perfect for a quick appetizer or a light meal. In this post, I’ll share everything you need to create crispy, golden fritters that will impress your family and friends. Let’s dive into this simple and satisfying recipe!
Ingredients
To make delicious zucchini corn fritters, gather these fresh ingredients:
– Zucchini: 2 medium, grated
– Corn: 1 cup, kernels (fresh or frozen)
– Flour: 1/2 cup, all-purpose
– Cornmeal: 1/4 cup
– Eggs: 2 large, beaten
– Green Onions: 1/4 cup, finely chopped
– Baking Powder: 1/2 teaspoon
– Spices: 1 teaspoon chili powder, 1/2 teaspoon garlic powder
– Seasoning: Salt and pepper to taste
– Olive Oil: For frying
– Optional Garnish: Sour cream or yogurt for serving
Each ingredient plays a key role in creating the perfect fritters. The zucchini adds moisture and flavor, while corn gives a sweet crunch. Flour and cornmeal provide structure, keeping the fritters together. Eggs bind everything, making them light and fluffy. The spices add warmth and depth.
Using fresh corn enhances the taste, but frozen works too. Green onions bring brightness and a mild onion flavor. Baking powder helps them rise, making them airy. Season with salt and pepper to balance the flavors.
You can serve these fritters with a dollop of sour cream or yogurt for creaminess. This simple combination of ingredients creates a dish that is tasty, fun, and easy to make.
Step-by-Step Instructions
Preparation of Zucchini
First, you need to grate the zucchinis. Use a box grater or a food processor for this task. Next, place the grated zucchini into a clean kitchen towel. Gather the ends of the towel and squeeze firmly. This step removes extra moisture. Dry zucchini helps the fritters hold together. If they are too wet, the fritters will be soggy.
Mixing Dry Ingredients
In a spacious mixing bowl, combine the flour, cornmeal, baking powder, chili powder, garlic powder, salt, and pepper. Use a whisk to blend the dry ingredients well. This ensures that the spices mix evenly. A good mix adds flavor to every bite.
Combining All Ingredients
Now, add the squeezed zucchini, corn kernels, and chopped green onions to the dry mix. Pour in the beaten eggs. Stir everything together gently. You want the mixture to be thick but still smooth. This right consistency is key for frying.
Cooking the Fritters
Heat a large skillet over medium heat. Add enough olive oil to cover the bottom by about 1/4 inch. To check if the oil is ready, drop a small spoonful of batter into it. If it sizzles, the oil is hot. Carefully drop heaping tablespoons of the batter into the hot oil. Flatten them slightly with the back of the spoon. Fry the fritters for 3-4 minutes on each side. They should turn golden brown and crispy.
Draining and Serving
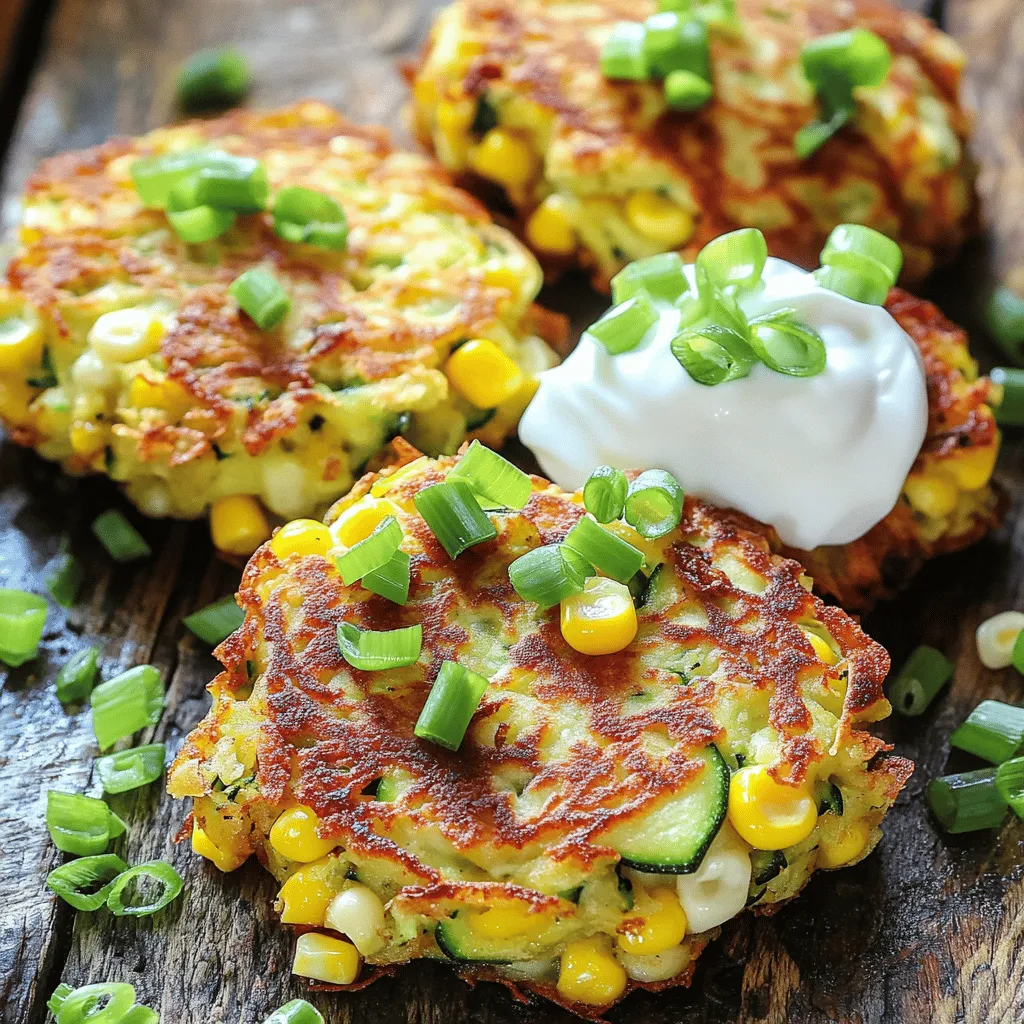
Once the fritters are cooked, use a slotted spoon to move them to a plate lined with paper towels. This helps drain excess oil, making them lighter. For a great presentation, stack the fritters on a colorful platter. Add a small bowl of sour cream on the side. You can sprinkle more chopped green onions on top for extra flair.
Tips & Tricks
Perfecting the Fritter Texture
To get the best texture, start by balancing moisture. Squeeze the grated zucchini well. This step is key. Too much water makes soggy fritters. Use a clean kitchen towel to help. After squeezing, you should see less liquid in the bowl.
Next, adjust the flour and cornmeal ratios. If your batter feels too wet, add more flour. If it’s too dry, a little more cornmeal helps. Play around with these amounts until you find the perfect mix. A thick but smooth batter works best.
Flavor Enhancements
Want to kick up the flavor? Try adding spices like cumin or paprika. Fresh herbs like cilantro or parsley also add a nice touch. You can even mix in some grated cheese. Feta or cheddar works great! These little changes can make your fritters feel new and exciting.
You can also combine different ingredients for a twist. How about adding diced bell peppers or jalapeños? They can bring extra crunch and heat. Be creative and experiment with flavors you enjoy.
Cooking Tips
When frying, the oil temperature is very important. Heat the oil over medium heat. If it’s too hot, the outside burns before the inside cooks. If it’s too low, your fritters soak up oil and become greasy. A small drop of batter should sizzle immediately when it hits the oil.
Avoid overcrowding your skillet. Fry in batches. If you put too many fritters in at once, they won’t cook evenly. Leave space around each fritter so they get crispy. This way, you enjoy that golden-brown crunch with every bite.

Variations
Ingredient Substitutions
You can easily swap ingredients in your zucchini corn fritters. If you want to replace eggs, try flaxseed or applesauce. Just mix one tablespoon of ground flaxseed with three tablespoons of water. Let it sit for a few minutes to thicken, then add it to your batter. Applesauce works well too. Use 1/4 cup of unsweetened applesauce instead of eggs.
For a gluten-free version, consider using almond flour or chickpea flour. Almond flour keeps the fritters light and nutty. Chickpea flour adds a nice flavor and helps bind the fritters. Both options make your dish safe for gluten-sensitive friends.
Seasonal Variations
You can also change up your fritters with seasonal veggies. Add bell peppers for a sweet crunch or spinach for a pop of color. Both will enhance the flavor and nutrition of your fritters. Try using different types of cheese, too. Feta adds a tangy kick, while cheddar gives a rich, creamy taste.
Serving Suggestions
When it comes to dipping sauces, think outside the box! A zesty yogurt dip with lemon and herbs pairs nicely with the fritters. You can also serve them with a spicy salsa or a creamy avocado dip.
For creative serving ideas, stack the fritters high on a colorful platter. They make a great appetizer or snack. Add a small bowl of your favorite dip for guests to enjoy. Whether it’s a party or a family meal, these fritters are sure to impress!
Storage Info
Storing Leftovers
To keep your zucchini corn fritters fresh, store them in an airtight container. Place parchment paper between layers to prevent sticking. Refrigerate them right after they cool down. They stay good for about 3 to 4 days. If you notice any water or moisture in the container, change the paper to keep them crispy.
Reheating Instructions
For the best results, reheat fritters in a skillet on medium heat. This method helps them regain their crispiness. Add a little olive oil to the pan and place the fritters in it. Heat for about 2 to 3 minutes on each side. Avoid using the microwave, as it can make them soggy and lose that delightful crunch.
Freezing Fritters
To freeze fritters, let them cool completely first. Lay them out in a single layer on a baking sheet. Freeze until solid, then transfer them to a zip-top bag. They can last in the freezer for up to 2 months. When you’re ready to enjoy, thaw them in the fridge overnight before reheating in a skillet. This method keeps them tasty and crispy.
FAQs
How do I prevent my zucchini corn fritters from falling apart?
To keep your fritters intact, proper binding is key. Always squeeze out extra moisture from the grated zucchini. This step helps your fritters hold together better. You can also add more flour if the batter seems too wet.
Heat plays a big role as well. Make sure your oil is hot enough before adding the fritters. If the oil is cold, the fritters will absorb too much oil and may break apart. Fry them for about 3-4 minutes per side until golden brown.
Can I make these fritters ahead of time?
Yes, you can make zucchini corn fritters ahead of time. Prepare the batter and store it in the fridge for up to one day. Cover it tightly to keep it fresh.
For storage, place cooked fritters in an airtight container. They will last for about three days in the fridge. When you are ready to eat, reheat them in a skillet. This keeps them crispy and tasty.
What can I serve with zucchini corn fritters?
These fritters pair well with many sides. A fresh salad adds crunch and color. You can also serve them with a yogurt dip or a tangy salsa.
For drinks, consider a light beer or lemonade. They complement the flavors nicely. You can even enjoy them with a glass of refreshing iced tea.
To make delicious zucchini corn fritters, start with great ingredients and careful preparation. Grate zucchini and squeeze out moisture for a perfect texture. Mix the dry ingredients evenly, then combine everything for a tasty batter. Fry them in hot oil until golden brown, and drain on paper towels. Remember to get creative with variations and enjoy them with dips. By following these tips, you can impress friends and family with your cooking skills. Enjoy every bite of these delightful fritters!


