Zesty Lime Chicken Avocado Salad Fresh and Tasty Dish

Are you ready to brighten up your dinner table? This Zesty Lime Chicken Avocado Salad bursts with fresh flavors and vibrant colors. Made with juicy chicken, creamy avocados, and zesty lime dressing, this dish is perfect for any occasion. Join me as I break down the simple steps to create this delicious and healthy salad that will impress your family and friends! Let’s dive into the tasty details!
Why I Love This Recipe
- Fresh and Vibrant: This salad combines fresh ingredients that not only look beautiful but also burst with flavor, making each bite a delightful experience.
- Healthy and Satisfying: With lean protein from the chicken and healthy fats from the avocados, this salad is both nutritious and filling, perfect for a light meal.
- Quick and Easy: Ready in just 30 minutes, this recipe is perfect for busy weeknights or when you need a delicious meal in a hurry.
- Customizable: You can easily adapt this recipe by adding your favorite ingredients or adjusting the dressing to suit your taste preferences.
Ingredients
Main Ingredients
– 2 boneless, skinless chicken breasts
– 2 ripe avocados, diced
– 1 cup cherry tomatoes, halved
– 1/2 red onion, finely chopped
– 1/4 cup fresh cilantro, chopped
– 3 tablespoons freshly squeezed lime juice (about 2 limes)
– 2 tablespoons extra virgin olive oil
Seasoning and Spices
– 1 teaspoon garlic powder
– 1 teaspoon ground cumin
– Salt and black pepper to taste
Suggested Tools
– Skillet
– Mixing bowls
– Whisk
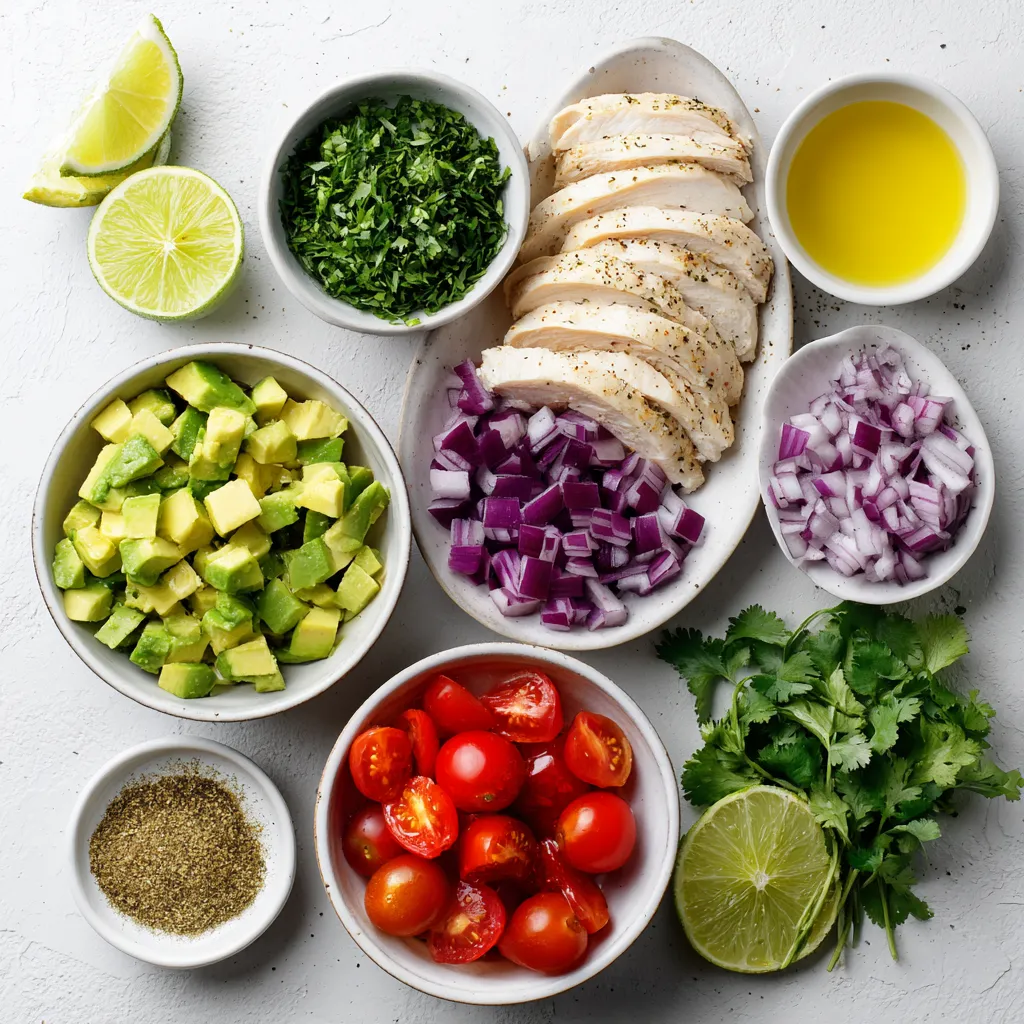
The main ingredients for Zesty Lime Chicken Avocado Salad are fresh and bright. The chicken offers protein, while the avocados add creaminess. Cherry tomatoes burst with flavor, and red onion gives a nice bite. Fresh cilantro brings a unique taste.
You will need a skillet for cooking the chicken. A mixing bowl is great for the salad mix and dressing. A whisk helps blend the dressing well.
Using fresh ingredients makes this salad shine. Choose ripe avocados and sweet tomatoes. Trust me; the taste will be worth it!

Step-by-Step Instructions
Cooking the Chicken
Start with the chicken breasts. First, season them on both sides with garlic powder, ground cumin, salt, and black pepper. This adds great flavor. In a skillet, heat olive oil over medium heat. When the oil is hot, add the chicken. Cook each side for about 6-7 minutes. The chicken should be browned and the juices should run clear. Once done, take it out and let it rest for 5 minutes. After resting, slice the chicken into thin strips.
Preparing the Dressing
Grab a small mixing bowl. Whisk together the lime juice and olive oil. Add a pinch of salt and black pepper. Taste the dressing, and adjust the seasoning if needed. You want it zesty but balanced.
Combining the Salad
In a large bowl, mix the diced avocados, halved cherry tomatoes, chopped red onion, and fresh cilantro. Gently fold the ingredients together. Be careful not to mash the avocados. This creates a nice, colorful base for your salad.
Final Assembly
Now, layer the sliced chicken on top of the salad mixture. Drizzle the lime dressing over everything. Toss the salad gently to combine. This keeps the avocados intact and creamy.
Serving Suggestions
Portion the salad into bowls or plates. For a nice touch, garnish each serving with extra cilantro leaves and lime wedges. This adds color and a burst of flavor.
Tips & Tricks
Perfecting the Salad
To keep your avocados intact, handle them gently. After cutting, use a spoon to scoop them into the bowl. Choose ripe avocados for the best flavor and texture. The perfect cooking time for chicken is about 6-7 minutes per side. Cook until juices run clear. This ensures juicy chicken for your salad.
Ingredient Substitutions
You can swap chicken for grilled shrimp or tofu. If you want a different taste, try using mango instead of avocado. For dressings, a yogurt-based dressing works well. You can also add nuts or seeds for extra crunch.
Dietary Modifications
For a gluten-free salad, just check all ingredients. Most are naturally gluten-free. If you want a vegan version, use chickpeas or tofu. They add protein and keep the salad filling. Enjoy making the salad work for your diet!
Pro Tips
- Perfectly Cooked Chicken: Use a meat thermometer to check the internal temperature of the chicken; it should reach 165°F (75°C) for safety and optimal juiciness.
- Fresh Ingredients: Select ripe avocados and fresh herbs for the best flavor. Firm avocados will not mash easily and will add creaminess to the salad.
- Make Ahead: Prepare the dressing and chop the vegetables in advance to save time. Combine just before serving to maintain freshness.
- Flavor Variations: Add diced jalapeños for a spicy kick or sprinkle some feta cheese for a creamy, tangy addition that complements the lime.

Variations
Mexican-Inspired Version
You can give this salad a fun twist with a Mexican flair. Start by adding corn and black beans. These ingredients bring a sweet and hearty flavor. You can also use taco seasoning for the chicken. This seasoning adds spice and depth to your dish, making it extra tasty.
Mediterranean Twist
For a Mediterranean twist, incorporate feta cheese and olives into your salad. Feta adds a creamy texture and a salty kick. Olives bring a briny flavor that pairs well with the other fresh ingredients. Instead of the lime dressing, try using balsamic vinaigrette. This change gives the salad a sweet and tangy note.
Seasonal Ingredients
Using fresh herbs and veggies from local markets can enhance your salad. Seasonal produce not only tastes better but also supports local farms. Consider adding seasonal fruits like strawberries or peaches. These fruits add a burst of flavor and color, making your salad even more delightful.
Storage Info
Refrigeration Guidelines
Store your Zesty Lime Chicken Avocado Salad in an airtight container. This helps keep it fresh. It is best to eat the salad within 1-2 days. After that, the avocados may turn brown and mushy. If you have leftovers, avoid mixing in the dressing until ready to eat. This keeps the salad crisp.
Freezing Considerations
Can the salad be frozen? I do not recommend freezing it. Freezing changes the texture of the avocado and tomatoes. If you want to save chicken, you can freeze it separately. Wrap the chicken tightly in plastic wrap or foil. Store it in a freezer bag for up to 3 months. Make sure to label the bag with the date.
Reheating Tips
To reheat the chicken, place it in a skillet over low heat. Add a splash of water to keep it moist. Heat for 5-10 minutes, turning often. Do not let it get too hot, or it will dry out. When you serve the salad, add fresh ingredients like avocado and tomatoes. This keeps the salad fresh and enjoyable.
FAQs
How long does Zesty Lime Chicken Avocado Salad last in the fridge?
This salad lasts about 2-3 days in the fridge. Store it in an airtight container. Always check for signs of spoilage before eating. The chicken and dressing should stay fresh for a few days. However, the avocados may brown. To slow this down, keep the dressing separate until serving.
Can I prepare the salad ahead of time?
Yes, you can prepare this salad ahead of time. Cook the chicken and let it cool before slicing. You can mix the other ingredients in a bowl. Just wait to add the dressing until you are ready to serve. This keeps the avocados fresh and tasty.
What can I serve with this salad?
This salad pairs well with many dishes. You can serve it with tortilla chips for crunch. Grilled corn on the cob also makes a great side. If you want something warm, try garlic bread. For a light meal, serve it with a soup, like tomato basil.
This blog post covers a delicious Zesty Lime Chicken Avocado Salad. We explored the main ingredients, tools needed, and step-by-step instructions to create it. I also shared tips for perfecting your salad, possible variations, and storage advice. Experiment with flavors that excite you and adapt the recipe to your taste. This salad is not only tasty, but it can also fit any meal plan. Enjoy making it your own and satisfying your hunger with fresh ingredient

Zesty Lime Chicken Avocado Salad
Ingredients
- 2 pieces boneless, skinless chicken breasts
- 2 pieces ripe avocados, diced
- 1 cup cherry tomatoes, halved
- 0.5 pieces red onion, finely chopped
- 0.25 cup fresh cilantro, chopped
- 3 tablespoons freshly squeezed lime juice
- 2 tablespoons extra virgin olive oil
- 1 teaspoon garlic powder
- 1 teaspoon ground cumin
- to taste salt and black pepper
Instructions
- Begin by seasoning the chicken breasts generously with garlic powder, ground cumin, salt, and black pepper on both sides. In a skillet, heat the extra virgin olive oil over medium heat. Once hot, add the chicken breasts and cook for approximately 6-7 minutes per side, or until the chicken is thoroughly cooked and the juices run clear. Once beautifully browned, remove the chicken from the skillet and allow it to rest for 5 minutes. Then, slice it into thin strips.
- In a small mixing bowl, whisk together the freshly squeezed lime juice, olive oil, and a pinch of salt and black pepper. Taste the dressing and adjust the seasoning if necessary, striking the perfect balance of zesty flavors.
- In a large mixing bowl, add the diced avocados, halved cherry tomatoes, finely chopped red onion, and fresh cilantro. Gently fold the ingredients together to avoid mashing the avocados, creating a colorful base for your salad.
- Layer the sliced chicken on top of the vibrant salad mixture. Drizzle the freshly prepared lime dressing over the entire bowl, then carefully toss everything together. Be gentle to ensure the avocados remain intact for a creamy texture with each bite.
- Portion the salad into individual serving bowls or plates. For an extra touch, garnish with additional cilantro leaves and lime wedges on the side for a splash of color and a burst of flavor.


. To start, you need to mash the chickpeas. Use a fork or a potato masher. Mash until you have a chunky texture. You want to leave some whole chickpeas. This gives your sandwich a nice bite and texture. Next, add the tahini, lemon juice, and Dijon mustard to the chickpeas. Mix everything well. You should have a creamy base. Now, chop the red onion, celery, and grate the carrot. Fold these veggies into the chickpeas. The crunch from the veggies adds great flavor and color to your salad. Now it's time to season your chickpea mixture. Add salt and black pepper to taste. Adjust the flavors to your liking. If you want more tang, add lemon juice. If you prefer creaminess, add more tahini. For the bread, lightly toast it if you want a crunch. Spread a generous amount of the chickpea salad on two slices of bread. Add a few crisp lettuce leaves on top. If you like, add thin slices of tomatoes and cucumbers. Place the other slices of bread on top. Cut each sandwich in half for easy eating. You can serve them right away or wrap them in parchment paper for later. For a nice touch, arrange the sandwiches on a wooden board or plate. Enjoy this fresh and flavorful meal! For the complete recipe, check the Full Recipe above. To prepare chickpeas, start with rinsing and draining. Use a fine mesh strainer for this task. Rinsing removes excess sodium from canned chickpeas. Draining helps avoid excess water that can make your salad soggy. You want the chickpeas dry but not overly crushed. Adjusting seasoning is key for a tasty salad. Start with salt and pepper. Taste your mixture before serving. Add more lemon juice for brightness. If you want creaminess, add more tahini. These simple changes can enhance the dish. Make your meal look nice with a few easy tips. Use a rustic wooden board or a bright plate. This adds charm to your presentation. Garnish with fresh dill on top of the sandwich. Serve with colorful veggie sticks on the side. It makes for an eye-catching and healthy display. For the full recipe, check the section above. {{image_4}} You can change up the chickpeas in this sandwich. Try using black beans or lentils instead. Both options give a different taste and texture. For extra creaminess, swap tahini with vegan mayonnaise. This will make the mix smooth and rich. You can even blend both for a unique flavor. Herbs and spices can change the taste of your sandwich. Instead of dill, use parsley or cilantro for a fresh kick. You can also add garlic powder or smoked paprika for depth. For a spicy twist, throw in some chopped jalapeños or a dash of hot sauce. These additions can bring a fun zing to your meal. When it comes to bread, you have many choices. Whole grain bread is great, but you can also use gluten-free options. Try wraps made from rice or corn for a lighter touch. This makes for a fun, portable meal. Each bread type changes the sandwich's feel, so choose what you love! To keep leftovers fresh, store your chickpea salad in an airtight container. Make sure to refrigerate it right away. This helps keep the flavors intact for up to three days. When ready to eat, just give it a good stir. You can enjoy it cold or make a fresh sandwich. If you want to store the chickpea salad for longer, freezing is a great option. Place the chickpea salad mixture in a freezer-safe container. Leave some space at the top to allow for expansion. It will stay good for about three months. When you're ready to eat it, let it thaw in the fridge overnight. To refresh your sandwich after storage, you can add a bit of olive oil or lemon juice. This helps bring back the moisture and flavor. If you want, you can toast the bread again for a crunchy bite. This simple step makes your sandwich taste fresh and delicious again. Enjoy your meal! To make this sandwich gluten-free, choose gluten-free bread. Many stores offer great options. Look for brands made from rice or almond flour. You can also try lettuce wraps instead of bread. This keeps it fresh and light too! Yes, you can. Make the chickpea salad a day ahead. Store it in an airtight container in the fridge. It stays good for about three days. Just remember to add fresh toppings right before serving for best flavor. Chickpeas are packed with protein and fiber. They help keep you full and satisfied. This sandwich is low in fat and high in vitamins. The veggies add crunch and nutrients. Tahini brings in healthy fats and flavor. Overall, this sandwich is a tasty way to eat healthy! This blog covered how to make a tasty chickpea salad sandwich. We explored main ingredients, step-by-step instructions, and storage tips. You learned how to adjust flavors and choose the right bread. Remember, you can customize the recipe with different herbs or legumes. Enjoy this easy meal any day! It’s healthy, quick, and delicious. I hope you try it soon. Your taste buds will thank you!](https://goldendishy.com/wp-content/uploads/2025/06/7c039c45-1f39-49ec-9b48-b25c6f87980b-768x768.webp)
![- 1 large head of cauliflower, cut into bite-sized florets - 1 cup shredded sharp cheddar cheese - 1/2 cup grated Parmesan cheese, divided - 1 cup heavy cream - 2 cloves garlic, finely minced - 1/2 teaspoon smoked paprika - 1/2 teaspoon freshly ground black pepper - 1 teaspoon salt, or to taste - 1/2 teaspoon onion powder - 1/4 cup seasoned breadcrumbs (optional, for added crunch) - Fresh parsley, chopped, for garnish The key to a great cheesy cauliflower bake lies in its simple yet flavorful ingredients. First, you need a large head of cauliflower. Cut it into bite-sized florets. This helps it cook evenly. Next, gather your cheeses. I love using sharp cheddar for its strong taste and Parmesan for a hint of nutty flavor. Heavy cream is a must for that rich, creamy texture. Don't forget the garlic! Mince two cloves finely for a burst of flavor. Seasoning is important, too. Smoked paprika adds warmth, while black pepper and onion powder enhance the dish. If you want a crunchy topping, use seasoned breadcrumbs. They give the bake a nice texture. Finally, finish with fresh parsley. It brings color and freshness. These ingredients come together to create a comforting dish that everyone will enjoy. Check out the Full Recipe for more details! - Preheat the oven to 375°F (190°C). - Boil the cauliflower florets. Start by preheating your oven. This step is key to getting that nice, golden top. While the oven heats, take a pot and fill it with water. Add a pinch of salt. Bring the water to a boil. Once boiling, add the cauliflower florets. Cook them for about 5 to 7 minutes. You want them tender but still a bit firm. Drain the cauliflower and set it aside. - Combine heavy cream, garlic, and spices in a saucepan. - Stir in shredded cheddar and Parmesan cheese until smooth. Now, let’s make the cheese sauce. In a medium saucepan, pour in the heavy cream. Add the minced garlic, salt, black pepper, smoked paprika, and onion powder. Heat it on medium. Stir this mix gently, keeping it warm but don’t let it boil. Once warm, slowly add the shredded cheddar and half of the grated Parmesan cheese. Stir until the cheese melts and the sauce is smooth and creamy. - Mix the cauliflower with the cheese sauce. - Transfer to a baking dish and top with breadcrumbs. In a large bowl, mix the cooked cauliflower with your cheese sauce. Make sure every floret gets coated with that cheesy goodness. Next, take a baking dish and lightly grease it. Pour the cauliflower mixture into the dish. Spread it evenly. If you want a crunchy topping, sprinkle the remaining grated Parmesan cheese and breadcrumbs on top. - Bake until golden brown and bubbly. - Garnish and serve. Place the baking dish in the preheated oven. Bake it for about 20 to 25 minutes. You want the top to be golden brown and bubbly. When it's done, take it out and let it cool for a few minutes. For a nice touch, sprinkle some freshly chopped parsley on top before serving. Enjoy your cheesy cauliflower bake! For the full recipe, refer to the earlier sections. To make the best cheesy cauliflower bake, cook the cauliflower just right. Boil it for about 5-7 minutes. You want it tender but still slightly firm. This helps keep the florets intact when you mix them with the cheese sauce. For the cheese sauce, ensure it is smooth. Stir the heavy cream and garlic over medium heat. Add the cheese slowly while stirring. This will help you avoid lumps. A smooth sauce coats the cauliflower evenly, giving it that creamy goodness. Don't be afraid to experiment with flavors. A little smoked paprika adds a nice touch. You can also try different cheeses. A mix of cheddar and Gruyère can elevate your dish. Using fresh herbs for garnish makes a big difference. Chopped parsley adds color and freshness. You can also use chives for an onion flavor boost. These small touches can turn a great dish into a memorable one. Think about what pairs well with cheesy cauliflower bake. It goes great with roasted chicken or grilled fish. You can also serve it with a crisp salad for added crunch. This dish is perfect for gatherings. Serve it at family dinners or potlucks. It is a great side dish for holidays too. Everyone loves a warm, cheesy treat! For the full recipe, check the instructions above. {{image_4}} You can make this dish lighter with a few easy swaps. - Low-fat cheese options: Try using part-skim mozzarella or low-fat cheddar. - Alternative non-dairy cream substitutes: Use almond milk or coconut cream for a dairy-free choice. These swaps keep the taste rich while cutting calories and fat. Want to spice it up? There are plenty of ways to add flavor. - Adding cooked bacon or sausage for extra protein: Crumbled crispy bacon brings a smoky touch. - Introducing vegetables like spinach or bell peppers: These add color and nutrients to your bake. Feel free to mix and match your favorite proteins and veggies for a unique dish. How you serve this dish can change the experience. - Individual ramekins for portion control: They make for a fun and fancy presentation. - Making it a main dish with protein additions: Pair it with chicken or fish for a complete meal. These options help you customize your cheesy cauliflower bake for any occasion. After enjoying your cheesy cauliflower bake, you might have some leftovers. To keep them fresh, place them in an airtight container. This helps lock in moisture and flavor. You can store the leftovers in the fridge for up to three days. When you’re ready to eat again, just scoop out what you need. Want to save some for later? Freezing is a great option. Cool the dish completely first. Then, transfer it to a freezer-safe container. Make sure to label it with the date. You can freeze it for up to three months. When you’re ready to enjoy it again, thaw it in the fridge overnight. For reheating, you can use the oven. Preheat it to 350°F (175°C). Cover the dish with foil to keep it moist. Bake for about 25-30 minutes, or until heated through. If you want a crispy top, remove the foil for the last 10 minutes. Enjoy your cheesy goodness! For the full recipe, click here [Full Recipe]. Yes, you can prepare cheesy cauliflower bake ahead of time. Start by cooking the cauliflower and making the cheese sauce. After mixing them together, place the dish in the fridge. Cover it tightly with plastic wrap or foil to keep it fresh. When ready to bake, remove it from the fridge. Bake it straight from the cold for about 10 minutes longer than the usual time. This way, you enjoy a warm, cheesy treat without a lot of last-minute work. Cheesy cauliflower bake pairs well with many dishes. Here are some great options: - Grilled chicken: The savory chicken complements the creamy bake. - Steak: A juicy steak adds richness to the meal. - Salad: A fresh garden salad balances the heaviness of the bake. - Roasted vegetables: Crisp, roasted veggies add color and flavor. These side dishes can make your meal feel complete and delicious. Yes! Cheesy cauliflower bake is perfect for vegetarians. It uses cauliflower, cheese, and cream, all plant-based. Just ensure that the cheese options are vegetarian-friendly. Many cheeses are made without animal rennet, making them suitable for vegetarian diets. This dish is a tasty way to enjoy a healthy meal while meeting dietary needs. To sum up, this blog covered how to make a delicious cheesy cauliflower bake. We talked about required ingredients, step-by-step instructions, and tips for great results. You learned about variations, healthy swaps, and how to store leftovers. This dish is not just tasty; it is easy to make and perfect for many meals. Try it yourself for a comforting treat that everyone will enjoy. Remember, the best part is making it your own by adding what you love!](https://goldendishy.com/wp-content/uploads/2025/06/4f60bbbb-6786-4607-99e4-9a4e6c15f60e-768x768.webp)
