Go Back
- 20 Oreo cookies, finely crushed - 1/4 cup unsalted butter, melted - 1 cup creamy peanut butter - 1 cup powdered sugar, sifted - 1 cup cream cheese, softened - 2 cups whipped cream or topping - 1/2 cup chocolate chips (optional) - Additional crushed Oreos (for garnish) To make the best Peanut Butter Oreo Pie, you need simple, tasty ingredients. Oreo cookies form the base of this pie. Their rich flavor gives a great taste. Unsalted butter helps bind the cookie crumbs into a crust. Creamy peanut butter adds a smooth texture. It also gives the pie that delicious nutty taste. Sifted powdered sugar sweetens the filling just right. Softened cream cheese makes the filling rich and creamy. Whipped cream lightens it up, adding fluffiness. You can top with chocolate chips for a fun touch. The extra crushed Oreos on top make it look pretty too! Gather these ingredients before you start. They will create a pie that everyone will love. {{ingredient_image_2}} First, we mix the crushed Oreo cookies with melted butter. This makes a sticky, tasty mixture. Use a medium bowl for this. Stir well until the crumbs are coated. Next, we press this mixture into a 9-inch pie dish. Make sure it is even on the bottom and sides. This helps form a solid crust. After that, we chill the crust in the fridge. This step sets the crust, making it firm. Now, let’s make the filling. In a large bowl, beat creamy peanut butter and softened cream cheese. Use an electric mixer for a smooth blend. Once mixed, we sift in powdered sugar. This helps remove lumps. Keep mixing until everything is blended well. Next, we fold in the whipped cream. Use a spatula to mix gently. Be careful not to over-mix, or the filling will lose its fluffiness. After that, we spread the filling into the chilled crust. Use a spatula to make it smooth on top. Finally, we cover the pie with plastic wrap. Refrigerate it for at least four hours. If you can, chill it overnight for the best flavor. When making this pie, your choice of peanut butter matters. You can use creamy or crunchy peanut butter. Creamy peanut butter gives a smooth texture. It blends well and helps the filling stay light. Crunchy peanut butter adds a nice bite. Both can work, but I prefer creamy for this recipe. For brands, I recommend Jif or Skippy. They are smooth and taste great in desserts. Folding whipped cream into the filling is key. To keep it fluffy, use a large spatula. Start at the bottom of the bowl and gently lift the mixture. This helps mix without deflating the cream. If you need a substitute, try using whipped topping. It holds up well and is easy to use. Another option is to make homemade whipped cream. Just whip heavy cream with a bit of sugar until peaks form. Chilling the pie is crucial. Aim for at least 4 hours in the fridge. For the best taste and texture, let it chill overnight. This helps the flavors come together. To check if the pie is ready, gently shake it. If the filling is firm and does not jiggle, it is set. You can also insert a knife in the middle. If it comes out clean, the pie is ready to serve. Pro Tips Use Room Temperature Cream Cheese: This helps to achieve a smooth and creamy filling without lumps. Chill the Pie Overnight: Allowing the pie to set overnight enhances the flavors and improves the texture. Experiment with Variations: Try adding different toppings like crushed nuts or caramel drizzle for a unique twist. Store Properly: Keep leftovers in an airtight container in the refrigerator to maintain freshness. {{image_4}} You can change the taste of your Peanut Butter Oreo Pie. Adding chocolate or caramel swirls gives it a rich twist. Simply drizzle melted chocolate or caramel on top before chilling. Then, swirl it in gently. This adds a fun look and taste. You can also use different flavored Oreos. Think about mint, peanut butter, or even birthday cake Oreos. Each flavor gives a new spin on this pie. Just crush your choice of Oreos as you would the original. This lets you explore fun flavor pairings. For a lighter version, consider low-fat cream cheese. It keeps the creamy texture but cuts calories. You can also swap out regular cream cheese for a dairy-free option if needed. Using sugar substitutes can help too. Options like Stevia or erythritol work well. Just adjust the amount to match your taste. These swaps keep the pie delicious while making it a bit healthier. Pair this pie with ice cream or sauces for extra joy. Vanilla ice cream complements the rich peanut butter flavor nicely. You could also try chocolate or caramel sauce drizzled on top. Get creative with serving ideas. Serve slices in bowls with whipped cream and crushed Oreos on top. You can even add fresh fruit like bananas or berries for a refreshing touch. These additions can make your dessert even more delightful. To keep your Peanut Butter Oreo Pie fresh, store it properly. - Refrigeration Guidelines: Cover the pie with plastic wrap or foil. Place it in the fridge. This keeps it cool and prevents odors from other foods. The pie will stay fresh for up to 5 days. - Freezing Instructions: If you need to store it longer, you can freeze it. Wrap the pie tightly in plastic wrap, then in aluminum foil. It can last for about 2 months in the freezer. When ready to eat, let it thaw in the fridge overnight. Understanding how long your pie lasts helps you enjoy it at its best. - Shelf Life in the Fridge: The pie is great for 5 days when stored in the fridge. - Signs of Spoilage: Watch for changes in smell or texture. If the pie looks off or has a strange odor, it’s best to toss it out. Enjoy your sweet treat while it’s fresh! Yes, you can use homemade whipped cream. Here’s how to make it: - Start with 1 cup of heavy cream. - Use a mixing bowl and beaters. - Whip the cream until soft peaks form. - Add 2 tablespoons of sugar and a splash of vanilla. - Whip until stiff peaks form. Homemade whipped cream adds a fresh touch. It’s creamy and light, perfect for this pie. Making a gluten-free Peanut Butter Oreo Pie is easy. Here are some tips: - Use gluten-free Oreo cookies, which are available in stores. - For the crust, you can use gluten-free cookie crumbs. - Almond flour or gluten-free graham crackers work well too. With these swaps, you can enjoy this treat without gluten. Chilling the pie overnight gives it the best flavor and texture. Here’s why: - Chilling helps the filling set properly. - It allows the flavors to blend together. - The texture becomes creamy and smooth. If you can, chill it overnight. If not, chill for at least four hours. This makes a big difference! This pie combines Oreos, peanut butter, and cream cheese for a rich treat. You learned how to make the crust, filling, and tips for perfecting your pie. Remember to chill it properly for the best flavor. Feel free to experiment with variations or health swaps. Whether serving it with ice cream or enjoying it plain, this pie is sure to impress. Store leftovers well to enjoy another day. Enjoy your baking adventure!

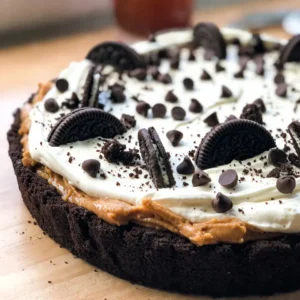
Peanut Butter Oreo Bliss Pie

A delicious dessert pie made with a creamy peanut butter filling and an Oreo cookie crust.
Prep Time 20 minutes
Total Time 4 hours 20 minutes
Course Dessert
Cuisine American
Servings 8
Calories 350 kcal

Ingredients
  

  • 20 cookies Oreo cookies, finely crushed
  • 1/4 cup unsalted butter, melted
  • 1 cup creamy peanut butter
  • 1 cup powdered sugar, sifted
  • 1 cup cream cheese, softened
  • 2 cups whipped cream or whipped topping
  • 1/2 cup chocolate chips (optional)
  • to taste none additional crushed Oreos, for garnish

Instructions
 

  • Prepare the Crust: In a medium-sized mixing bowl, combine the finely crushed Oreo cookies with the melted unsalted butter. Stir until the crumbs are well-coated with butter, forming a moist mixture. Press this mixture firmly into the bottom and up the sides of a 9-inch pie dish to create an even crust. Once done, place the crust in the refrigerator to chill and set while you prepare the filling.
  • Make the Filling: In a large mixing bowl, use an electric mixer to beat the creamy peanut butter and softened cream cheese together until the mixture is smooth and well-combined. Gradually sift in the powdered sugar, mixing continuously until everything is blended and there are no lumps.
  • Fold in Whipped Cream: Gently incorporate the whipped cream into the peanut butter mixture using a spatula or large spoon. Carefully fold until the filling is light and fluffy, being cautious not to over-mix so that the whipped cream retains its airy texture.
  • Assemble the Pie: Take the chilled Oreo crust from the refrigerator. Spoon the creamy peanut butter filling into the prepared crust and spread it evenly using a spatula. Make sure the filling is evenly distributed and smooth on top.
  • Chill: Cover the assembled pie with plastic wrap or aluminum foil. Refrigerate for at least 4 hours (or ideally overnight) to ensure the pie sets completely and the flavors meld together beautifully.
  • Serve: When ready to serve, remove the pie from the refrigerator. For an added touch, sprinkle the top with chocolate chips and extra crushed Oreos for garnish. Slice into wedges and enjoy this delightful dessert!

Notes

For best results, chill overnight.
Keyword dessert, Oreo, peanut butter, pie