Go Back
- 1 cup (225g) unsalted butter, melted - 2 cups (400g) granulated sugar - 4 large eggs - 1 teaspoon vanilla extract - 1 cup (130g) all-purpose flour - 1 cup (90g) unsweetened cocoa powder - 1/2 teaspoon salt - 1/2 teaspoon baking powder - 1 cup (175g) chocolate chips - 1/2 cup (75g) chopped walnuts or pecans (optional) The ingredients for classic chocolate brownies are simple but essential. Each one plays a key role in making these treats rich and tasty. - Butter: It gives the brownies their moist texture and rich flavor. Use unsalted butter for better control of salt levels. - Sugar: Granulated sugar adds sweetness and helps create that glossy top. You can also experiment with brown sugar for a deeper flavor. - Eggs: They bind everything together. Use large eggs for the best results. - Vanilla extract: This adds a lovely aroma and enhances the chocolate flavor. - All-purpose flour: It provides structure to the brownies. Too much can make them dry. - Cocoa powder: Unsweetened cocoa gives that deep chocolate taste. Use high-quality cocoa for better results. - Salt: Just a bit of salt enhances all the flavors. - Baking powder: This is key for a slight lift, making the brownies less dense. - Chocolate chips: These add gooey pockets of chocolate. Choose dark or semi-sweet for richness. - Nuts: Chopped walnuts or pecans add a crunchy texture. They are optional but add a nice bite. - Butter alternatives: If you want a dairy-free version, you can use coconut oil or vegan butter. - Different types of sugars: You can mix in brown sugar for a richer taste or use coconut sugar for a healthier twist. - Gluten-free options: For gluten-free brownies, substitute all-purpose flour with almond flour or a gluten-free blend. These ingredients create a classic brownie that is both decadent and irresistible. For the full recipe, you can check the complete instructions to bring these brownies to life! 1. Preheat your oven to 350°F (175°C). 2. Grease or line a 9x13 inch baking pan with parchment paper. This helps with easy removal later. 1. In a large bowl, mix the melted butter and sugar together. Stir until smooth. 2. Add four large eggs, one at a time. Blend well after each addition. 3. Pour in one teaspoon of vanilla extract. This adds a nice aroma. 4. In another bowl, sift together one cup of all-purpose flour, one cup of cocoa powder, half a teaspoon of salt, and half a teaspoon of baking powder. This prevents lumps. 5. Gradually mix the dry ingredients into the wet mixture. Use a spatula to fold gently. Do not overmix; this keeps your brownies soft. 1. Carefully fold in one cup of chocolate chips and half a cup of chopped nuts if you like. 2. Pour the batter into the prepared pan. Spread it evenly. 3. Bake for 25 to 30 minutes. Test for doneness using a toothpick. It should come out with a few moist crumbs. 4. Let the brownies cool in the pan for about 15 minutes. If you used parchment paper, lift them out for easier cutting. Otherwise, cool them in the pan. 5. Cut into squares and enjoy your decadent treat! For the full recipe, check the previous section. To get the best brownies, avoid overmixing the batter. When you mix too much, you add air. This can make brownies tough instead of soft. Stir just until the dry and wet ingredients blend together. You want a thick, gooey batter. This ensures your brownies come out rich and fudgy. To ensure gooey brownies, underbake them slightly. Bake them until a toothpick shows moist crumbs. This means they are perfectly gooey. Let them cool in the pan for a bit before cutting. This helps set the texture. For a rich taste, I recommend dark or semi-sweet chocolate chips. They melt beautifully and add depth. You can also add spices or extracts for more flavor. A pinch of cinnamon or a splash of espresso can elevate your brownies. Vanilla extract adds warmth and sweetness. Cutting brownies can be tricky. Use a sharp knife for clean edges. Wipe the knife between cuts to keep the slices neat. For a lovely presentation, dust the brownies with powdered sugar. You can also serve them with a scoop of vanilla ice cream. This makes for a delicious treat. For the full recipe, check the detailed instructions above. {{image_4}} You can easily add a nutty crunch to your brownies. Use walnuts or pecans for this. Chop them into small pieces. Fold them gently into the batter before baking. This adds a lovely texture and flavor. The nuts also bring a nice contrast to the smooth chocolate. If you like, you can mix different nuts for fun flavors. Swirling flavors into brownies makes them even more special. You can use cream cheese or peanut butter. Just soften them a bit first. Drop spoonfuls into the brownie batter. Then, use a knife to swirl gently. This creates beautiful patterns in your brownies. It also adds a creamy texture that pairs well with chocolate. Mixing flavors can make your brownies unique. Try mint chocolate brownies for a fresh twist. Just add mint extract to the batter. For coffee lovers, espresso or coffee-infused brownies are great too. Brew some strong coffee and mix it into the batter. Both of these options enhance the chocolate taste and make them extra tasty. For the full recipe, check out the section above. To keep your brownies fresh, consider where to store them. You can choose to keep them at room temperature or in the fridge. - Room Temperature: Place brownies in an airtight container. This keeps them moist. They will stay good for about 3 to 4 days. - Refrigerator: Storing brownies in the fridge is great for longer freshness. Use an airtight container. They can last up to a week this way. For best results, always let brownies cool completely before storing. This prevents excess moisture and keeps them from becoming soggy. Brownies taste best when eaten fresh. However, they can last a bit longer with proper storage. - Optimal Taste and Texture: Enjoy your brownies within the first 2 to 3 days for the best flavor and texture. - Signs of Spoilage: If you see mold or a change in smell, it’s best to throw them away. Brownies that feel dry or hard also indicate they are past their prime. By following these tips, you can enjoy your decadent chocolate brownies for days! For more details, check the Full Recipe for making these treats. To check if your brownies are done, use a toothpick. Insert it into the center of the brownies. If it comes out with a few moist crumbs, your brownies are ready. If it comes out wet, bake them a bit longer. Keep a close eye on the time, as every oven is different. I recommend checking them a few minutes before the timer goes off. This test helps ensure you get that perfect gooey texture. Yes, you can freeze brownies! First, let them cool completely. Then, cut them into squares. Wrap each square in plastic wrap. Place the wrapped brownies in a freezer-safe bag or container. Make sure to label the bag with the date. To thaw, take them out of the freezer. Leave them in the fridge overnight or on the counter for a few hours. This way, you can enjoy your brownies later. The difference between fudgy and cakey brownies lies in the ingredients and baking time. Fudgy brownies have more fat, like butter and chocolate, and less flour. This creates a dense and rich treat. Cakey brownies contain more flour and baking powder, giving them a lighter and fluffier texture. Bake fudgy brownies for a shorter time for that gooey center. If you want cakey brownies, bake them a bit longer. Adjusting these factors helps you achieve your desired brownie texture. In this blog post, we explored essential ingredients for delicious brownies, including butter, sugar, and chocolate chips. I shared handy tips on tweaks, like dairy-free options and enhancing flavors. You learned step-by-step instructions, from prepping the oven to achieving the perfect texture. Remember, you can easily customize your brownies with different nuts or flavor swirls. Store them right to keep them fresh. Now, go ahead and bake some mouth-watering treats that your friends and family will love!

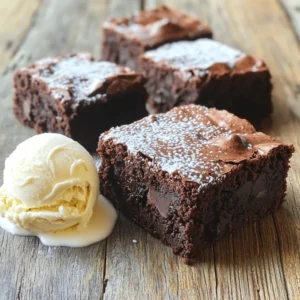
Classic Chocolate Brownies

Indulge in the ultimate decadence with these dreamy chocolate brownies! With a rich blend of chocolate chips, buttery goodness, and a hint of nuts, every bite is pure bliss. Discover how easy it is to whip up this classic treat with our simple recipe. Perfect for any occasion, these brownies are sure to impress friends and family. Click through to explore the full recipe and elevate your dessert game today!

Ingredients
  

1 cup (225g) unsalted butter, melted

2 cups (400g) granulated sugar

4 large eggs

1 teaspoon vanilla extract

1 cup (130g) all-purpose flour

1 cup (90g) unsweetened cocoa powder

1/2 teaspoon salt

1/2 teaspoon baking powder

1 cup (175g) chocolate chips (choose dark or semi-sweet for richness)

1/2 cup (75g) chopped walnuts or pecans (optional, for crunch)

Instructions
 

Begin by preheating your oven to 350°F (175°C). Prepare a 9x13 inch baking pan by greasing it with non-stick spray or lining it with parchment paper, allowing for easy removal of the brownies later.

    In a large mixing bowl, pour in the melted butter and granulated sugar. Stir vigorously until the mixture becomes smooth and glossy, indicating the sugar is well incorporated.

      Add the eggs to the butter-sugar mixture, one at a time, thoroughly blending each egg before proceeding to the next. Once combined, stir in the vanilla extract for an aromatic touch.

        In a separate bowl, sift together the all-purpose flour, unsweetened cocoa powder, salt, and baking powder. This ensures there are no lumps and the dry ingredients are evenly mixed.

          Gradually introduce the sifted dry mixture to the wet ingredients, gently folding them together with a spatula or wooden spoon until just combined. Be careful not to overmix, as this can lead to dense brownies.

            Carefully fold in the chocolate chips and the chopped nuts (if using), making sure they are evenly distributed throughout the batter.

              Pour the rich brownie batter into the prepared baking pan, spreading it out evenly with a spatula for uniform cooking.

                Place in the oven and bake for 25-30 minutes. To test for doneness, insert a toothpick in the center; it should come out with a few moist crumbs, indicating gooey perfection rather than wet batter.

                  Once done, allow the brownies to cool in the pan for about 15 minutes. If you used parchment paper, lift them out for easier slicing. Otherwise, let them cool directly in the pan before cutting into squares for serving.

                    Prep Time: 15 mins | Total Time: 45 mins | Servings: 12

                      - Presentation Tips: For an elegant touch, dust the cooled brownies with powdered sugar. Alternatively, serve each brownie with a scoop of creamy vanilla ice cream on top for an indulgent dessert experience!