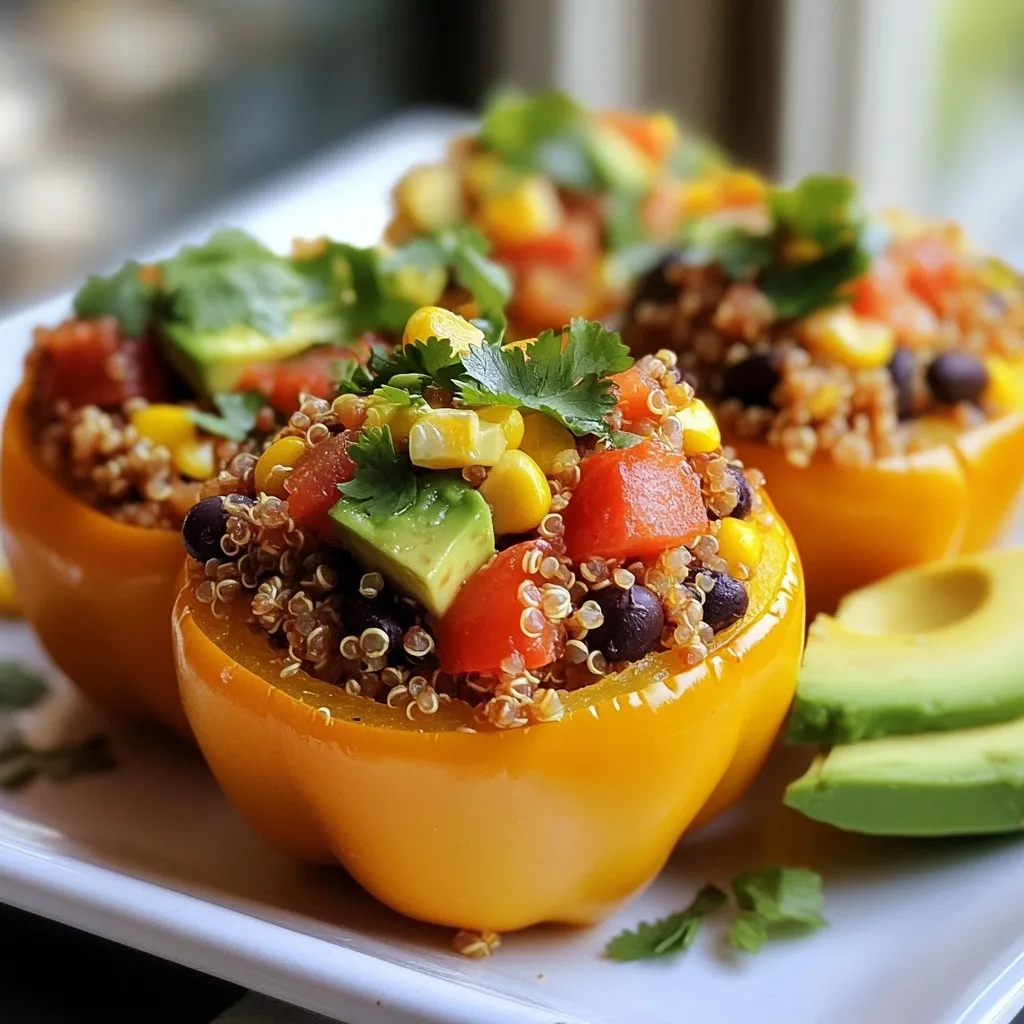
Looking for a delicious and healthy meal? Vegan stuffed bell peppers pack a punch with flavor and nutrition. These colorful peppers are easy to make and fun to customize. You’ll fill them with wholesome ingredients like quinoa, black beans, and fresh veggies. Whether you crave spicy or mild, this dish suits every palate. Join me as we dive into this tasty recipe that will satisfy your hunger and keep your diet on track!
Why I Love This Recipe
- Colorful Presentation: These stuffed bell peppers are visually stunning, showcasing a rainbow of colors that make them irresistible on any table.
- Nutrient-Packed Filling: With quinoa, black beans, and a variety of vegetables, this recipe is not only delicious but also loaded with essential nutrients.
- Easy to Customize: You can easily swap in your favorite vegetables or grains, making this a versatile dish that suits your taste preferences.
- Perfect for Meal Prep: These stuffed peppers store well in the fridge, making them an ideal option for quick and healthy meals throughout the week.
Ingredients
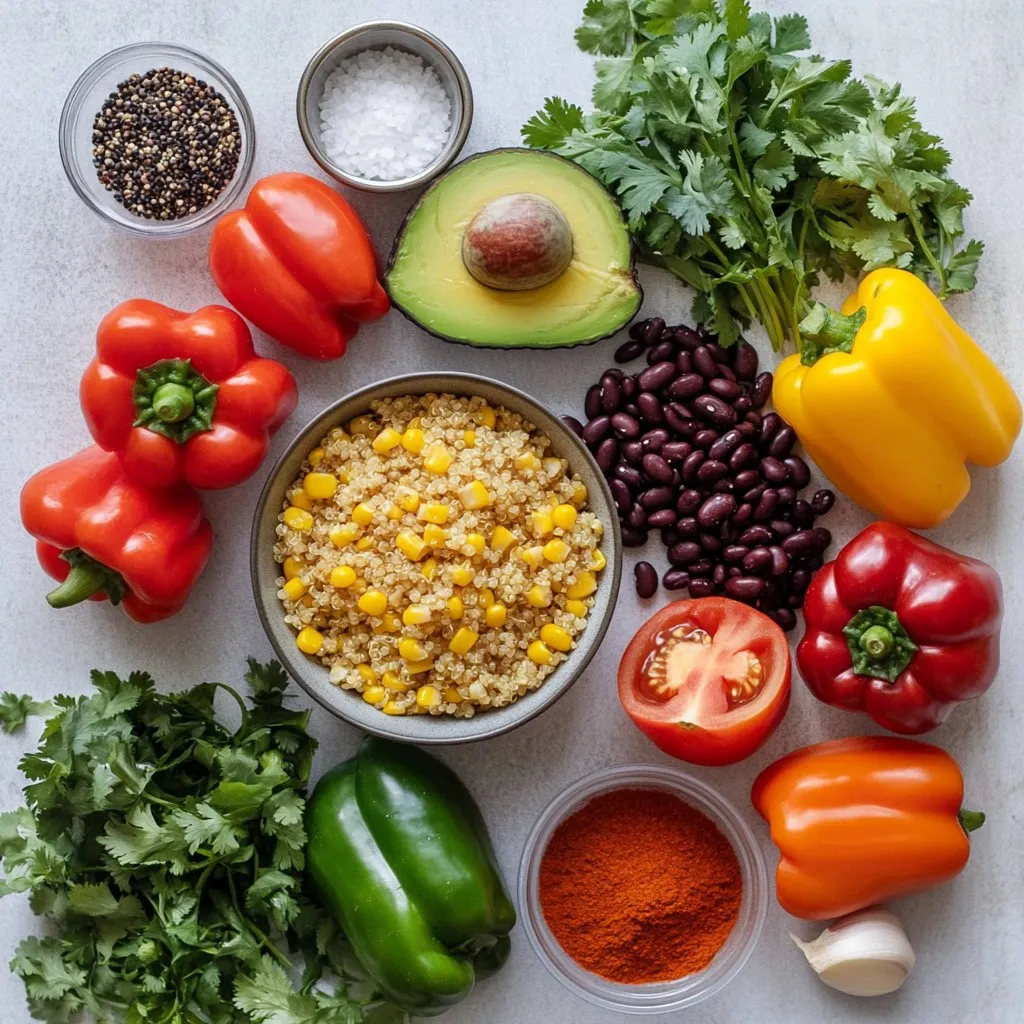
List of Ingredients
– 4 large bell peppers
– 1 cup quinoa
– 2 cups vegetable broth
– 1 can black beans
– 1 cup corn
– 1 cup diced tomatoes
– 1 small onion
– 2 cloves garlic
– Spices: cumin, smoked paprika, chili powder
– Garnishes: cilantro, avocado
– Seasoning: salt and black pepper
For this dish, I love using vibrant bell peppers. They add color and flavor. You can pick any color you like, such as red, yellow, or green. Quinoa is the star of the filling. It is packed with protein and very filling. The vegetable broth gives it a nice taste.
Black beans add a creamy texture. They are also a great source of fiber. Corn adds sweetness and crunch. Diced tomatoes bring juiciness. They make the filling moist and delicious.
For aromatics, I use a small onion and garlic. They enhance flavor and aroma. The spices—cumin, smoked paprika, and chili powder—bring warmth and depth. Adjust the spice levels to fit your taste.
Finally, fresh cilantro and avocado elevate the dish. Cilantro adds a burst of freshness. Avocado brings creaminess and richness. This combination makes each bite special.
Step-by-Step Instructions
Preheating the Oven
Start by preheating your oven to 375°F (190°C). This step is key. Preheating helps cook the peppers evenly. It also ensures a nice roasted finish on top.
Cooking the Quinoa
To cook quinoa, bring 2 cups of vegetable broth to a boil in a medium saucepan. Rinse 1 cup of quinoa under cold water. Add the quinoa to the boiling broth. Lower the heat and cover the pot. Let it simmer for about 15 minutes. The quinoa is done when all the liquid is absorbed and it looks fluffy. If you want, you can also cook quinoa in a rice cooker. Just follow the same water-to-quinoa ratio.
Preparing the Bell Peppers
While the quinoa cooks, prepare your bell peppers. Take 4 large bell peppers and carefully slice the tops off. Remove the seeds and membranes inside. This makes room for the filling. Arrange the hollowed peppers upright in a baking dish. This helps them stay standing during baking.
Sautéing Aromatics
In a large skillet, add a splash of olive oil over medium heat. Add 1 finely chopped onion and 2 minced garlic cloves. Sauté them together for about 3 to 4 minutes. You want the onion to be soft and translucent. This step adds a lot of flavor to your dish.
Mixing the Filling
Once the onion and garlic are ready, it’s time to mix the filling. Add the cooked quinoa, 1 can of rinsed black beans, 1 cup of corn, and 1 cup of diced tomatoes to the skillet. Also, add 1 teaspoon of ground cumin, 1 teaspoon of smoked paprika, ½ teaspoon of chili powder, salt, and black pepper. Stir everything well to combine. Cook for another 5 minutes to heat through. This ensures every bite is full of flavor.
Stuffing and Baking the Peppers
Now for the fun part! Generously spoon the filling into each bell pepper. Press down slightly to pack it in well. If you have leftover filling, spread it around the peppers in the baking dish. Cover the dish with aluminum foil. This keeps moisture in while baking. Bake in your preheated oven for 25 to 30 minutes. The peppers should be tender when done. After that, remove the foil and bake for another 10 minutes. This gives the tops a lovely roasted look.
Tips & Tricks
Achieving Perfectly Cooked Quinoa
To cook quinoa just right, avoid common mistakes. Rinse the quinoa well before cooking. This removes the bitter outer coating. Use a ratio of one cup of quinoa to two cups of liquid. I prefer vegetable broth for added flavor. Bring the broth to a boil, then reduce to a simmer. Cover and let it cook for about 15 minutes. The quinoa will be fluffy when done. If you see liquid left, cook for a few more minutes.
Flavoring quinoa can elevate your dish. Add herbs, spices, or even a splash of lemon juice. This simple step can make a big difference.
Adjusting Spice Levels
You can easily customize the heat of your stuffed peppers. Start with less chili powder and add more to taste. If you enjoy bold flavors, consider adding jalapeños or cayenne pepper. For a different twist, try paprika or curry powder for warmth.
Alternative spices can change the flavor profile. Cumin adds earthiness, while smoked paprika gives a nice smoky touch. Don’t be afraid to experiment and find your perfect mix.
Healthy Ingredient Substitutions
If you need gluten-free options, replace quinoa with rice or millet. For a soy-free choice, use lentils or chickpeas instead of beans. These options keep the filling hearty and nutritious.
You can also switch up legumes or grains. Try farro, barley, or even bulgur for a different texture. Each option brings its unique flavor and adds variety to your meal.
Pro Tips
- Choose Colorful Peppers: Using a mix of bell pepper colors not only enhances the visual appeal but also adds a variety of nutrients to your dish.
- Quinoa Cooking Tip: Rinse quinoa well before cooking to remove any bitterness from the saponins on its surface, resulting in a cleaner flavor.
- Season to Taste: Always taste the filling before stuffing the peppers; adjust the seasonings if necessary to ensure maximum flavor.
- Make Ahead: Prepare the filling in advance and store it in the fridge. Stuff the peppers just before baking for an easy weeknight dinner.
Variations
Different Filling Options
You can change the filling to suit your taste. Consider adding more veggies like spinach or zucchini. You might also try nuts such as walnuts or almonds for extra crunch.
For a protein boost, you can switch up the beans. Instead of black beans, use kidney beans or chickpeas. You can also add grains like brown rice or farro for a heartier meal.
Flavor Profile Changes
If you want a Southwestern twist, add jalapeños for heat and lime for freshness. The spice will kick up the flavor nicely. You can also sprinkle some cilantro on top for added zest.
For a Mediterranean flair, use couscous instead of quinoa. Mix in herbs like parsley or oregano to elevate the taste. This version is fresh and bright, perfect for summer meals.
Serving Suggestions
Pair your stuffed peppers with a tasty sauce or dip. A creamy avocado sauce or a zesty salsa works great. These will enhance the flavors and add a nice touch.
You can serve the peppers with a side salad or some roasted veggies. A simple green salad will balance the meal nicely. This makes for a colorful and nutritious plate.
Storage Info
How to Store Leftover Stuffed Peppers
To keep your stuffed peppers fresh, use an airtight container. Glass containers work best. Place the peppers in the container after they cool. You can store them in the fridge for up to five days. Make sure to cover them well to prevent drying out.
Freezing Instructions
To freeze stuffed peppers, wrap each one tightly in plastic wrap. Then, place them in a freezer-safe bag or container. Label the bag with the date. You can freeze them for up to three months. When you’re ready to eat, take them out and let them thaw in the fridge overnight.
Reheating Tips
Reheat stuffed peppers in the oven for the best texture. Preheat your oven to 350°F (175°C). Place the peppers in a baking dish and cover with foil. This keeps them moist. Heat for about 20-25 minutes. Avoid microwaving, as it can make them soggy. Enjoy your meal warm and tasty!
FAQs
Can I Make These Stuffed Peppers Ahead of Time?
Yes, you can make stuffed peppers ahead of time. Prepare the filling and stuff the peppers. Then, store them in the fridge for up to 24 hours. When ready to cook, just pop them in the oven. If you want, you can also freeze them. Wrap each pepper in foil and place them in a freezer-safe bag. They will last up to three months. When you want to eat them, thaw in the fridge overnight, then bake as usual.
What Can I Substitute for Quinoa?
If you need a substitute for quinoa, try rice, farro, or couscous. Cooked rice takes about 15-20 minutes. Farro usually cooks in 30-40 minutes, while couscous cooks in just 5 minutes. Each option will bring a different texture and taste to your peppers but will still be delicious!
Are Stuffed Peppers Healthier Than Other Meals?
Stuffed peppers are indeed healthy. They contain a variety of nutrients. Bell peppers are high in vitamins A and C. Quinoa is a great source of protein and fiber. Black beans add even more protein and fiber. Corn brings in vitamins and minerals too. This dish is low in fat and packed with good things.
Can I Use Different Types of Peppers?
You can use different types of peppers! Each type has its own flavor. Green peppers have a more bitter taste, while red and yellow are sweeter. You can also use smaller peppers like jalapeños for a spicy kick. Just remember that cooking times may vary. Smaller peppers may cook faster, while larger ones might need more time in the oven.
What Are the Best Toppings for Stuffed Peppers?
Toppings can make your stuffed peppers even better. Fresh cilantro adds a bright taste. Slices of avocado give a creamy texture. You can also add a drizzle of lime juice for a zesty touch. If you enjoy a bit of heat, try adding jalapeños. For a crunchy finish, sprinkle some crushed tortilla chips on top before serving.
In this article, we explored how to make delicious stuffed peppers using wholesome ingredients. We covered everything from gathering the right materials to prepping, cooking, and storing your dish. Remember, the beauty of this recipe lies in its flexibility. You can customize the filling or change the spices to fit your taste. Stuffed peppers can be a healthy and fun meal for your family. Enjoy experimenting with this straightforward recip


