Vegan Chocolate Mousse Decadent and Simple Recipe

If you’ve ever craved a dessert that’s both rich and easy to make, stop right here! This Vegan Chocolate Mousse recipe will satisfy your sweet tooth without compromising your values. With just a few simple ingredients like silken tofu and dark dairy-free chocolate, you’ll whip up a treat that’s creamy, dreamy, and completely plant-based. Let’s dive into this decadent delight that will leave everyone asking for seconds!
Ingredients
Essential Ingredients
– 1 cup silken tofu, carefully drained
– 1/2 cup dark dairy-free chocolate chips
– 1/4 cup pure maple syrup
Additional Ingredients
– 1 tablespoon pure vanilla extract
– 1 tablespoon unsweetened cocoa powder
– A pinch of fine sea salt
– Fresh mixed berries and mint leaves for an elegant garnish
To make the best vegan chocolate mousse, you need a few simple ingredients. First, silken tofu acts as the base. It gives the mousse a creamy texture without dairy. Next, dark dairy-free chocolate chips add rich flavor. They bring that deep chocolate taste we all love. Pure maple syrup sweetens the mousse without overpowering it.
For added depth, you will use pure vanilla extract. This ingredient enhances the chocolate flavor. Unsweetened cocoa powder deepens the chocolate notes even more. Finally, a pinch of fine sea salt balances the sweetness.
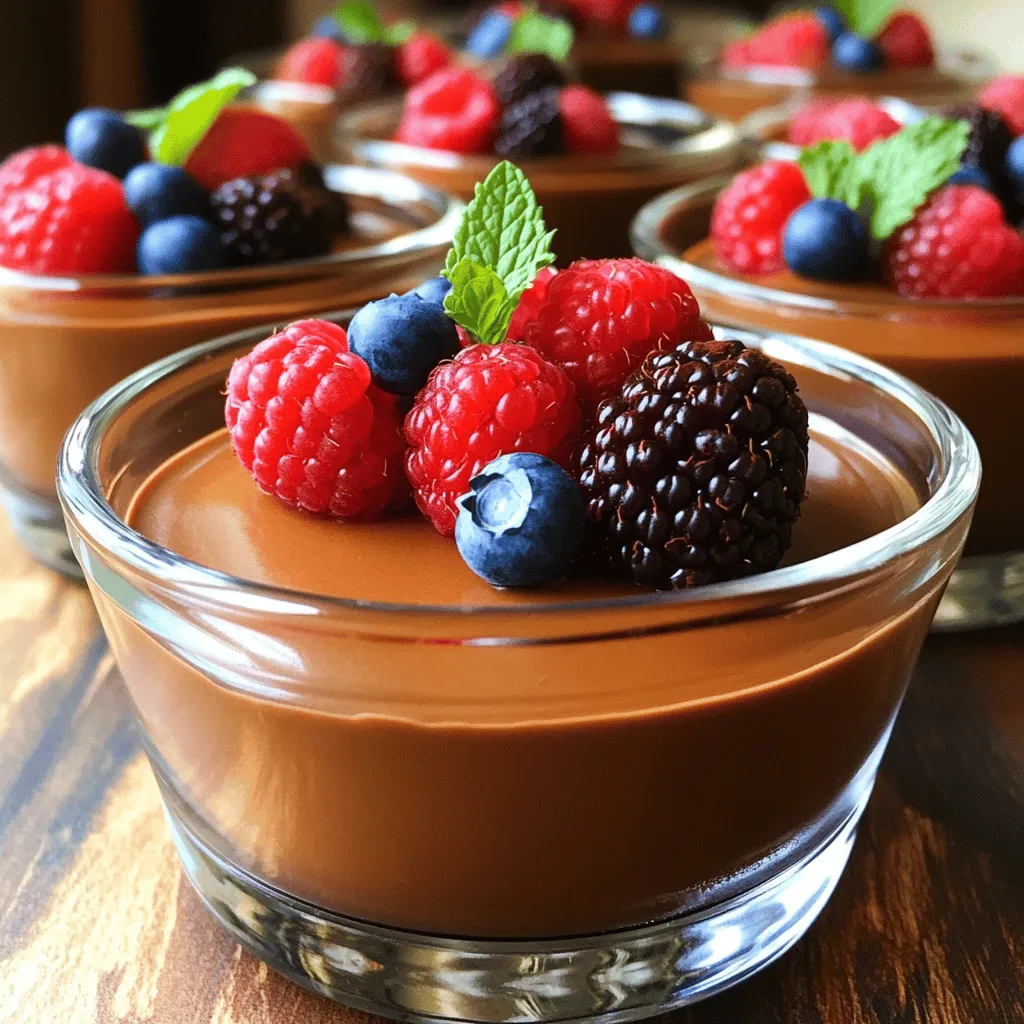
For garnishing, fresh mixed berries and mint leaves add color and freshness. They make your dessert look and taste amazing.
Step-by-Step Instructions
Preparing the Chocolate
Melt the dark dairy-free chocolate chips first. You can use either the microwave or a double boiler.
– Microwave Method: Place chocolate chips in a microwave-safe bowl. Heat for 20 seconds. Stir and heat again until melted. Repeat until smooth.
– Double Boiler Method: Boil water in a pan. Place a bowl over the pan. Add chocolate chips to the bowl. Stir until melted. Set aside to cool.
Blending the Mousse
Next, combine all your ingredients in a blender. Add the drained silken tofu, cooled melted chocolate, maple syrup, vanilla, cocoa powder, and a pinch of salt.
Blend on high speed. Stop to scrape the sides if needed. Blend until creamy and smooth.
Finalizing the Mousse
After blending, taste the mousse. If it needs more sweetness, add some maple syrup. Blend again to mix well.
Spoon the mousse into serving dishes or a bowl. Smooth the tops with a spatula for a nice finish.
Finally, chill the mousse in the fridge for at least 30 minutes. This helps it set and become creamy.
When ready to serve, add fresh berries and mint on top for a bright touch. Enjoy your delicious vegan chocolate mousse!
Tips & Tricks
Achieving Ideal Texture
Using silken tofu is key to a smooth mousse. Silken tofu gives your mousse a creamy base. It blends easily and creates a rich texture. Always drain the tofu well before use. This removes excess water and helps prevent a watery mousse.
Chilling your mousse is just as important. After blending, let it cool in the fridge for at least 30 minutes. This step firms up the mousse and enhances its flavor. The longer it chills, the better the texture becomes.
Sweetness Adjustments
You can easily adjust the sweetness of your mousse. If you like it sweeter, add more maple syrup. Blend again to mix it well. Taste as you go to find your perfect level of sweetness.
If you want alternatives to maple syrup, try agave syrup or date syrup. Both provide sweetness and have their unique flavors. You can even use coconut sugar for a different taste. Just remember to blend well for an even mix.
Presentation Tips
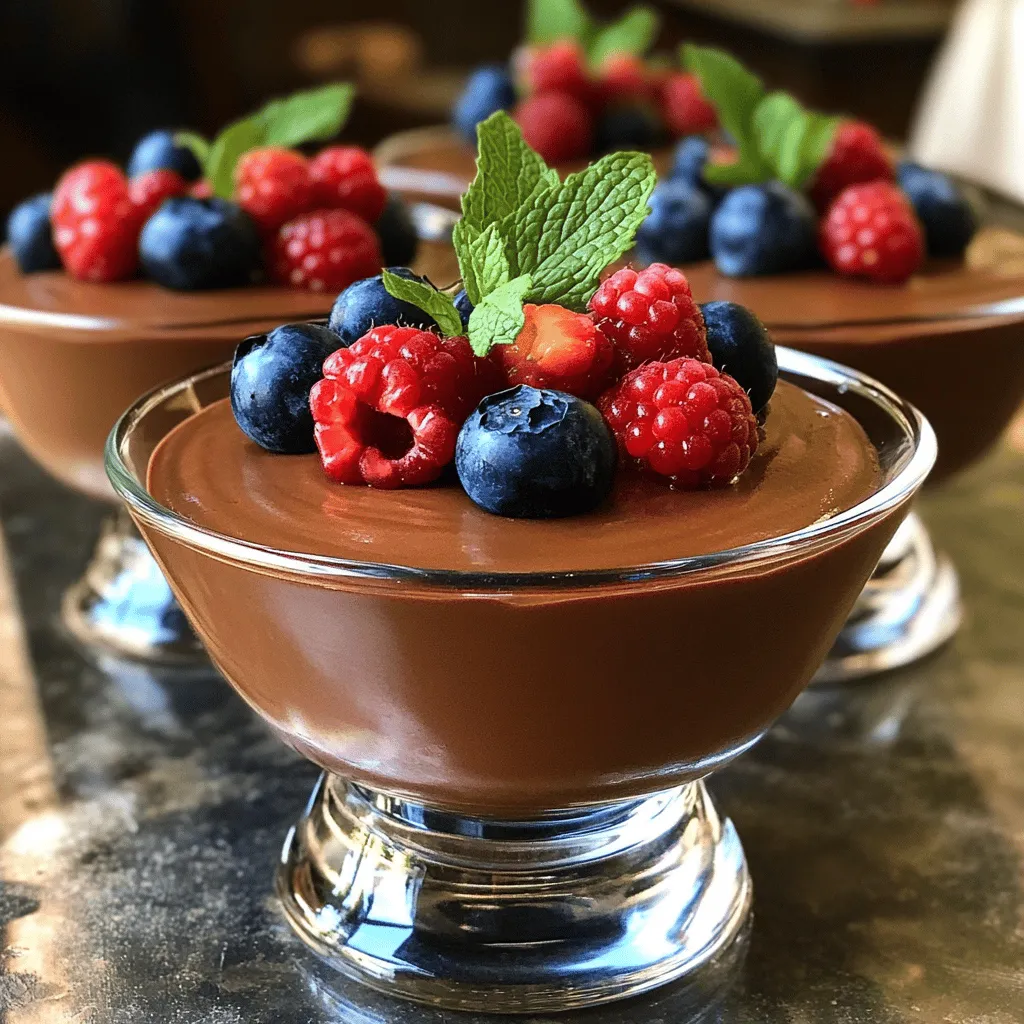
Serving your mousse can be fun and creative. Consider using small jars or glasses for individual servings. This adds charm and makes it easy to share. You can also layer the mousse with fresh berries for a stunning look.
Garnishing is key for that elegant touch. Top your mousse with fresh mixed berries and mint leaves. This adds color and freshness to your dish. A sprinkle of cocoa powder or shaved chocolate can also enhance the look.

Variations
Flavored Mousse Options
You can easily change the taste of your vegan chocolate mousse. One fun way is to add espresso or coffee flavor. Simply mix in a shot of strong espresso or a teaspoon of instant coffee when blending your mousse. This adds a rich depth and makes it taste even more decadent.
Another great option is infusing your mousse with citrus zest. Try adding the zest of an orange or a lemon. Just a teaspoon will brighten the flavor. The citrus cuts through the sweetness and gives a fresh twist.
Vegan Chocolate Mousse Layers
Layering your mousse can make it even better. You can layer it with fruits or nuts. Fresh berries like strawberries or raspberries add a nice tartness. Chopped nuts like almonds or hazelnuts give a delightful crunch. Just add a layer of mousse, then a layer of your choice, and repeat.
Another fun idea is to incorporate a granola base. Start with a layer of granola in your serving dish. Then, add a generous layer of mousse on top. It creates a tasty texture contrast and looks lovely in a clear dish.Enjoy these variations and make your mousse unique!
Storage Info
How to Store
To keep your vegan chocolate mousse fresh, use airtight containers. Glass or plastic containers both work well. Make sure the lid seals tightly to keep out air. Store the mousse in the fridge right after chilling. This will help it stay creamy and delicious.
Shelf Life
Your mousse stays fresh for about 3 to 5 days in the fridge. After that, it may lose its texture and flavor. Look for signs that it has spoiled. If you see any mold or an off smell, it’s time to toss it. Always trust your senses; if it looks or smells bad, don’t eat it.
FAQs
Can I make this mousse ahead of time?
Yes, you can make this mousse ahead of time. I often prepare it a day in advance. This allows the flavors to meld and the texture to set nicely. Just store it in an airtight container in the fridge. It will stay fresh for up to three days.
Is silken tofu healthy?
Silken tofu is very healthy. It is low in calories and high in protein. It contains essential amino acids, which are great for muscle repair. It also has calcium, which is good for bones. The fats in silken tofu are healthy fats, making it a great choice for a vegan diet.
Can I use other types of chocolate?
Yes, you can use other types of chocolate. If you want a sweeter mousse, try using semi-sweet chocolate. For a richer taste, use dark chocolate with a higher cocoa percentage. You can even try white chocolate, but make sure it is dairy-free. Just remember, the flavor will change a bit with different chocolates.
This blog post covered how to make a delicious vegan chocolate mousse. We discussed key ingredients like silken tofu and dairy-free chocolate chips. I shared step-by-step methods for preparing and blending your mousse.
You can customize sweetness and add fun flavors. Remember to chill for the best texture. Store it properly to keep it fresh. Enjoy exploring different variations for your own unique treat!


. To keep your scones fresh, let them cool completely. Place them in an airtight container. You can store them at room temperature for up to three days. If you live in a humid area, refrigerate them to prevent spoilage. Use parchment paper between layers to keep them from sticking. Reheat your scones for the best taste. Preheat your oven to 350°F (175°C). Place the scones on a baking sheet. Heat them for about 5 to 10 minutes, or until warm. You can also use a microwave. Heat them for 15 to 20 seconds. This warms them quickly but may make them soft. To freeze scones, wrap each one in plastic wrap. Place them in a freezer bag or airtight container. Label with the date for easy tracking. They can last up to three months in the freezer. When ready to eat, thaw them in the fridge overnight. Reheat as mentioned above for a fresh taste. Check the Full Recipe for more tips on making these treats! To make cinnamon roll scones, follow this simple process. First, mix the dry ingredients in a bowl. This includes flour, sugar, baking powder, salt, and cinnamon. Next, cut in cold butter until the mix looks crumbly. Then, whisk buttermilk, melted butter, and vanilla in another bowl. Combine the wet and dry mixes gently. Pat the dough into a rectangle, brush melted butter, and sprinkle brown sugar for the swirl. Roll it up, slice it, and bake. For the full recipe, check the details above. Yes, you can use milk instead of buttermilk. If you do, add a splash of lemon juice or vinegar. This helps the milk mimic buttermilk's tangy flavor. It also makes the scones soft and fluffy. However, buttermilk adds a richer taste. Serve cinnamon roll scones warm for the best taste. Drizzle the icing over the top just before serving. You can also sprinkle a little cinnamon on top for added flavor. Pair them with coffee or tea for a relaxing treat. They look great on a nice platter. Cinnamon roll scones last for about two days at room temperature. To keep them fresh longer, store them in an airtight container. You can also refrigerate them for up to a week. Just warm them in the oven before serving to regain that fresh-baked taste. Yes, you can make cinnamon roll scones ahead of time. Prepare the dough, and cut the scones. Then, place them on a baking sheet and freeze until firm. After that, transfer them to a bag or container. When you’re ready, bake them straight from the freezer, adding a few extra minutes to the baking time. This way, you enjoy fresh scones anytime! Making scones is simple and fun. You learned about ingredients, tools, and baking steps. I shared tips to help you avoid mistakes and find the best flavors. You also discovered flavor variations and storage methods. Scones can be your tasty treat for any occasion. With a few easy steps, you can impress your friends. Enjoy baking, and don’t forget to share your tasty results!](https://goldendishy.com/wp-content/uploads/2025/07/878de396-77ac-4fc1-b8cf-b56551936fe1-768x768.webp)
![- 1 cup cherries, pitted and chopped - 1 cup unsweetened applesauce - 1/2 cup peanut butter or almond butter - 1/2 cup honey or maple syrup - 1 teaspoon vanilla extract - 2 cups rolled oats - 1/2 cup chocolate protein powder - 1 teaspoon baking powder - 1/2 teaspoon baking soda - 1/4 teaspoon salt - 1/3 cup dark chocolate chips To make the best Cherry Chocolate Protein Muffins, you need fresh ingredients. Start with cherries. Choose ripe cherries for a sweet taste. Pitting and chopping them helps mix them into the batter easily. Next, use unsweetened applesauce. It adds moisture and replaces some fat. This keeps the muffins light and fluffy. If you prefer a nutty flavor, choose between peanut butter or almond butter. Both work well. For sweetness, you can pick honey or maple syrup. Each adds a unique flavor. Don’t forget the vanilla extract. It enhances the overall taste. Now, let’s talk about the dry ingredients. Rolled oats add texture and fiber. They also help bind the muffins. The chocolate protein powder is key for a protein boost. It makes these muffins a healthy snack. Add baking powder and baking soda for lift. This ensures your muffins rise well. Lastly, sprinkle in some salt to balance the sweetness. The dark chocolate chips are the fun part. They melt in the oven and create pockets of gooey chocolate. This makes every bite a treat! For the full recipe, check out the instructions in the next section. Enjoy every step of making these delicious muffins! 1. First, preheat your oven to 350°F (175°C). This step is key to baking muffins evenly. 2. Prepare your muffin tin by lining it with paper liners. You can also lightly grease each cup to help prevent sticking. 3. In a large mixing bowl, combine the unsweetened applesauce, your choice of nut butter, honey, and vanilla extract. Mix well with a whisk or spatula until smooth. 4. Now, it’s time to fold in the chopped cherries. Gently stir them into the wet mixture. Make sure they spread evenly throughout the batter. 5. In another bowl, whisk together the rolled oats, chocolate protein powder, baking powder, baking soda, and salt. This mix will give your muffins a nice rise. 6. Gradually add the dry mix to the wet mixture. Fold them together gently, being careful not to overmix. Overmixing can make your muffins tough. 7. Next, fold in the dark chocolate chips. Ensure they are well-distributed, so you get a chocolate burst in every bite. 8. Use a spoon or an ice cream scoop to pour the batter into the muffin tin. Fill each cup about 2/3 full to allow room for rising. 9. Bake the muffins in your preheated oven for 18-20 minutes. Check for doneness by inserting a toothpick into the center. If it comes out clean, they are ready! 10. Once baked, remove the muffins and let them cool in the tin for 5 minutes. Then, transfer them to a wire rack to cool completely. This step helps keep the texture light and fluffy. For the full recipe, check out the details above. Enjoy your delicious Cherry Chocolate Protein Muffins! To make the best Cherry Chocolate Protein Muffins, avoid overmixing the batter. Overmixing can lead to tough muffins. Mix just until the dry and wet ingredients combine. This keeps your muffins light and fluffy. Measuring ingredients accurately is also key. Use dry measuring cups for solids like oats and protein powder. For liquids, use a liquid measuring cup. This ensures you add the right amounts for great results. I love serving these muffins warm. They taste best right out of the oven. A light dusting of powdered sugar or a drizzle of melted dark chocolate adds a special touch. You can also pair them with Greek yogurt for extra protein and creaminess. For a balanced meal, enjoy these muffins with a side of fruit. Slices of banana or a handful of berries can brighten your plate and add freshness. These muffins are packed with health benefits. Protein powder offers a great source of protein. It helps build and repair muscles. This makes them perfect for post-workout snacks. Cherries are rich in antioxidants. They help fight inflammation and support heart health. Oats provide fiber, which is good for digestion. They also keep you feeling full longer, making these muffins a smart choice for any time of day. For the complete recipe, check out the [Full Recipe]. {{image_4}} You can make Cherry Chocolate Protein Muffins gluten-free by using certified gluten-free oats. Almond flour also works well here. For a vegan option, replace honey with maple syrup. Use a vegan protein powder to keep it plant-based. This way, everyone can enjoy these tasty muffins, no matter their diet. - Gluten-free: Use gluten-free oats and almond flour. - Vegan: Swap honey for maple syrup and use vegan protein powder. Spicing up your muffins can add a fun twist. Try adding 1 teaspoon of cinnamon or nutmeg to the mix. This small change can bring warmth and depth to the flavor. You might also want to mix in nuts or seeds. Chopped walnuts or sunflower seeds can add crunch and nutrition to your muffins. - Spices: Add 1 teaspoon of cinnamon or nutmeg. - Nuts or seeds: Incorporate chopped walnuts or sunflower seeds. You can customize these muffins with fruits that are in season. In summer, try adding blueberries or peaches. In fall, diced apples or pumpkin puree would be delightful. Different types of chocolate can also change the taste. Dark chocolate, milk chocolate, or even white chocolate can make the muffins exciting and unique. - Seasonal fruits: Use blueberries in summer or apples in fall. - Chocolate types: Experiment with dark, milk, or white chocolate. To keep your Cherry Chocolate Protein Muffins fresh, follow these simple steps: - Allow the muffins to cool completely before storage. - Use an airtight container to maintain moisture. - Place parchment paper between layers to avoid sticking. I find that glass containers work best because they help keep the muffins soft and fresh. Freezing muffins is a great way to enjoy them later. Here’s how to do it: - Allow the muffins to cool fully. - Wrap each muffin in plastic wrap or aluminum foil, then place them in a freezer bag. - Label the bag with the date for easy tracking. When you’re ready to eat, thaw the muffins by leaving them out at room temperature. For quicker results, pop them in the microwave for about 20 seconds. This method keeps them moist and tasty. Cherry Chocolate Protein Muffins can last: - At room temperature: 3 to 4 days in an airtight container. - In the fridge: 1 week if stored properly. This means you can enjoy these muffins without worry for several days! Remember to check for freshness before eating. Enjoy your delicious snacks! Can I make these muffins ahead of time? Yes, you can make these muffins ahead of time. They store well for a few days. Just make sure to keep them in an airtight container. You can also freeze them for longer storage. What can I use instead of protein powder? If you don't have protein powder, you can use ground oats or almond flour. This will change the texture a bit but keeps the muffins tasty. You might need to adjust the liquid in the recipe. How can I reduce sugar in the recipe? To cut down on sugar, use less honey or maple syrup. You can also swap in a sugar substitute like stevia. This will help keep the sweetness but lower the sugar content. Is it possible to use fresh cherries instead of frozen? Yes, fresh cherries work great too! Just chop them up and remove the pits. Fresh cherries can add a nice burst of flavor. They may make the muffins a bit moister, so keep an eye on baking time. What is the protein content per muffin? Each muffin has about 7 grams of protein. This comes mainly from the protein powder and nut butter. It makes a healthy snack or breakfast option. Are these muffins suitable for kids? Absolutely! These muffins are great for kids. They are tasty and packed with nutrients. Plus, the chocolate bits make them fun to eat. In this article, we explored how to make delicious Cherry Chocolate Protein Muffins. We covered ingredients, step-by-step instructions, and tips for perfecting the recipe. You learned how to store these muffins and adapt them for different diets. These muffins are not just tasty; they offer health benefits too. Experiment with flavors and enjoy them as snacks or meals. Now, grab your ingredients and start baking your own batch today!](https://goldendishy.com/wp-content/uploads/2025/07/bcf12119-4bc4-4824-810e-f617231ac2e7-768x768.webp)


