Thai Basil Chicken Stir-Fry Flavorful and Quick Meal

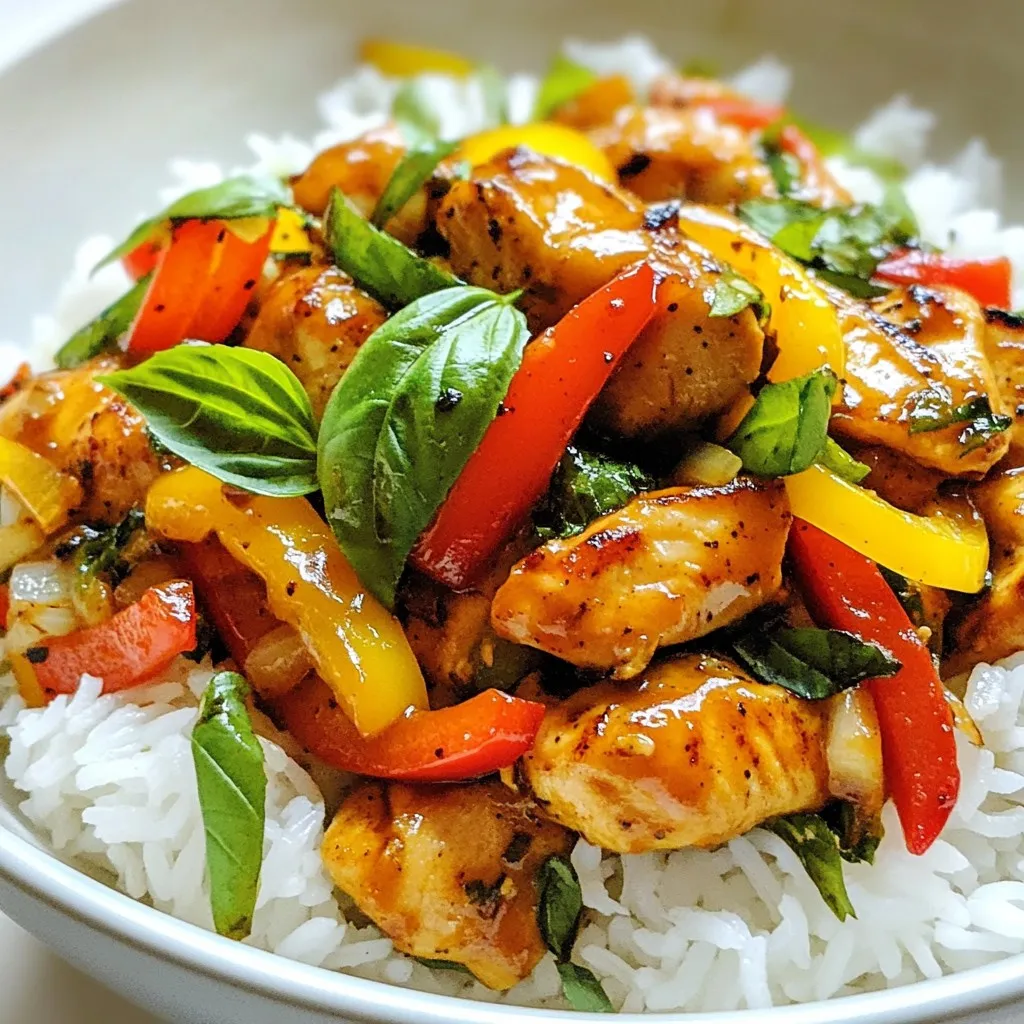
Want to whip up a quick and flavorful dinner? Thai Basil Chicken Stir-Fry is the answer! With its perfect blend of chicken, fresh basil, and zesty sauce, this dish brings restaurant-quality taste to your home. Don’t worry if you’re short on time; this meal cooks in just minutes. Let’s dive into the simple steps and ingredients you’ll need to create this delicious stir-fry!
Why I Love This Recipe
- Fresh Ingredients: This recipe utilizes fresh Thai basil and vibrant vegetables, providing a burst of flavor and nutrition.
- Quick to Prepare: With just a 20-minute total cook time, this dish is perfect for busy weeknights without compromising on taste.
- Customizable Spice Level: The use of Thai bird’s eye chilies allows you to easily adjust the heat to your personal preference.
- Deliciously Aromatic: The combination of garlic, basil, and savory sauces creates an irresistible aroma that fills your kitchen.
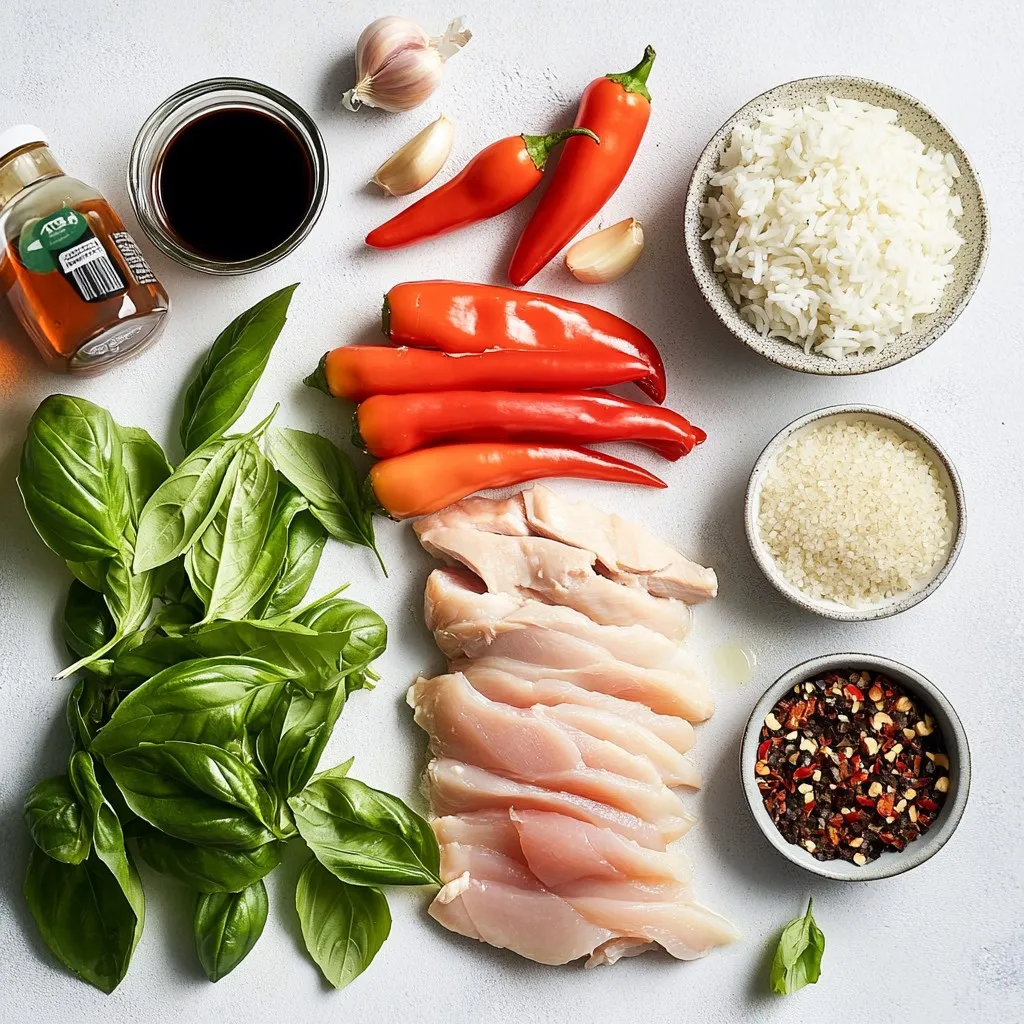
Ingredients
Main Ingredients List
– 1 lb (450g) chicken breast, thinly sliced
– 1 cup fresh Thai basil leaves, torn
– 1 bell pepper (choose red or green), thinly sliced
– 1 medium onion, thinly sliced
– 3 cloves garlic, finely minced
– 1-2 Thai bird’s eye chilies, finely minced
Sauces and Seasonings
– 2 tablespoons soy sauce
– 1 tablespoon oyster sauce
– 1 tablespoon fish sauce
– 1 teaspoon sugar
Serving Suggestions
– Cooked jasmine rice
– Optional garnishes (lime wedges, extra basil, chilies)
For this dish, the chicken breast is a great choice. It cooks quickly and stays tender. I love using fresh Thai basil because it adds a unique flavor that brightens the dish. The bell pepper and onion bring color and crunch. Garlic adds depth while the chilies give it a spicy kick.
The sauces are key to this dish. Soy sauce adds saltiness. Oyster sauce gives a rich flavor. Fish sauce adds umami, while sugar balances everything out.
When serving, I recommend fluffy jasmine rice. It’s a perfect match for the stir-fry. For extra flair, add lime wedges, more basil, or even more chilies on top. This makes your meal pop with fresh flavors!

Step-by-Step Instructions
Preparation Steps
Start by prepping your veggies. Slice the bell pepper and onion into thin strips. This helps them cook evenly. Mince the garlic and Thai bird’s eye chilies finely. Set all your ingredients aside. This way, you can grab them quickly while cooking.
For slicing, use a sharp knife. A sharp knife makes clean cuts. Thin strips cook faster and blend well. Aim for similar sizes, so everything cooks evenly.
Cooking Process
Now, heat vegetable oil in a large skillet or wok over medium-high heat. Once the oil shimmers, add the thinly sliced chicken. Cook the chicken for about 4-5 minutes. Make sure it turns golden and no longer looks pink in the center.
Next, push the chicken to one side of the skillet. In the empty space, toss in the minced garlic and chilies. Sauté them for about 30 seconds. This step releases their wonderful aromas. Be careful not to burn them.
Now, add the sliced onion and bell pepper. Stir-fry everything for 2-3 minutes. You want the veggies to be slightly tender but still crisp.
Then, pour in the soy sauce, oyster sauce, fish sauce, and sugar. Stir it all together. Let it cook for an additional 1-2 minutes. This helps the flavors mix and become rich.
Final Assembly
It’s time to add the star of the dish—fresh Thai basil leaves. Gently toss them in. Stir until the basil wilts and blends into the dish. Turn off the heat.
To serve, place the stir-fry over a bed of fluffy jasmine rice. This creates a colorful and satisfying meal. For extra flair, consider garnishing with more basil or chilies. Lime wedges on the side add a nice citrus kick.
Tips & Tricks
Perfecting Your Stir-Fry
To make a great stir-fry, the heat must be high. Start with medium-high heat to get that perfect sizzle. This helps your chicken cook fast and stay juicy.
Common mistakes include overcrowding the pan. If you add too much food at once, it steams instead of fries. Cook in batches if needed. Also, be careful not to burn the garlic. This can ruin your dish.
Adjusting Spice Levels
If you want more heat, add more Thai bird’s eye chilies. Start with one and taste. You can always add more, but you can’t take it out once it’s in.
If you prefer a milder dish, try using bell peppers or sugar snap peas. These add flavor without heat. You can also use sweet paprika for a colorful twist.
Enhancing Flavor
To boost flavor, consider adding a splash of lime juice. This adds brightness and balances the savory notes.
Other spices to try include black pepper or a pinch of cumin. Pair your stir-fry with jasmine rice for a comforting meal. If you want something extra, serve with a side of pickled vegetables. This adds crunch and tang, making your meal even better.
Pro Tips
- Choose the Right Basil: Use fresh Thai basil for an authentic flavor, as it has a distinct aroma that complements the dish beautifully.
- Adjust Spice Level: Modify the number of Thai bird’s eye chilies based on your spice tolerance; you can also remove the seeds for a milder flavor.
- Don’t Overcook the Vegetables: Stir-fry the vegetables just until tender to maintain their bright colors and crisp texture.
- Use High Heat: Cooking on medium-high heat helps achieve that perfect stir-fry texture, locking in moisture and flavor while ensuring a quick cook.

Variations
Alternate Proteins
You can switch the chicken for beef or shrimp. Thinly slice beef and cook it like chicken. For shrimp, use deveined, peeled shrimp. They cook fast and add a nice taste.
For a vegetarian option, use tofu or tempeh. Cut them into cubes and stir-fry until golden. This keeps the dish tasty while meeting plant-based needs.
Different Vegetable Combinations
Feel free to mix in seasonal vegetables. Zucchini, snap peas, or carrots work well. Each adds color and nutrition.
Keep a balance of flavors. Use sweet bell peppers with bitter greens, like bok choy. This makes each bite exciting and fresh.
Sauce Alternatives
You can create your own sauce at home. Mix soy sauce, garlic, and sesame oil for a twist.
If you need a gluten-free option, use tamari instead of soy sauce. This keeps the dish safe for those with gluten sensitivities.
Storage Info
Storing Leftovers
To keep your Thai Basil Chicken fresh, store it right away. Place leftovers in an airtight container. Refrigerate them within two hours of cooking. This will help keep the flavors intact. Your dish will stay good in the fridge for about three days.
If you want to keep it longer, freezing is a great option. Divide your stir-fry into smaller portions. Use freezer-safe bags or containers to prevent freezer burn. It can last up to three months in the freezer. Just remember to label the bags with the date.
Reheating Tips
When it’s time to enjoy your leftovers, reheating properly is key. You want to keep the texture and flavor just right. The best method is to use a skillet. Heat it over medium heat and add a splash of water or broth. This helps steam the dish and keeps it moist. Stir occasionally until heated through.
You can also use a microwave. Place the dish in a microwave-safe bowl. Cover it with a damp paper towel to trap moisture. Heat it in 30-second intervals, stirring in between until hot.
How Long It Lasts
Your cooked Thai Basil Chicken will stay fresh for about three days in the fridge. Look for signs of spoilage before eating. If you see any off smells or changes in color, it’s best to throw it out. When properly frozen, your dish can last about three months. Just remember to check for freezer burn when you defrost it.
FAQs
What is Thai basil and how is it different from regular basil?
Thai basil has a unique flavor. It tastes sweet with a hint of spice. The leaves are darker and thicker than regular basil. It also has a slight anise or licorice note. This makes it perfect for stir-fries and Asian dishes. Regular basil is milder and often used in Italian cooking. When you use Thai basil, it gives your dish a vibrant and bold taste.
Can I make Thai Basil Chicken ahead of time?
Yes, you can make Thai Basil Chicken ahead of time. To prep, cook the chicken and veggies as usual. Let them cool before storing. Use an airtight container to keep it fresh in the fridge. This meal lasts about 3 days in the fridge. If you want to store it longer, freeze it for up to a month. When ready to eat, just reheat it on the stove.
What can I serve with Thai Basil Chicken Stir-Fry?
Thai Basil Chicken pairs well with many sides. Here are a few great options:
– Cooked jasmine rice
– Steamed broccoli
– Cucumber salad
– Thai spring rolls
– Lightly pickled vegetables
These sides add color and texture to your meal, making it a complete feast!
In this blog post, I explored the key ingredients for a delicious Thai Basil Chicken dish, including chicken, fresh basil, and various sauces. I covered the preparation steps, cooking process, and tips to perfect your stir-fry. We also discussed variations like using different proteins and vegetables. Lastly, I provided safe storage methods for your leftovers.
With these tips, you can enjoy a flavorful meal at home. Don’t be afraid to experiment and make it your own! Your Thai cooking journey starts her

Thai Basil Chicken Delight
Ingredients
- 1 lb chicken breast, thinly sliced
- 1 cup fresh Thai basil leaves, torn
- 1 whole bell pepper (red or green), thinly sliced
- 1 medium onion, thinly sliced
- 3 cloves garlic, finely minced
- 2 tablespoons soy sauce
- 1 tablespoon oyster sauce
- 1 tablespoon fish sauce
- 1 teaspoon sugar
- 1-2 whole Thai bird's eye chilies, finely minced
- 2 tablespoons vegetable oil
- as needed serving cooked jasmine rice
Instructions
- Prepare the Vegetables: Begin by slicing the bell pepper and onion into thin strips. Next, finely mince the garlic and chilies. Set all prepared ingredients aside for easy access.
- Cook the Chicken: Heat the vegetable oil in a large skillet or wok over medium-high heat. Once the oil is shimmering, add the thinly sliced chicken. Stir-fry for about 4-5 minutes or until the chicken is fully cooked and no longer pink in the center.
- Add Aromatics: Push the cooked chicken to one side of the skillet. In the empty space, add the minced garlic and chilies. Sauté these aromatics for about 30 seconds until they become fragrant, being careful not to let them burn.
- Incorporate Vegetables: Add the sliced onion and bell pepper to the skillet. Stir-fry the mixture for an additional 2-3 minutes, allowing the vegetables to become slightly tender but still retain a crisp texture.
- Add Sauces and Sweetness: Pour in the soy sauce, oyster sauce, fish sauce, and sugar. Stir everything together thoroughly, letting the mixture cook for an additional 1-2 minutes. This allows the flavors to meld beautifully.
- Finish with Basil: Gently toss in the fresh Thai basil leaves. Stir the ingredients until the basil wilts and combines evenly into the dish. Remove the skillet from heat.
- Serve: To plate, serve the fragrant stir-fry over a bed of fluffy jasmine rice, creating a satisfying and colorful meal.


![For perfect Greek lemon potatoes, gather these simple ingredients: - 2 pounds baby potatoes, halved - 1 cup chicken or vegetable broth - 2 tablespoons extra virgin olive oil - 3 tablespoons freshly squeezed lemon juice - 2 teaspoons fresh lemon zest - 4 cloves garlic, minced - 1 tablespoon dried oregano - Sea salt and freshly cracked pepper to taste - Fresh parsley, chopped (for garnish) You can swap baby potatoes for Yukon Gold or red potatoes. Both work well and add great taste. If you want a vegan option, use vegetable broth instead of chicken broth. Fresh lemon juice is best, but bottled works in a pinch. You can add fresh herbs like thyme or rosemary to change the flavor. For a spicy kick, consider a pinch of red pepper flakes. Using high-quality ingredients makes a big difference. Fresh potatoes give the best texture and flavor. Extra virgin olive oil adds richness. Fresh lemon juice and zest brighten the dish. Quality broth enhances the taste. When you use good ingredients, you create an authentic Greek experience. They help your dish shine and make every bite delicious. Check out the Full Recipe for more tips and tricks on how to make these zesty potatoes. To make Greek lemon potatoes, start by gathering your ingredients. You need baby potatoes, broth, olive oil, fresh lemon juice, lemon zest, garlic, oregano, salt, and pepper. 1. Preheat the oven to 425°F (220°C). This heat helps the potatoes become crispy. 2. Halve the baby potatoes. This allows them to soak up all the flavors. 3. In a large bowl, mix the broth, olive oil, lemon juice, lemon zest, garlic, oregano, salt, and pepper. Stir well to combine. 4. Add the halved potatoes to the bowl. Toss them until they are fully coated with the mixture. Once your potatoes are ready, it’s time to roast them. 1. Pour the potato mix into a roasting pan. Spread the potatoes out in a single layer. This step ensures they cook evenly. 2. Roast in the oven for about 30-35 minutes. Check for a golden brown color and fork-tender texture. 3. Stir the potatoes halfway through roasting. This helps them absorb more flavors and become crispy all around. Sometimes things don’t go as planned. Here are some tips to help. - If your potatoes are not browning, increase the oven temperature by 25°F. This can help them crisp up. - If they seem too dry, add a splash more broth. This will keep them moist and flavorful. - If they are not tender after 35 minutes, roast them a bit longer. Just keep an eye on them to prevent burning. For a full recipe, refer to the [Full Recipe]. Enjoy the deliciousness of Greek lemon potatoes! To boost the taste of Greek lemon potatoes, use fresh ingredients. Fresh garlic and herbs add a lot of flavor. When using oregano, choose dried or fresh based on what you have. For a zingy kick, try adding a pinch of red pepper flakes. This little touch makes a big difference. You can also let the potatoes marinate in the broth mixture for an hour before cooking. This extra time helps the flavors soak in deeply. To get potatoes that are both soft and crispy, cut them evenly. Halving the baby potatoes helps ensure they cook at the same rate. Use a hot oven, around 425°F (220°C). The high heat helps the outside crisp up while keeping the inside tender. Halfway through cooking, give the potatoes a good stir. This helps them brown evenly. If you want extra crispiness, broil them for the last 2-3 minutes. Just keep an eye on them to avoid burning. Prep the ingredients ahead of time to save effort later. You can wash and cut the potatoes a day before. Store them in water in the fridge to keep them fresh. You can also mix the broth and seasonings ahead. Just combine everything in a bowl and cover it. When you are ready to cook, simply combine the potatoes with the mixture. This makes dinner quick and easy. For even faster meals, consider roasting a larger batch. Leftovers taste great and can be enjoyed in many ways. For the full recipe, check out the complete cooking guide for Greek lemon potatoes. {{image_4}} You can easily make Greek lemon potatoes vegan. Just swap chicken broth for vegetable broth. This change keeps the rich flavor intact. Make sure your broth is gluten-free if needed. You can use any vegetable broth you like. This way, everyone can enjoy this dish! Feel free to mix up the flavors! Add fresh herbs like thyme or rosemary. These herbs give a nice twist. You can also try spices like paprika or cumin for heat. For a creamier taste, sprinkle some feta cheese on top before serving. You can even toss in some olives for a salty kick. Each of these options makes the dish unique! Greek lemon potatoes shine as a side dish. Pair them with grilled chicken or fish for a full meal. They also go well with a fresh salad or tzatziki sauce. If you want to make it special, serve with warm pita bread. These potatoes are great for any gathering. They will impress your guests, and they are easy to share. For the full recipe, check out the Full Recipe link above. To keep your Greek Lemon Potatoes fresh, let them cool first. Then, place them in an airtight container. You can also cover them tightly with plastic wrap. Store them in the fridge for up to three days. This method helps keep their flavor and texture. When reheating, use the oven for the best taste. Preheat your oven to 350°F (175°C). Spread the potatoes on a baking sheet. Heat them for about 15 to 20 minutes. This way, they will regain their crispiness. If you’re in a hurry, you can use the microwave. Just heat them in 30-second bursts, but they may not be as crispy. Greek Lemon Potatoes stay good in the fridge for three days. If you want to keep them longer, you can freeze them. Place the cooled potatoes in a freezer-safe bag. They can last up to three months in the freezer. When ready to eat, thaw them in the fridge overnight. Then, reheat them as mentioned above. Greek Lemon Potatoes are a delicious side dish. They are made with baby potatoes, lemon juice, and herbs. The dish is known for its bright, zesty flavor. The potatoes become tender and crisp when roasted. You can enjoy them with grilled meats or fish. They add a refreshing touch to any meal. You can prepare Greek Lemon Potatoes ahead of time. First, follow the recipe up to the roasting step. After mixing the ingredients, cover the dish and store it in the fridge. This way, the flavors will blend. When you're ready to cook, just preheat your oven and roast them. You may need to add a few extra minutes to the cooking time. Yes, you can use other potatoes like Yukon Gold or red potatoes. These types work well due to their creamy texture. Just remember to cut them into similar sizes. This helps them cook evenly. Each potato type will offer a slightly different taste and texture. Feel free to experiment with your favorites! Greek Lemon Potatoes are a delightful dish that you can easily make. You learned the key ingredients that make them special, and tips for the best flavor. Following the step-by-step guide ensures perfect roasting every time. You also discovered tasty variations for different diets and ways to store leftovers. In closing, use fresh ingredients and don't rush the cooking process. Enjoy this dish with friends and family. Each bite will showcase Greek flavors. Happy cooking!](https://goldendishy.com/wp-content/uploads/2025/07/055e8462-33de-483e-a53c-599291ba0dde-768x768.webp)


