Tex-Mex Quinoa Skillet Quick and Flavorful Meal

Looking for a quick and tasty meal? Try my Tex-Mex Quinoa Skillet! This dish is packed with flavor, featuring quinoa, beans, and fresh veggies. You’ll have a hearty meal ready in just 30 minutes. Perfect for busy weeknights, this one-pan wonder is clean-up friendly too. Ready to spice up your dinner routine? Let’s dive into the ingredients and get cooking!
Why I Love This Recipe
- Healthful Ingredients: This dish is packed with nutritious ingredients like quinoa, black beans, and fresh vegetables, making it a wholesome choice for any meal.
- Easy to Prepare: With straightforward steps and minimal prep time, this recipe is perfect for busy weeknights when you want a satisfying meal quickly.
- Flavorful and Satisfying: The combination of spices and ingredients creates a deliciously rich flavor profile that is both hearty and comforting.
- Customizable: You can easily adapt this recipe to your taste by adding your favorite toppings or swapping in different vegetables and proteins.
Ingredients
Main Ingredients
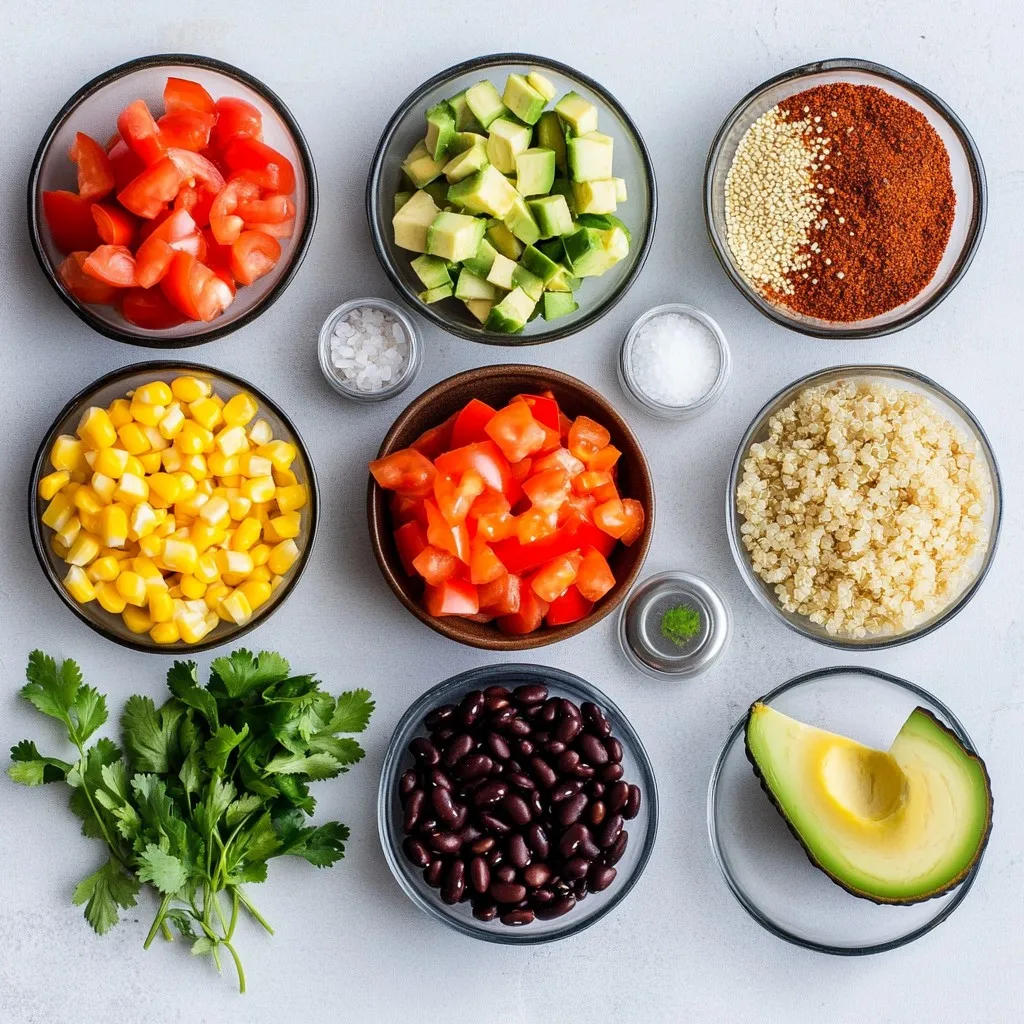
– 1 cup quinoa (rinsed)
– 2 cups vegetable broth
– 1 tablespoon olive oil
Vegetables
– 1 small onion (finely diced)
– 2 cloves garlic (minced)
– 1 red bell pepper (diced)
Canned Goods & Seasonings
– 1 can black beans (drained and rinsed)
– 1 can sweet corn kernels (drained)
– 1 can diced tomatoes with green chilies (undrained)
– 1 tablespoon chili powder
– 1 teaspoon ground cumin
– ½ teaspoon smoked paprika
– Salt and pepper to taste
Optional Toppings
– 1 cup shredded cheddar cheese
– Fresh cilantro for garnish
– Ripe avocado slices
To make my Tex-Mex Quinoa Skillet, I gather these simple ingredients that create a burst of flavor. First, I rinse the quinoa to remove any bitterness. Next, I grab vegetable broth to cook the quinoa. Olive oil adds a nice richness to the dish and helps sauté the veggies.
For the veggies, I finely dice a small onion and mince two cloves of garlic. A red bell pepper adds sweetness and color. I always keep canned goods on hand, like black beans and corn, which are packed with nutrients. Diced tomatoes with green chilies add a bit of spice and juiciness. I season the dish with chili powder, cumin, smoked paprika, salt, and pepper for depth.
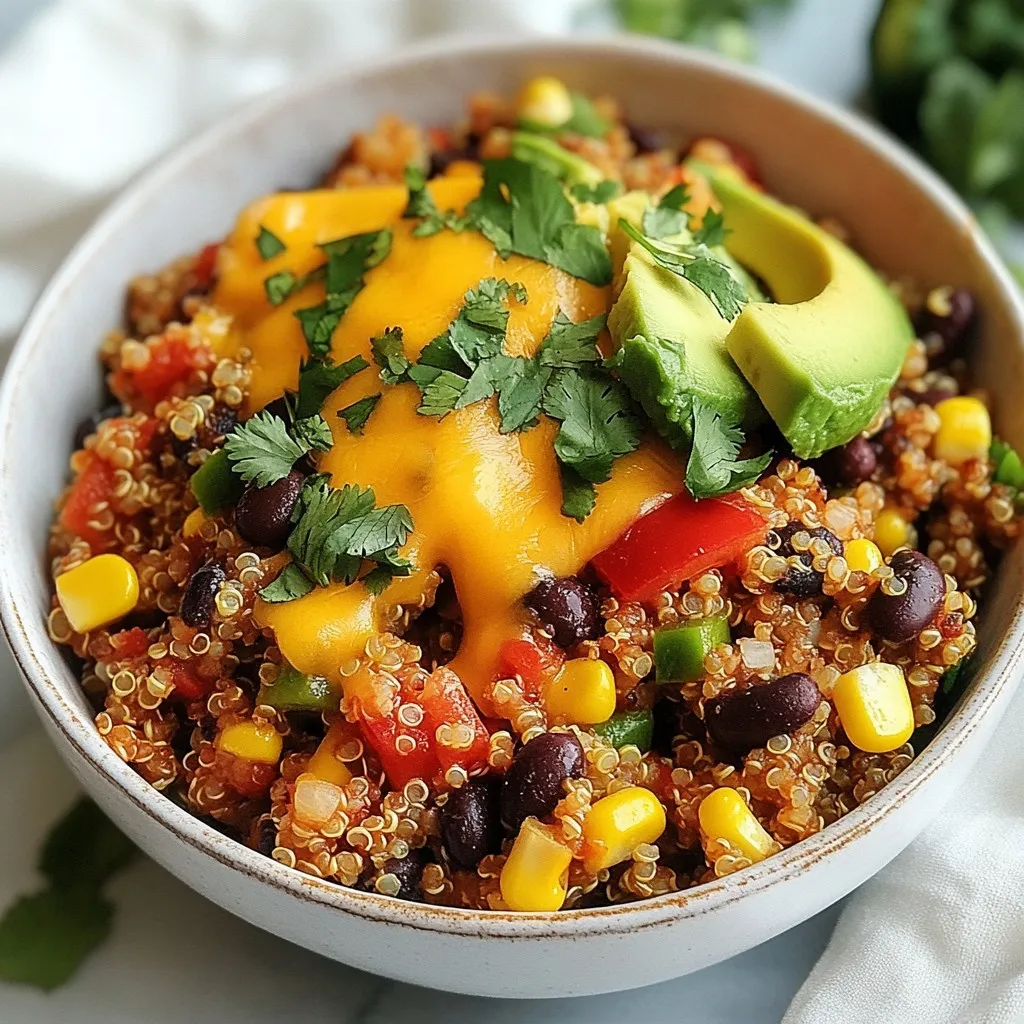
If I want to make it extra special, I top it with shredded cheddar cheese, fresh cilantro, or creamy avocado slices. These toppings not only enhance the taste but also make the dish look inviting. This combination of ingredients makes each bite a delightful experience.

Step-by-Step Instructions
Cooking the Quinoa
– Start by combining 1 cup of rinsed quinoa and 2 cups of vegetable broth in a medium saucepan.
– Bring it to a boil over medium-high heat.
– Once it boils, reduce the heat to low. Cover the pan and let it simmer for about 15 minutes.
– When done, the quinoa should be fluffy and all the liquid should be absorbed.
– Remove it from heat and let it sit uncovered for a few minutes.
Sautéing the Vegetables
– In a large skillet, heat 1 tablespoon of olive oil over medium heat.
– Add 1 small diced onion and sauté for 3 to 4 minutes until it turns translucent.
– Then, add 2 minced garlic cloves and 1 diced red bell pepper.
– Cook for another 2 to 3 minutes until the bell pepper is soft.
Mixing Ingredients
– Now, stir in 1 can of black beans, 1 can of sweet corn, and 1 can of diced tomatoes with green chilies, including the juice.
– Sprinkle in 1 tablespoon of chili powder, 1 teaspoon of ground cumin, and ½ teaspoon of smoked paprika.
– Mix everything well and cook for about 5 minutes. This helps the flavors blend nicely.
Combining Quinoa and Skillet Mixture
– Carefully fold the cooked quinoa into the skillet mixture.
– Season it with salt and freshly cracked pepper to taste.
– Stir everything together and heat until it’s piping hot.
Melting the Cheese
– If you want, sprinkle 1 cup of shredded cheddar cheese over the top.
– Cover the skillet with a lid for a couple of minutes to melt the cheese.
Serving
– Dish out the Tex-Mex quinoa skillet onto plates.
– Garnish with fresh cilantro and add slices of ripe avocado on top for a creamy finish.
Tips & Tricks
Perfecting the Quinoa
Start by rinsing your quinoa. This step helps remove the bitter coating called saponin. Rinse it in a fine mesh strainer under cold water for about 30 seconds. This simple action improves the texture. Each brand of quinoa may need a different amount of liquid. If your brand suggests using more or less broth, adjust it. This helps ensure your quinoa cooks perfectly every time.
Flavor Enhancements
Want more kick? Add extra spices or a splash of hot sauce to the mix. You can also try fresh lime juice. A squeeze of lime brightens the dish. It adds a zesty flavor that makes every bite exciting. Don’t be afraid to experiment with flavors!
Presentation Tips
Serving your dish in colorful bowls makes it pop! Use bright colors to create an inviting plate. It’s fun and makes the meal feel special. Adding lime wedges on the side gives a nice touch. This not only looks great but also allows guests to add more lime if they wish. A vibrant presentation enhances the dining experience!
Pro Tips
- Rinse Your Quinoa: Always rinse quinoa before cooking to remove its natural coating, called saponin, which can impart a bitter taste.
- Customize Your Veggies: Feel free to add or substitute other vegetables like zucchini, spinach, or jalapeños to customize the flavor and nutrition.
- Make It Ahead: This Tex-Mex skillet can be made ahead of time and stored in the refrigerator for up to 4 days, making it perfect for meal prep.
- Spice Adjustments: Adjust the level of spiciness by increasing or decreasing the chili powder and adding fresh jalapeños or hot sauce as desired.

Variations
Protein Additions
You can change up the protein in your Tex-Mex quinoa skillet. Adding cooked chicken or turkey gives it a hearty touch. If you prefer plant-based options, tofu works great too. You can also swap black beans for pinto or kidney beans. This keeps the dish fresh and exciting.
Vegetarian/Vegan Adjustments
If you’re going vegetarian or vegan, there’s an easy fix. Just skip the cheese or try plant-based cheese instead. This keeps the flavors while sticking to your diet. Always check that canned goods are vegan-friendly. It’s a simple step that makes a big difference.
Grain Alternatives
You can also switch the grain for a new twist. Brown rice or quinoa blends make a nice base. For a lower-carb option, try cauliflower rice. This keeps your meal light but still packed with flavor. Each grain brings its own texture, so pick what you like best!
Storage Info
Refrigeration
Store any leftovers in an airtight container. This keeps them fresh and tasty. For best flavor, eat the dish within 3-4 days. Check for any signs of spoilage before enjoying your meal.
Freezing
You can freeze portions for easy meal prep. Divide the skillet into single servings and place them in freezer-safe containers. When you want to eat, thaw overnight in the fridge. This helps keep the texture nice and prevents sogginess.
Reheating Instructions
For a quick method, use the microwave. Heat for 1-2 minutes or until warm. Stir halfway to ensure even heating. For a stovetop option, add a splash of water to the skillet. Heat on low, stirring often, until everything is hot. This method keeps the dish’s texture just right.
FAQs
How long does it take to make Tex-Mex Quinoa Skillet?
Total time is approximately 30 minutes. This includes cooking the quinoa and sautéing the veggies.
Can I use other grains instead of quinoa?
Yes, rice or cauliflower rice work well. Both options give a nice texture and taste.
Is this recipe gluten-free?
Yes, all ingredients are gluten-free. You can enjoy this dish without worry.
How can I make it spicier?
Add more chili powder or diced jalapeños. You can adjust the heat to your taste.
What can I serve with Tex-Mex Quinoa Skillet?
Suggestions for sides include guacamole, salsa, or tortilla chips. These add extra flavor and fun!
This Tex-Mex Quinoa Skillet is easy to make and full of flavor. Start with quinoa and broth, then sauté fresh veggies. Mix in black beans, corn, and spices. Finish with melting cheese on top. You can make it your own with different proteins or by changing grains. Leftovers store well in the fridge or freezer. Enjoy a colorful, tasty meal that fits your diet. With simple steps and tasty options, this dish is a win for dinne

Tex-Mex Quinoa Skillet
Ingredients
- 1 cup quinoa, thoroughly rinsed
- 2 cups vegetable broth
- 1 tablespoon olive oil
- 1 small onion, finely diced
- 2 cloves garlic, minced
- 1 red bell pepper diced into small pieces
- 1 can (15 oz) black beans, drained and rinsed
- 1 can (15 oz) sweet corn kernels, drained
- 1 can (14.5 oz) diced tomatoes with green chilies, undrained
- 1 tablespoon chili powder
- 1 teaspoon ground cumin
- ½ teaspoon smoked paprika
- to taste Salt and freshly cracked pepper
- 1 cup shredded cheddar cheese (optional, for topping)
- to garnish Fresh cilantro
- to top Ripe avocado slices
Instructions
- In a medium saucepan, combine the rinsed quinoa and vegetable broth. Bring the mixture to a boil over medium-high heat. Once boiling, reduce the heat to low, cover the saucepan, and let it simmer gently for approximately 15 minutes, or until the quinoa is light and fluffy, and all the liquid has been absorbed. Once done, remove the saucepan from heat and set it aside uncovered to cool slightly.
- Meanwhile, in a large skillet, heat the olive oil over medium heat. Add the diced onion and sauté for 3-4 minutes until it becomes translucent and fragrant.
- Add the minced garlic and diced red bell pepper to the skillet. Continue to cook for an additional 2-3 minutes, stirring occasionally, until the bell pepper pieces are tender and vibrant.
- Stir in the black beans, corn, and canned diced tomatoes (including their juice) to the skillet. Sprinkle in the chili powder, ground cumin, and smoked paprika. Mix everything thoroughly and allow it to cook for about 5 minutes to let the flavors blend harmoniously.
- Carefully fold the cooked quinoa into the skillet mixture, ensuring it's evenly distributed. Season with salt and freshly cracked pepper to taste. Stir to combine and heat through until everything is piping hot and well-mixed.
- If using, sprinkle the shredded cheddar cheese over the top of your skillet mixture. Cover the skillet with a lid and let it sit for a couple of minutes to allow the cheese to melt beautifully.
- To serve, dish out the Tex-Mex quinoa skillet onto plates, garnishing generously with fresh cilantro and adding slices of ripe avocado on top for that creamy finish.


![To make honey lemon roasted salmon, you need a few simple items: - 4 salmon fillets (6 oz each) - 1/4 cup honey - 2 tablespoons freshly squeezed lemon juice - Zest of 1 lemon (about 1 teaspoon) - 2 tablespoons extra virgin olive oil - 3 cloves garlic, finely minced - Salt and black pepper to taste These ingredients work well together. The honey adds sweetness, while the lemon gives a bright flavor. The olive oil helps keep the salmon moist. Garlic brings a nice kick to the dish. You can add some optional garnishes to make your dish look even better. Consider these: - Fresh dill sprigs for a pop of color and taste - Extra lemon wedges for serving These garnishes add freshness and make the dish more appealing. They also enhance the flavors. If you don't have all the ingredients, don't worry! You can swap some things out: - Use maple syrup instead of honey for a different sweet flavor. - Lime juice can replace lemon juice for a zesty twist. - If you lack fresh garlic, garlic powder works in a pinch. These swaps can still give you a tasty meal. Feel free to get creative! For the full recipe, check the detailed steps. To start, preheat your oven to 400°F (200°C). This gives the salmon a nice roast. In a bowl, mix honey, lemon juice, lemon zest, olive oil, and minced garlic. Whisk it well until smooth. Next, take your salmon fillets and season both sides with salt and black pepper. This will boost the flavor. Place the fillets skin-side down on a baking sheet lined with parchment paper. This step makes cleanup easy. Now, use a brush or spoon to spread the honey lemon mix over the salmon fillets. Make sure to coat them well for great taste. Now, place the baking sheet in the oven. Roast the salmon for 12-15 minutes. It’s done when the flesh looks opaque and flakes easily with a fork. This means it's tender and juicy. After roasting, take the salmon out of the oven. Let it rest for a few minutes. This keeps it warm and moist. When serving, lay the salmon on a white platter. Drizzle any leftover honey lemon mixture from the baking sheet on top. For a nice touch, add lemon wedges around the salmon. If you like, you can garnish with fresh dill sprigs. This adds color and flavor. You can find the full recipe and more tips at [Full Recipe]. Enjoy your meal! To get perfectly roasted salmon, start with fresh fillets. Fresh fish tastes better. Always preheat your oven to 400°F (200°C). This helps the salmon cook evenly. Make sure to line your baking sheet with parchment paper. This keeps the salmon from sticking. For a nice glaze, brush the honey lemon mixture on thick. This adds more flavor and caramelizes well. Roast for 12 to 15 minutes. The salmon is done when it flakes easily with a fork. One common mistake is overcooking the salmon. This makes it dry and tough. Always check it a few minutes before the time is up. Another mistake is not seasoning enough. Salt and pepper bring out the salmon's natural taste. Skipping the marinade is also a no-go. The honey and lemon mix adds great flavor. Lastly, don’t skip resting the salmon after cooking. This keeps it juicy and tender. Marinating is key to enhancing flavor. You can use the honey lemon mix as a marinade. Let the salmon sit in the mixture for 30 minutes before cooking. This allows the fish to soak up all the flavors. Feel free to add herbs like thyme or rosemary. These herbs pair well with salmon. You can also try different citrus juices for a twist. Orange or lime can add a nice touch. For more ideas, check out the Full Recipe. {{image_4}} Grilling salmon gives it a lovely smoky flavor. Start with the same honey lemon mix. Marinate the salmon in this blend for about 30 minutes. Preheat your grill to medium-high heat. Cook each side for about 5-7 minutes. Look for grill marks and a nice char. This method adds depth to the dish. Fresh herbs can brighten your meal. Add herbs like thyme or parsley to the honey lemon mix. These herbs work well with the salmon's rich flavor. Simply brush the mixture over the salmon fillets before cooking. It gives each bite a fresh taste. You can also sprinkle herbs on top after cooking for added color and flavor. Want a faster option? Pan-searing is quick and easy. Heat a bit of olive oil in a skillet over medium heat. Season the salmon with the honey lemon mix. Place the fillets skin-side down in the hot skillet. Cook for about 4-5 minutes per side. This method gives you a crispy skin and juicy inside. It's a great way to enjoy salmon on a busy night. For more cooking ideas, check out the Full Recipe. After cooking your honey lemon roasted salmon, let it cool down. Place the leftover salmon in an airtight container. This keeps it fresh. Store it in the fridge for up to three days. If you want to enjoy it later, do not wait too long. The sooner you store it, the better it tastes when you reheat. You can freeze honey lemon salmon if you have extra. Wrap each piece tightly in plastic wrap. Then, place them in a freezer-safe bag. Squeeze out the air before sealing. Label the bag with the date. You can freeze it for up to three months. When you're ready to eat it, thaw it overnight in the fridge. To reheat salmon, the oven works best. Preheat the oven to 275°F (135°C). Place the salmon on a baking sheet. Cover it with foil to prevent drying. Heat for about 15 minutes or until warm. You can also use a microwave. Put it on a plate and cover it with a microwave-safe lid. Heat for 30 seconds at a time until warm. Enjoy your meal again! For the full recipe, check back to our earlier section. You can tell salmon is done when it looks opaque. The flesh should flake easily with a fork. Use a meat thermometer if you want to be sure. The internal temp should reach 145°F (63°C). If you cut into the fish, it should look moist and tender. Overcooked salmon can be dry, so check it closely. Yes, you can use frozen salmon for honey lemon roasted salmon. Just make sure to thaw it first. Place the salmon in the fridge overnight or run it under cold water. Once thawed, pat it dry with a paper towel. Then, follow the recipe as usual. Cooking from frozen may require a few extra minutes. Honey lemon roasted salmon pairs well with many sides. Here are some ideas: - Steamed broccoli - Roasted asparagus - Quinoa salad - Garlic mashed potatoes - Lemon rice - Mixed greens with vinaigrette These sides add color and nutrition to your meal. You can mix and match based on your taste. Enjoy trying out different combinations! For the full recipe, check out the section above. This blog post covered how to make honey lemon roasted salmon. We explored key ingredients, including essential and optional items. I shared step-by-step cooking instructions and tips to avoid mistakes. You also learned about variations and how to store salmon. Try these methods to create simple and tasty meals. With practice, you'll impress yourself and others with your cooking skills. Enjoy your journey to making delicious honey lemon salmon!](https://goldendishy.com/wp-content/uploads/2025/07/988a6f99-fc0c-4e25-b6bc-fd8b1dc60d33-768x768.webp)

![For Lemon Basil Zucchini Orzo, you will need: - 1 cup of orzo pasta - 2 medium zucchinis, diced into bite-sized cubes - 1 cup of vegetable broth - 1 tablespoon of extra-virgin olive oil - 3 cloves of garlic, finely minced - Zest and juice of 1 large lemon - 1/4 cup of fresh basil leaves, chopped roughly - 1/4 teaspoon of red pepper flakes (adjust to taste) - Salt and freshly cracked black pepper, to taste - Grated Parmesan cheese, for garnish (optional) You can make your dish pop with these garnishes: - Extra fresh basil leaves - A sprinkle of lemon zest - A drizzle of olive oil These will add color and flavor to your meal. To make this dish, gather these tools: - A medium-sized pot for cooking orzo - A large skillet for sautéing - A colander for draining orzo - A sharp knife for chopping - A cutting board for prepping ingredients Having these on hand will make your cooking easier and more fun. For the full recipe, follow the steps carefully to enjoy a tasty, fresh meal. Start by boiling water in a medium pot. You need about 4 cups of water. When it boils, add 1 cup of orzo pasta. Cook it for 9 to 11 minutes, following the package instructions. You want it to be al dente, so check it often. Once it's cooked, drain the orzo in a colander and set it aside. This pasta adds a nice texture to your meal. Next, grab a large skillet and heat 1 tablespoon of extra-virgin olive oil over medium heat. Once the oil is hot, add 3 cloves of minced garlic. Sauté for about 1 minute. You want it fragrant, but don’t let it brown. After that, toss in 2 medium zucchinis, diced into bite-sized cubes. Stir them together for 4 to 5 minutes. The zucchinis should soften but still have some crunch. If you like it spicy, add 1/4 teaspoon of red pepper flakes at this point. Now it's time to bring it all together. Pour in 1 cup of vegetable broth and squeeze the juice of 1 large lemon into the skillet. Let it simmer gently for 3 to 4 minutes. This helps the flavors mix well. After that, stir in the cooked orzo pasta, zest from the lemon, and 1/4 cup of roughly chopped fresh basil leaves. Season it all with salt and freshly cracked black pepper to taste. Mix thoroughly. If the dish seems a bit dry, add a splash more vegetable broth for a creamy finish. Finally, let it cook on low heat for another 2 to 3 minutes before serving. For the full recipe, check out the instructions above. To get the best texture in your Lemon Basil Zucchini Orzo, cook the orzo just right. Follow the package time closely, aiming for al dente. This means it should be firm but not hard. After cooking, drain it well. Avoid overcooking the zucchini. Sauté them until they are tender but still have a little bite. This keeps your dish fresh and exciting. You can boost the flavor in this dish easily. Fresh lemon juice gives a bright taste. Adding lemon zest will enhance this citrus flavor even more. For a bit of heat, use red pepper flakes, but adjust to your taste. If you want a richer flavor, sprinkle on some grated Parmesan cheese before serving. Fresh basil is key too; it adds a deep, herbal note that ties everything together. Serve your Lemon Basil Zucchini Orzo in shallow bowls for a lovely look. Add a few extra basil leaves on top for color. A sprinkle of lemon zest makes it pop, adding brightness to the dish. You can also drizzle a little olive oil on top for a nice finish. Don't forget to use your best bowls; good presentation makes the dish even more appealing. For the full recipe, check out the earlier section. {{image_4}} You can make this dish vegan by skipping the cheese. Use nutritional yeast instead for a cheesy taste. This works well with the lemon and basil. You can add more veggies like bell peppers or spinach for extra flavor. To make this dish gluten-free, swap the orzo with gluten-free pasta. Rice or quinoa can also work well. These options keep the dish light and fresh. Always check labels to ensure they are gluten-free. If you want to add protein, consider chickpeas or lentils. They pair nicely with the lemon and basil. Grilled chicken or shrimp are also great choices. Just cook them separately and mix them in at the end. This makes the meal hearty and satisfying. For the full recipe, check the Full Recipe section. Store any leftover Lemon Basil Zucchini Orzo in an airtight container. Place it in the fridge. It stays fresh for up to 3 days. Before serving again, check for any signs of spoilage. If it smells off or has changed color, toss it out. You can freeze Lemon Basil Zucchini Orzo, but with a few tips. Let the dish cool completely before freezing. Use a freezer-safe container or bag. It can last up to 2 months in the freezer. When you're ready to eat, thaw it in the fridge overnight. To reheat, use a skillet over low heat. Add a splash of broth to help it stay creamy. Stir frequently until it's warmed through. You can also use the microwave. Heat in short bursts, stirring in between, until hot. Enjoy your meal just like it was fresh! For the full recipe, check out the original. Yes, you can use other pasta types. Try penne or farfalle for a twist. Both will work well with the flavors in this dish. Just remember to adjust the cooking time as needed. Check the package for the best cooking instructions. To add heat, sprinkle in red pepper flakes. You can also add diced jalapeños or a dash of hot sauce. Start with a small amount and taste as you go. This way, you can find the perfect level of spice that suits your taste. Zucchini is low in calories and full of vitamins. It helps keep you hydrated and is a good source of fiber. Basil has anti-inflammatory properties and is rich in antioxidants. This herb can boost your immune system and enhance your mood. Together, they make a nutritious choice for any meal. For a full recipe, check the [Full Recipe]. This blog post covered the key ingredients and steps to make a tasty dish. You learned about cooking orzo, sautéing garlic and zucchini, and combining flavors. Tips helped achieve great texture and presentation. Variations offered vegan and gluten-free options. Remember to store leftovers properly and reheat them well. Use these insights to create a meal you love. Enjoy the process and make it your own! With some practice, you'll impress everyone with your cooking skills.](https://goldendishy.com/wp-content/uploads/2025/07/61f764e1-906e-4d38-9844-2e2d556314ee-768x768.webp)

![- 1 pound boneless, skinless chicken breasts - 6 cups low-sodium chicken broth - 1 medium onion, finely chopped - 2 cloves garlic, minced - 2 medium carrots, diced - 2 stalks celery, diced - 1 cup orzo pasta - 3 large eggs - 1/2 cup freshly squeezed lemon juice (about 2-3 lemons) This soup starts with tender chicken. I prefer boneless, skinless chicken breasts. They cook fast and stay juicy. Next, low-sodium chicken broth gives the soup its rich base. Fresh veggies add flavor and nutrition. Onion, garlic, carrots, and celery create a perfect mix. I chop them finely for even cooking. Orzo pasta makes the soup filling. It cooks well in the broth, soaking up all the flavors. To achieve that creamy texture, I use eggs and lemon juice. The eggs blend with the broth, creating a silky finish. Fresh lemon juice brightens the soup, making every bite refreshing. - 1 teaspoon dried oregano - 1 teaspoon sea salt - 1/2 teaspoon freshly ground black pepper - 2 tablespoons extra-virgin olive oil Seasoning is key in this recipe. Dried oregano adds a hint of earthiness. Sea salt and black pepper enhance the natural flavors. I always choose extra-virgin olive oil for sautéing. It has a wonderful taste and is healthy too. - Fresh parsley, finely chopped - Lemon wedges for serving Garnishes make a dish special. Fresh parsley adds color and freshness. I sprinkle it on top before serving. Lemon wedges are great for those who want extra zing. They brighten the dish and add a punch of flavor. For the full recipe, check out the Mediterranean Lemon Chicken Orzo Soup! It’s a perfect guide to make this comforting dish. Start by chopping the vegetables. You will need to dice the onion, carrots, and celery. Next, shred the cooked chicken. This can be done easily with two forks. For the egg mixture, whisk together the eggs and lemon juice in a medium bowl. Make sure they blend well. In a large pot, heat two tablespoons of olive oil over medium heat. Once hot, add the chopped onion, diced carrots, and celery. Sauté these vegetables for about 5 to 7 minutes. They should become tender and fragrant. Now, stir in two minced garlic cloves. Cook for one more minute. You want the garlic to smell wonderful, but not brown. Add the chicken breasts into the pot. Pour in six cups of low-sodium chicken broth. Increase the heat slightly and bring it to a gentle simmer. Let the chicken cook for 15 to 20 minutes. Once fully cooked, carefully remove the chicken from the pot and set it aside to cool. When cool, shred the chicken into bite-sized pieces. Return to the pot and add one cup of orzo pasta. Let the soup simmer for 8 to 10 minutes, stirring to prevent sticking. In your mixing bowl, you have the whisked eggs with lemon juice. Now, temper the eggs by slowly adding a ladleful of hot broth from the pot. Whisk constantly to prevent the eggs from cooking too quickly. Gradually mix the egg mixture back into the soup. This will give your soup a creamy texture. Now it’s time to adjust the seasoning. Taste the soup and add sea salt and black pepper as needed. Finally, garnish your soup with fresh parsley before serving. This adds a nice color and fresh flavor. Enjoy your comforting bowl of Greek lemon chicken soup! For the full recipe, see the detailed instructions above. - Choosing the right type of chicken: I recommend using boneless, skinless chicken breasts. This cut cooks quickly and stays tender in the soup. It also absorbs the rich flavors of the broth well. - Adjusting salt levels for broth versus soup: Start with low-sodium chicken broth. Taste as you cook, and add salt as needed. This way, you control the saltiness without overwhelming the dish. - Techniques for tempering eggs properly: To prevent egg curdling, whisk the eggs and lemon juice in a bowl. Slowly add hot broth while whisking. This warms the eggs without cooking them. - Continuous whisking for a smooth texture: Keep whisking as you add the broth. This ensures a creamy, smooth texture in your soup. It’s key for that authentic Greek flavor. - Suggestions for family dinners or special occasions: Greek Lemon Chicken Soup is perfect for family dinners. Serve it on cozy nights or special occasions like holidays. It brings warmth and comfort to the table. - Pairing with sides for a complete meal: I love pairing this soup with a fresh Greek salad or crusty bread. These sides complement the soup and make a full meal. Enjoy your cooking adventure with this classic dish! Check out the [Full Recipe] for step-by-step details on making this delightful soup. {{image_4}} If you can't find orzo, don't worry! You can use other small pasta shapes, like ditalini or acini di pepe. Both work great in this soup. For those who need gluten-free options, try rice or quinoa. These grains add texture and flavor while keeping the dish gluten-free. You can make your soup even better by adding greens. Spinach or kale works well. Simply toss them in during the last few minutes of cooking. This adds color and nutrients. You can also enhance the flavor by using herbs. Fresh dill or basil adds a lovely aroma and taste. Try adding a handful of either herb for a bright twist. If you want a meatless version, you can replace the chicken with plant-based proteins. Tofu or chickpeas are good choices. They soak up the soup's flavors nicely. Use vegetable broth instead of chicken broth to keep the taste rich and savory. This way, everyone can enjoy a bowl of this comforting soup! For the full recipe, check out the Mediterranean Lemon Chicken Orzo Soup . To keep your Greek Lemon Chicken Soup fresh, let it cool first. Pour it into airtight containers. Make sure to store it in the fridge. It should stay good for about 3 to 4 days. Always label your containers with the date. This helps you track how long it’s been there. When reheating, do it gently. You can use the stove or microwave. If using the stove, heat it on low heat. Stir often to prevent sticking. If it seems thick, add a splash of broth or water. This keeps the soup nice and smooth. To freeze Greek Lemon Chicken Soup, let it cool completely. Pour it into freezer-safe bags or containers. Remove as much air as possible. It can last up to 3 months in the freezer. When you’re ready to eat, thaw it in the fridge overnight. Reheat gently to enjoy the same great flavor. Greek Lemon Chicken Soup, also known as Avgolemono, is a classic dish. It features tender chicken, bright lemon, and creamy eggs. This soup warms the heart and soul, especially during cold months. It is a staple in Greek homes and often appears at family gatherings. The mix of flavors showcases the essence of Greek cooking. To achieve a creamy texture, temper the eggs. Whisk eggs and lemon juice together in a bowl. Gradually add hot broth while whisking. This method prevents the eggs from scrambling. Slowly stir the egg mixture back into the soup. This creates a smooth and velvety finish. Avoid boiling the soup after adding the egg to keep it creamy. Yes, you can make this soup ahead of time. Prepare the soup but skip adding the egg mixture until serving. Store the soup in an airtight container in the fridge for up to three days. When ready to serve, reheat gently and add the egg mixture. This keeps the soup fresh and creamy. This soup pairs well with a simple Greek salad. You can also serve it with warm pita bread or crusty bread. For a lighter meal, consider grilled vegetables on the side. These options enhance the flavors and create a lovely dining experience. In this post, I shared how to make Greek Lemon Chicken Soup. You learned about the key ingredients, like chicken, orzo, and the egg-lemon mixture that gives the soup its creamy texture. I provided steps for preparation, cooking, and tips for keeping the soup delicious and authentic. Don't hesitate to mix it up with different ingredients or share it with others. Enjoy this comforting dish anytime!](https://goldendishy.com/wp-content/uploads/2025/06/4ca94f54-e42c-42a8-b75c-f7048ee8bbd9-768x768.webp)