Teriyaki Tofu Stir-Fry Quick and Flavorful Meal

Looking for a quick and tasty meal? Teriyaki Tofu Stir-Fry is here to delight your taste buds! This dish combines firm tofu and fresh veggies like bell peppers and snap peas, all coated in a flavorful teriyaki sauce. In just a few easy steps, you can whip up a dinner that’s both satisfying and nutritious. Ready to impress your family or friends? Let’s dive into this delicious recipe!
Why I Love This Recipe
- Easy to Make: This recipe is straightforward and quick, making it perfect for weeknight dinners or meal prep.
- Healthy Ingredients: Packed with colorful vegetables and protein-rich tofu, this dish is both nutritious and satisfying.
- Flavor Explosion: The combination of soy sauce, ginger, and sesame oil creates a deliciously rich and savory flavor that’s hard to resist.
- Customizable: You can easily swap in your favorite vegetables or adjust the sauce for a personal touch, making it versatile for any palate.
Ingredients
Main Ingredients
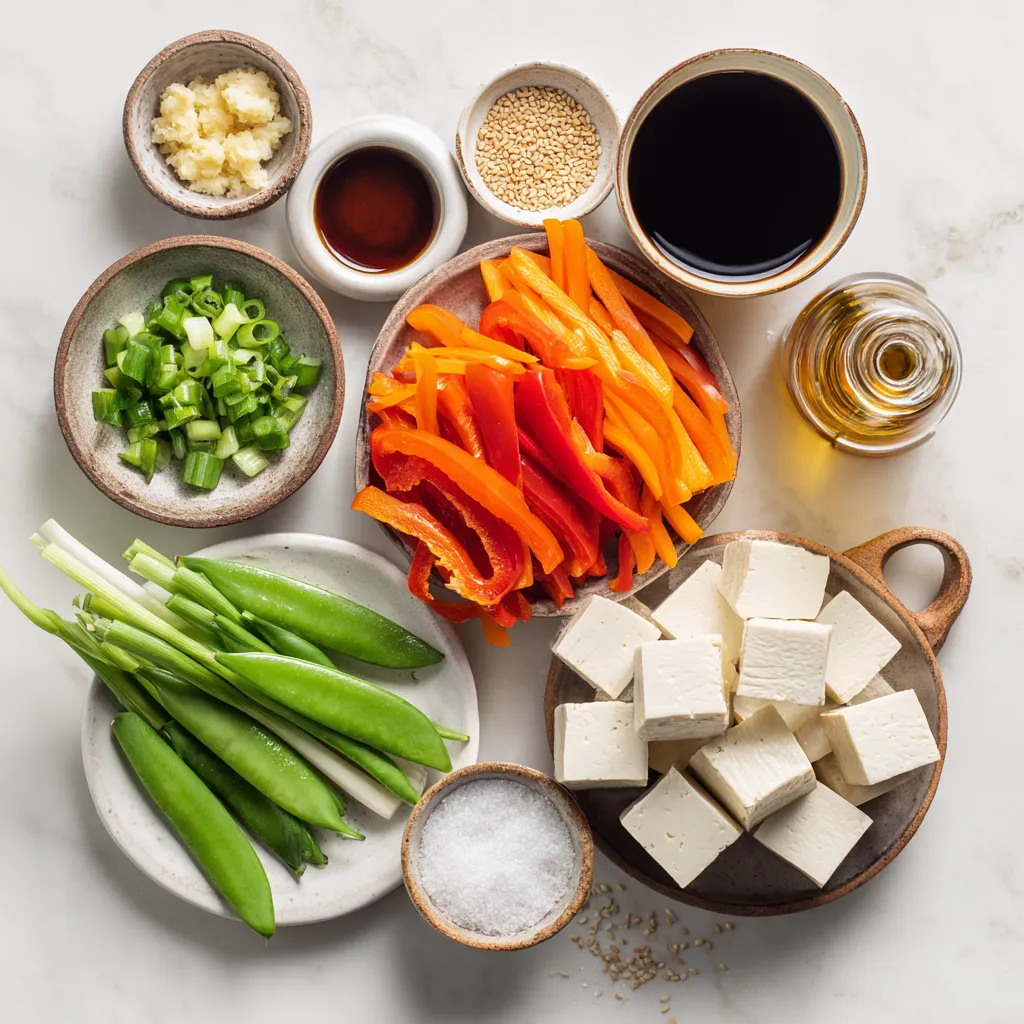
– 14 oz (400g) firm tofu, drained and pressed
– 1 red bell pepper, sliced into thin strips
– 1 green bell pepper, sliced into thin strips
– 1 cup snap peas, trimmed for freshness
– 1 medium carrot, julienned into matchstick pieces
– 3 green onions, chopped (keep whites and greens separated)
– 2 cloves garlic, minced finely
– 1 tablespoon fresh ginger, minced
Sauce Ingredients
– 1/4 cup low-sodium soy sauce
– 2 tablespoons mirin (or vinegar)
– 1 tablespoon brown sugar, packed
– 1 tablespoon sesame oil
Optional Garnishes
– Sesame seeds
– Lime wedges
Gather these fresh and tasty ingredients. Firm tofu serves as the main protein source. The bell peppers add color and crunch. Snap peas bring a sweet taste, while the carrot adds a nice texture. Garlic and ginger give a fragrant kick. The sauce combines soy sauce, mirin, brown sugar, and sesame oil for a sweet and savory flavor. For a finishing touch, sprinkle sesame seeds and serve with lime wedges for extra zest. This blend of ingredients creates a well-rounded, delicious dish.

Step-by-Step Instructions
Preparing the Tofu
– Cut the pressed tofu into bite-sized cubes.
– Toss the tofu cubes in cornstarch until each piece is coated. This step gives the tofu a crispy texture.
Cooking the Tofu
– Heat 1 tablespoon of vegetable oil in a non-stick skillet over medium-high heat.
– Add the tofu cubes. Fry them for about 8-10 minutes. Turn them often until they are golden brown on all sides. Once done, take the tofu out and set it aside on a plate.
Stir-Frying the Vegetables
– In the same skillet, add another tablespoon of oil.
– Add the sliced red and green bell peppers, snap peas, and julienned carrot. Stir-fry for about 5 minutes until the veggies are tender but still crisp.
– Add the minced garlic, minced ginger, and the chopped white parts of the green onions. Stir-fry these for 1-2 minutes, letting the flavors mix.
Combining Ingredients
– In a small bowl, mix the low-sodium soy sauce, mirin (or vinegar), brown sugar, and sesame oil. Whisk until the sugar dissolves.
– Pour the sauce over the sizzling veggies in the skillet. Stir well to coat everything.
– Gently add the crispy tofu back into the skillet. Toss everything together to coat the tofu in the sauce. Cook for another 2-3 minutes until heated through.
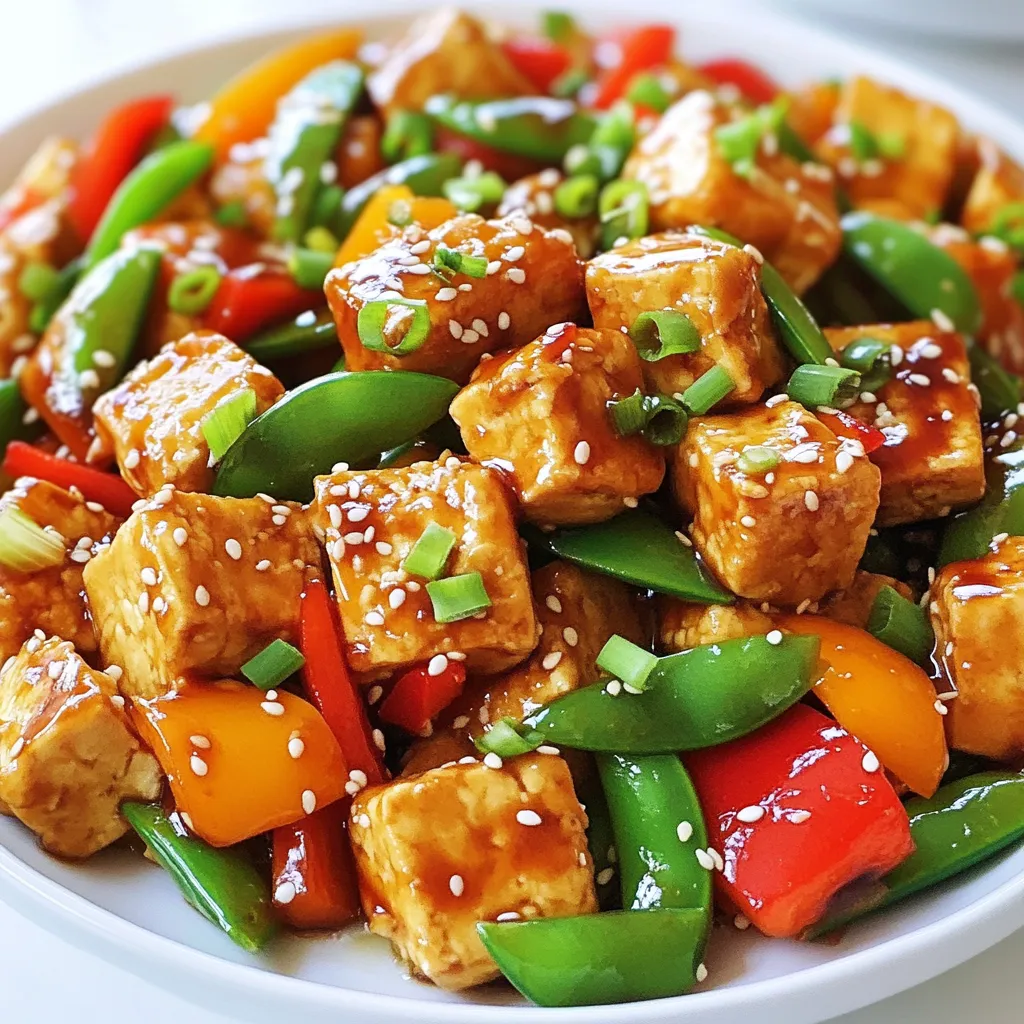
Serve your Teriyaki Tofu Stir-Fry right away. Enjoy with a sprinkle of sesame seeds and green parts of the chopped green onions for a fresh touch.
Tips & Tricks
Perfecting the Tofu Texture
To get that perfect tofu texture, cornstarch is key. It creates a crispy crust when you fry the tofu.
– Coat the Tofu: After pressing the tofu, cut it into cubes. Toss those cubes in cornstarch until each piece is covered. This helps achieve crunchiness.
– Frying Techniques: Heat oil in a non-stick skillet until hot. Add the cornstarch-coated tofu. Fry it for 8-10 minutes, turning until golden brown. This method gives you the best crisp.
Enhancing Flavor
Fresh herbs can really boost the taste of your dish. Consider adding basil or cilantro for a fresh twist.
– Sauce Substitutions: If you run out of mirin, apple cider vinegar works great. It adds a nice tang.
Presentation Ideas
Serve your Teriyaki Tofu Stir-Fry over fluffy jasmine rice or quinoa. This pairing makes for a filling meal.
– Garnishing Tips: A sprinkle of sesame seeds adds a nice crunch. Green onion tops also bring a pop of color. Consider adding a lime wedge for extra zest!
Pro Tips
- Press Tofu Thoroughly: Make sure to press the tofu for at least 30 minutes to remove excess moisture. This step is crucial for achieving that perfect crispy texture when frying.
- Use High Heat: When stir-frying, always use high heat. This helps to quickly cook the vegetables while preserving their crispness and vibrant colors.
- Customize Your Sauce: Feel free to tweak the sauce by adding chili flakes for heat or a splash of lime juice for acidity. This can elevate the overall flavor profile of the dish.
- Garnish for Appeal: Don’t skip the sesame seeds and green onion garnish! They not only add visual appeal but also enhance the dish’s flavor with their nutty and fresh notes.

Variations
Protein Alternatives
You can switch out tofu for tempeh. Tempeh has a nuttier taste and a firmer bite. It works well with teriyaki sauce and takes on flavors nicely. If you prefer meat, try adding chicken or shrimp. Both cook quickly and soak up the sauce flavor.
Vegetable Swaps
Feel free to mix in other vegetables. Broccoli, zucchini, or mushrooms can add new flavors. You can also use seasonal veggies. In summer, add fresh corn or bell peppers. In winter, try carrots or bok choy for a cozy dish.
Sauce Modifications
Adjust the sweetness by adding more brown sugar or using honey. If you like heat, add chili flakes or sriracha. This can make your stir-fry spicier and more exciting. Experiment with flavors to find your perfect balance!
Storage Info
Refrigerating Leftovers
To keep your Teriyaki Tofu Stir-Fry fresh, store it in the fridge. Use airtight containers to prevent moisture loss. Glass or plastic containers work well. Make sure to let it cool down before sealing.
Reheating Instructions
For reheating, use a skillet over medium heat. This keeps the tofu crispy. Add a splash of water to the pan to create steam. Cover it briefly to heat through. You can also use a microwave, but it may soften the tofu.
Freezing Guidelines
Yes, you can freeze Teriyaki Tofu Stir-Fry. Place it in freezer bags or containers. Remove as much air as possible. For thawing, leave it in the fridge overnight. Reheat in a skillet to restore texture.
FAQs
How do I make tofu crispy in stir-fries?
To make tofu crispy, start with firm tofu. Press it well to remove excess water. Cut it into small cubes. Coat the cubes in cornstarch. This creates a nice crunch when fried. Heat oil in a pan until hot. Fry the tofu until golden brown on all sides. This method gives you that perfect crispy texture.
Can I use different vegetables in this recipe?
Yes, you can use any vegetables you like! Broccoli, zucchini, or mushrooms work well. Just cut them into similar sizes for even cooking. You can mix and match based on what you have at home. Each vegetable adds its own flavor and texture to the stir-fry.
What can I substitute for mirin?
If you don’t have mirin, apple cider vinegar is a great substitute. It gives a zesty kick. You can also mix water and sugar as another option. Just keep the ratio balanced for the right taste. Both options will still enhance the flavor of your stir-fry.
Is Teriyaki Tofu Stir-Fry gluten-free?
Yes, Teriyaki Tofu Stir-Fry can be gluten-free. Use gluten-free soy sauce instead of regular soy sauce. Always check labels to ensure all ingredients meet gluten-free standards. This way, you can enjoy the dish without any worries.
How long can I store the stir-fry in the fridge?
You can store the stir-fry in the fridge for up to three days. Keep it in an airtight container to keep it fresh. Reheat it on the stove or microwave before serving. This will help maintain the flavor and texture.
This blog post covered making Teriyaki Tofu Stir-Fry from start to finish. We explored main ingredients, sauce options, and cooking methods. You can enhance flavor with fresh herbs or swap proteins for variety. Don’t forget storage tips to keep leftovers fresh.
Teriyaki Tofu Stir-Fry is tasty, flexible, and easy to prepare. Enjoy making this dish your ow


![- 1 pound fresh shrimp, peeled and deveined - 3 tablespoons unsalted butter, divided - 4 cloves garlic, finely minced - 1 teaspoon smoked paprika - 1 teaspoon ground cumin - Salt and freshly ground black pepper, to taste - 8 small corn tortillas - 1 cup red cabbage, finely shredded - 1 ripe avocado, sliced into thin wedges - Fresh cilantro leaves, roughly chopped, for garnish - Lime wedges, cut into quarters, for serving To make these garlic butter grilled shrimp tacos, you need fresh shrimp. I recommend getting shrimp that are firm and have a nice sheen. Make sure they are peeled and deveined for easy eating. Butter is key for adding richness. Use unsalted butter so you can control the saltiness. Garlic adds a wonderful aroma and flavor. Mince it finely for the best taste. For spices, smoked paprika brings a deep, smoky flavor. Ground cumin adds warmth. Be sure to season with salt and black pepper to taste. Corn tortillas are the perfect wrap. They are soft and add a nice corn flavor. Red cabbage gives a crunchy texture and a pop of color. Sliced avocado adds creaminess. Fresh cilantro gives a burst of freshness. Finally, lime wedges add a zesty kick. To see the full recipe, check out the [Full Recipe]. To start, melt 2 tablespoons of unsalted butter in a large skillet. Use medium heat. Once the butter is melted, add 4 cloves of minced garlic. Sauté the garlic for 1-2 minutes. It should smell great and turn a light golden color. Be careful not to burn the garlic! Next, stir in 1 teaspoon of smoked paprika and 1 teaspoon of ground cumin. Add a pinch of salt and fresh black pepper to taste. Mix well. This creates a tasty marinade for the shrimp. Now, add 1 pound of peeled and deveined shrimp to the skillet. Cook the shrimp for 3-4 minutes. Stir occasionally to make sure they cook evenly. You will know they are done when they turn opaque and pink. This buttery garlic mixture makes them extra delicious! While the shrimp cooks, take another skillet and heat it over medium-high heat. Warm each of the 8 small corn tortillas for about 30 seconds on each side. You want them to be soft and flexible. Look for slight char marks on the tortillas. This adds great flavor! To build your tacos, take a warm tortilla and layer some cooked shrimp in the center. Then, top it with shredded red cabbage and avocado slices. The cabbage adds crunch, while the avocado gives creaminess. Finish off your tacos by adding fresh cilantro on top. Serve them with lime wedges on the side for a zesty touch. For a nice presentation, arrange the tacos on a colorful platter. You can add extra cilantro and lime wedges to make it look even better. Enjoy every bite with a squeeze of lime! When picking shrimp, you have two main choices: fresh or frozen. Fresh shrimp can taste better, but frozen shrimp is often just as good. If you choose frozen shrimp, look for those that are flash-frozen right after harvest. This keeps them fresh and tasty. Size matters too! For tacos, I suggest using medium to large shrimp. They hold up well in the taco and give you a satisfying bite. Aim for shrimp that are about 21 to 30 per pound. To boost the flavor, you can swap the spices. Try adding chili powder or even a pinch of cayenne for heat. If you want a smoky taste, smoked paprika works wonders. You can also mix in some lime zest for a bright kick. To elevate your tacos, think about toppings. Mango salsa adds sweetness, while jalapeños bring heat. A drizzle of sour cream or a splash of hot sauce can make your tacos sing. Do not overcook your shrimp. They cook quickly and should only take 3-4 minutes. When they turn pink and opaque, they are done. Overcooking makes them tough and rubbery. For the tortillas, warmth is key. Heat them in a hot skillet for about 30 seconds on each side. This gives them a nice char and keeps them soft. You can also wrap them in a clean towel to keep them warm while you assemble your tacos. {{image_4}} You can switch the shrimp for other proteins. Chicken is a great option. Use boneless chicken breasts cut into bite-sized pieces. Season them like the shrimp. Cook until golden brown and juicy. Fish also works well. Choose firm fish like mahi-mahi or cod. Grill or pan-fry the fish until flaky. For a vegetarian twist, try veggies or tofu. Grilled bell peppers, onions, and zucchini make a colorful filling. Tofu absorbs flavors well, so marinate it before grilling. Want to spice things up? Add jalapeños or your favorite hot sauce. Slice jalapeños and mix them in with the shrimp. This adds a nice kick. You can change the toppings too. Mango salsa adds sweetness and freshness. Just mix diced mango, red onion, and lime juice. Another tasty option is crema. This creamy sauce balances the spices. Mix sour cream with lime juice and a pinch of salt. Serve your tacos with tasty sides. A fresh salad pairs well. Try a simple cucumber and tomato salad. Rice and beans are classic choices too. Cilantro lime rice adds bright flavor. For drinks, grab a cold beer or a zesty margarita. A light, fruity drink will complement the meal. Explore the full recipe for more ideas. To keep your garlic butter grilled shrimp tacos fresh, store them in an airtight container. Place the shrimp and toppings in separate containers. This helps maintain the flavors and textures. For the tortillas, wrap them in foil or plastic wrap. This keeps them soft and prevents them from drying out. Use them within three days for the best taste. To reheat the shrimp, place them in a skillet over low heat. Add a splash of water or a bit of butter to keep them moist. Heat for about five minutes, stirring gently. For the tortillas, warm them in a dry skillet for about 30 seconds each side. This method helps keep them soft and adds a nice char. Avoid using the microwave, as it may make them chewy. Yes, you can freeze grilled shrimp! Cool the shrimp completely before placing them in a freezer-safe bag. Squeeze out as much air as possible to prevent freezer burn. They can last up to three months in the freezer. When you're ready to use them, thaw overnight in the fridge. For meal prep, consider freezing the shrimp without the seasonings. This way, you can add fresh spices when you cook them later. You can tell when shrimp are cooked by looking for a few signs. First, they change color from grey to bright pink. Second, they curl into a C shape. Finally, perfectly cooked shrimp feel firm to the touch. If they are tough or rubbery, they may be overcooked. The cooking time is usually 3-4 minutes, but this can vary with size. Yes, you can prepare some parts of the tacos in advance. Cook the shrimp and store them in the fridge for up to two days. You can also warm the tortillas just before serving. If you want to save time, chop the cabbage and avocado ahead of time. Just remember to squeeze lime juice on the avocado to keep it fresh and green. Some great sides to serve with shrimp tacos include: - Cilantro lime rice - Black beans - Corn salad - Chips with salsa - Grilled vegetables These sides balance the flavors of the shrimp tacos and make the meal more complete. You can also serve a light salad to add freshness. You learned how to make delicious shrimp tacos from scratch. We covered fresh ingredients, step-by-step cooking, and tasty toppings. Remember, fresh shrimp and warm tortillas make a big difference. You can customize flavors with spices or different proteins. Enjoy serving them with a refreshing drink on the side. Proper storage will keep your leftovers tasty too. Whether you’re cooking for one or many, these tacos are a hit. Enjoy your cooking and get ready for a yummy meal.](https://goldendishy.com/wp-content/uploads/2025/06/f6806160-83d3-4aa8-a207-34a87a11273f-768x768.webp)
![To make this tasty dish, gather these main items: - 1 large head of cauliflower, cut into bite-sized florets - 5 cloves of garlic, skins left on - 3 tablespoons extra virgin olive oil, divided - 1/4 cup unsweetened almond milk (or your preferred milk) - 2 tablespoons butter (or a vegan alternative) - Salt and freshly ground black pepper, to taste These ingredients form the base of the mash. The cauliflower gives the dish its creamy texture. Roasting the garlic adds a rich flavor. You can change the recipe to suit your taste. Here are some ideas: - Swap almond milk for regular milk or cream for a richer flavor. - Use ghee instead of butter for a unique twist. - Add a pinch of nutmeg for warmth. - Incorporate herbs like thyme or rosemary for added depth. These options let you make the dish your own. Feel free to get creative! Garnishing makes the dish look appealing. Here are some great choices: - Fresh chives, finely chopped, for a pop of color - A drizzle of extra virgin olive oil for richness - A sprinkle of smoked paprika for a touch of spice These garnishes enhance the flavor and presentation. They make your Roasted Garlic Cauliflower Mash shine on the table. For the full recipe, check the earlier section. To start, I preheat my oven to 400°F (200°C). This temperature works best for roasting. Next, I take one large head of cauliflower and cut it into bite-sized florets. I love using fresh cauliflower for the best flavor. On a baking sheet, I place the florets and five unpeeled cloves of garlic. Then, I drizzle two tablespoons of extra virgin olive oil over them. I sprinkle salt and black pepper generously, then toss everything together. It helps the veggies get well-coated. I spread the cauliflower and garlic in a single layer. Now, I roast them for 25 to 30 minutes. Halfway through, I gently toss them to ensure they cook evenly. I look for a nice golden brown color and tender texture when they are done. Once roasted, I let the garlic cool for a few minutes before handling it. After cooling, I squeeze the softened garlic out of its skin. I put it into a large mixing bowl with the roasted cauliflower. Then, I add a quarter cup of unsweetened almond milk, two tablespoons of butter, and the last tablespoon of olive oil. I grab a hand mixer or an immersion blender to blend the mix. I blend until it turns smooth and creamy. If I want a chunkier mash, I blend just until combined. I make sure not to overmix, as it can change the texture. Once blended, I taste the mash. If it needs more flavor, I adjust with extra salt and pepper. I love a well-seasoned mash! Now, I transfer the cauliflower mash to a serving bowl. For a fun finishing touch, I sprinkle freshly chopped chives on top. This adds color and a nice flavor. To make it look fancy, I might drizzle a bit of olive oil on top. This mash is now ready to impress! Enjoy this easy and tasty dish from the [Full Recipe]. To make the best roasted garlic cauliflower mash, follow these tips. First, use a large head of cauliflower. This gives you enough to work with. Cut the florets into even sizes. This helps them cook at the same rate. Roasting adds flavor, so don’t rush it. Allow the cauliflower to become tender and golden. When blending, don’t overmix. A few pulses will give you a nice texture. If you want it creamier, add a splash more milk. Always taste as you go. Adjust salt and pepper to your liking for the best flavor. Having the right tools makes cooking easier. Here’s what I recommend: - Baking sheet for roasting - Large mixing bowl for combining ingredients - Immersion blender or hand mixer for smoothness - Measuring cups and spoons for precise amounts - Knife and cutting board for prep These tools help you work efficiently and make the process enjoyable. Watch out for these common mistakes. First, don’t skip the roasting step. Raw cauliflower will not have the same rich taste. Second, avoid using too much liquid. It can make your mash watery. If you prefer a thicker mash, add less almond milk. Finally, remember to season well. Under-seasoning can leave your mash bland. Always taste your dish before serving. This way, you ensure it is full of flavor. For the full recipe, check the details above. Enjoy making your roasted garlic cauliflower mash! {{image_4}} You can easily make this dish dairy-free. Use almond milk or coconut milk instead of regular milk. For a buttery flavor, swap butter for vegan butter or olive oil. This keeps the mash creamy and rich without dairy. Adding flavors can elevate your mash. Fresh herbs like thyme or rosemary add a lovely touch. You can also sprinkle in garlic powder for extra garlic flavor. If you enjoy cheese, mix in some grated Parmesan for a savory kick. Get creative with how you serve this mash! Use it as a base for grilled chicken or fish. You can also serve it as a side dish with roasted vegetables. Try topping it with sautéed mushrooms or crispy bacon bits for added flavor and texture. After enjoying your roasted garlic cauliflower mash, let it cool. Place it in an airtight container. Store it in the fridge for up to 4 days. This keeps the flavor fresh and the texture nice. If you have more leftovers, freezing is a great option. Put the mash in a freezer-safe bag or container. Make sure to remove excess air. It will last for about 3 months. Label the container with the date so you can keep track. When you're ready to enjoy the mash again, reheat it gently. You can use the microwave or a stovetop. If it seems dry, add a splash of almond milk or butter. Stir it well as you heat it. This keeps it creamy and delicious. Yes, you can make Roasted Garlic Cauliflower Mash ahead of time. Prepare the mash, then let it cool. Store it in an airtight container in the fridge for up to three days. When you’re ready to eat, simply reheat it on the stove or in the microwave. You may need to add a splash of milk to bring back the creamy texture. Yes, cauliflower mash is a low-carb alternative to mashed potatoes. A cup of cooked cauliflower has about 5 grams of carbs, while a cup of mashed potatoes has around 35 grams. This makes cauliflower mash a great choice if you want to cut carbs but still enjoy a creamy side dish. Roasted Garlic Cauliflower Mash pairs well with many dishes. You can serve it with roasted chicken, grilled steak, or pan-seared fish. It also complements sautéed vegetables or a fresh salad. For a hearty meal, try it with a rich mushroom gravy or a savory sauce. The mash's creamy texture and garlic flavor enhance any main dish beautifully. Roasted Garlic Cauliflower Mash is simple and tasty. We covered its key ingredients, from cauliflower to garlic. You can customize it with optional ingredients and garnishes for more flavor. The step-by-step instructions ensure a smooth texture every time. You now have tips to avoid common mistakes. Variations allow for dairy-free or unique flavors. Storing is easy, and leftovers can even be frozen. This mash is a great low-carb option. Try it with your favorite dishes for a perfect side.](https://goldendishy.com/wp-content/uploads/2025/07/e8f9d6da-9905-472e-90b5-76f2ba9b0789-768x768.webp)

![To make this simple and tasty chicken and rice soup, gather these ingredients: - 2 boneless, skinless chicken breasts - 1 cup jasmine rice, thoroughly rinsed - 6 cups chicken broth (preferably low-sodium) - 2 carrots, peeled and diced - 2 stalks celery, chopped - 1 small onion, finely diced - 3 garlic cloves, minced - 1 teaspoon dried thyme - 1 bay leaf - 1 tablespoon extra virgin olive oil - Salt and freshly ground pepper, to taste - 1 cup frozen peas - Juice from 1 fresh lemon - Fresh parsley, roughly chopped (for garnish) Each serving of this chicken and rice soup is packed with nutrition. Here’s a quick look at what you get: - Calories: 300 - Protein: 25g - Carbohydrates: 40g - Fat: 6g - Fiber: 2g This soup is low in fat and rich in protein and carbs, making it a cozy choice for any meal. If you need to swap out some items, here are some ideas: - Chicken: Use shredded rotisserie chicken for a quick option. - Rice: Substitute with brown rice or quinoa for a different texture. - Broth: Vegetable broth works well for a lighter flavor. - Vegetables: Add bell peppers, corn, or spinach for extra nutrition. - Herbs: Fresh herbs like rosemary or dill can replace thyme for a new taste. These substitutions help you make this soup work for your pantry or dietary needs. Enjoy creating your version! Start by gathering your ingredients. You need chicken breasts, jasmine rice, broth, carrots, celery, onion, garlic, thyme, a bay leaf, olive oil, and peas. 1. Heat the olive oil: In a large pot, place the olive oil over medium heat. Wait until it shimmers. 2. Add the vegetables: Toss in the diced onion, carrots, and celery. Sauté these for about 5 minutes. You want them to soften and the onion to look clear. 3. Incorporate garlic: Stir in the minced garlic. Cook this for one minute. The smell should fill your kitchen. 1. Add chicken and broth: Place the chicken breasts into the pot. Pour in the chicken broth. Add thyme, bay leaf, salt, and pepper. 2. Bring to a boil: Turn up the heat until the mixture boils. Then, lower the heat to a gentle simmer. 3. Cook the chicken: Cover the pot and let it simmer for 15-20 minutes. Make sure the chicken cooks fully (165°F or 75°C inside). 1. Shred the chicken: Once cooked, remove the chicken and let it cool. Use two forks to shred it into smaller pieces. 2. Add rice: Stir in the rinsed jasmine rice into the pot. Cover it again and let it simmer for about 15 minutes. The rice should be tender. 3. Finish the soup: Return the shredded chicken to the pot. Add the frozen peas and lemon juice. Taste and adjust salt and pepper if needed. 4. Serve: Remember to take out the bay leaf. Serve hot in bowls. Top with fresh parsley for a nice touch. For the complete recipe, visit [Full Recipe]. To make your chicken and rice soup shine, focus on fresh ingredients. Start with quality chicken broth. Low-sodium broth gives you control over salt levels. Add fresh herbs like thyme and parsley for a bright taste. A splash of lemon juice at the end brightens the flavor too. You can also toss in some fresh garlic for depth. One big mistake is overcooking the chicken. Remove it from the pot once it reaches 165°F. Letting it simmer too long can make it dry. Another common error is not rinsing the rice. Rinsing removes excess starch, which helps keep the soup clear. Avoid adding too much water or broth. You want a nice balance of soup and rice. For a creamy texture, add a splash of heavy cream or coconut milk. Stir it in after you add the chicken back to the pot. You can also blend a portion of the soup. Use an immersion blender to create a creamy base while keeping some chunks intact. This mix gives you both texture and creaminess in every spoonful. Follow the [Full Recipe] for a step-by-step guide to making this comforting dish. {{image_4}} You can easily add veggies to your chicken and rice soup. Chopped carrots, celery, and peas work well. You can also try adding spinach, kale, or zucchini for more color and nutrition. These vegetables add flavor and make your soup more filling. Just toss them in during the last few minutes of cooking. This way, they will stay bright and fresh. If you like a kick, make a spicy version. Add diced jalapeños or red pepper flakes for heat. A splash of hot sauce or a spoonful of sriracha can also spice things up. Just keep in mind to adjust the salt. You want a balance of flavors. This spicy twist can warm you up on a cold day! Using a slow cooker makes this recipe even easier. Simply add all your ingredients into the slow cooker. Set it on low for 6-8 hours or high for 3-4 hours. This method allows all the flavors to blend beautifully. Plus, you can come home to a warm, tasty meal. Check out the Full Recipe for detailed steps and measurements. After you finish your chicken and rice soup, let it cool down. This helps keep the soup fresh. Transfer it to an airtight container. It will stay good in the fridge for 3 to 4 days. Make sure to label the container with the date. This way, you’ll know when to eat it. If you want to save some soup for later, freezing works great. First, let the soup cool completely. Then, pour it into freezer-safe bags or containers. Leave some space at the top for expansion. You can freeze it for up to 3 months. When you’re ready to eat, just thaw it overnight in the fridge. To reheat your soup, pour it into a pot. Heat it on medium-low heat. Stir it often to ensure it warms evenly. If the soup seems too thick, add a splash of broth or water. You can also microwave it in a safe bowl. Heat it in short intervals, stirring in between. This ensures every bite is warm and tasty. Enjoy your cozy meal! For the full recipe, check out the Cozy Chicken & Rice Delight section. Yes, you can use brown rice. Brown rice adds a nutty flavor and is more nutritious. However, it takes longer to cook. You should adjust the cooking time. Add brown rice early when you add the broth, and let it simmer for 40-45 minutes. This way, the rice becomes tender and blends well with the soup. To make the soup gluten-free, you need to check a few things. First, use a gluten-free chicken broth. Many brands offer gluten-free options. Also, make sure your rice is certified gluten-free. Jasmine rice is usually safe, but always check the label. By following these steps, your soup will be gluten-free and just as tasty. You can serve many tasty sides with your soup. Here are some great options: - A fresh green salad - Crusty bread or rolls - Garlic breadsticks - Steamed vegetables These sides will make your meal complete and satisfying. For more ideas, feel free to check the Full Recipe and explore different serving suggestions. We reviewed the key steps to make Chicken and Rice Soup, from choosing the right ingredients to cooking methods. You learned helpful tips to enhance flavor and avoid common mistakes. Variations and storage details ensure this dish suits your taste and convenience. Trust these insights to create a tasty soup every time. Enjoy warm bowls of nourishment that you made with care. Happy cooking!](https://goldendishy.com/wp-content/uploads/2025/06/7617fd4a-61d9-414c-8819-76abcb6635e5-768x768.webp)

![To make maple glazed butternut squash, you’ll need the following items: - 1 medium butternut squash, peeled and cut into 1-inch cubes - 3 tablespoons pure maple syrup - 2 tablespoons extra virgin olive oil - 1 teaspoon ground cinnamon - 1/2 teaspoon freshly grated nutmeg - 1/4 teaspoon cayenne pepper (optional, for a kick) - Sea salt and freshly cracked black pepper, to taste - 1/4 cup pecans, roughly chopped (for garnish) - Fresh parsley, finely chopped (for garnish) When cooking, measuring accurately is key. Use dry measuring cups for solid items like squash and nuts. For liquids, use a liquid measuring cup. Always level off dry ingredients with a straight edge. This step ensures you get the right amount for best results. You can swap ingredients based on your needs. If you prefer a sweeter taste, try honey instead of maple syrup. For a nut-free option, skip the pecans or use seeds like pumpkin seeds. Always check for allergies, especially with nuts and spices. To make maple glazed butternut squash, start by gathering your ingredients. You'll need: - 1 medium butternut squash, peeled and cut into 1-inch cubes - 3 tablespoons pure maple syrup - 2 tablespoons extra virgin olive oil - 1 teaspoon ground cinnamon - 1/2 teaspoon freshly grated nutmeg - 1/4 teaspoon cayenne pepper (optional) - Sea salt and freshly cracked black pepper, to taste - 1/4 cup pecans, roughly chopped (for garnish) - Fresh parsley, finely chopped (for garnish) First, preheat your oven to 400°F (200°C). This step is key for good roasting. Next, peel and cube the butternut squash. Place the cubes in a large bowl. Drizzle the olive oil and maple syrup over the squash. Then, sprinkle the ground cinnamon, nutmeg, cayenne, sea salt, and black pepper. Toss gently until all the pieces are well coated. Now, it's time to roast your squash. Line a baking sheet with parchment paper. This helps prevent sticking and makes cleanup easy. Spread the coated squash in a single layer on the sheet. Place the baking sheet in the oven. Roast the squash for 25-30 minutes. About halfway through the cooking time, stir the squash. This ensures all sides caramelize and cook evenly. When the squash is fork-tender and has a nice golden color, it's done. Remove it from the oven and let it cool for 2-3 minutes. To get that perfect caramelization, watch your cooking time closely. Stirring halfway through helps. The key is to spread the squash out evenly. If it's too crowded, it will steam instead of roast. You can also adjust the maple syrup for sweetness. A little extra can help with caramelization. If you like a kick, add the cayenne pepper. It balances the sweet and savory flavors beautifully. Once cooked, transfer the squash to a serving dish. Top with chopped pecans and parsley for a fresh touch. This dish is sure to impress! For the complete recipe, check out the [Full Recipe]. When making maple glazed butternut squash, avoid cutting the squash too small. Smaller pieces cook too fast and can burn. Also, don’t skip the olive oil. It helps the squash caramelize and adds flavor. Overcrowding the baking sheet is another mistake. Leave space between the cubes to ensure even cooking. To boost the flavor, add a splash of balsamic vinegar before roasting. This adds depth to the sweetness. Try different spices, too. A pinch of smoked paprika can give a nice twist. For a savory touch, mix in garlic powder or fresh garlic. These will elevate your dish. Use a sturdy baking sheet lined with parchment paper. This helps with easy cleanup and prevents sticking. A large mixing bowl is great for tossing the squash and spices. If you have one, a vegetable peeler makes peeling the squash quick and easy. For a perfect roast, an oven thermometer ensures your oven is at the right temperature. For the full recipe, refer to the above instructions. {{image_4}} You can make this dish even better by adding other veggies. Try sweet potatoes for a richer flavor. Carrots add sweetness and color, while red onions bring a slight bite. Just cut them into similar sizes as the squash. Toss them in the same maple glaze for a yummy blend. You’ll create a colorful and flavorful dish that everyone will love. Want to change the taste? You can use different spices. Try ginger for a warm kick. If you like it spicy, add more cayenne pepper. You can also use smoked paprika for a smoky flavor. Experiment with herbs like thyme or rosemary. Just remember to keep it balanced, so no single flavor overpowers the dish. This recipe is naturally vegan and gluten-free. You can enjoy it without worry. If you want to add protein, try chickpeas. They pair well with the flavors and add a nice crunch. For those who need low-carb options, skip the maple syrup and use a sugar substitute. It’s easy to adapt this dish to fit your needs. For the full recipe, check out the detailed instructions above. To keep your maple glazed butternut squash fresh, store it in an airtight container. Let the squash cool down after cooking. Then, place it in the fridge. It will stay fresh for about 3 to 5 days. If you want to keep it longer, consider freezing. Reheat your butternut squash in the oven for the best results. Preheat your oven to 350°F (175°C). Spread the squash on a baking sheet. Heat it for about 10-15 minutes or until warm. You can also use the microwave. Place it in a microwave-safe dish and cover it. Heat in short bursts, checking to avoid overcooking. Freezing is a great way to save this dish for later. First, let the squash cool completely. Then, spread it on a baking sheet in a single layer. Freeze it for about 1-2 hours until firm. Once frozen, transfer the squash to a freezer-safe bag or container. It can last for up to 3 months in the freezer. When ready to eat, thaw overnight in the fridge before reheating. For more details, check the Full Recipe. Yes, you can prepare this dish ahead of time. Cook the butternut squash and let it cool. Store it in an airtight container in the fridge. You can make it up to two days in advance. When you're ready to eat, just reheat it in the oven or microwave. This makes it great for meal prep. Maple glazed butternut squash lasts about 3 to 5 days in the fridge. Make sure it’s in a sealed container. Check for any signs of spoilage before eating. If it looks or smells off, it’s best to toss it. Freshness is key for enjoying this tasty dish. You can pair this dish with many foods. It goes well with roasted chicken or turkey. You can also serve it with quinoa or brown rice for a healthy meal. For a vegetarian option, pair it with a bean salad. The sweet and savory flavors work well with many sides. For more details on how to whip up this incredible dish, check out the Full Recipe. This guide walked you through each step of making Maple Glazed Butternut Squash. We covered ingredients, how to prepare, cook, and store your dish. I shared tips to avoid mistakes and ideas for adding your own twist. Remember, the key to perfect caramelization is patience. Enjoy experimenting with flavors and variations. This dish can be a crowd-pleaser and is easy to adapt. I hope you feel ready to try it out. Enjoy your cooking!](https://goldendishy.com/wp-content/uploads/2025/07/e9e7eb41-1a1b-4d7a-9d20-35ffe8b1aa92-768x768.webp)