Teriyaki Salmon Bowls Flavorful and Easy Dinner Guide

Are you ready to enjoy a delicious and healthy dinner? Teriyaki Salmon Bowls are not just flavorful; they are also quick and easy to make. With a few simple steps, you can create a dish that impresses your family and friends. In this guide, I’ll show you how to prepare mouthwatering teriyaki salmon, choose the right ingredients, and even provide tasty variations for everyone. Let’s dive into this tasty adventure!
Why I Love This Recipe
- Healthy and Nutritious: This teriyaki salmon bowl is packed with omega-3 fatty acids from the salmon, fiber from the quinoa or brown rice, and a variety of vitamins from the fresh vegetables.
- Quick and Easy: With a total preparation time of just 40 minutes, this dish is perfect for busy weeknights or a last-minute dinner idea.
- Flavor Explosion: The homemade teriyaki sauce combines sweet, savory, and umami flavors, making every bite of this salmon bowl incredibly delicious.
- Customizable: You can easily swap out the vegetables or grains based on your preferences or what you have on hand, making this recipe versatile and adaptable.
Ingredients
List of Ingredients
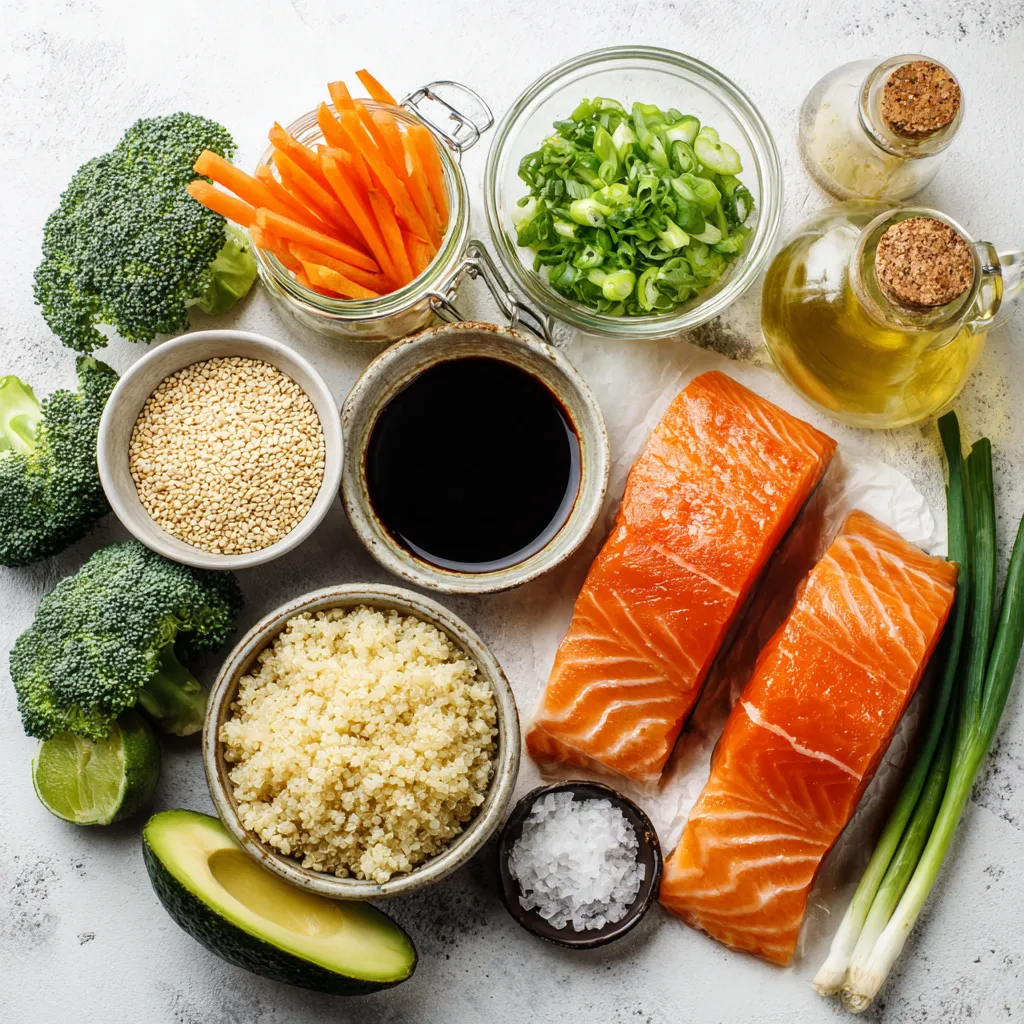
– 2 fresh salmon fillets (6 oz each)
– 1/4 cup low-sodium soy sauce
– 2 tablespoons honey
– 1 tablespoon sesame oil
– 1 tablespoon rice vinegar
– 1 teaspoon fresh ginger, finely grated
– 1 teaspoon garlic, finely minced
– 1 cup quinoa or brown rice, cooked
– 1 cup broccoli florets, trimmed
– 1/2 cup carrots, thinly sliced
– 1/2 ripe avocado, carefully sliced
– 2 green onions, finely chopped
– Sesame seeds, for garnish
– Salt and pepper, to taste
Optional Ingredients for Added Flavor
– Red pepper flakes for heat
– Lime juice for a tangy twist
– Cashews for crunch
– Cilantro for freshness
These optional ingredients can take your teriyaki salmon bowls to another level. A sprinkle of red pepper flakes can add a nice kick. Fresh lime juice brightens the dish. Cashews give a crunchy texture, while cilantro adds a fresh note.
Nutritional Information per Serving
– Calories: 550
– Protein: 30g
– Carbohydrates: 50g
– Fat: 25g
– Fiber: 9g
– Sodium: 600mg
This meal is packed with protein and healthy fats. The fiber from quinoa and veggies helps keep you full. It’s a great choice for a balanced dinner.

Step-by-Step Instructions
Preparing the Teriyaki Sauce
To make the teriyaki sauce, gather your ingredients. You need low-sodium soy sauce, honey, sesame oil, rice vinegar, ginger, and garlic. In a small bowl, whisk them together until smooth. This sauce adds a sweet and savory flavor to the salmon. It is easy to make and brings everything together.
Marinating the Salmon
Now, take your fresh salmon fillets. Place them skin-side down in a shallow dish. Pour half of the teriyaki sauce over the fillets. Make sure they are well-coated. Cover the dish with plastic wrap and let it marinate for at least 15 minutes. This step is key for flavor.
Cooking the Grains and Steaming Vegetables
While the salmon marinates, cook your grains. You can use quinoa or brown rice. Follow the package instructions for cooking time. Once done, fluff it with a fork. Next, steam the broccoli and carrots in a steaming pot for about 5-7 minutes. They should be tender but still bright and crunchy.
Cooking the Salmon and Assembling the Bowls
Heat a non-stick skillet over medium heat. Place the marinated salmon fillets skin-side down in the skillet. Cook for 4-5 minutes. Gently flip them and cook for another 4-5 minutes. Brush the fillets with the remaining teriyaki sauce while cooking. Once cooked, the salmon should flake easily.
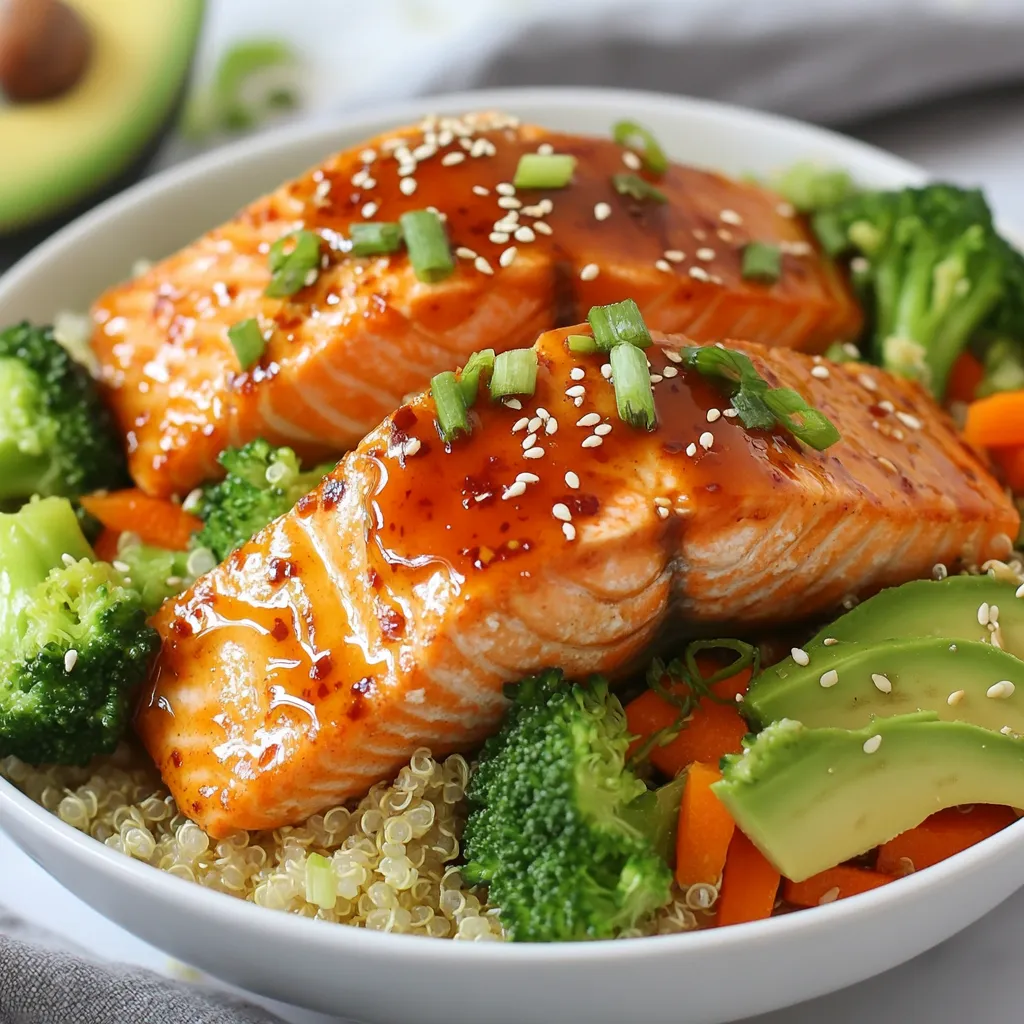
To assemble the bowls, start with a layer of quinoa or rice as the base. Next, add the steamed broccoli and carrots around the grains. Finally, place a perfectly cooked salmon fillet on top of the vegetables.
Final Garnishing Techniques
For the final touch, slice half an avocado and place it on the side of the bowl. Sprinkle chopped green onions over the salmon. Finish with a light dusting of sesame seeds. This adds flavor and makes the dish look beautiful. For extra flavor, drizzle any leftover teriyaki sauce before serving.
Tips & Tricks
Best Cooking Methods for Salmon
The best way to cook salmon is in a skillet. A non-stick skillet keeps the fish from sticking and makes cleanup easy. You can also bake or grill salmon for a tasty flavor. Baking will keep the fish tender and juicy. Grilling adds a nice char and smokiness.
Marination Time Recommendations
I suggest marinating the salmon for at least 15 minutes. This time lets the flavors soak in. If you have more time, marinating for 30 minutes to an hour works even better. Just remember not to marinate too long. The soy sauce can make the fish too salty.
Suggestions for Perfectly Cooked Rice or Quinoa
For fluffy quinoa or rice, follow the package cooking instructions. Rinse the grains before cooking to remove extra starch. This step helps achieve a light texture. After cooking, let the grains sit for 5 minutes, then fluff them with a fork. This makes the rice or quinoa nice and airy.
Pro Tips
- Use Fresh Ingredients: Always opt for fresh salmon and vibrant vegetables to enhance the flavor and nutritional value of your dish.
- Adjust the Marinade: Feel free to tweak the teriyaki sauce ingredients to suit your taste—add more honey for sweetness or extra ginger for a spicy kick!
- Perfectly Cooked Salmon: Cook salmon skin-side down first; this helps to keep the fillet moist and allows the skin to crisp up beautifully.
- Meal Prep Friendly: Prepare extra quinoa or brown rice and vegetables to use for meal prep throughout the week. They pair well with various proteins!

Variations
Alternative Protein Options
You can swap salmon for other proteins. Chicken breast works well with teriyaki sauce. Just marinate and cook it like you do with salmon. Tofu is another great choice. It soaks up the sauce nicely. Use firm tofu for the best texture. Cook it until golden for a nice crunch. Shrimp is also a fun option. Just be sure to adjust cooking times, as shrimp cooks quickly.
Vegan Adaptations
To make this dish vegan, replace salmon with jackfruit or tempeh. Jackfruit has a meaty texture and absorbs flavors well. Marinate it in the same teriyaki sauce. For tempeh, steam it first for a softer bite. Then, marinate and cook it as you would with salmon. You can also use cauliflower steaks. They grill nicely and add a great flavor.
Different Vegetable Combinations
Feel free to mix and match your veggies. Bell peppers add a sweet crunch. Snap peas bring a fresh taste. Zucchini or squash can be sliced and steamed, too. You can also include edamame for a protein boost. Just be creative with what you have! The goal is to keep the colors bright and flavors bold. Remember to steam or sauté until tender but crisp. Enjoy the variety!
Storage Info
How to Store Leftovers
To keep your teriyaki salmon bowls fresh, store the leftovers in an airtight container. Place the salmon, quinoa or rice, and vegetables in separate sections if possible. This keeps the flavors intact. You can store the leftovers in the fridge for up to three days.
Reheating Techniques
When you’re ready to enjoy the leftovers, use a microwave or a skillet. If using a microwave, heat for one minute, then stir and heat in 30-second bursts until warm. If using a skillet, add a splash of water and cover. Heat over medium-low until everything warms up. This keeps the salmon moist.
Freezing Options for Meal Prep
You can freeze the individual parts of the teriyaki salmon bowls. Make sure to use freezer-safe containers. Store the salmon, grains, and veggies in separate bags or containers. They can last up to three months in the freezer. When you’re ready to eat, thaw in the fridge overnight. Then, reheat as mentioned above. This makes meal prep easy and delicious!
FAQs
Can I use other sauces besides teriyaki?
Yes, you can use other sauces. Soy sauce, hoisin, or a sweet chili sauce work well too. Each sauce brings a unique flavor. Experimenting can add fun twists to your dish. If you like a spicy kick, try sriracha mixed with soy sauce. Just make sure to balance flavors with sweetness or acidity.
What side dishes pair well with Teriyaki Salmon Bowls?
Many side dishes complement Teriyaki Salmon Bowls. Here are a few ideas:
– Steamed edamame
– Cucumber salad
– Miso soup
– Pickled vegetables
These sides add freshness and crunch. They also enhance the meal’s overall taste.
How can I adjust the recipe for more servings?
To make more servings, simply increase the ingredients. Use a larger amount of salmon and grains. For example, use four salmon fillets if serving four people. Adjust the sauce too. A double batch of the teriyaki sauce works well. Keep the ratio of sauce to salmon the same for the best flavor.
Can I make this dish ahead of time?
Yes, you can prepare parts ahead of time. Cook the grains and steam the veggies in advance. Store them in the fridge for up to three days. You can also marinate the salmon earlier. For the best taste, cook the salmon fresh right before serving. This keeps it tender and flaky.
This blog post covered making Teriyaki Salmon Bowls from start to finish. We discussed key ingredients, step-by-step cooking methods, and useful tips for success. You learned about variations for protein and vegetables, plus storage options.
Experimenting with flavors will make this dish your own. Enjoy your cooking journey and try new things along the way. These bowls are not just tasty; they’re easy and fun to make. With practice, you’ll find what works best for you and your famil

Teriyaki Salmon Bowls
Ingredients
- 2 fillets fresh salmon fillets (approximately 6 oz each)
- 0.25 cup low-sodium soy sauce
- 2 tablespoons honey
- 1 tablespoon sesame oil
- 1 tablespoon rice vinegar
- 1 teaspoon fresh ginger, finely grated
- 1 teaspoon garlic, finely minced
- 1 cup quinoa or brown rice, cooked
- 1 cup broccoli florets, trimmed
- 0.5 cup carrots, thinly sliced
- 0.5 fruit ripe avocado, carefully sliced
- 2 stalks green onions, finely chopped
- 1 tablespoon sesame seeds, for garnish
- to taste salt and pepper
Instructions
- Prepare the Teriyaki Sauce: In a small mixing bowl, thoroughly whisk together the low-sodium soy sauce, honey, sesame oil, rice vinegar, grated ginger, and minced garlic until the mixture is smooth and well-blended.
- Marinate the Salmon: In a shallow dish, place the salmon fillets skin-side down. Generously pour half of the prepared teriyaki sauce over the fillets, ensuring they are well-coated. Cover with plastic wrap and allow the salmon to marinate for a minimum of 15 minutes to absorb the flavors.
- Cook the Grains: While the salmon is marinating, prepare the quinoa or brown rice according to the package instructions. Once cooked, remove it from heat and fluff it gently with a fork to separate the grains.
- Steam the Vegetables: In a steaming pot or a microwave steamer, add the broccoli florets and sliced carrots. Steam them for about 5-7 minutes, until they are tender but still vibrant green, retaining their nutrients and crunch.
- Cook the Salmon: Heat a non-stick skillet over medium heat. Carefully place the marinated salmon fillets in the skillet, skin-side down. Cook for 4-5 minutes, then gently flip and continue cooking for another 4-5 minutes. Brush the fillets with the remaining teriyaki sauce during cooking to enhance their flavor. The salmon should be cooked through and flake easily with a fork.
- Assemble the Bowls: In each serving bowl, scoop a generous layer of quinoa or brown rice as the base. Next, elegantly arrange the steamed broccoli and carrots around the grains, and place a beautifully cooked salmon fillet right on top of the vegetables.
- Garnish: Artfully add the sliced avocado on the side, sprinkle chopped green onions over the top, and finish with a light dusting of sesame seeds for texture and visual appeal.
- Serve: For an extra burst of flavor, drizzle any remaining teriyaki sauce over the assembled bowls right before serving.


![- 12 oz fettuccine or pappardelle pasta - 2 cups butternut squash, peeled and cubed - 1 tablespoon olive oil The base of this dish is fettuccine or pappardelle pasta. I love these shapes as they hold the creamy sauce well. You will also need fresh butternut squash. It gives the dish a warm color and sweet flavor. Using olive oil helps with roasting and adds richness to the pasta. - 1 small onion, diced - 2 cloves garlic, minced - 1 teaspoon freshly grated nutmeg Onions and garlic add depth to the sauce. Dicing the onion makes it cook evenly. Minced garlic gives a punch of flavor. Nutmeg brings warmth and a hint of spice, making the dish cozy and inviting. - 1 cup vegetable broth - 1 cup coconut milk (or heavy cream for a non-vegan option) - ½ cup grated Parmesan cheese (optional) For the sauce, you need vegetable broth for a savory base. Coconut milk adds creaminess and a hint of sweetness. If you prefer, heavy cream works too. Adding Parmesan cheese can enhance the flavor, but it's optional. - Salt and freshly cracked pepper to taste - Fresh sage leaves for garnish Season with salt and cracked pepper to bring everything together. Fresh sage leaves add a lovely touch. They not only look nice but also add an aromatic flavor that complements the dish well. These ingredients create a lovely balance of flavors in the creamy butternut squash pasta. For the full recipe, check out the detailed instructions to make this delicious meal. - Preheat your oven to 400°F (200°C). - Toss the cubed butternut squash in olive oil, salt, and pepper. - Spread the squash on a baking sheet. Roast for 20-25 minutes. The squash should be tender and have a light caramel color. - Bring a large pot of salted water to a boil. - Add the pasta and cook it as per package instructions. - Before draining, reserve 1 cup of the pasta water. This helps adjust your sauce later. - Heat olive oil in a large skillet over medium heat. - Add diced onion and sauté until soft, about 5 minutes. - Stir in minced garlic and cook for about 1 minute. - Blend the roasted squash with the sautéed onion, garlic, vegetable broth, and coconut milk. Use an immersion blender or a regular blender. - Return the blended sauce to the skillet and heat on low. - Add the cooked pasta and gradually mix in the reserved pasta water. - Stir well until the pasta is coated with the sauce. - If you like, stir in the Parmesan cheese. - Taste and adjust seasoning with salt and pepper as needed. - Plate the pasta in shallow bowls for a nice look. - Garnish with fresh sage leaves and drizzle a little olive oil on top. For a detailed guide, check out the Full Recipe. Enjoy your creamy butternut squash pasta! To get a creamy consistency, blend the roasted butternut squash well. You want it smooth. Use an immersion blender for easy mixing. If it’s too thick, add a splash of pasta water. This helps the sauce cling to the noodles. Want to add more flavor? Try spices like cinnamon or a pinch of chili powder. Fresh herbs, such as thyme or rosemary, can boost taste too. You can also add veggies like spinach or kale for added nutrition. They cook quickly and blend well with the sauce. Pair creamy butternut squash pasta with a simple salad. A mix of greens with a light vinaigrette works well. For drinks, a glass of white wine like Sauvignon Blanc complements the dish nicely. If you prefer non-alcoholic options, try sparkling water with a slice of lemon. These sides enhance the meal and make it even more enjoyable. For the full recipe, check out [Full Recipe]. {{image_4}} You can easily adjust creamy butternut squash pasta to fit different diets. For a vegan option, swap heavy cream with coconut milk and skip the cheese. This change still gives you a creamy sauce that tastes great. If you need gluten-free pasta, use rice or corn-based noodles. These options keep the dish light and tasty. Experimenting with different ingredients can make this dish exciting. Instead of butternut squash, try using acorn or delicata squash. Each type has its unique flavor and texture. For cheese, you can use feta for a tangy twist or goat cheese for a creamy finish. These swaps let you create new flavor combinations that keep things fresh. To make this dish more seasonal, add roasted vegetables like Brussels sprouts or carrots. This not only enhances the flavor but also adds color. Making creamy butternut squash pasta in fall is perfect. You can enjoy the warmth of the season with every bite. Try using spices like cinnamon or cloves for a cozy feel. For the full recipe, check out the complete guide and enjoy the rich flavors! To store leftover creamy butternut squash pasta, let it cool first. Then, place it in an airtight container. Glass or BPA-free plastic containers work best. Make sure to seal them tightly to keep the air out. This helps keep the pasta fresh and tasty. Store the container in the fridge for up to four days. Yes, you can freeze this dish! To do this, use a freezer-safe container. Leave some space at the top for expansion. It is best to freeze the pasta without the cheese added. This helps keep the texture right. When you are ready to eat, move the container to the fridge to thaw overnight. To reheat, use a skillet over low heat. Add a splash of vegetable broth or water to help it warm up evenly. In the fridge, creamy butternut squash pasta lasts for about four days. After that, the taste and quality may drop. Always check for signs of spoilage. If the pasta smells sour or has a strange texture, it’s best to throw it away. Enjoy your creamy butternut squash pasta fresh! For the full recipe, visit [Full Recipe]. It takes about 40 minutes to make creamy butternut squash pasta. The prep time is 10 minutes. Cooking the dish takes about 30 minutes. You will spend 20-25 minutes roasting the squash. Boiling the pasta adds another 10-12 minutes. This dish is quick and easy for a weeknight meal! Yes, you can use many types of pasta. Fettuccine and pappardelle work well for this sauce. You can also try penne or rigatoni for a fun twist. Each shape holds the sauce differently, so feel free to experiment! Absolutely! To make it nut-free, use coconut milk instead of cream. If you want a non-vegan option, use heavy cream instead. You can skip any nuts in the garnish. This keeps the dish creamy and delicious without nuts. You can serve this dish with many sides. A crisp green salad pairs well. Try a side of garlic bread for extra comfort. For dessert, pumpkin pie or apple crisp can be great choices. These options enhance the cozy vibe of the meal. To reheat, use a skillet over low heat. Add a splash of water or broth to the pasta. This helps keep the sauce creamy. Stir until heated through. You can also use the microwave, but stir halfway for even heating. Enjoy your leftovers just as much! This creamy butternut squash pasta combines hearty flavors and texture. We roasted the squash and blended it with garlic and onion to create a rich sauce. You learned how to make it creamy, adjust seasoning, and even swap ingredients. In the end, this dish is versatile and perfect for any meal. Enjoy experimenting with flavors and sharing this delightful recipe with friends and family.](https://goldendishy.com/wp-content/uploads/2025/07/000431ad-92db-4f90-88d6-bb841745a08c-768x768.webp)