Taco Stuffed Zucchini Boats Flavorful and Healthy Meal

Looking for a meal that’s both tasty and healthy? Taco Stuffed Zucchini Boats are the answer! These fun, flavorful creations allow you to enjoy classic taco flavors while cutting down on carbs. In this post, I’ll guide you step-by-step through a simple recipe that delights your taste buds and nourishes your body. Get ready to impress family and friends with this scrumptious dish! Let’s dive into the ingredients and cooking process!
Ingredients
Complete List of Ingredients
– Zucchini and Protein:
– 4 medium zucchinis
– 1 lb ground turkey or ground beef
– Vegetables and Beans:
– 1 can black beans, rinsed and drained
– 1 cup corn kernels (fresh or frozen)
– 1 small onion, finely chopped
– 2 cloves garlic, minced
– Spices:
– Chili powder
– Ground cumin
– Smoked paprika
– Salt and pepper to taste
– Toppings:
– 1 cup shredded cheddar cheese
– 1 cup salsa (your choice of spice level)
– Fresh cilantro, chopped (for garnish)
– Sour cream (for serving)
Using these fresh ingredients makes your Taco Stuffed Zucchini Boats tasty and healthy. Start with firm zucchinis for the best texture. Ground turkey is lean, while beef offers rich flavor. Black beans add protein and fiber. Corn gives a nice sweetness. The onion and garlic provide a savory base. Spices like chili powder and cumin bring warmth and depth. Topping with cheese, salsa, and cilantro boosts flavor and looks great.
Step-by-Step Instructions
Preparation Steps
– Preheat the Oven: Set your oven to 375°F (190°C) to get it ready.
– Prepare the Zucchini Boats: Cut each zucchini in half lengthwise. Use a spoon to scoop out the middle, making a hollow ‘boat’. Save the scooped-out flesh for later.
Cooking the Filling
– Sautéing Aromatics: In a large skillet, heat olive oil over medium heat. Add the chopped onion and minced garlic. Sauté until the onion is soft, about 3-4 minutes.
– Cooking the Meat: Increase the heat a bit and add ground turkey or beef. Cook until it browns, breaking it apart as it cooks.
Stuffing and Baking
– Combining Ingredients: Once the meat is cooked, mix in the reserved zucchini flesh, black beans, corn, chili powder, cumin, paprika, and season with salt and pepper. Cook this mix for 5 minutes to blend the flavors.
– Stuffing the Zucchini Boats: Spoon the tasty filling into each hollow zucchini half. Press down gently to pack them well.
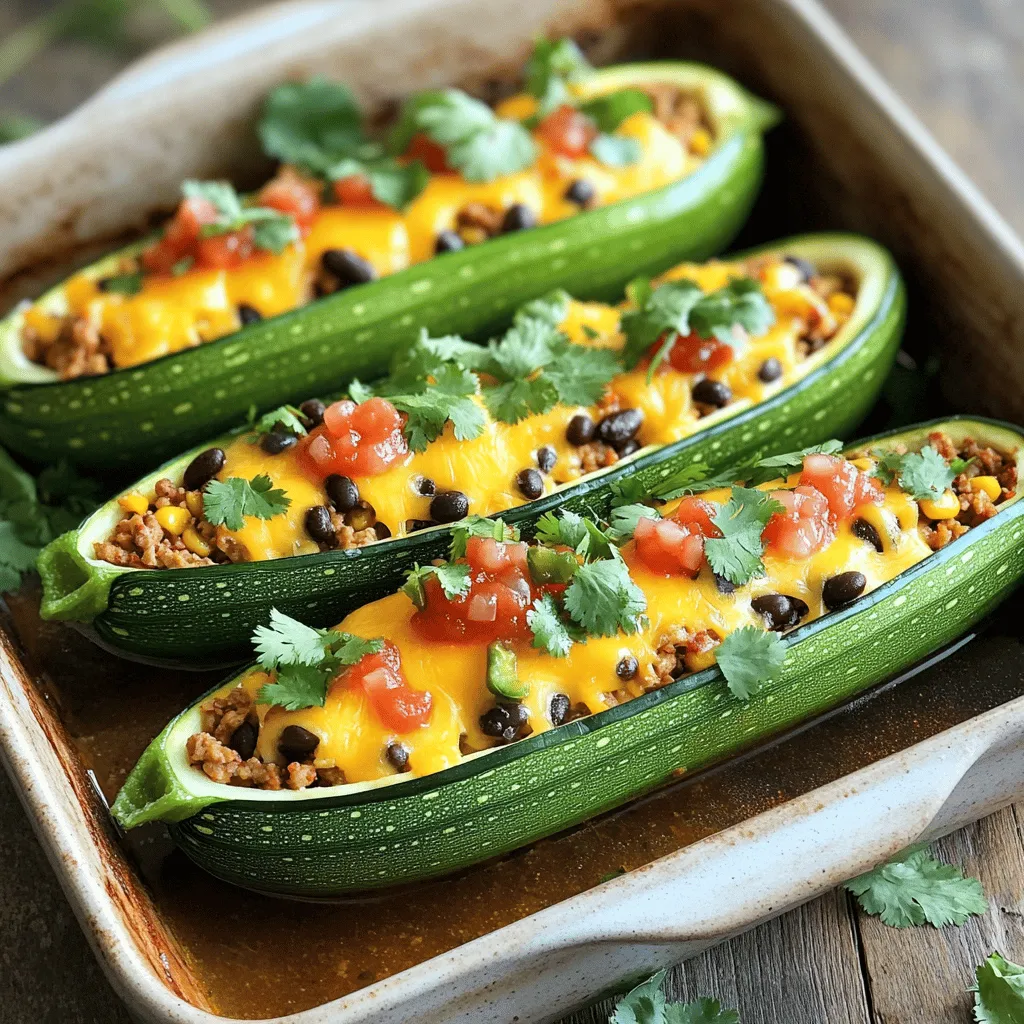
– Baking Instructions: Place the stuffed zucchini boats in a baking dish. Top each boat with salsa and shredded cheddar cheese. Cover the dish with foil and bake for 25 minutes. Remove the foil and bake for another 10 minutes, or until the cheese melts and bubbles.
These steps will help you create a flavorful and healthy meal with Taco Stuffed Zucchini Boats.
Tips & Tricks
Perfecting the Recipe
To hollow out zucchini without breaking them, use a sharp knife. Cut the zucchini in half lengthwise. Then, take a spoon and gently scoop out the center, leaving a thin wall. This keeps your boats sturdy. Be careful not to scoop too much. Save the flesh you remove; it adds flavor to your filling.
If you want meat alternatives, try using lentils or chickpeas. They work great in place of ground turkey or beef. You can also use cooked quinoa for a tasty twist. These options make it easy to enjoy a meat-free meal without losing flavor.
Flavor Enhancements
Adding extra spices can elevate your dish. Consider mixing in some cumin or smoked paprika for depth. If you want heat, toss in jalapeños or chili flakes. These spices bring a new layer of flavor that excites the palate.
For cheese, while cheddar is classic, feel free to explore. Try using pepper jack for a spicy kick or mozzarella for a mild taste. Each cheese choice gives your taco stuffed zucchini boats a different twist. Experimenting with cheese can lead to exciting new flavors that you and your guests will love.

Variations
Different Fillings
You can switch up the filling for Taco Stuffed Zucchini Boats to meet your taste.
– Vegetarian Option: For a meatless version, use black beans or lentils. Add more veggies like bell peppers, corn, or diced tomatoes. This adds color and flavor while keeping it nutritious. You can make it creamy by adding some avocado or a dollop of sour cream on top.
– Spicy Twist: If you like heat, add jalapeños or a splash of hot sauce. You can also mix in diced green chilies for a kick. Try different spices too, like cayenne or chipotle powder, to give your boats an extra flavor boost.
Serving Suggestions
Serving Taco Stuffed Zucchini Boats can be fun and versatile.
– Side Dishes: Pair these boats with simple sides. A light salad or Mexican rice works well. You can also serve tortilla chips with salsa or guacamole for a great crunch.
– Meal Prep Ideas: These boats are perfect for meal prep. You can make a batch on Sunday and enjoy them all week. Just store them in the fridge. Heat them in the oven or microwave when ready to eat. This makes lunch or dinner easy and tasty.
Storage Info
Storing Leftovers
To store your Taco Stuffed Zucchini Boats, let them cool first. Then, place them in an airtight container. They will stay fresh in the fridge for up to three days.
For reheating, I suggest using the oven. Preheat it to 350°F (175°C). Place the zucchini boats in a baking dish and cover with foil. Bake for about 15 to 20 minutes. This helps keep the zucchini moist and the cheese melty.
Freezing Instructions
If you want to freeze the zucchini boats, it’s best to do this before baking. After you stuff the zucchini, wrap each boat in plastic wrap, or place them in a freezer-safe bag. They will last up to three months in the freezer.
When you’re ready to eat them, remove them from the freezer. Thaw in the fridge overnight.This way, you can enjoy a quick and healthy meal anytime!
FAQs
Common Questions
How long do Taco Stuffed Zucchini Boats take to bake?
These tasty boats bake for about 35 minutes in total. First, cover them with foil and bake for 25 minutes. Then, remove the foil and bake for an extra 10 minutes. This ensures the cheese is melted and the zucchini is tender.
Can I prepare these boats in advance?
Yes, you can prepare them ahead of time. Stuff the zucchini and store them in the fridge for up to 24 hours. Just bake them when you’re ready to eat. This makes meal prep easy and quick!
What can I use instead of zucchini for this recipe?
You can use bell peppers, eggplant, or even large mushrooms. Each option offers a unique taste and texture. Just make sure to adjust the cooking time if needed.
How to make Taco Stuffed Zucchini Boats gluten-free?
To keep them gluten-free, ensure all your ingredients are gluten-free. Use gluten-free salsa and check that your spices are safe. Ground turkey and beans are already gluten-free, so you’re good there!
In this blog post, we explored how to create delicious Taco Stuffed Zucchini Boats. We covered ingredients, step-by-step cooking instructions, and tips for perfecting your dish. You can customize fillings and toppings to fit your taste. Remember, zucchini boats are not just healthy; they’re also fun to make. Use these ideas to try something new in your kitchen. Enjoy your cooking adventure with these tasty boats!


![For perfect Greek lemon potatoes, gather these simple ingredients: - 2 pounds baby potatoes, halved - 1 cup chicken or vegetable broth - 2 tablespoons extra virgin olive oil - 3 tablespoons freshly squeezed lemon juice - 2 teaspoons fresh lemon zest - 4 cloves garlic, minced - 1 tablespoon dried oregano - Sea salt and freshly cracked pepper to taste - Fresh parsley, chopped (for garnish) You can swap baby potatoes for Yukon Gold or red potatoes. Both work well and add great taste. If you want a vegan option, use vegetable broth instead of chicken broth. Fresh lemon juice is best, but bottled works in a pinch. You can add fresh herbs like thyme or rosemary to change the flavor. For a spicy kick, consider a pinch of red pepper flakes. Using high-quality ingredients makes a big difference. Fresh potatoes give the best texture and flavor. Extra virgin olive oil adds richness. Fresh lemon juice and zest brighten the dish. Quality broth enhances the taste. When you use good ingredients, you create an authentic Greek experience. They help your dish shine and make every bite delicious. Check out the Full Recipe for more tips and tricks on how to make these zesty potatoes. To make Greek lemon potatoes, start by gathering your ingredients. You need baby potatoes, broth, olive oil, fresh lemon juice, lemon zest, garlic, oregano, salt, and pepper. 1. Preheat the oven to 425°F (220°C). This heat helps the potatoes become crispy. 2. Halve the baby potatoes. This allows them to soak up all the flavors. 3. In a large bowl, mix the broth, olive oil, lemon juice, lemon zest, garlic, oregano, salt, and pepper. Stir well to combine. 4. Add the halved potatoes to the bowl. Toss them until they are fully coated with the mixture. Once your potatoes are ready, it’s time to roast them. 1. Pour the potato mix into a roasting pan. Spread the potatoes out in a single layer. This step ensures they cook evenly. 2. Roast in the oven for about 30-35 minutes. Check for a golden brown color and fork-tender texture. 3. Stir the potatoes halfway through roasting. This helps them absorb more flavors and become crispy all around. Sometimes things don’t go as planned. Here are some tips to help. - If your potatoes are not browning, increase the oven temperature by 25°F. This can help them crisp up. - If they seem too dry, add a splash more broth. This will keep them moist and flavorful. - If they are not tender after 35 minutes, roast them a bit longer. Just keep an eye on them to prevent burning. For a full recipe, refer to the [Full Recipe]. Enjoy the deliciousness of Greek lemon potatoes! To boost the taste of Greek lemon potatoes, use fresh ingredients. Fresh garlic and herbs add a lot of flavor. When using oregano, choose dried or fresh based on what you have. For a zingy kick, try adding a pinch of red pepper flakes. This little touch makes a big difference. You can also let the potatoes marinate in the broth mixture for an hour before cooking. This extra time helps the flavors soak in deeply. To get potatoes that are both soft and crispy, cut them evenly. Halving the baby potatoes helps ensure they cook at the same rate. Use a hot oven, around 425°F (220°C). The high heat helps the outside crisp up while keeping the inside tender. Halfway through cooking, give the potatoes a good stir. This helps them brown evenly. If you want extra crispiness, broil them for the last 2-3 minutes. Just keep an eye on them to avoid burning. Prep the ingredients ahead of time to save effort later. You can wash and cut the potatoes a day before. Store them in water in the fridge to keep them fresh. You can also mix the broth and seasonings ahead. Just combine everything in a bowl and cover it. When you are ready to cook, simply combine the potatoes with the mixture. This makes dinner quick and easy. For even faster meals, consider roasting a larger batch. Leftovers taste great and can be enjoyed in many ways. For the full recipe, check out the complete cooking guide for Greek lemon potatoes. {{image_4}} You can easily make Greek lemon potatoes vegan. Just swap chicken broth for vegetable broth. This change keeps the rich flavor intact. Make sure your broth is gluten-free if needed. You can use any vegetable broth you like. This way, everyone can enjoy this dish! Feel free to mix up the flavors! Add fresh herbs like thyme or rosemary. These herbs give a nice twist. You can also try spices like paprika or cumin for heat. For a creamier taste, sprinkle some feta cheese on top before serving. You can even toss in some olives for a salty kick. Each of these options makes the dish unique! Greek lemon potatoes shine as a side dish. Pair them with grilled chicken or fish for a full meal. They also go well with a fresh salad or tzatziki sauce. If you want to make it special, serve with warm pita bread. These potatoes are great for any gathering. They will impress your guests, and they are easy to share. For the full recipe, check out the Full Recipe link above. To keep your Greek Lemon Potatoes fresh, let them cool first. Then, place them in an airtight container. You can also cover them tightly with plastic wrap. Store them in the fridge for up to three days. This method helps keep their flavor and texture. When reheating, use the oven for the best taste. Preheat your oven to 350°F (175°C). Spread the potatoes on a baking sheet. Heat them for about 15 to 20 minutes. This way, they will regain their crispiness. If you’re in a hurry, you can use the microwave. Just heat them in 30-second bursts, but they may not be as crispy. Greek Lemon Potatoes stay good in the fridge for three days. If you want to keep them longer, you can freeze them. Place the cooled potatoes in a freezer-safe bag. They can last up to three months in the freezer. When ready to eat, thaw them in the fridge overnight. Then, reheat them as mentioned above. Greek Lemon Potatoes are a delicious side dish. They are made with baby potatoes, lemon juice, and herbs. The dish is known for its bright, zesty flavor. The potatoes become tender and crisp when roasted. You can enjoy them with grilled meats or fish. They add a refreshing touch to any meal. You can prepare Greek Lemon Potatoes ahead of time. First, follow the recipe up to the roasting step. After mixing the ingredients, cover the dish and store it in the fridge. This way, the flavors will blend. When you're ready to cook, just preheat your oven and roast them. You may need to add a few extra minutes to the cooking time. Yes, you can use other potatoes like Yukon Gold or red potatoes. These types work well due to their creamy texture. Just remember to cut them into similar sizes. This helps them cook evenly. Each potato type will offer a slightly different taste and texture. Feel free to experiment with your favorites! Greek Lemon Potatoes are a delightful dish that you can easily make. You learned the key ingredients that make them special, and tips for the best flavor. Following the step-by-step guide ensures perfect roasting every time. You also discovered tasty variations for different diets and ways to store leftovers. In closing, use fresh ingredients and don't rush the cooking process. Enjoy this dish with friends and family. Each bite will showcase Greek flavors. Happy cooking!](https://goldendishy.com/wp-content/uploads/2025/07/055e8462-33de-483e-a53c-599291ba0dde-768x768.webp)
