Sweet Chili Garlic Shrimp Flavorful and Easy Delight

Are you ready for a flavor-packed meal that’s quick and easy? Sweet Chili Garlic Shrimp is your answer! This dish combines juicy shrimp with a zesty marinade that brings a perfect balance of sweetness and heat. In just a few steps, you’ll create a delightful meal that impresses. Grab your ingredients, and let’s dive into cooking this tasty dish together!
Why I Love This Recipe
- Quick and Easy: This recipe comes together in just 15 minutes, making it perfect for busy weeknights or last-minute gatherings.
- Flavor Packed: The combination of sweet chili sauce, garlic, and lime creates a deliciously vibrant flavor that’s sure to impress.
- Customizable Heat: With the option to add red pepper flakes, you can easily adjust the spice level to suit your taste.
- Garnish Galore: The fresh green onions and cilantro not only enhance the presentation but also add a fresh burst of flavor.
Ingredients
List of Ingredients
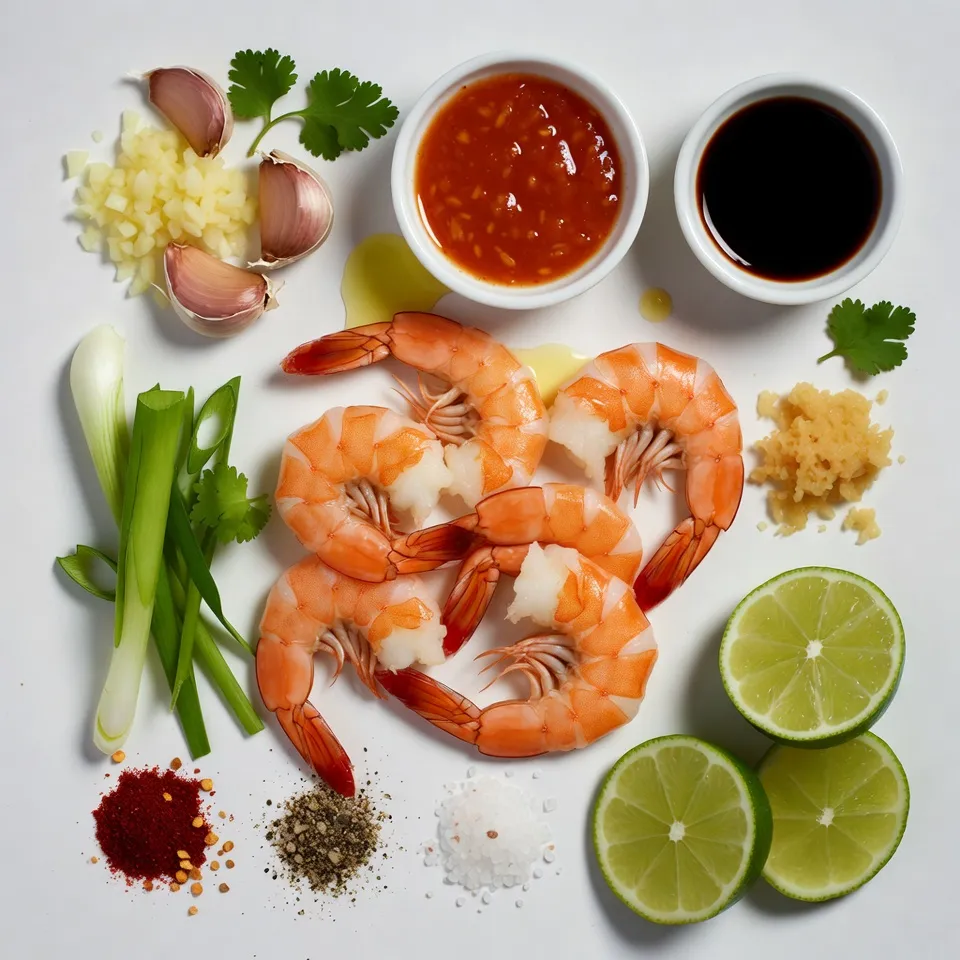
– 1 pound large shrimp, peeled and deveined
– 2 tablespoons olive oil
– 5 cloves garlic, finely minced
– 1/4 cup sweet chili sauce
– 1 tablespoon soy sauce
– 1 tablespoon fresh lime juice
– 1 teaspoon ginger, freshly grated
– 1/4 teaspoon red pepper flakes (optional)
– Salt and freshly ground black pepper to taste
– 2 green onions, thinly sliced (for garnish)
– A handful of fresh cilantro leaves (for garnish)
For this sweet chili garlic shrimp, you need a few key ingredients. Start with one pound of large shrimp. Make sure they are peeled and deveined for easy cooking. Next, gather two tablespoons of olive oil. This gives your shrimp a nice base.
You will also need five cloves of garlic. Mince them finely to release their flavor. The star of the dish is one-fourth cup of sweet chili sauce, which adds sweetness and spice. To balance that, you will need one tablespoon of soy sauce and one tablespoon of fresh lime juice.
Adding one teaspoon of freshly grated ginger gives it a warm kick. If you like heat, consider adding one-fourth teaspoon of red pepper flakes. Lastly, season with salt and black pepper to taste. For a fresh finish, slice two green onions and chop a handful of cilantro leaves for garnish.
These ingredients combine to create a dish that is both easy and delicious. You will love how they come together to make a tasty meal!

Step-by-Step Instructions
Preparation of Marinade
First, grab a mixing bowl. In it, whisk together these ingredients:
– 1/4 cup sweet chili sauce
– 1 tablespoon soy sauce
– 1 tablespoon fresh lime juice
– 1 teaspoon freshly grated ginger
– 1/4 teaspoon red pepper flakes (if you want some heat)
Mix them well until they combine. This marinade brings lots of flavor to the dish. Set it aside for later.
Cooking the Shrimp
Now, heat 2 tablespoons of olive oil in a large skillet over medium-high heat. Wait until the oil shimmers. Add 5 finely minced garlic cloves and sauté them for about 30 seconds. You want the garlic to smell nice and golden, but not burnt.
Next, add 1 pound of large shrimp to the skillet. Sprinkle salt and freshly ground black pepper on top. Cook the shrimp for 2-3 minutes on one side until they turn pink. Flip them over, then pour the marinade you made earlier over the shrimp. Cook for another 2-3 minutes. Stir occasionally until the shrimp are fully cooked and enjoy that delightful aroma.
Rest and Serve
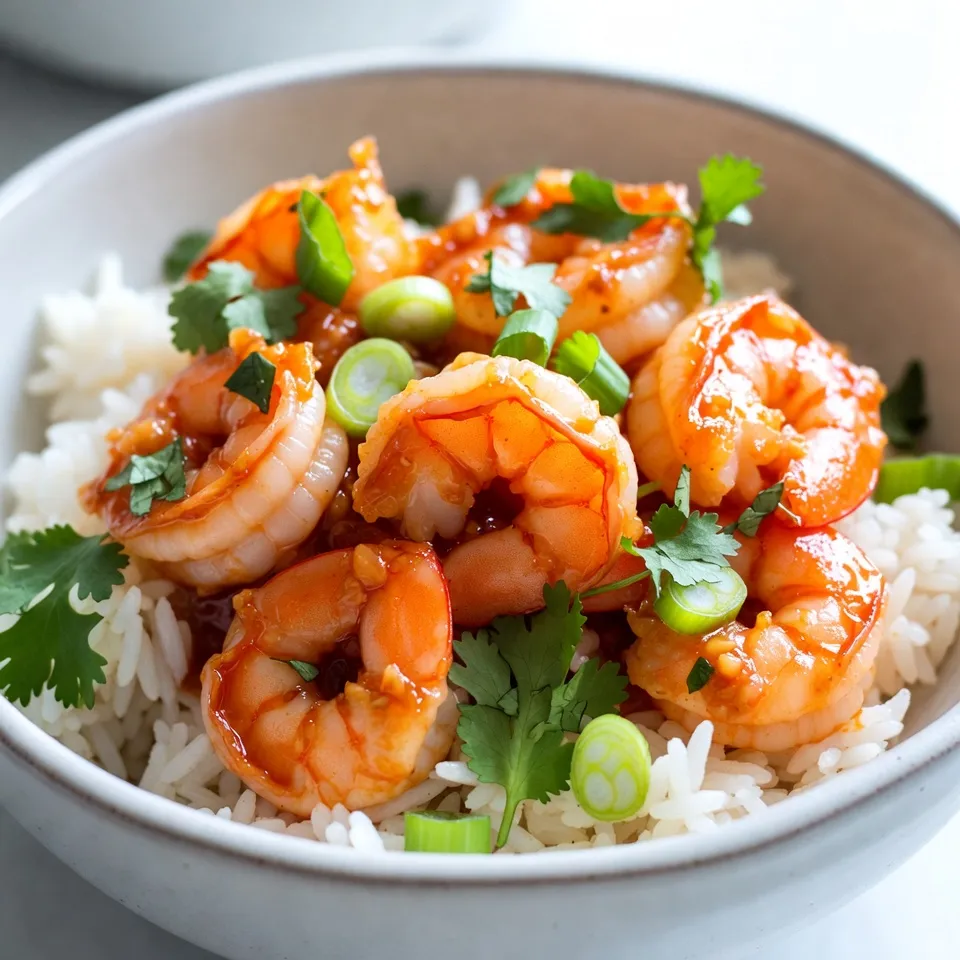
Once the shrimp are ready, take the skillet off the heat. Let the shrimp rest for about a minute. This helps the flavors blend together. When serving, garnish with thinly sliced green onions and fresh cilantro leaves. They add a nice touch and extra flavor. Enjoy your Sweet Chili Garlic Shrimp warm!
Tips & Tricks
Cooking Tips
To get shrimp just right, watch the cooking time. Shrimp cook fast, so don’t overdo it. Cook them for 2-3 minutes on one side. They will turn pink when ready. Flip them and pour on the marinade. Cook for another 2-3 minutes. This way, you keep them tender and juicy.
If you want extra heat, use red pepper flakes. Start with 1/4 teaspoon. You can always add more if you like it spicy. Just remember, a little goes a long way!
Presentation Tips
For a beautiful plate, serve the shrimp over steamed jasmine rice. This makes a soft base. You can also pair it with stir-fried veggies. They add color and crunch.
Don’t waste any flavor! Use leftover sauce from the pan. Drizzle it over your shrimp before serving. This adds shine and taste to your dish. Enjoy the feast!
Pro Tips
- Perfectly Cooked Shrimp: Cook the shrimp just until they turn pink and opaque. Overcooking will make them tough and rubbery.
- Customize the Heat: Adjust the red pepper flakes according to your spice preference. You can also add some fresh chopped chili for an extra kick!
- Marinate for More Flavor: For a deeper flavor, consider marinating the shrimp in the sauce for 15-30 minutes before cooking.
- Garnish Wisely: Fresh herbs like cilantro and green onions not only add flavor but also brighten the dish visually. Don’t skip this step!

Variations
Ingredient Swaps
You can swap shrimp for chicken, tofu, or vegetables. Chicken adds heartiness, while tofu brings a plant-based option. Use vegetables like zucchini or mushrooms for a fresh twist.
You can also change the sauce. Try spicy chili garlic for heat or peanut sauce for a creamy texture. Each swap gives a new taste and keeps dishes exciting.
Flavor Enhancements
To enhance flavor, add fresh herbs like cilantro or parsley. These herbs brighten up the dish and add a fresh taste.
Incorporating vegetables is another great option. Add bell peppers for sweetness or snap peas for crunch. This not only adds color but also boosts nutrition in your meal.
Storage Info
Short-Term Storage
To store your leftover Sweet Chili Garlic Shrimp, let it cool first. Place the shrimp in an airtight container. You should use the container within 2 to 3 days. Keep it in the fridge to keep it fresh. If you want to avoid sogginess, do not store it with rice or veggies.
Reheating Instructions
Reheating shrimp can be tricky. You want to keep it tender and juicy. The best method is to use a skillet. Heat your skillet over medium heat. Add a splash of water or oil to keep it moist. Cook for about 2 to 3 minutes, turning gently. You can also use the microwave, but be careful. Heat in short bursts, stirring in between. This helps avoid overcooking. Enjoy your shrimp warm for the best taste!
FAQs
What is Sweet Chili Garlic Shrimp?
Sweet chili garlic shrimp is a simple dish that combines shrimp with a sweet and spicy sauce. The main flavors come from sweet chili sauce, garlic, and lime juice. These ingredients blend well to create a tasty, sticky glaze. You will taste a mix of sweetness and heat from the chili sauce and red pepper flakes. The garlic adds depth and aroma. This dish is easy to prepare and perfect for a quick weeknight meal or to impress guests.
How to tell when shrimp are cooked?
You can tell shrimp are cooked when they turn pink and opaque. The shrimp will curl into a loose “C” shape. If they curl tightly into an “O” shape, they might be overcooked. Cooking shrimp usually takes about 2-3 minutes per side. Keep an eye on them as they cook, since they can go from perfect to rubbery quickly.
Can I make this dish ahead of time?
Yes, you can make sweet chili garlic shrimp ahead of time. Cook the shrimp and store them in an airtight container in the fridge. They will keep for about 1-2 days. When you are ready to eat, heat them gently in a skillet. Avoid cooking them again for too long to keep them tender. You can also prep the marinade in advance to save time.
This blog post covered everything to make sweet chili garlic shrimp. We started with a simple list of ingredients and how to prepare them. I provided easy steps for marinating and cooking your shrimp, plus tips for perfecting your dish. Remember, you can swap ingredients for variety and store leftovers correctly. You now have the tools to create a tasty meal that will impress anyone. Enjoy experimenting with your flavors and presentatio

Sweet Chili Garlic Shrimp
Ingredients
- 1 pound large shrimp, peeled and deveined
- 2 tablespoons olive oil
- 5 cloves garlic, finely minced
- 0.25 cup sweet chili sauce
- 1 tablespoon soy sauce
- 1 tablespoon fresh lime juice
- 1 teaspoon ginger, freshly grated
- 0.25 teaspoon red pepper flakes (optional)
- to taste salt and freshly ground black pepper
- 2 green onions, thinly sliced (for garnish)
- a handful fresh cilantro leaves (for garnish)
Instructions
- In a mixing bowl, whisk together the sweet chili sauce, soy sauce, lime juice, grated ginger, and red pepper flakes (if you like it spicy) until well combined. This will be your flavorful marinade. Set it aside for later use.
- Heat the olive oil in a large skillet or frying pan over medium-high heat until shimmering.
- Add the minced garlic to the hot skillet and sauté for approximately 30 seconds, or until it becomes fragrant and golden, taking care not to let it burn.
- Introduce the shrimp to the skillet, seasoning them with salt and freshly ground black pepper. Allow them to cook for 2-3 minutes on one side until they turn a lovely pink color.
- Flip the shrimp to the other side and pour the prepared marinade over them. Continue to cook for an additional 2-3 minutes, stirring occasionally, until the shrimp are fully cooked and have absorbed the delicious marinade.
- Once cooked, remove the skillet from the heat and let the shrimp rest for about a minute to allow the flavors to meld.
- Serve the shrimp warm, garnished with a sprinkle of sliced green onions and fresh cilantro leaves for a burst of color and flavor.


![- 1 cup green or brown lentils, thoroughly rinsed - 1 tablespoon coconut oil - 1 medium onion, finely chopped - 3 garlic cloves, minced - 1-inch piece of fresh ginger, grated - 1 can (14 oz) full-fat coconut milk - 2 ripe tomatoes, diced - 1 tablespoon curry powder - 1 teaspoon ground cumin - 1 teaspoon ground turmeric - 1 cup vegetable broth (use low-sodium if preferred) - 2 cups fresh spinach or kale, chopped - Sea salt and freshly ground black pepper to taste - Fresh cilantro, chopped (for garnish, optional) To make this Easy Vegan Lentil Curry, you need a few key items. The lentils are the base. They bring protein and texture. I prefer green or brown lentils because they hold their shape well. Rinsing them removes dust and ensures you start with clean lentils. Next, the coconut oil adds a rich, creamy taste. It helps sautΓ© the onion, garlic, and ginger. These three ingredients create a fragrant base. They add depth and warmth to the curry. Tomatoes add sweetness and acidity. They balance the creamy coconut milk perfectly. The spicesβcurry powder, cumin, and turmericβbring warmth and flavor. They transform the dish into a vibrant, colorful meal. For added nutrition, I recommend spinach or kale. These greens are packed with vitamins. They also bring a lovely color to the curry. Finally, fresh cilantro adds a bright, fresh flavor. You can use it as a garnish or mix it in for extra taste. For the full recipe, check out the detailed instructions. This dish is not only simple but full of flavor! - Heat 1 tablespoon of coconut oil in a medium pot over medium heat. - Once the oil is hot, add 1 finely chopped onion. SautΓ© for about 5 minutes. The onion should become soft and clear. - Next, add 3 minced garlic cloves and 1-inch grated ginger. Cook for 1 to 2 minutes. You want the kitchen to smell amazing! - Now, add 2 diced tomatoes, 1 tablespoon of curry powder, 1 teaspoon of ground cumin, and 1 teaspoon of ground turmeric. - Stir and cook this mix for about 2 to 3 minutes. This step helps the spices release their lovely flavors and soften the tomatoes. - Add 1 cup of rinsed lentils to the pot. Then, pour in 1 can of full-fat coconut milk and 1 cup of vegetable broth. - Stir well to combine, then bring the mix to a gentle boil. Once it boils, turn the heat down and cover the pot. Let it simmer for 25 to 30 minutes. Check the lentils to see if they are tender and creamy. - After the lentils are cooked, fold in 2 cups of chopped spinach or kale. Cook for about 5 minutes. The greens should be bright and wilted. - Taste the curry and add sea salt and freshly ground black pepper to make it just right for you. For the full recipe, you can check out the details above. Enjoy your cooking! You can adjust spices to suit your taste. If you love heat, add more curry powder. A dash of lime juice brightens the dish. It adds a fresh twist that wakes up the flavors. To save time, use pre-cooked lentils. They cook faster and save you at least 20 minutes. Vegetable broth can boost flavor without much work. It gives your curry a rich taste. Serve your curry in shallow bowls. A sprinkle of cilantro on top creates a nice look. Pair it with fluffy rice or warm naan. This makes your meal more filling and fun to eat. For the full recipe, check out the details above. {{image_4}} You can change the type of lentils in your curry. - Red lentils cook faster and give a smoother texture. - Black or French lentils add more firmness and bite. Using different lentils can change the dish's look and feel. I find red lentils to be a great option for a quick meal. They break down nicely, making the curry creamy. Black lentils keep their shape, adding a nice texture. Spices can make your curry unique. - Try garam masala or chili powder for a spicy kick. - Fresh herbs like cilantro or mint can brighten the flavor. Experimenting with spices can lead to exciting new tastes. Garam masala adds warmth and depth, while chili powder can increase heat. Fresh herbs not only taste great but also add color to your dish. Adding extra vegetables boosts nutrition and flavor. - Carrots or bell peppers add sweetness and crunch. - Swap kale for other leafy greens like Swiss chard. Incorporating more veggies is a fun way to customize your curry. Carrots add a lovely sweetness, while bell peppers bring crunch and color. Swiss chard can be a great substitute for kale and offers a different taste profile. To keep your Easy Vegan Lentil Curry fresh, store leftovers in an airtight container. This method helps maintain flavor and texture. You can keep it in the fridge for up to 4 days. If you want to save it for later, freeze portions for up to 3 months. Just make sure to label the container with the date. When you're ready to enjoy your curry again, reheat it on the stove. Add a splash of vegetable broth to keep it creamy and delicious. Stir it often to ensure even heating. If you're in a hurry, you can microwave it too. Do this in short bursts, stirring frequently to avoid hot spots. Always check for signs of spoilage before eating. Look for any off smells or changes in color. If your curry looks or smells strange, itβs best to discard it. Safety first! Enjoy your meal knowing you stored it well. For the full recipe, check out the earlier sections. - Prep time: 10 minutes, Total time: 40 minutes Making this curry is quick and easy. You will spend about 10 minutes getting ready. Cooking takes an additional 30 minutes. This means you can enjoy a tasty meal in just 40 minutes! - Yes, the flavors meld nicely if made a day ahead You can make this curry in advance. If you prepare it a day before, the flavors will blend well. This makes the dish even tastier when you eat it later. - Great with rice, quinoa, or naan for a hearty meal This curry pairs perfectly with many side dishes. Rice is a classic choice, but quinoa works well too. You can also serve it with warm naan for a filling meal. - Yes, all ingredients are naturally gluten-free You will be glad to know this recipe is gluten-free. All the ingredients, like lentils and coconut milk, do not contain gluten. This makes it a safe choice for anyone avoiding gluten. For the full recipe, check out the [Full Recipe]. This Easy Vegan Lentil Curry is tasty and simple to make. You learned about the main ingredients, step-by-step instructions, flavor tips, and storage info. Customization options, like different lentils and spices, let you make it your own. This dish is perfect for meal prep and serving with rice or naan. Remember to store leftovers properly and watch for spoilage signs. Enjoy this dish that is not only healthy but full of flavor! You will love experimenting with it for your next meal.](https://goldendishy.com/wp-content/uploads/2025/06/33b3e4d2-4af0-4f09-8df6-36adfea2fbd1-768x768.webp)
