Spinach Parmesan Puff Pastry Pinwheels Delightful Bite

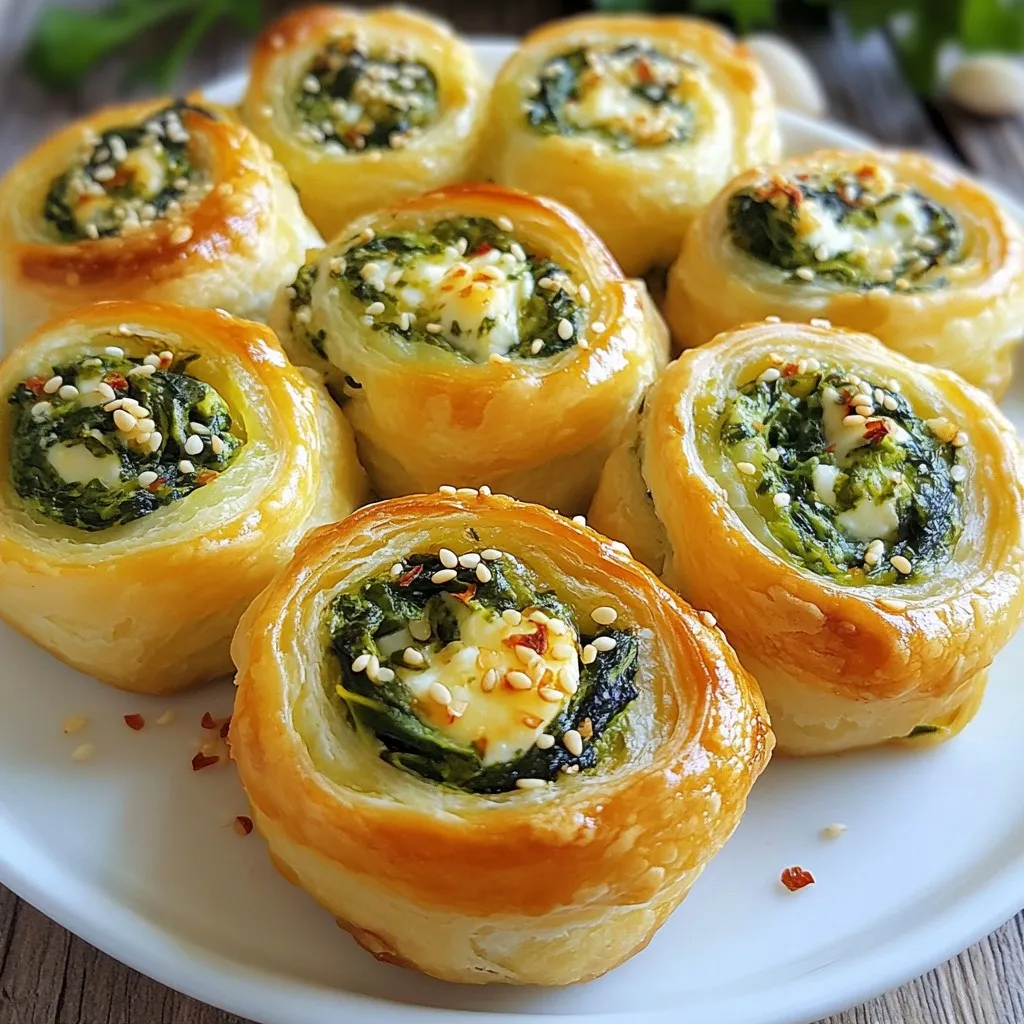
Looking for a quick and tasty snack? You’re in the right place! These Spinach Parmesan Puff Pastry Pinwheels are easy to make and full of flavor. With layers of fresh spinach, rich cheese, and flaky pastry, they’re perfect for any occasion. I’ll guide you through simple steps to whip up this delightful treat and share tips for the best results. Let’s dive into this delicious dish together!
Why I Love This Recipe
- Irresistible Flavor: The combination of fresh spinach, creamy ricotta, and sharp Parmesan creates a delightful taste that is both savory and satisfying.
- Easy to Make: With just a few simple steps and ingredients, these pinwheels come together quickly, making them perfect for appetizers or snacks.
- Versatile Filling: You can easily customize the filling by adding other ingredients like sun-dried tomatoes or different cheeses to suit your taste.
- Great for Any Occasion: Whether it’s a party, a picnic, or just a cozy night in, these pinwheels are always a hit with friends and family.
Ingredients
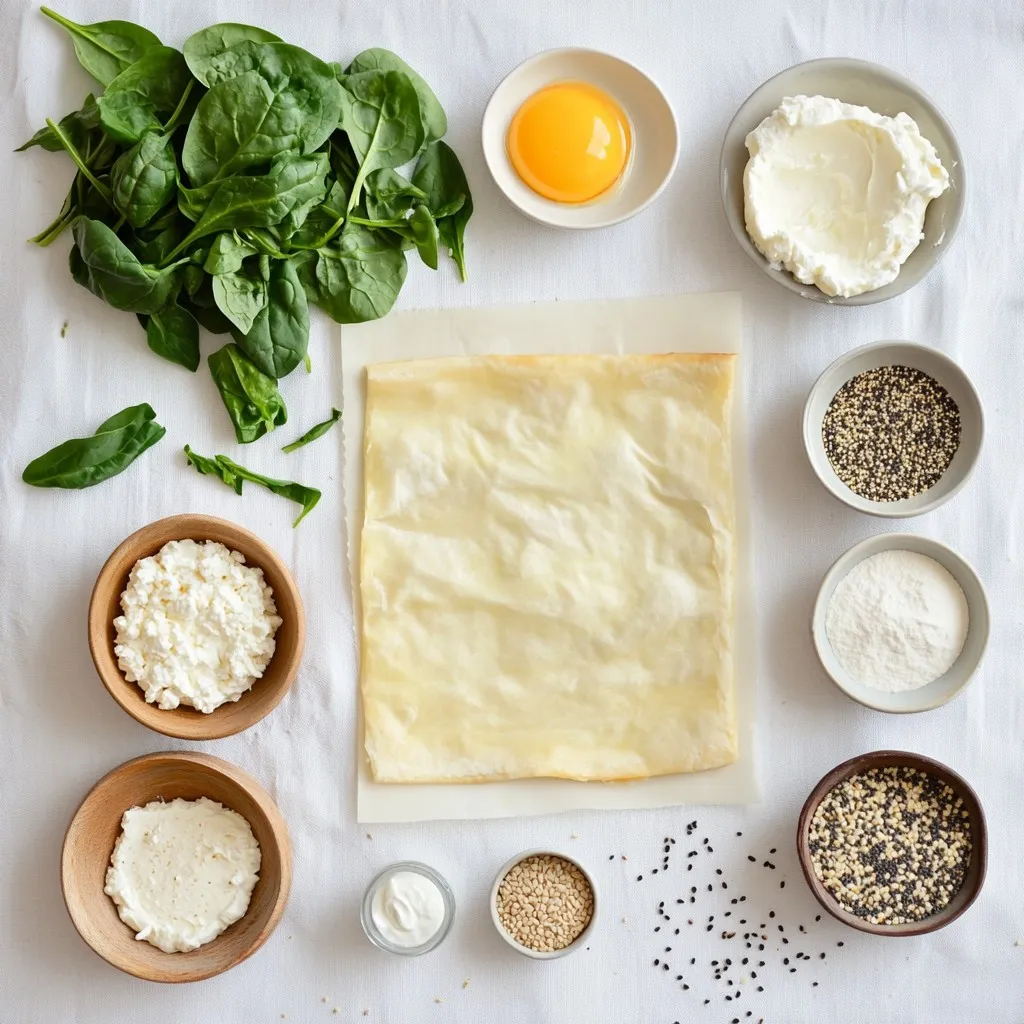
Let’s get into the fun part: the ingredients! Each one plays a vital role. Gather these items for your Spinach Parmesan Puff Pastry Pinwheels:
– 1 sheet of puff pastry, thawed
– 1 cup fresh spinach, finely chopped
– 1/2 cup grated Parmesan cheese
– 1/4 cup ricotta cheese
– 1/4 teaspoon garlic powder
– 1/4 teaspoon red pepper flakes (optional for a spicy kick)
– 1 egg, beaten (for egg wash)
– Salt and black pepper to taste
– Sesame seeds or poppy seeds for garnishing (optional)
These ingredients work together to create a tasty treat. The puff pastry gives a flaky and buttery base. Fresh spinach adds a pop of color and nutrients. The Parmesan and ricotta cheese provide creaminess and depth of flavor. Garlic powder and red pepper flakes bring that extra zing.
You can easily customize this recipe. If you want a spicy bite, add red pepper flakes. For a lovely finish, sprinkle sesame or poppy seeds on top. Feel free to play around with the ingredients. Enjoy the process of making these delightful pinwheels!

Step-by-Step Instructions
Preparing the Oven and Baking Sheet
Start by preheating your oven to 400°F (200°C). This helps the pinwheels cook evenly. Next, line your baking sheet with parchment paper. This step keeps the pinwheels from sticking to the pan. It also makes clean-up easier.
Mixing the Filling
In a medium bowl, combine the spinach, Parmesan, and ricotta cheese. Add the garlic powder and red pepper flakes if you like some heat. Season with salt and black pepper to taste. Mix everything well. This filling will be rich and tasty. Make sure there are no clumps.
Rolling and Slicing the Pinwheels
Lightly dust a clean surface with flour. Roll out the puff pastry until it’s smooth. You want it slightly larger than its original size. Spread the spinach mixture evenly over the pastry. Leave about a 1-inch border around the edges.
Now, start rolling the pastry from one edge. Be careful to keep the filling inside. Once you have a tight log, use a sharp knife to slice it into 1-inch thick pinwheels. Place each pinwheel cut side up on the baking sheet. Leave some space between them for expansion.
Baking
Brush the tops of the pinwheels with the beaten egg. This gives them a lovely golden color. If you want, sprinkle sesame or poppy seeds on top for extra crunch. Bake in the oven for 20-25 minutes. Look for a puffed and golden appearance.
Once done, take them out and let them cool slightly. They are best enjoyed warm.
Tips & Tricks
Making the Perfect Puff Pastry Pinwheels
To make great pinwheels, start with cold puff pastry. Thaw it in the fridge, not at room temperature. This keeps the layers firm. Roll the pastry on a floured surface to avoid sticking. Aim for an even thickness. When spreading the filling, leave a 1-inch border. This helps seal the edges. Roll the pastry tightly to keep the filling in place. Slice the pinwheels with a sharp knife for clean edges.
Achieving the Best Flavor
For the best flavor, use fresh spinach. It adds a vibrant taste. Grated Parmesan gives a rich, nutty flavor. Mixing in ricotta makes the filling creamy. Add garlic powder for depth. If you like spice, sprinkle in red pepper flakes. Season with salt and black pepper to enhance the taste. Always taste the filling before sealing. Adjust the seasonings to your liking.
Presentation Tips
Presentation matters! Arrange the pinwheels neatly on a platter. Garnish with fresh spinach or parsley for color. For a fun touch, serve with marinara sauce or yogurt dip. These add flavor and excitement to your dish. Sprinkle sesame or poppy seeds on top for texture. A little extra effort makes your dish stand out.
Pro Tips
- Keep Your Pastry Cold: Ensure that your puff pastry remains cold throughout the preparation process to achieve maximum flakiness when baked.
- Experiment with Fillings: Feel free to add other ingredients like sun-dried tomatoes or feta cheese to enhance the flavor profile of your pinwheels.
- Slice with Precision: Use a sharp knife to slice the pinwheels evenly to ensure they bake uniformly and look appealing.
- Serve Fresh: These pinwheels are best enjoyed fresh out of the oven. If making ahead, reheat in the oven for a few minutes to restore their crispiness.

Variations
Adding Proteins (e.g., Chicken, Ham)
You can easily add protein to your pinwheels. Cooked chicken or ham works great. Simply chop the meat into small pieces and mix it with the spinach and cheese. This adds flavor and makes the pinwheels heartier.
Vegan Alternative Options
For a vegan version, swap out the cheese with a nut-based option. You can use cashew cheese or tofu. Also, replace the egg wash with a light brush of almond milk. This keeps the golden color without using animal products.
Seasoning Adjustments
Feel free to play with the seasonings. Add herbs like oregano or basil for extra flavor. If you love heat, increase the red pepper flakes. You can also try adding lemon zest for a fresh twist. Adjusting seasonings makes each batch unique!
Storage Info
Short-term Storage (Refrigeration)
To keep your Spinach Parmesan Puff Pastry Pinwheels fresh, store them in the fridge. Place the pinwheels in an airtight container. They last about 2-3 days. If you want to keep them crisp, try not to stack them too much. This helps avoid sogginess.
Long-term Storage (Freezing)
For longer storage, you can freeze the pinwheels. First, let the baked pinwheels cool completely. Then, arrange them on a baking sheet in a single layer. Freeze them for about 1-2 hours. Once firm, transfer them to a freezer-safe bag or container. They can last up to a month in the freezer. When you’re ready to eat, just bake them straight from frozen.
Reheating Instructions
Reheating the pinwheels is simple. Preheat your oven to 350°F (175°C). Place the pinwheels on a baking sheet. Heat them for about 10-15 minutes, or until warm. This way, they stay crispy and delicious. You can also use a microwave, but this may make the pastry less crisp. If you do use the microwave, heat them for about 30 seconds to 1 minute.
FAQs
Can I use frozen spinach instead?
Yes, you can use frozen spinach. Just thaw it first. Squeeze out as much water as you can. This keeps your pinwheels from getting soggy. Frozen spinach often has a stronger taste, which can work well in this recipe.
How do I prevent the puff pastry from getting soggy?
To keep the puff pastry crispy, avoid too much moisture. Use fresh ingredients and well-drained spinach. Make sure to bake the pinwheels right after you assemble them. If you let them sit too long, they may lose their crunch.
What dipping sauces pair well with the pinwheels?
Several dips work well with these pinwheels. Marinara sauce is classic and tasty. A yogurt dip adds a cool touch. You can also try a garlic aioli for extra flavor. Each dip can enhance your eating experience!
To make tasty puff pastry pinwheels, gather fresh ingredients like spinach and cheese. Follow easy steps to mix, roll, and bake them perfectly. Remember to use tips for a great flavor and nice look. You can switch up ingredients for fun variations. Store leftovers wisely for later enjoyment. Keep experimenting to find your favorite spin on this recipe. Enjoy every bite and share your tasty creations with other

Spinach Parmesan Puff Pastry Pinwheels
Ingredients
- 1 sheet puff pastry, thawed
- 1 cup fresh spinach, finely chopped
- 0.5 cup grated Parmesan cheese
- 0.25 cup ricotta cheese
- 0.25 teaspoon garlic powder
- 0.25 teaspoon red pepper flakes (optional)
- 1 egg beaten (for egg wash)
- to taste salt and black pepper
- optional sesame seeds or poppy seeds for garnishing
Instructions
- Preheat your oven to 400°F (200°C). Line a baking sheet with parchment paper to prevent sticking.
- In a medium-sized mixing bowl, combine the finely chopped spinach, grated Parmesan, ricotta cheese, garlic powder, and, if using, red pepper flakes. Season with salt and black pepper to taste. Mix well until all ingredients are thoroughly incorporated.
- Lightly flour a clean surface and roll out the thawed puff pastry sheet until it's smooth and slightly larger in size.
- Evenly spread the spinach and cheese mixture over the entire surface of the puff pastry, leaving about a 1-inch border around the edges for sealing.
- Starting from one edge of the pastry, carefully roll it up into a tight log, ensuring that the filling stays securely inside.
- Using a sharp knife, slice the rolled pastry into 1-inch thick pinwheels. Place each pinwheel cut side up onto the prepared baking sheet, leaving some space between them for expansion while baking.
- Brush the tops of the pinwheels with the beaten egg to create a shiny, golden-brown finish as they bake.
- For added texture, sprinkle the tops with sesame seeds or poppy seeds, if desired.
- Bake in the preheated oven for 20-25 minutes, or until the pinwheels are puffed and beautifully golden.
- Once baked, remove the pinwheels from the oven and let them cool slightly on the baking sheet before serving warm.


![- 2 cups shredded cooked chicken - 1 (8 oz) package of cream cheese - 1/2 cup buffalo sauce - 1/2 cup ranch dressing For buffalo chicken dip, the main ingredients create a creamy and rich base. Shredded cooked chicken gives it that hearty texture. You can use rotisserie chicken to save time. Cream cheese adds smoothness, while buffalo sauce brings the heat. Ranch dressing balances the flavors and adds a nice creaminess. - 1/2 cup crumbled blue cheese - 1 green onion for garnish - Tortilla chips or celery sticks for serving Optional ingredients enhance the dip. Crumbled blue cheese adds a bold taste that many love. It pairs well with the spicy buffalo flavor. A sprinkle of green onion on top looks great and adds freshness. For serving, I recommend crunchy tortilla chips or crisp celery sticks. They both complement the dip's rich and creamy texture. Always remember to adjust the buffalo sauce to match your spice preference. You can find the full recipe in the section above for more detailed steps! 1. First, preheat your oven to 350°F (175°C). This helps the dip cook evenly. 2. In a large bowl, combine the shredded chicken, cream cheese, buffalo sauce, and ranch dressing. Mix until smooth. 1. Now, gently fold in the shredded cheddar cheese and blue cheese, if you use it. This adds great flavor and creaminess. 2. Next, transfer the chicken mixture to a baking dish. Spread it evenly with a spatula. 3. Bake the dip for 20-25 minutes. Look for bubbling edges and a slightly golden top. 1. When your dip is done, take it out and garnish with sliced green onions. This adds freshness. 2. Serve it warm with tortilla chips or celery sticks. Enjoy this creamy and flavorful delight! For the full recipe, check out the details above. Adjusting buffalo sauce is key for your dip. If you love heat, add more buffalo sauce. If you prefer mild dishes, use less. Start small and taste as you go. You can always add more but can’t take it out. If you want a cream cheese alternative, try Greek yogurt. It gives a nice tang and cuts some fat. You can also use vegan cream cheese for a plant-based option. This keeps the dip creamy without dairy. To get the perfect crust, bake your dip until it’s bubbly and golden. This usually takes about 20-25 minutes at 350°F. You want the edges to have a light brown color. This shows the dip is ready and adds flavor. For a crispy top, use a broiler after baking. Set your oven to broil and watch closely. Just a few minutes under the broiler can give your dip a nice crunch. Be careful not to burn it! When serving at parties, focus on presentation. Put the dip in the center of a colorful platter. Surround it with chips and celery sticks. This makes it look inviting and fun. For drinks, consider pairing it with light beers or sparkling water. The lightness balances the richness of the dip. You can also serve it with a side of fresh veggies for a nice crunch. {{image_4}} You can make buffalo chicken dip healthier with just a few swaps. - Low-fat cream cheese options: Use low-fat cream cheese. It cuts fat and calories but keeps the creaminess. - Using Greek yogurt instead of ranch dressing: Greek yogurt adds a tangy taste and protein. It's a great way to lower calories while keeping it creamy. You might want to kick up the flavor in your dip. - Additions like diced jalapeños or hot peppers: These add heat and a fresh taste. Adjust to your spice level. - Incorporating other cheeses for unique flavors: Try mixing in mozzarella or gouda. Each cheese adds its own twist to the dip's flavor. Change how you serve your buffalo chicken dip for fun. - Buffalo chicken dip stuffed in peppers: Hollow out mini bell peppers and fill them with the dip. Bake until warm for a tasty bite. - Spinach and buffalo chicken dip combo: Mix in fresh spinach. It adds color and nutrition, making the dip even better. For the complete recipe, check out the [Full Recipe]. To keep buffalo chicken dip fresh, place it in an airtight container. This helps prevent it from drying out. Store the dip in the fridge for up to five days. You may notice the flavors deepen as it sits. Just be sure to cover it well to avoid any fridge odors. You can freeze buffalo chicken dip for longer storage. First, let the dip cool completely. Then, transfer it to a freezer-safe container. Press plastic wrap directly on the dip before sealing. It can last for up to three months in the freezer. When you're ready to enjoy it, thaw it in the fridge overnight. You have two great options to reheat buffalo chicken dip: the oven or microwave. If using the oven, preheat it to 350°F (175°C). Place the dip in an oven-safe dish and heat for about 20 minutes. Stir halfway through for even warming. If you choose the microwave, heat in 30-second intervals. This prevents hot spots and keeps the dip creamy. To maintain texture, avoid overheating. Let the dip sit for a minute after reheating. This helps the flavors come back together. Enjoy your dip warm with chips or celery sticks! Yes, you can make buffalo chicken dip ahead of time. To prepare in advance, follow these steps: - Mix the ingredients: Combine the shredded chicken, cream cheese, buffalo sauce, and ranch dressing. - Store it: Place the mixture in a baking dish, cover it with plastic wrap, and put it in the fridge. - Bake when ready: When you are ready to serve, take it out and bake it at 350°F for 20-25 minutes. This way, you save time and enjoy a warm dip at your gathering. If you want to swap ranch dressing, here are some great options: - Blue cheese dressing: This adds a tangy flavor that works well. - Greek yogurt: Use plain Greek yogurt for a healthier twist. - Caesar dressing: This offers a different but tasty flavor profile. Feel free to experiment with your favorite dressings! To kick up the spice level, try these ideas: - Extra buffalo sauce: Add more buffalo sauce to your mix. - Diced jalapeños: Mix in fresh or pickled jalapeños for heat. - Hot sauce: Drizzle hot sauce on top before serving for an extra kick. Adjust the spice to match your taste, and enjoy the heat! Buffalo chicken dip can be gluten-free, but check your ingredients. Here’s what to know: - Buffalo sauce: Most brands are gluten-free, but confirm by reading the label. - Ranch dressing: Look for gluten-free options if using store-bought. - Dipping options: Use gluten-free tortilla chips or fresh veggies for dipping. With careful choices, everyone can enjoy this dip! You now know how to make buffalo chicken dip from scratch. We covered key ingredients like chicken, cream cheese, and buffalo sauce. I shared step-by-step instructions to get delicious results. You learned tips for adjustments and variations to suit your taste. Remember, this dip is versatile; you can customize it for any gathering. Enjoy experimenting with flavors and serving styles. Your next snack night will be a hit!](https://goldendishy.com/wp-content/uploads/2025/07/99cdad4a-7337-4a60-a9b0-2f79e024797e-768x768.webp)


![- 1 pound fresh green beans, trimmed - 4 tablespoons unsalted butter - 4 cloves garlic, finely minced - 1 teaspoon fresh lemon zest - 1 tablespoon fresh lemon juice - 1/2 teaspoon red pepper flakes (optional for heat) - Salt and freshly ground black pepper to taste - 1/4 cup sliced almonds, toasted (for garnish) Fresh green beans are key for this dish. Look for bright, crisp beans without blemishes. The unsalted butter lets you control the salt level. Garlic adds a strong, savory taste, so use fresh cloves when possible. Lemon zest and juice brighten the dish, adding a nice tang. Red pepper flakes give a little kick, but you can skip them if you want a milder flavor. Toasted almonds add a crunchy finish, so don’t skip them! If you can’t find fresh green beans, frozen ones work too. Just thaw and drain them first. For a dairy-free option, use olive oil instead of butter. You can swap garlic for shallots for a milder taste. If you don’t like lemon, try lime juice or vinegar for acidity. Instead of almonds, use walnuts or pine nuts for a different crunch. Feel free to mix and match these options to fit your taste! For the full recipe, check out the step-by-step guide to make these tasty Garlic Butter Green Beans. 1. Boil Water: Start by filling a large pot with water. Add salt and bring it to a boil. 2. Trim Beans: While waiting, trim the ends of the green beans. This simple step makes them easier to eat. 3. Ice Bath Ready: Prepare a bowl with ice water. This will help stop the cooking later. 1. Blanch the Beans: Once the water is boiling, add the green beans. Cook them for 3-4 minutes. They should be bright green and crisp-tender. 2. Cool Down: Quickly move the beans to the ice bath. Let them cool for about 5 minutes. Drain the beans and set them aside. 3. Melt Butter: In a large skillet, add butter over medium heat. Wait until it melts and bubbles. 4. Add Garlic: Put in the minced garlic. Sauté for about 30 seconds. Be careful not to brown the garlic. It can turn bitter. 5. Combine Beans: Add the blanched green beans to the skillet. Toss them gently in the garlic butter. Cook for 4-5 minutes until heated through. 6. Finish with Flavor: Stir in lemon zest, lemon juice, and optional red pepper flakes. Season with salt and pepper. Mix well. 1. Serving Dish: Carefully transfer the green beans to a serving dish. 2. Garnish: Sprinkle toasted almond slices on top. This adds crunch and looks lovely. 3. Presentation: Arrange the green beans neatly. Place lemon wedges on the side for extra flair. Enjoy your Garlic Butter Green Beans! You can find the Full Recipe linked here. To make the best garlic butter green beans, start with fresh green beans. Look for beans that are bright green and firm. Trim the ends for a clean look. Blanching is key. It keeps the beans bright and crisp. Use a large pot of salted water for boiling. An ice bath helps stop the cooking. This gives you that perfect crunch! To add more flavor, try using garlic oil instead of butter. This gives a nice twist to the dish. Adding lemon zest brightens the taste too. If you like spice, sprinkle in red pepper flakes. For extra crunch, toast almond slices before adding them on top. These small steps really boost the flavor and texture. One common mistake is overcooking the beans. They should be crisp-tender, not mushy. Be careful with the garlic; it can burn quickly. If it turns brown, it will taste bitter. Also, don’t skip the ice bath after blanching. It keeps your beans looking fresh and vibrant. Following these tips will help you create a stunning side dish. For a full recipe, check out the complete details above. {{image_4}} You can change the flavor of garlic butter green beans easily. Try adding herbs like thyme or basil for a fresh twist. If you prefer a spicy kick, use diced jalapeños instead of red pepper flakes. For a unique taste, mix in some soy sauce or balsamic vinegar. These additions bring out different flavors and keep the dish exciting. Want to make your green beans a full meal? Consider adding protein. Cooked chicken or shrimp pairs well with the garlic butter. Just toss them in the skillet with the green beans. For a plant-based option, add chickpeas or tofu. These ingredients not only enhance flavor but also make the dish heartier. Switching ingredients based on the season can elevate your green beans. In spring, consider adding fresh peas for sweetness. During summer, cherry tomatoes add a burst of flavor. In fall, roasted butternut squash brings warmth. Winter calls for crispy Brussels sprouts for a crunchy contrast. These swaps keep your dish fresh and interesting all year round. For the complete recipe, check out the [Full Recipe]. To store leftover Garlic Butter Green Beans, place them in an airtight container. Make sure they are completely cool before sealing. This helps keep them fresh. Store the container in the fridge for up to three days. When you want to enjoy your leftovers, you can reheat them easily. You can use the microwave or a skillet. For the microwave, heat for about 30 seconds. Stir and check if they are warm enough. If using a skillet, add a little butter and heat on low. Stir until hot, about 3-4 minutes. You can freeze Garlic Butter Green Beans, but they may lose some crunch. To freeze, first, blanch the beans as in the recipe. Cool them in ice water, then drain well. Place the beans in a freezer-safe bag. Remove as much air as possible before sealing. They can freeze for up to three months. When you are ready to use them, thaw overnight in the fridge before reheating. For the full recipe, check out the details above. To make Garlic Butter Green Beans vegan, swap the butter for vegan butter or olive oil. Use the same amount for a rich flavor. The garlic and lemon will still shine through. This change keeps the dish tasty while meeting vegan needs. The best ways to prepare green beans include blanching, steaming, or sautéing. Blanching keeps them bright and crisp. Sautéing with garlic, like in this recipe, adds great flavor. You can also roast them for a lovely char. Each method brings out the green beans' natural sweetness. Yes, you can make Garlic Butter Green Beans ahead of time. Cook them fully and let them cool. Store in an airtight container in the fridge for up to three days. When ready to serve, reheat in a pan. This keeps the flavors fresh and vibrant. For the full recipe, check out the details above. You learned about the key ingredients for Garlic Butter Green Beans and how to use them. I shared tips to make your dish better, avoid common mistakes, and add variety. You'll know how to store leftovers, reheat, and even freeze them. Remember to tweak the recipe based on your taste or what you have on hand. Cooking should be fun, so feel free to try new things. Enjoy making this dish and impressing your family or friends!](https://goldendishy.com/wp-content/uploads/2025/07/f7ec476a-8ba6-4070-896d-8b390928597f-768x768.webp)

![- 2 ripe peaches, diced - 2 ripe avocados, diced - 1 cup fresh arugula or a mix of your favorite greens - Fresh mint leaves, for garnish - 1/2 cup tangy feta cheese, crumbled - 1/4 cup pecans, coarsely chopped - 2 tablespoons creamy honey - 2 tablespoons freshly squeezed lemon juice - Salt and freshly cracked pepper, to taste To make this Peach and Avocado Salad, you need fresh, quality ingredients. Ripe peaches bring a sweet taste. Ripe avocados add creamy texture. Fresh arugula or mixed greens offer a nice crunch. Don't forget the fresh mint leaves for a pop of color and flavor. For additional flavor, add tangy feta cheese. It enhances the salad's taste. Pecans add a lovely crunch and nuttiness. Honey gives a hint of sweetness. Fresh lemon juice adds a zesty touch. Finally, season with salt and pepper to balance everything. This mix of flavors and textures creates a fresh and flavorful delight. For the complete recipe, you can check the [Full Recipe]. - First, dice the peaches and avocados. Aim for small, even pieces. This helps them blend well in the salad. - Next, layer the diced peaches and avocados in a large salad bowl. This forms a colorful base for the dish. - Now, gently fold in your choice of greens, like arugula or mixed greens. This adds a nice crunch and freshness. - Sprinkle the crumbled feta cheese and chopped pecans on top. They give a lovely salty flavor and texture contrast. - In a small bowl, whisk together the honey and fresh lemon juice. This dressing is simple but very tasty. - Drizzle the dressing over the salad. Toss gently to combine without smashing the avocado. - Finally, taste and season with salt and freshly cracked pepper. Adjust to make the flavors pop. You can find the complete instructions in the [Full Recipe]. To make the best peach and avocado salad, cut your fruits into similar sizes. This helps create a nice balance. When you toss the salad, do it gently. You want to mix it well but avoid mashing the ripe avocado. This keeps the salad light and fresh. Taste is key. Adjust the seasoning to fit your palate. You can also add a touch of honey for sweetness or fresh mint leaves for a burst of flavor. These small tweaks can take your salad to the next level. Serving matters. You can place the salad in individual bowls for a nice touch. Another idea is to arrange everything on a platter. A colorful display makes the salad look even more inviting. A drizzle of honey or a sprinkle of mint can add a lovely finish. For the full recipe, check out the detailed steps provided. {{image_4}} You can switch up the cheese and nuts in this salad for new flavors. Instead of feta, try goat cheese or blue cheese. Both add a rich taste that pairs well with peaches. For nuts, swap pecans for walnuts or almonds. Each nut gives its unique crunch and flavor. You can also change the greens. If you want a different taste, use spinach or kale. Both greens add a nice twist. Spinach brings a soft texture, while kale adds a bit of bite. Each option makes the salad fresh and fun to eat. The dressing plays a big role in this salad. If you want to try something different, use balsamic vinegar or olive oil instead of honey and lemon juice. Balsamic adds a sweet and tangy flavor, while olive oil brings a smooth, rich taste. You can also experiment with flavored vinegars. Try raspberry or apple cider vinegar for a new twist. These flavors will enhance the sweetness of the peaches. To make this salad a complete meal, add grilled chicken or shrimp. Both proteins add heartiness and pair well with the fruits. Grilled chicken offers a mild flavor, while shrimp brings a sweet touch. You can also mix in extra fruits like berries. Strawberries or blueberries add a burst of color and flavor. They make the salad even more vibrant and exciting. For the full recipe, check out the Peachy Avocado Delight 🥭🥗 section. To store leftovers, place the salad in an airtight container. This helps keep the salad fresh. Make sure to seal it well. Keep it in the refrigerator. It will stay good for about one day. The avocado may brown a bit, but it remains tasty. To help maintain freshness, you can add a squeeze of lemon. This slows down browning and keeps flavors bright. You cannot freeze this salad. Freezing will change the texture of the peaches and avocados. They may become mushy when thawed. Enjoy the salad fresh for the best taste and experience. You can enjoy leftovers cold straight from the fridge. The cool salad is refreshing on warm days. If you prefer it warm, gently reheat it. Use a pan over low heat. Heat just until warm, but avoid cooking it. This keeps the flavors intact and the ingredients from getting mushy. Enjoy every bite of your Peach and Avocado Salad! For the full recipe, check out the detailed instructions above. Yes, you can make this salad ahead of time. To keep it fresh, follow these steps: - Prep ingredients separately: Dice your peaches and avocados. Store them in separate containers. - Mix greens and toppings: Combine arugula, feta, and pecans in another bowl. - Make the dressing: Whisk together honey and lemon juice. Store in a small jar. When ready to serve, mix everything together for a fresh taste. This method helps prevent browning. This salad is both tasty and healthy. Here’s a quick look at its nutrition: - Calories: About 250 per serving - Protein: 5 grams - Fat: 18 grams - Carbohydrates: 22 grams - Fiber: 6 grams It offers a good mix of healthy fats from avocados and protein from feta. You can easily make this salad vegan. Here are some swaps: - Cheese: Replace feta with vegan cheese or omit it. - Honey: Use maple syrup or agave nectar instead of honey. These changes keep the salad creamy and sweet without dairy. This salad pairs well with many dishes. Here are a few ideas: - Grilled chicken or fish: Adds protein and complements the fruit. - Quinoa or rice: Serve as a side dish for a fuller meal. - Bruschetta: Offers a crunchy contrast to the salad's softness. These options create a balanced and satisfying meal. For the full recipe, check out Peachy Avocado Delight. This blog post detailed how to make a refreshing Peach and Avocado Salad. You learned about the best fresh ingredients, like ripe peaches and avocados, and useful tips for preparation and mixing. I shared ways to enhance flavor and present your salad beautifully, along with easy swaps and storage tips. In conclusion, this salad brightens any meal. Experiment with ingredients and enjoy fresh flavors. Make it your own!](https://goldendishy.com/wp-content/uploads/2025/06/36e1ff7f-d317-490a-9c34-18da7fd6bdcc-768x768.webp)