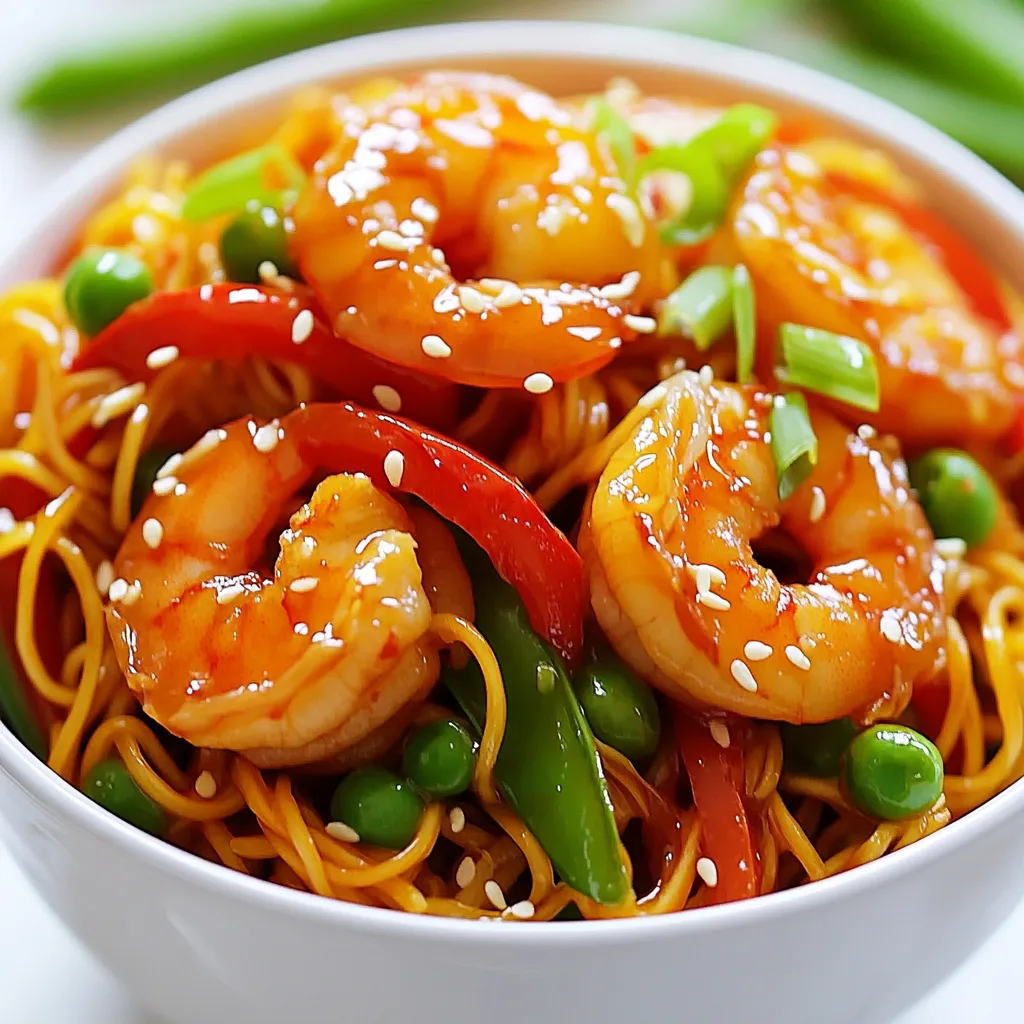
Are you craving a quick meal that packs a punch? Look no further than Spicy Shrimp Lo Mein! This dish combines tender shrimp with fresh vegetables and classic flavors, all in under 30 minutes. I’ll walk you through each step, from boiling the noodles to perfecting the spice levels. Whether you’re a busy parent or a cooking newbie, this guide ensures you’ll impress everyone at your dinner table. Let’s dive in!
Why I Love This Recipe
- Quick and Easy: This recipe comes together in just 30 minutes, making it perfect for busy weeknights.
- Flavor Packed: The combination of shrimp, fresh vegetables, and spicy sauce creates a deliciously bold flavor profile.
- Customizable: You can easily adjust the spice level and swap out vegetables based on your preference or what you have on hand.
- Healthy Option: Featuring shrimp and lots of veggies, this lo mein is a nutritious choice that doesn’t compromise on taste.
Ingredients
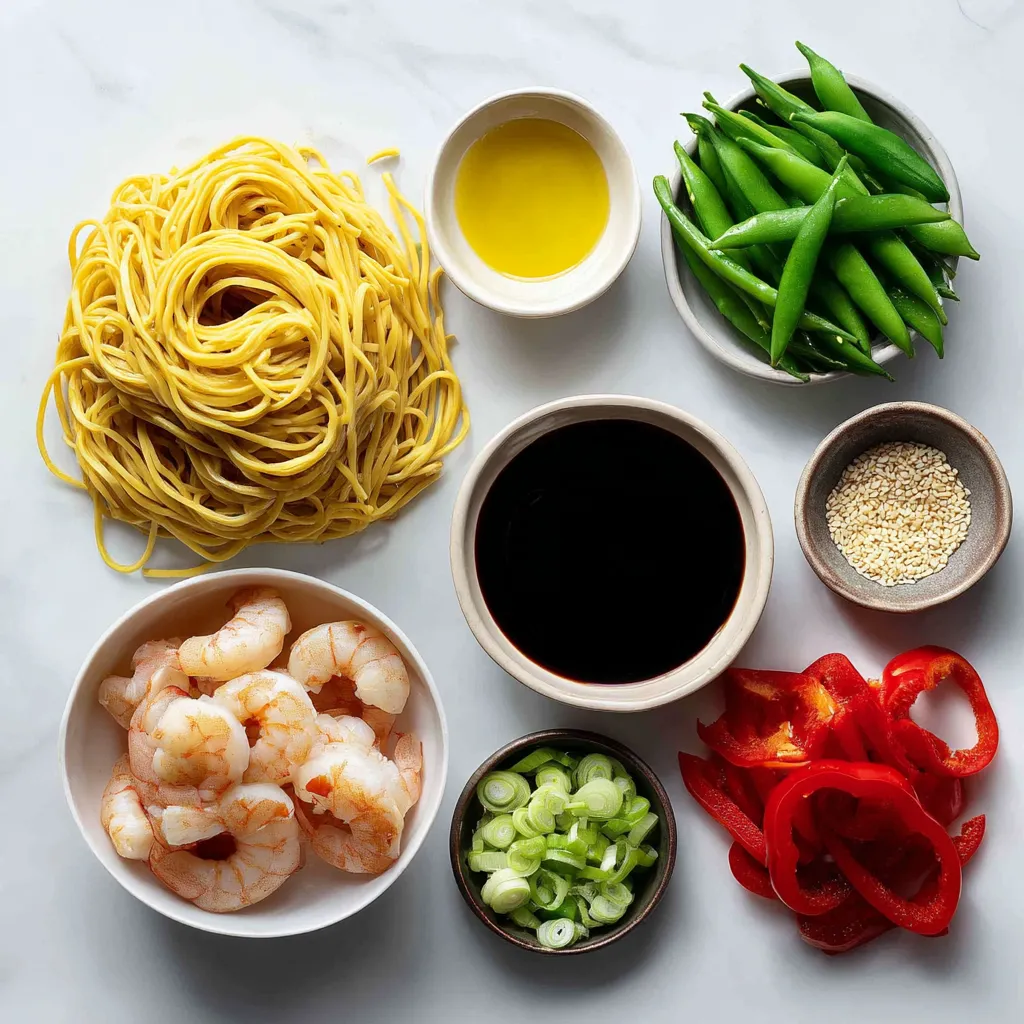
List of Ingredients
– 8 oz lo mein noodles
– 1 lb large shrimp, peeled and deveined
– 2 tablespoons vegetable oil
– 1 tablespoon sesame oil
– 1 red bell pepper, thinly sliced
– 1 cup snap peas, trimmed
– 3 cloves garlic, minced
– 2 inches fresh ginger, grated
– 2 tablespoons soy sauce
– 1 tablespoon chili garlic sauce
– 1 tablespoon oyster sauce
– 2 green onions, sliced (for garnish)
– Sesame seeds (for garnish)
– Salt and pepper to taste
I love the balance of flavors in this dish. The key ingredients are simple but powerful.
First, you need lo mein noodles. They give the dish its base and texture. Use fresh or dried noodles based on your preference.
Next, you have shrimp. Large, peeled, and deveined shrimp are the best choice. They cook fast and soak up flavors well.
For the oils, I use vegetable oil for cooking and sesame oil for flavor. They work together to enhance the dish.
The veggies are just as important. I like red bell pepper for sweetness and snap peas for crunch. They add color and nutrients to your meal.
Garlic and ginger bring warmth and depth. Their strong scents will fill your kitchen and make your mouth water.
Soy sauce, chili garlic sauce, and oyster sauce add umami. Adjust the chili garlic sauce to match your spice level.
Finally, green onions and sesame seeds are for garnish. They make the dish look great and add a nice crunch.
With these ingredients, you will create a vibrant and tasty meal in no time.
Step-by-Step Instructions
Cooking the Noodles
Start by boiling a large pot of water. Add salt to the water to enhance the flavor of the noodles. Once the water boils, add 8 oz of lo mein noodles. Cook them according to the package instructions until they are al dente. This usually takes about 3 to 5 minutes. After cooking, drain the noodles in a colander. To prevent sticking, drizzle the noodles with 1 tablespoon of sesame oil and toss them gently. Set them aside for later.
Sautéing the Shrimp
In a large skillet or wok, heat 2 tablespoons of vegetable oil over medium-high heat. Once the oil is hot, add 1 lb of peeled and deveined shrimp. Lightly season the shrimp with salt and pepper. Sauté the shrimp for 2 to 3 minutes. You know they are done when they turn pink and opaque. Remove the shrimp from the skillet and keep them warm on a plate.
Stir-frying the Vegetables
In the same skillet, add 3 cloves of minced garlic and 2 inches of grated ginger. Cook for about 30 seconds until fragrant. Next, add 1 thinly sliced red bell pepper and 1 cup of trimmed snap peas. Stir-fry the vegetables for 3 to 4 minutes. They should be bright and slightly tender but still crisp.
Combining Ingredients
Return the cooked shrimp to the skillet with the vegetables. Now, add the lo mein noodles to the mix. Pour in 2 tablespoons of soy sauce, 1 tablespoon of chili garlic sauce, and 1 tablespoon of oyster sauce. Gently toss everything together for 2 to 3 minutes. Make sure the noodles and shrimp are well coated in the sauce and heated through.
Garnishing and Serving
After combining, remove the skillet from the heat. For a beautiful presentation, serve the lo mein hot. Garnish with sliced green onions and a sprinkle of sesame seeds. This adds both flavor and visual appeal to your dish. Enjoy your meal!
Tips & Tricks
Achieving Perfect Shrimp
– Choose large shrimp that are fresh and firm.
– Look for shrimp with a slight sheen and no strong odor.
– To cook shrimp, heat oil in a skillet over medium-high heat.
– Cook shrimp for 2-3 minutes until they turn pink.
– To avoid rubbery shrimp, do not overcook them.
Overcooking makes shrimp tough and chewy. The right timing is key.
Enhancing Flavor
– Add spices like red pepper flakes or black pepper for extra heat.
– Use garlic powder or onion powder to boost the taste.
– Adjust chili garlic sauce based on your spice preference.
– Consider adding a splash of lime juice for brightness.
Experiment with flavors to find your perfect balance.
Cooking Methods
– You can steam lo mein instead of boiling for a different texture.
– Try stir-frying in a wok for a smoky flavor.
– For meal prep, cook a big batch of shrimp and noodles ahead.
– Store cooked noodles in oil to prevent sticking.
Meal prep saves time on busy weeknights and makes cooking easier.
Pro Tips
- Use Fresh Ingredients: Whenever possible, use fresh vegetables and shrimp for the best flavor and texture. Fresh ingredients make a noticeable difference in taste.
- Control the Heat: Adjust the amount of chili garlic sauce based on your heat preference. Start with less and add more if you prefer a spicier dish.
- Don’t Overcook the Noodles: Make sure to cook the lo mein noodles just until al dente. They will continue to cook when you stir-fry them with the other ingredients.
- Garnish for Flavor: Don’t skip the green onions and sesame seeds! They add a fresh crunch and enhance the overall presentation of the dish.
Variations
Protein Substitutes
You can swap shrimp for many other proteins. Chicken works well and has a mild flavor. Tofu is a great choice for a plant-based option. When using chicken, cook it for about 5-7 minutes until it is no longer pink. If you use tofu, sauté it until golden brown to add texture. Adjust cooking times based on what protein you choose.
Vegetarian/Vegan Options
To make Spicy Shrimp Lo Mein plant-based, just remove the shrimp. Use more veggies like broccoli, carrots, and mushrooms. Try adding some edamame for protein. Toss in some bok choy for crunch. This way, you keep the dish colorful and tasty while enjoying a veggie feast.
Noodle Alternatives
If you cannot find lo mein noodles, use spaghetti or rice noodles. Both can give you a nice texture. For gluten-free options, try rice noodles or zucchini noodles. They cook quickly and soak up the flavors well. Just remember to adjust the cooking time to ensure they don’t get mushy.
Storage Info
Leftover Storage
To keep your spicy shrimp lo mein fresh, store leftovers right away. Use airtight containers to prevent moisture loss. This keeps your dish tasty and safe to eat. I recommend glass or BPA-free plastic containers. They seal well and are easy to clean.
Reheating Tips
When reheating lo mein, use a skillet or a microwave. In a skillet, heat on low and add a splash of water. This keeps the noodles from drying out. Stir often to warm evenly. In the microwave, cover the bowl with a lid or wrap. Heat in short bursts, stirring in between. This helps maintain the texture and flavor.
Freezing Recommendations
You can freeze lo mein, but it’s best to do this before adding shrimp. Cook the noodles and veggies, then cool them. Place them in airtight containers. For shrimp, cook fresh when you’re ready to eat. To thaw, place in the fridge overnight, then reheat as described above. This way, your meal tastes fresh and delicious!
FAQs
What is Lo Mein?
Lo mein is a Chinese dish made from soft wheat noodles. It differs from chow mein, which uses crispy fried noodles. Lo mein noodles are soft, chewy, and perfect for soaking up sauce. Chow mein noodles are often crisp and crunchy. Both dishes use similar ingredients like vegetables and proteins, making them delicious comfort food.
Can I make this dish ahead of time?
Yes, you can prep this dish in advance. Cook the shrimp and vegetables, then store them in the fridge. Keep the noodles separate to avoid sogginess. You can store everything in airtight containers. When ready to eat, simply reheat everything in a pan. This saves time on busy nights.
How can I adjust the spiciness?
To make it milder, reduce the chili garlic sauce. You can also use less hot sauce or replace it with a sweeter sauce. For extra heat, add more chili garlic sauce or some red pepper flakes. Taste as you go to find your perfect spice level.
What sides pair well with Spicy Shrimp Lo Mein?
Some great sides include spring rolls, dumplings, or a fresh salad. You might also enjoy a hot bowl of miso soup. For drinks, try iced tea or a light beer. These pairings balance the flavors and make your meal complete.
Where does Lo Mein originate from?
Lo mein has roots in Chinese cuisine, tracing back to Cantonese cooking. It reflects the blend of cultures in China. The dish became popular in Western countries too, adapting to local tastes. Today, it is a staple in Chinese restaurants worldwide, loved for its flavor and versatility.
You now know how to make a delicious Spicy Shrimp Lo Mein. We covered the needed ingredients, step-by-step cooking instructions, and helpful tips to enhance the recipe. Remember, you can easily switch proteins or adjust spice levels based on your taste. Storing leftovers properly can keep them fresh for later. Whether you choose to serve this dish alone or with sides, it’s a tasty meal sure to impress. Enjoy your cooking, and have fun making this dish your ow


