Spicy Garlic Shrimp Tacos Flavorful and Easy Meal

Get ready to spice up taco night with my easy Spicy Garlic Shrimp Tacos! These tacos combine juicy, garlicky shrimp with flavorful toppings for a dish everyone will love. You don’t need to be a kitchen pro to whip these up—simply gather fresh ingredients, marinate the shrimp, and assemble your tacos. Let’s dive into this quick and tasty recipe that’s perfect for any weeknight dinner!
Why I Love This Recipe
- Bold Flavors: This recipe packs a punch with the combination of spicy cayenne and smoky paprika, creating a vibrant taste that tantalizes the palate.
- Quick and Easy:
- Fresh Ingredients: The use of fresh toppings like avocado, red cabbage, and cilantro adds a refreshing crunch and elevates the overall dish.
- Customizable Heat: You can easily adjust the level of spiciness to your liking, making it suitable for everyone from spice lovers to those who prefer milder flavors.
Ingredients
Main Ingredients
– 1 lb large shrimp, peeled and deveined
– 4 cloves garlic, minced
– 2 tablespoons olive oil
The main ingredients are simple yet bold. Fresh shrimp gives the dish a sweet taste. Garlic adds a strong kick that pairs well with the shrimp. Olive oil is key for cooking and adds richness.
Spices and Seasonings
– 1 teaspoon smoked paprika
– 1 teaspoon cayenne pepper
– 1 teaspoon ground cumin
– Salt and freshly ground black pepper to taste
Spices bring the shrimp to life. Smoked paprika adds depth and warmth. Cayenne pepper gives a spicy touch, so adjust it to your taste. Ground cumin adds a nice earthy flavor. Don’t forget to season with salt and pepper.
Taco Assembly Ingredients
– 8 small corn tortillas
– 1 ripe avocado, sliced
– 1 cup red cabbage, finely shredded
– ½ cup fresh cilantro, chopped
– 1 lime, cut into wedges
– Sour cream or Greek yogurt for drizzling (optional)
– Hot sauce for serving (optional)
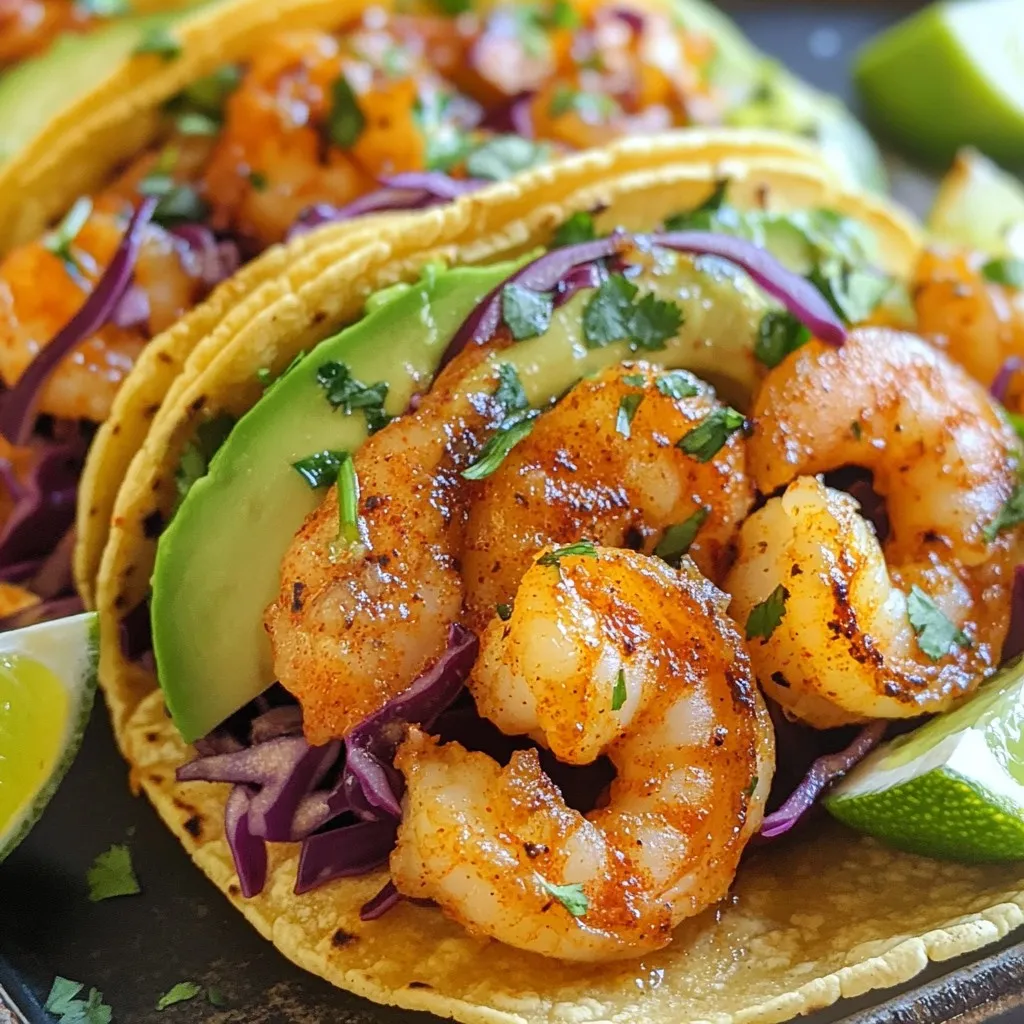
When it comes to tacos, assembly is key. Small corn tortillas are perfect for holding everything. Avocado adds creaminess and balances the spice. Red cabbage provides crunch and color. Fresh cilantro adds a burst of flavor. Lime wedges help brighten the dish. You can drizzle sour cream or yogurt if you like. Hot sauce is a great option for those who want more heat. Each ingredient works together to create a rich, flavorful taco experience.

Step-by-Step Instructions
Marinating the Shrimp
First, grab a large mixing bowl. Add the shrimp, minced garlic, and olive oil. Next, sprinkle in the smoked paprika, cayenne pepper, ground cumin, and salt and pepper to taste. Mix everything well to coat the shrimp evenly. Let them marinate for 15-20 minutes. This step helps the shrimp soak up all those tasty flavors.
Preparing Taco Toppings
While the shrimp marinates, it’s time to prepare the toppings. Slice the avocado into wedges and finely shred the red cabbage. Chop the fresh cilantro, too. Arrange these colorful ingredients on a platter. This makes it easy to grab what you need when you start building your tacos.
Cooking the Shrimp
Now, heat a large skillet over medium-high heat. Once hot, carefully add the marinated shrimp in a single layer. Cook them for 4-6 minutes total. After 2-3 minutes, flip the shrimp to cook the other side. They should turn pink and opaque when done. This means they’re perfectly cooked and ready for tacos.
Warming the Tortillas
While the shrimp cooks, warm the corn tortillas. You can do this in a skillet or directly over a gas flame. Heat each tortilla for a few seconds on each side until soft. Keep them warm by wrapping them in a clean kitchen towel. This keeps them nice and pliable for folding.
Assembling the Tacos
To assemble, take a warm tortilla and fill it with 3-4 shrimp. Next, add slices of avocado, shredded cabbage, and a sprinkle of fresh cilantro. Serve with lime wedges on the side for squeezing over the tacos. If you like, drizzle with sour cream or Greek yogurt. Don’t forget the hot sauce for extra heat!
Tips & Tricks
Enhancing Flavor
To make these tacos stand out, adjust the cayenne pepper to your heat level. If you like it spicy, add more! For a richer taste, marinate the shrimp for a longer time. Aim for at least 30 minutes. This lets the shrimp soak in all those tasty flavors.
Perfect Taco Texture
Using fresh corn tortillas is key for great texture. They should be soft and warm. To avoid soggy tortillas, heat them quickly in a skillet or over a flame. Keep them warm by wrapping them in a clean towel. This simple step keeps the tortillas from getting wet from the toppings.
Presentation Suggestions
Make your tacos look great on a colorful platter. Arrange them neatly to catch the eye. For a fresh look, garnish with extra cilantro and lime wedges. This adds color and makes each bite even better. Plus, it gives your guests a fun way to dress their tacos!
Pro Tips
- Fresh Shrimp Matters: Always use the freshest shrimp available for the best flavor and texture. Frozen shrimp can be used, but ensure they are completely thawed and drained before marinating.
- Adjusting Spice Levels: The cayenne pepper can be adjusted based on your heat preference. Start with less if you’re unsure, and you can always add hot sauce later for extra heat.
- Perfectly Warm Tortillas: To achieve soft and pliable tortillas, warm them for just a few seconds on a skillet or over a flame. Overheating can make them brittle.
- Garnish for Flavor: Don’t skip the fresh cilantro and lime wedges! They add brightness and flavor that perfectly complement the spicy shrimp.

Variations
Alternative Proteins
You can easily swap shrimp for other proteins. Chicken or fish works well in this recipe. Just follow the same marinating steps. For a vegetarian option, try grilled veggies or tofu. They add great flavor and texture.
Flavor Additions
To boost the taste, add diced tomatoes or jalapeños. These ingredients give a fresh kick. If you want a touch of sweetness, include mango or pineapple. These fruits contrast nicely with the spicy shrimp.
Different Tortilla Options
Tortillas are key to great tacos. You can use flour tortillas for a softer bite or lettuce wraps for a low-carb choice. If you’re feeling adventurous, try making your own tortillas. They taste amazing and will impress your friends.
Storage Info
Storing Leftovers
To keep your Spicy Garlic Shrimp Tacos fresh, separate the shrimp and tortillas. Store the shrimp in an airtight container. This helps keep them juicy. Place the tortillas in a different container. You can wrap them in foil or plastic wrap.
For toppings, like avocado and cabbage, use airtight containers too. This keeps them crisp and fresh. If you have leftover cilantro, store it in a small jar with water. Cover it with a plastic bag in the fridge.
Reheating Instructions
To reheat shrimp, use a skillet. Heat it on medium. Add a little olive oil. Cook for 2-3 minutes until warm. This method keeps the shrimp tender.
For tortillas, warm them in a skillet or on a gas flame. Heat them for just a few seconds on each side. This makes them soft without drying out. Keep them wrapped in a kitchen towel to stay warm.
Freezing Guidelines
You can freeze shrimp before cooking. Make sure they are clean and dry. Place them in a freezer bag and remove as much air as possible. They can stay in the freezer for up to three months.
If you have cooked shrimp left, you can freeze them too. Allow them to cool first. Then, place them in a freezer bag. They will keep well for up to two months. Just remember to thaw them in the fridge before reheating.
FAQs
Can I make Spicy Garlic Shrimp Tacos ahead of time?
Yes, you can prepare shrimp and toppings in advance. Marinate the shrimp and keep it in the fridge for up to 24 hours. This lets the flavors blend well. You can also chop the toppings ahead. Slice the avocado, shred the cabbage, and chop cilantro. Store them in separate containers. When it’s time to eat, just cook the shrimp and warm the tortillas. This method saves time and keeps everything fresh!
How do I adjust the spice level?
To change the heat in your tacos, you can play with the cayenne pepper. If you prefer less heat, cut the amount in half. You can also skip it altogether for mild tacos. For more heat, add extra cayenne or include sliced jalapeños. Hot sauce on the side lets everyone choose their spice level. Remember, you can always add spice, but it’s hard to take it away!
What can I serve with Spicy Garlic Shrimp Tacos?
These tacos pair well with many sides. Try a simple salad with lime dressing. Rice or quinoa make great additions too. For drinks, cold Mexican beer or a fruity margarita works well. You can also serve fresh salsa or guacamole for extra flavor. These sides make the meal fun and tasty!
Are these tacos gluten-free?
Yes, these tacos can be gluten-free! Use small corn tortillas instead of flour ones. Check the label to ensure they are 100% corn. If you want a lower-carb option, lettuce wraps work too. They are fresh and crunchy. This way, everyone can enjoy the meal, regardless of dietary needs!
Can I use frozen shrimp for this recipe?
Yes, you can use frozen shrimp! Just make sure to thaw it first. Place the shrimp in the fridge overnight or run it under cold water for quick thawing. Once thawed, peel and devein if needed. The flavor and texture will still be great. Just follow the same marinating and cooking steps as fresh shrimp. Enjoy your tasty tacos!
We explored how to make spicy garlic shrimp tacos, from selecting fresh ingredients to cooking and assembling. This dish is simple, bursting with flavor, and customizable. Use shrimp, spices, and a vibrant array of toppings to make it your own. You can even adjust the heat to fit your taste. Remember to store leftovers properly to enjoy them later. With a bit of creativity, these tacos can become a household favorite. Enjoy preparing and sharing this delicious mea

Spicy Garlic Shrimp Tacos
Ingredients
- 1 lb large shrimp, peeled and deveined
- 4 cloves garlic, minced
- 2 tablespoons olive oil
- 1 teaspoon smoked paprika
- 1 teaspoon cayenne pepper
- 1 teaspoon ground cumin
- to taste salt and freshly ground black pepper
- 8 small corn tortillas
- 1 ripe avocado, sliced
- 1 cup red cabbage, finely shredded
- 0.5 cup fresh cilantro, chopped
- 1 lime cut into wedges
- Sour cream or Greek yogurt for drizzling (optional)
- Hot sauce for serving (optional)
Instructions
- In a large mixing bowl, combine the peeled and deveined shrimp with the minced garlic, olive oil, smoked paprika, cayenne pepper, ground cumin, and a generous pinch of salt and pepper. Toss the mixture thoroughly to ensure each shrimp is well coated in the spices and garlic. Allow the shrimp to marinate for 15-20 minutes to absorb the flavors.
- While the shrimp is marinating, prepare the taco toppings: slice the avocado into wedges, finely shred the red cabbage, and chop the fresh cilantro. Arrange these ingredients on a platter or separate bowls for easy assembly later.
- Heat a large skillet over medium-high heat. Once hot, add the marinated shrimp in a single layer, ensuring not to overcrowd the pan. Cook the shrimp for 2-3 minutes on one side until they turn pink, then flip them over and cook for an additional 2-3 minutes until completely opaque and cooked through.
- Meanwhile, to warm the corn tortillas, place them in a separate skillet or directly over a gas flame for a few seconds on each side until they become soft and pliable. Keep them warm by wrapping them in a clean kitchen towel.
- To assemble the tacos, place 3-4 shrimp into each warm tortilla, then generously top with slices of avocado, shredded red cabbage, and a sprinkle of fresh cilantro.
- Serve the tacos with lime wedges on the side for squeezing over the top, and drizzle with sour cream or Greek yogurt if desired. Don't forget the hot sauce for those who crave extra heat!


![To make vegan creamy pesto pasta, gather these fresh and simple ingredients. - 12 oz pasta (penne, spaghetti, or your favorite variety) - 2 cups fresh basil leaves, tightly packed - 1/2 cup raw cashews (soaked in water for at least 2 hours) - 1/4 cup nutritional yeast (for a cheesy flavor) - 3 cloves garlic, minced - 1/4 cup extra virgin olive oil - 1 tablespoon fresh lemon juice - Sea salt and freshly ground black pepper, to taste - 1 cup cherry tomatoes, halved (for topping) - Extra fresh basil leaves (for garnish) Each ingredient plays a vital role. The pasta is the base, while basil brings freshness. Cashews create a rich, creamy texture. Nutritional yeast adds a cheesy taste, perfect for vegan dishes. Garlic gives depth, while olive oil provides smoothness. Lemon juice brightens the flavors. Salt and pepper enhance everything. Cherry tomatoes add color and sweetness. Extra basil leaves make the dish look beautiful. For the full recipe, check out the link to ensure a delicious meal! First, fill a large pot with water and add a generous amount of salt. Bring the water to a rapid boil. This step is key; the salt helps flavor the pasta. Once boiling, add 12 ounces of your favorite pasta, like penne or spaghetti. Cook according to the package instructions. You want the pasta to be al dente, which means it should be tender but still firm to bite. Usually, this takes about 8 to 12 minutes. When the pasta is ready, drain it well and set it aside. Next, it’s time to make the vegan pesto. Grab your blender or food processor. Add 2 cups of fresh basil leaves, 1/2 cup of soaked raw cashews, and 1/4 cup of nutritional yeast. Also, include 3 cloves of minced garlic and 1 tablespoon of fresh lemon juice. Season with a pinch of sea salt and freshly ground black pepper. Blend this mixture until it becomes smooth and creamy. If it doesn't blend well, scrape down the sides of the blender and blend again until you get a silky texture. Now, combine the drained pasta with the creamy pesto sauce. Use a large mixing bowl for this. Pour the pesto over the pasta. With a pair of tongs or a spatula, toss everything together. Ensure that each piece of pasta gets coated with the vibrant pesto. If the sauce looks too thick, add a little water, one teaspoon at a time, until it reaches the desired consistency. Don't forget to taste! Adjust the seasoning with more salt, pepper, or lemon juice if needed. Finally, gently fold in 1 cup of halved cherry tomatoes for a fresh burst of flavor. Serve this delicious dish warm, garnished with extra basil leaves. Enjoy your vegan creamy pesto pasta! For the complete recipe, check the [Full Recipe]. Soaked cashews are the secret to a smooth and creamy sauce. They soften and blend well, making the pesto rich. Soak them in water for at least two hours before use. This step is key for a silky texture. If your pesto is too thick, don’t worry. Just add water! Start with a teaspoon at a time. Blend until you reach your desired creaminess. This helps the sauce hug the pasta perfectly. Don’t stop at just basil! You can spice it up with some red pepper flakes for heat. A pinch of black pepper adds depth. Try adding a bit of garlic powder for more flavor. Lemon juice adds freshness, but balance is key. If it’s too tangy, add a pinch of sugar or more cashews. This helps round out the flavors and brings the dish to life. Pair this pasta with roasted vegetables for a colorful plate. A side salad adds crunch and freshness. For a drink, consider a light white wine, like Sauvignon Blanc. As for portion sizes, aim for about one and a half cups per person. This ensures everyone leaves satisfied. Enjoy this dish warm for the best flavor experience! {{image_4}} You can change nuts or seeds in your pesto. Try using almonds or sunflower seeds. Each option brings a unique taste. For those avoiding gluten, select gluten-free pasta. Options like brown rice or chickpea pasta work well. Both choices give a nice texture and flavor. To mix up the flavor, add different herbs like parsley or spinach. These herbs bring extra freshness to your dish. You can also incorporate various vegan cheeses. Options like cashew cheese or nutritional yeast can enhance the creamy taste. This helps create layers of flavor in your pesto. Make your dish fresh by using seasonal veggies. For example, zucchini or asparagus can add crunch and color. You can also try different tomatoes. Roasted tomatoes can bring a sweet touch, while cherry tomatoes add a pop of freshness. Finish with garnishes like pine nuts or extra basil for a lovely look. For the complete recipe, check the Full Recipe. After enjoying your vegan creamy pesto pasta, store any leftovers in an airtight container. This keeps the pasta fresh and tasty. Place it in the fridge right away. The best storage time is up to 3 days. Beyond that, the pasta may lose its flavor and texture. To reheat your pasta, the best method is using a stovetop. Heat a pan over medium heat. Add a splash of water or olive oil to keep it moist. Stir gently to warm it up. When reheating, avoid high heat, as this can dry out the sauce. You want to keep that creamy goodness intact. Enjoy your delicious meal again! To make vegan creamy pesto pasta, follow these simple steps: 1. Cook the Pasta: Bring salted water to a boil. Add 12 oz of your pasta and cook until tender. This usually takes about 8-12 minutes. Drain and set aside. 2. Prepare the Pesto: In a blender, add 2 cups of fresh basil leaves, 1/2 cup of soaked raw cashews, and 3 minced garlic cloves. Pour in 1/4 cup of nutritional yeast and 1 tablespoon of lemon juice. Add a pinch of sea salt and black pepper. Blend until smooth. 3. Emulsify with Olive Oil: While blending, slowly add 1/4 cup of extra virgin olive oil. Keep blending until creamy. If it’s too thick, add water, one teaspoon at a time. 4. Combine Pasta and Pesto: In a large bowl, mix the drained pasta with your creamy pesto. Toss gently to coat the pasta well. 5. Final Touches: Taste the mix and adjust the seasoning. Fold in 1 cup of halved cherry tomatoes for a fresh touch. 6. Serve: Serve warm with extra basil leaves on top. Enjoy your delicious vegan creamy pesto pasta! Yes, you can freeze vegan creamy pesto pasta. Here are some tips to keep it tasty: - Cool Before Freezing: Let the pasta cool down before packing it. - Use Airtight Containers: Store the pasta in airtight containers or freezer bags. - Leave Space: Leave some room in the container for the pasta to expand. - Label and Date: Always label your containers with the date. Use within 2-3 months for best quality. When ready to eat, thaw in the fridge overnight. Reheat gently on the stove or in the microwave. Add a splash of water if it seems dry. If you don’t have nutritional yeast, try these alternatives: - Grated Vegan Cheese: Use a dairy-free cheese for a similar flavor. - Ground Flaxseed: This can add a nutty taste, though it won't mimic the cheese flavor. - T nutritional yeast: You can use this if you want a similar profile. - Parmesan Substitute: Some brands offer vegan parmesan that works well in pesto. Each substitute will change the flavor a bit, so adjust to your taste! This blog post covered how to make vegan creamy pesto pasta. You learned about ingredients, cooking pasta, and blending the pesto. We explored tips for smooth texture and flavor. I shared variations to keep things fresh, plus storage and reheating advice. In the end, making this dish is quick and fun. Enjoy experimenting with flavors and textures. This pasta will please vegans and non-vegans alike!](https://goldendishy.com/wp-content/uploads/2025/07/928f57b2-1357-48f3-b20e-4d7b01e4c937-768x768.webp)
![To make a Spicy Chickpea Buddha Bowl, you need the following main ingredients: - 1 can (15 oz) chickpeas, drained and rinsed - 2 tablespoons olive oil - 1 tablespoon smoked paprika - 1 teaspoon ground cumin - 1/2 teaspoon cayenne pepper (adjust for spiciness) - Salt and black pepper, to taste - 1 medium sweet potato, peeled and diced - 1 cup quinoa, rinsed - 2 cups vegetable broth (or water) - 1 cup fresh spinach, roughly chopped - 1/2 cup cherry tomatoes, halved - 1 ripe avocado, sliced - 1/4 cup tahini - 2 tablespoons fresh lemon juice - Fresh cilantro leaves for garnish These ingredients blend well to give you a burst of flavor. The chickpeas add protein, while the sweet potato brings sweetness. Quinoa provides a hearty base, and the veggies add freshness. You can enhance your bowl with these optional toppings: - Feta cheese, crumbled - Pumpkin seeds or sunflower seeds - Fresh herbs like parsley or basil - Sliced radishes for crunch - Hot sauce for extra heat These toppings let you customize each bowl. They add flavor, texture, and nutrition. This Buddha bowl offers great health perks: - Chickpeas are high in protein and fiber. - Sweet potatoes are rich in vitamins A and C. - Quinoa is a complete protein and gluten-free. - Spinach packs iron and antioxidants. - Avocado provides healthy fats for heart health. Together, these ingredients create a balanced meal. You get energy, nutrients, and delicious flavors. For the full recipe, click here: [Full Recipe]. Start by preheating your oven to 400°F (200°C). In a bowl, mix the drained chickpeas with olive oil, smoked paprika, ground cumin, cayenne pepper, salt, and black pepper. Toss until every chickpea gets the spice mix. Spread them out on a baking sheet in a single layer. Roast them for 20-25 minutes. Shake the pan halfway through to make sure they cook evenly. While the chickpeas roast, take a separate baking sheet for the sweet potatoes. Toss the diced sweet potato in olive oil. Season with salt and black pepper. Place the sweet potatoes in the oven alongside the chickpeas. Roast for about 25-30 minutes. Stir them once to help them caramelize and soften. Next, rinse the quinoa under cold water. In a medium pot, combine the rinsed quinoa with vegetable broth or water. Bring it to a boil on high heat. Once it boils, lower the heat, cover the pot, and let it simmer for 15 minutes. When done, the quinoa should be fluffy and all the liquid absorbed. Remove it from heat and let it sit for 5 minutes. Fluff it gently with a fork. For the tahini dressing, whisk together tahini, fresh lemon juice, and a few tablespoons of water in a small bowl. Keep whisking until smooth. Adjust the water to make it drizzle easily. Season with salt to taste. To assemble, take a serving bowl and add a generous scoop of fluffy quinoa as the base. Next, layer on the roasted sweet potatoes, crispy chickpeas, chopped spinach, halved cherry tomatoes, and slices of avocado. Make it colorful for a beautiful presentation! Drizzle your tahini dressing over the assembled bowls. Let it cascade down the ingredients for a lovely effect. Top it off with fresh cilantro leaves. Serve right away and enjoy the vibrant flavors of this wholesome meal! For the full recipe, check out the detailed instructions above. You can make this bowl your own. Try different grains like brown rice or farro. Add more veggies like bell peppers or carrots for color and crunch. If you love heat, add jalapeños or chili flakes. You can swap chickpeas for black beans for a different taste. Enjoy your personal twist on this spicy chickpea Buddha bowl. The cooking time can change based on your oven. If your oven runs hot, check the chickpeas and sweet potatoes early. You want them crispy but not burnt. If you prefer softer veggies, roast them longer. Just keep an eye on them to avoid overcooking. Adjusting the time helps you get the best texture. Serve this bowl warm for the best taste. Pair it with a crisp green salad for balance. You can also add a dollop of yogurt or a sprinkle of feta cheese for creaminess. This bowl is perfect for meal prep. Just store each element separately. When ready to eat, combine them for a quick, healthy meal. You can find the full recipe here: [Full Recipe]. {{image_4}} This dish is naturally vegan and gluten-free. Chickpeas, quinoa, and veggies make it great for all. You don’t need to change the recipe to fit these diets. Just enjoy! You can switch out chickpeas for black beans or lentils. Try brown rice instead of quinoa. Sweet potatoes can be replaced with butternut squash. Each swap brings a new flavor. Use seasonal veggies for freshness. In spring, add asparagus or peas. In summer, use zucchini or bell peppers. In fall, try roasted Brussels sprouts or pumpkin. In winter, root veggies shine. These changes keep your Buddha bowl exciting. Check the full recipe for more ideas. To keep your Spicy Chickpea Buddha Bowl fresh, place leftovers in an airtight container. Make sure it cools to room temperature before sealing. Store it in the fridge for up to three days. The flavors will meld, making it even tastier the next day! When you're ready to enjoy your leftovers, you can reheat them in a few ways. The microwave works well for quick meals. Heat in short bursts, stirring in between. If you prefer, you can also use a skillet over medium heat. Add a splash of water to keep it moist while you warm it up. If you want to save some for later, freezing is a great option. Place the chickpeas and sweet potatoes in a freezer-safe bag. Keep the quinoa and fresh veggies separate. They freeze best when stored this way. You can freeze the chickpeas and sweet potatoes for up to three months. Just thaw in the fridge overnight before reheating. Enjoy your meal anytime, even when you're busy! For the full recipe, check out [Full Recipe]. Chickpeas are packed with protein and fiber. They help you feel full longer. They also contain essential vitamins and minerals. Eating chickpeas can boost heart health and aid digestion. They may help regulate blood sugar levels too. Plus, they are versatile and fit in many dishes. Yes, you can make parts of the Spicy Chickpea Buddha Bowl ahead of time. You can roast the chickpeas and sweet potatoes a day before. Store them in airtight containers in the fridge. You can also cook the quinoa in advance. Just reheat it when you are ready to assemble the bowl. If you don’t have tahini, try using almond butter or sunflower seed butter. You can also make a quick dressing with yogurt or avocado. Each option brings a unique flavor to the bowl. Feel free to experiment and find what you like best! To change the spice level, adjust the cayenne pepper amount in the recipe. If you prefer it milder, use less or skip it entirely. For more heat, add extra cayenne or some hot sauce. Taste as you go to find your perfect balance. Absolutely! You can include any veggies you love. Roasted broccoli, bell peppers, or zucchini work well. Fresh ingredients like cucumber or radishes add crunch. Mix and match to create your ideal bowl. The more colors, the better it looks and tastes! The Spicy Chickpea Buddha Bowl packs flavor and nutrition. We explored key ingredients, step-by-step prep, and tips for easy customizations. You can adjust the heat, swap ingredients, or even try new seasonal veggies. In the end, this meal is fun to make and eat. It supports your health and keeps well, too. Dive into your own bowl and enjoy the amazing taste and benefits!](https://goldendishy.com/wp-content/uploads/2025/06/fbd17ced-051b-409f-8c76-69a7b070695a-768x768.webp)


![- 2 cups elbow macaroni - 4 cups water - 1 teaspoon salt - 2 tablespoons unsalted butter - 1 cup sharp cheddar cheese, shredded - 1 cup Monterey Jack cheese, shredded - 1/2 cup cream cheese, softened - 1 teaspoon garlic powder - 1 teaspoon onion powder - 1/4 teaspoon black pepper - 1/4 teaspoon smoked paprika - Fresh parsley, chopped - Chives, chopped To make delicious Instant Pot mac and cheese, you need a few key ingredients. First, the elbow macaroni is your base. It holds the sauce well and cooks up perfectly. Water helps cook the pasta and creates steam. The salt adds flavor to the mix. Unsalted butter enriches the dish, making it creamy. Next, the cheese! Cheddar cheese gives that classic flavor, while Monterey Jack adds creaminess. Cream cheese helps bind everything together. For seasonings, garlic powder and onion powder bring depth. Black pepper adds a bit of heat. Smoked paprika gives a nice smoky touch. Finally, if you want to garnish, fresh parsley and chives add color and flavor. These ingredients come together to create a comforting dish that feels like a hug in a bowl. You can find the full recipe [here]. Start by adding the elbow macaroni into the Instant Pot. Next, pour in 4 cups of water. Sprinkle in 1 teaspoon of salt for flavor. Make sure all the macaroni is covered in water. Secure the lid tightly on the Instant Pot. Set the pressure release valve to the sealing position. Select the manual high-pressure setting. Adjust the timer to cook for 4 minutes. When the cooking cycle ends, do a quick pressure release. Carefully turn the valve to venting. Wait until the pressure is fully released. Open the lid slowly, being cautious of steam. Stir the noodles gently to separate any that are stuck together. Add 2 tablespoons of butter right away. Then, mix in 1 cup of sharp cheddar cheese, 1 cup of Monterey Jack cheese, and 1/2 cup of softened cream cheese. Next, add 1 teaspoon of garlic powder, 1 teaspoon of onion powder, 1/4 teaspoon of black pepper, and 1/4 teaspoon of smoked paprika. Stir well until the cheese melts into a creamy sauce. If your mac and cheese is too thick, add a splash of water or milk. Stir until it reaches your desired creamy consistency. Taste your mac and cheese and adjust the seasoning as needed. You can add a pinch more salt or pepper if you want. Serve your dish hot and enjoy the creamy comfort of this Instant Pot mac and cheese. For the full recipe, check the details above. To make your mac and cheese shine, choose a mix of cheeses. I love sharp cheddar for its bold taste and Monterey Jack for creaminess. Together, they create a rich flavor that sings. For a twist, add a bit of gouda or parmesan for depth. Preventing sticking is key. Make sure to stir the pasta before cooking. Adding a touch of oil helps too. This keeps the macaroni from clumping together in the pot. Cook in larger batches to save time. The Instant Pot can handle it! You can double the recipe easily. This way, you have leftovers for quick meals later. Just store them in the fridge. Clean-up can be quick if you act fast. Rinse the pot right after use. Soaking it for a few minutes also helps. Use a soft sponge to keep it scratch-free. For a stunning display, serve your mac and cheese in a beautiful bowl. Top it with extra cheese or crispy breadcrumbs for texture. Fresh herbs like parsley or chives add color and flavor too. Pair your dish with a simple salad or garlic bread. This makes a balanced meal that everyone will enjoy. {{image_4}} You can switch up the cheese for fun. Try using Gouda for a rich taste. It melts well and adds creaminess. Parmesan also works great. It gives a salty, nutty kick. If you're dairy-free, nut cheese is a good choice. It can make your dish creamy while keeping it plant-based. Want to make your mac and cheese more exciting? Add veggies! Broccoli or spinach mixes in nicely. They boost both flavor and nutrition. You can also throw in proteins like chicken or bacon. These ingredients add heartiness and make the dish more filling. If you like heat, spice it up! Add jalapeños for a fresh kick. Hot sauce can also bring the heat. Another fun idea is using smoky chipotle. It gives a deep, smoky flavor that pairs well with cheese. These spicy twists can take your mac and cheese to the next level. For the full recipe, check out the instructions above. Enjoy creating your perfect bowl of mac and cheese! After you make your Instant Pot mac and cheese, let it cool down first. This helps keep the creamy texture. Once cooled, place it in an airtight container. I like to use glass containers for easy reheating. Store it in the fridge for up to three days for the best taste. When it’s time to enjoy those leftovers, you can reheat them in two ways. The microwave is quick and easy. Just place a portion in a bowl and cover it. Heat for one minute, stir, and heat again if needed. The stovetop method keeps the texture nice. Add a splash of milk to a pan, stir in the mac and cheese, and heat on medium until hot. You can freeze mac and cheese for later! Let it cool completely, then spoon it into freezer-safe bags. Press out as much air as possible before sealing. It can stay fresh for about three months. To thaw, move it to the fridge overnight. After thawing, reheat it using the stovetop method for a creamy finish. To make Instant Pot Mac and Cheese, you start by adding elbow macaroni to the pot. Pour in water and add salt. Then, secure the lid and cook on high pressure for 4 minutes. After that, release the pressure quickly. Open the lid and stir the pasta. Add butter and mix in your cheeses. Finally, stir in the seasonings until smooth. You can find the full recipe for more details. Yes, you can use gluten-free macaroni. Just substitute regular pasta with gluten-free options. The cooking time may stay the same, but check the package for specific instructions. Some gluten-free pasta might need a little less time, so watch closely. This way, you can enjoy a creamy dish without gluten. If your mac and cheese is too thick, don’t worry! You can fix it easily. Add a splash of water or milk to the pot. Stir well until it reaches your desired creaminess. If it still seems thick, add a bit more liquid. This will help create that perfect velvety texture. You learned how to make Instant Pot mac and cheese with ease. We covered ingredients, cooking steps, and tips for perfect flavor. You can customize your dish with different cheeses and add-ins. Remember to store leftovers properly to enjoy later. Now it’s your turn to create a creamy, cheesy delight. Experiment with flavors and share your results! Enjoy your cooking journey.](https://goldendishy.com/wp-content/uploads/2025/07/fbbf4859-6ee8-4460-a645-018ee95cc89f-768x768.webp)
