Spicy Chili Crisp Ramen Bowls Quick and Flavorful Meal

Looking for a quick and tasty meal? These Spicy Chili Crisp Ramen Bowls are ready in just 15 minutes! Packed with rich flavors from shiitake mushrooms and fresh spinach, this dish is both comforting and exciting. I’ll guide you through simple steps to elevate instant ramen into a gourmet treat. Whether you’re in a rush or just craving something spicy, this recipe is perfect for you. Let’s dive in!
Ingredients
Main Ingredients
– 2 packs of instant ramen noodles
– 4 cups vegetable broth
– 1 cup shiitake mushrooms, sliced
– 1 cup baby spinach
Optional Toppings
– 1 boiled egg, halved
– 2 green onions, chopped
– Sesame seeds for garnish
– Fresh cilantro for garnish
Seasonings and Oils
– 1 tablespoon soy sauce
– 1 tablespoon chili crisp
– 1 tablespoon sesame oil
Gather these items first. The instant ramen noodles cook fast and make this meal quick. I love using vegetable broth for a rich flavor. Shiitake mushrooms add a nice depth, while baby spinach offers a fresh touch.
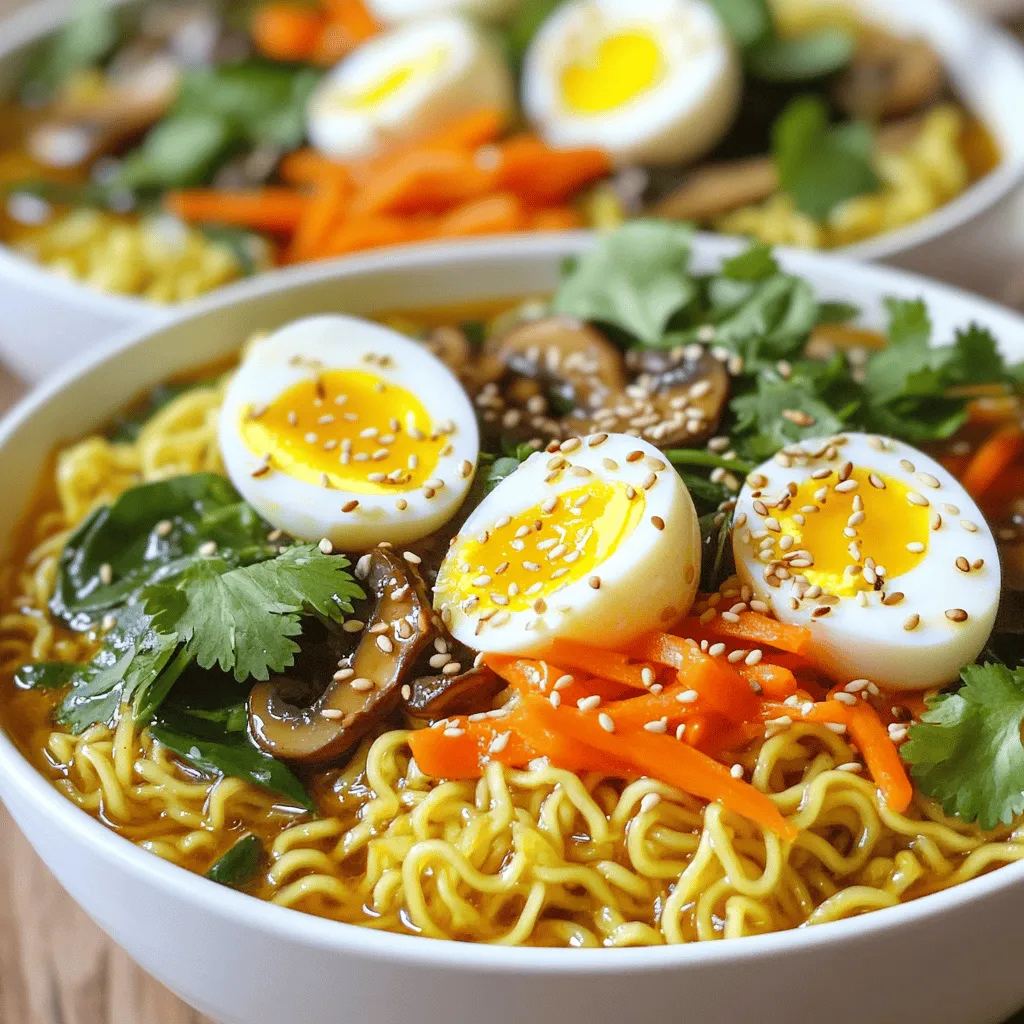
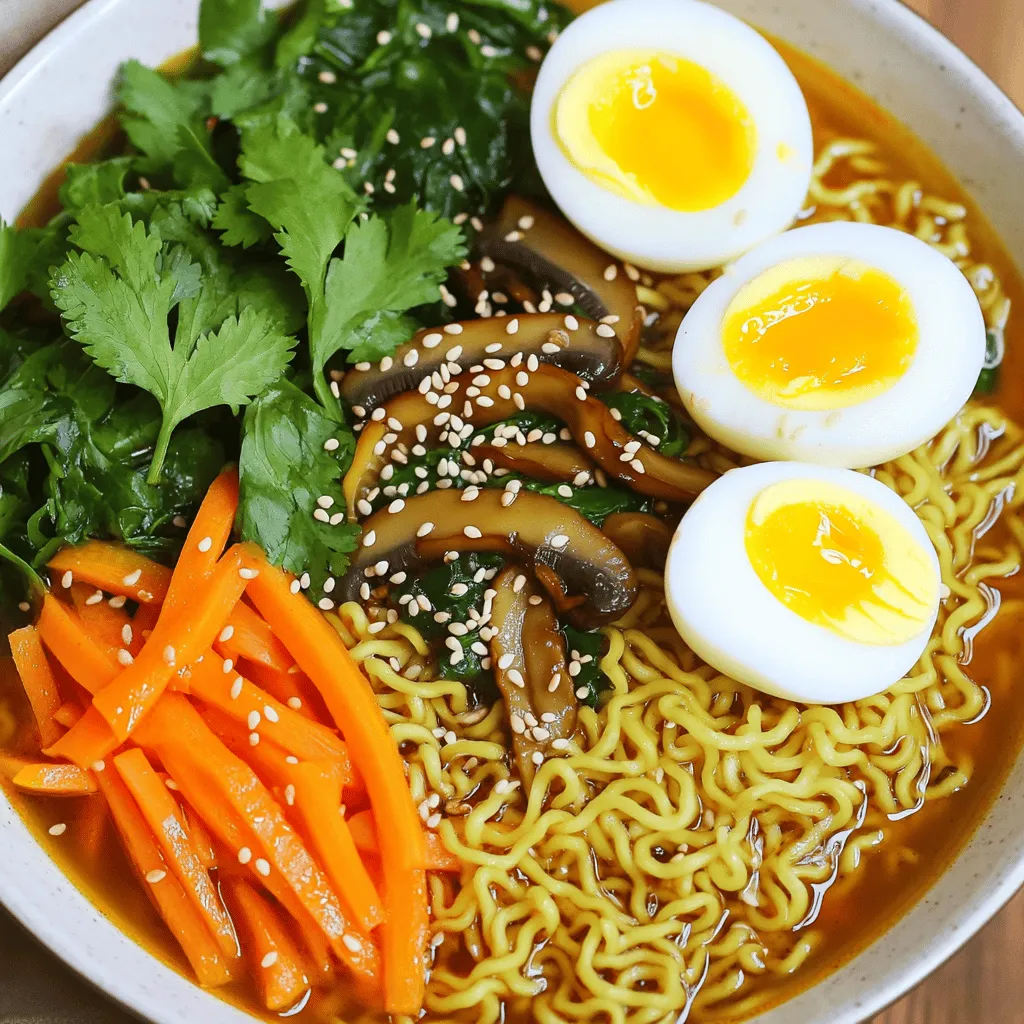
For optional toppings, a boiled egg adds creaminess. Green onions give a nice crunch, and sesame seeds add a little flair. Fresh cilantro brightens the dish and makes it look pretty.
Don’t forget the seasonings! Soy sauce brings umami, while chili crisp gives heat. Sesame oil adds a nutty taste. Adjust the chili crisp to make your bowl just right for your taste.
Step-by-Step Instructions
Preparing the Broth
Pour 4 cups of vegetable broth into a large pot. Set the heat to medium. Bring the broth to a rolling boil. Watch it closely to prevent overboiling. This step is key for a rich flavor.
Cooking the Ramen
Once the broth is boiling, add 2 packs of instant ramen noodles. Cook them for 3-4 minutes. Stir occasionally to keep them from sticking. This gives you the perfect noodle texture.
Incorporating Vegetables
In the last minute of cooking, add the sliced shiitake mushrooms, julienned carrot, and baby spinach. This timing helps them soften while staying fresh. Fresh veggies add great color and crunch.
Finishing Touches
Decide if you want a dry or soup-like dish. Drain excess broth for a dryer bowl or leave it in for a soup. Mix in 1 tablespoon of soy sauce, 1 tablespoon of chili crisp, and 1 tablespoon of sesame oil. Stir well to combine all flavors.
Plating Your Dish
Remove the pot from heat. Ladle the ramen mixture into bowls. Make sure each bowl has a good mix of noodles and veggies. For garnishing, top with halved boiled eggs, chopped green onions, sesame seeds, and fresh cilantro. These add flavor and a nice look.
Tips & Tricks
Enhancing Flavor
To make your ramen bowls pop, adjust the chili crisp to your spice level. Start with one tablespoon. If you want more heat, add more. My tip is to taste as you go. This way, you control the spice. For the soy sauce, choose a high-quality brand. Brands like Kikkoman or Tamari provide deep umami flavors. They enhance the broth and balance the heat perfectly.
Cooking Time Hacks
Want to speed up prep? Chop your veggies ahead of time. Use pre-sliced shiitake mushrooms and pre-washed baby spinach. This cuts down your cooking time. Another tip: boil the broth while you chop. This way, everything is ready when you need it.
Presentation Tips
For garnishing, get creative! Use halved boiled eggs, green onions, and sesame seeds. They add color and crunch. Fresh cilantro gives a pop of flavor too. Consider serving with crispy seaweed or pickled vegetables. These add texture and elevate your dish. A well-garnished bowl makes your meal more inviting and fun!

Variations
Protein Additions
You can easily add protein to your spicy chili crisp ramen bowls. Chicken, tofu, or shrimp work well. Just cook the protein separately and add it to the bowl before serving. For a vegetarian twist, try using chickpeas or edamame. These options add both protein and texture.
Noodle Alternatives
While instant ramen noodles are quick, you can use other noodles too. Rice noodles or udon noodles are excellent substitutes. If you’re gluten-free, consider using rice noodles or gluten-free ramen. They will still soak up the flavors well.
Broth Customizations
Homemade broth can take your ramen to the next level. You can simmer vegetables, herbs, and spices in water for a rich taste. Try adding ginger, garlic, or lemongrass for a burst of flavor. Infusing your broth with these ingredients will make it unique and delicious.
Storage Info
Refrigerating Leftovers
To keep your Spicy Chili Crisp Ramen Bowls fresh, store them in an airtight container. This helps keep flavors intact. The broth and noodles can stay in the fridge for up to three days. If you have added vegetables, try to eat them within two days. They may lose their crunch after that.
Freezing Tips
You can freeze your ramen bowls too. First, let the dish cool completely. Then, place it in a freezer-safe container. It can last for about a month. To enjoy it again, thaw it in the fridge overnight. When ready, heat it on the stove or in the microwave. Add a splash of broth if it seems dry.
Keeping Ingredients Fresh
Store leftover vegetables and garnishes in separate containers. This way, they stay crisp. Use them within three days for the best taste. For chili crisp, keep it in a cool, dark place. This helps maintain its heat and flavor. If you notice it losing potency, it might be time to buy a fresh jar.
FAQs
How long does it take to make Spicy Chili Crisp Ramen Bowls?
This dish takes 15 minutes from start to finish.
– Prep Time: 5 minutes
– Cook Time: 10 minutes
You can make this quick meal even on busy days. It’s easy to follow along and requires little prep.
Can I make this recipe vegetarian or vegan?
Yes, you can easily make this dish vegetarian or vegan.
– Substitutions: Use vegetable broth instead of chicken.
– Omit the boiled egg for a vegan choice.
These simple swaps keep the flavor and make it fit your diet.
What can I use if I don’t have chili crisp?
If you lack chili crisp, don’t worry!
– You can use red pepper flakes or sriracha for heat.
– A mix of garlic and oil can add some flavor too.
These alternatives still give a nice kick to your ramen.
How can I adjust the spice level?
Adjusting the spice level is easy and fun.
– Start with a small amount of chili crisp and taste.
– Add more if you want a spicier kick.
This way, you control the heat to match your taste buds.
Can I use fresh vegetables instead of frozen?
Yes! Fresh vegetables work great in this dish.
– Try using fresh shiitake mushrooms, carrots, and spinach.
– Fresh veggies will enhance the flavor and texture.
Using fresh produce adds brightness and crunch to your ramen bowls.
This recipe for Spicy Chili Crisp Ramen Bowls shows how easy it is to create a tasty meal. We covered key ingredients like ramen noodles, vegetable broth, and fresh veggies. Cooking tips help you prepare the dish quickly while keeping flavors vibrant. You can add proteins, use different noodles, or switch the broth for variety. Store leftovers safely to enjoy later.
With these steps, you can craft your own unique ramen. Enjoy your meal and make it your own!


![For Lemon Basil Zucchini Orzo, you will need: - 1 cup of orzo pasta - 2 medium zucchinis, diced into bite-sized cubes - 1 cup of vegetable broth - 1 tablespoon of extra-virgin olive oil - 3 cloves of garlic, finely minced - Zest and juice of 1 large lemon - 1/4 cup of fresh basil leaves, chopped roughly - 1/4 teaspoon of red pepper flakes (adjust to taste) - Salt and freshly cracked black pepper, to taste - Grated Parmesan cheese, for garnish (optional) You can make your dish pop with these garnishes: - Extra fresh basil leaves - A sprinkle of lemon zest - A drizzle of olive oil These will add color and flavor to your meal. To make this dish, gather these tools: - A medium-sized pot for cooking orzo - A large skillet for sautéing - A colander for draining orzo - A sharp knife for chopping - A cutting board for prepping ingredients Having these on hand will make your cooking easier and more fun. For the full recipe, follow the steps carefully to enjoy a tasty, fresh meal. Start by boiling water in a medium pot. You need about 4 cups of water. When it boils, add 1 cup of orzo pasta. Cook it for 9 to 11 minutes, following the package instructions. You want it to be al dente, so check it often. Once it's cooked, drain the orzo in a colander and set it aside. This pasta adds a nice texture to your meal. Next, grab a large skillet and heat 1 tablespoon of extra-virgin olive oil over medium heat. Once the oil is hot, add 3 cloves of minced garlic. Sauté for about 1 minute. You want it fragrant, but don’t let it brown. After that, toss in 2 medium zucchinis, diced into bite-sized cubes. Stir them together for 4 to 5 minutes. The zucchinis should soften but still have some crunch. If you like it spicy, add 1/4 teaspoon of red pepper flakes at this point. Now it's time to bring it all together. Pour in 1 cup of vegetable broth and squeeze the juice of 1 large lemon into the skillet. Let it simmer gently for 3 to 4 minutes. This helps the flavors mix well. After that, stir in the cooked orzo pasta, zest from the lemon, and 1/4 cup of roughly chopped fresh basil leaves. Season it all with salt and freshly cracked black pepper to taste. Mix thoroughly. If the dish seems a bit dry, add a splash more vegetable broth for a creamy finish. Finally, let it cook on low heat for another 2 to 3 minutes before serving. For the full recipe, check out the instructions above. To get the best texture in your Lemon Basil Zucchini Orzo, cook the orzo just right. Follow the package time closely, aiming for al dente. This means it should be firm but not hard. After cooking, drain it well. Avoid overcooking the zucchini. Sauté them until they are tender but still have a little bite. This keeps your dish fresh and exciting. You can boost the flavor in this dish easily. Fresh lemon juice gives a bright taste. Adding lemon zest will enhance this citrus flavor even more. For a bit of heat, use red pepper flakes, but adjust to your taste. If you want a richer flavor, sprinkle on some grated Parmesan cheese before serving. Fresh basil is key too; it adds a deep, herbal note that ties everything together. Serve your Lemon Basil Zucchini Orzo in shallow bowls for a lovely look. Add a few extra basil leaves on top for color. A sprinkle of lemon zest makes it pop, adding brightness to the dish. You can also drizzle a little olive oil on top for a nice finish. Don't forget to use your best bowls; good presentation makes the dish even more appealing. For the full recipe, check out the earlier section. {{image_4}} You can make this dish vegan by skipping the cheese. Use nutritional yeast instead for a cheesy taste. This works well with the lemon and basil. You can add more veggies like bell peppers or spinach for extra flavor. To make this dish gluten-free, swap the orzo with gluten-free pasta. Rice or quinoa can also work well. These options keep the dish light and fresh. Always check labels to ensure they are gluten-free. If you want to add protein, consider chickpeas or lentils. They pair nicely with the lemon and basil. Grilled chicken or shrimp are also great choices. Just cook them separately and mix them in at the end. This makes the meal hearty and satisfying. For the full recipe, check the Full Recipe section. Store any leftover Lemon Basil Zucchini Orzo in an airtight container. Place it in the fridge. It stays fresh for up to 3 days. Before serving again, check for any signs of spoilage. If it smells off or has changed color, toss it out. You can freeze Lemon Basil Zucchini Orzo, but with a few tips. Let the dish cool completely before freezing. Use a freezer-safe container or bag. It can last up to 2 months in the freezer. When you're ready to eat, thaw it in the fridge overnight. To reheat, use a skillet over low heat. Add a splash of broth to help it stay creamy. Stir frequently until it's warmed through. You can also use the microwave. Heat in short bursts, stirring in between, until hot. Enjoy your meal just like it was fresh! For the full recipe, check out the original. Yes, you can use other pasta types. Try penne or farfalle for a twist. Both will work well with the flavors in this dish. Just remember to adjust the cooking time as needed. Check the package for the best cooking instructions. To add heat, sprinkle in red pepper flakes. You can also add diced jalapeños or a dash of hot sauce. Start with a small amount and taste as you go. This way, you can find the perfect level of spice that suits your taste. Zucchini is low in calories and full of vitamins. It helps keep you hydrated and is a good source of fiber. Basil has anti-inflammatory properties and is rich in antioxidants. This herb can boost your immune system and enhance your mood. Together, they make a nutritious choice for any meal. For a full recipe, check the [Full Recipe]. This blog post covered the key ingredients and steps to make a tasty dish. You learned about cooking orzo, sautéing garlic and zucchini, and combining flavors. Tips helped achieve great texture and presentation. Variations offered vegan and gluten-free options. Remember to store leftovers properly and reheat them well. Use these insights to create a meal you love. Enjoy the process and make it your own! With some practice, you'll impress everyone with your cooking skills.](https://goldendishy.com/wp-content/uploads/2025/07/61f764e1-906e-4d38-9844-2e2d556314ee-768x768.webp)


![- 2 boneless, skinless chicken breasts - 8 oz fettuccine pasta - 2 cups fresh spinach, roughly chopped - 1 cup heavy cream - 1 cup finely grated Parmesan cheese - 2 tablespoons olive oil - 2 cloves garlic, minced - Salt and freshly ground black pepper, to taste - Fresh basil leaves, for garnish (optional) - Red pepper flakes, for a spicy kick (optional) When I cook Chicken and Spinach Alfredo, I gather these key ingredients first. The chicken breasts are a must because they add protein and flavor. I prefer fettuccine pasta for its wide shape, which holds the creamy sauce well. Fresh spinach adds a pop of green and nutrients, making the dish feel lighter. Next, I grab heavy cream. It’s the star of the sauce, bringing that rich, smooth texture. Of course, Parmesan cheese can't be skipped. It gives depth and a savory taste that blends perfectly with the cream. In the additional ingredients, olive oil is essential for cooking. It adds a nice flavor base. Minced garlic brings a wonderful aroma and a bit of zing. I always keep salt and pepper handy to season the dish just right. Lastly, I suggest garnishing with fresh basil for that extra flair. A sprinkle of red pepper flakes can bring heat if you like a spicy bite. For the full list of ingredients, check out the Full Recipe. First, I boil a large pot of salted water. Once it bubbles, I add the fettuccine. I cook it until it's al dente, which takes about 8-10 minutes. After cooking, I drain the pasta but keep a small cup of the pasta water for later. While the pasta cooks, I heat olive oil in a skillet over medium heat. I take the chicken breasts and season them with salt and pepper on both sides. I place the chicken in the hot skillet and cook for about 6-7 minutes on each side. When they turn golden brown and are fully cooked, I remove them from the skillet. I let them rest for a few minutes before slicing them into thin strips. In the same skillet, I lower the heat and add minced garlic. I sauté it for about 30 seconds until it smells amazing. Then, I slowly pour in heavy cream while stirring. I let it simmer gently, making sure it doesn’t boil. Next, I whisk in grated Parmesan cheese until the sauce is smooth and creamy. I add the chopped spinach and let it cook for 1-2 minutes until it wilts. Now, I carefully fold the cooked fettuccine into the creamy sauce. I mix it well so each strand is coated. If the sauce is too thick, I add a bit of the reserved pasta water to get the right consistency. Finally, I arrange the sliced chicken on top of the pasta. If I want a spicy touch, I sprinkle some red pepper flakes over everything. For the full recipe, check out the earlier section. - Adjusting seasoning: Start by tasting your sauce as you cook. Add more salt or pepper if needed. A pinch of nutmeg can also enhance the flavor. This small touch makes a big difference. - Whisking technique for smooth sauce: When you add the cream and cheese, whisk constantly. This helps to blend everything smoothly. It prevents lumps and ensures a creamy texture. - Presentation tips: Serve the Chicken and Spinach Alfredo in shallow bowls. Drizzle extra sauce on top for a rich look. Finish with freshly grated Parmesan and a basil sprig. This adds color and makes the dish pop. - Best accompaniments: Garlic bread or a fresh salad pairs perfectly. The crunch of the salad balances the creaminess of the dish. A glass of white wine complements the flavors well too. - Multitasking during prep: While the pasta cooks, focus on the chicken. Season it and cook it in the same skillet. This saves time and adds flavor to the sauce. Always keep an eye on the pasta so it doesn’t overcook. By using these tips, you can make your Chicken and Spinach Alfredo even better. Each step adds to the dish's overall experience, making it truly enjoyable. Enjoy the process and get creative! {{image_4}} You can switch out the chicken for other proteins. Shrimp works great in this dish. It adds a nice flavor and cooks quickly. Tofu is a good option for a vegetarian meal. Just make sure to season it well before cooking. For pasta, fettuccine is classic, but you can try penne or whole wheat. Penne holds the sauce well due to its shape. Whole wheat adds a nutty flavor and more fiber. Want to boost nutrition? Add seasonal vegetables. Broccoli brings crunch and color. You can steam it lightly before adding. Bell peppers add sweetness and vibrancy. Slice them thinly to mix in easily. Feel free to experiment! Seasonal vegetables can change the dish each time. Enhancing flavor is simple. You can add herbs like Italian seasoning for a savory kick. A sprinkle of lemon zest brightens the dish and adds freshness. For a bit of heat, red pepper flakes are great. Just a pinch goes a long way. These variations keep your Chicken and Spinach Alfredo fun and fresh. Check out the Full Recipe to get started! After you enjoy your Chicken and Spinach Alfredo, store any leftovers in the fridge. Use an airtight container to keep it fresh. You can keep it for about 3 to 4 days. To reheat, put the pasta in a pan over low heat. Add a splash of water or cream to help it warm evenly. Stir often to keep it creamy and avoid burning. If you want to keep it longer, you can freeze Chicken and Spinach Alfredo. Place it in a freezer-safe container or bag. Make sure to remove as much air as possible. It can last in the freezer for up to 2 months. When you are ready to eat it, take it out and thaw it in the fridge overnight. To reheat, warm it in a pan over low heat, adding a bit of water or cream to restore its creaminess. For the complete recipe, check the [Full Recipe]. Chicken and Spinach Alfredo lasts about 3 to 4 days in the fridge. Store it in an airtight container to keep it fresh. Make sure to cool it down before placing it in the fridge. This helps prevent condensation, which can make the dish soggy. Yes, you can make this recipe ahead of time. Cook the pasta and chicken in advance. Store them separately from the sauce. When you’re ready to eat, just heat everything together. This keeps the pasta from getting mushy. For the best taste, try to eat it within a few days. You can use half-and-half for a lighter option. If you want a dairy-free choice, try coconut cream or cashew cream. Both options give a nice creamy texture. You may need to adjust the seasonings to match your taste. Yes, you can make this dish gluten-free. Use gluten-free pasta such as rice or corn pasta. For the sauce, just check the labels on your cream and cheese. Most are gluten-free, but it’s good to be sure. This way, everyone can enjoy your Chicken and Spinach Alfredo. For the full recipe, check the details above! This blog post covered the key ingredients and steps for making Chicken and Spinach Alfredo. We discussed how to prepare the pasta, cook the chicken, and create a creamy sauce. Plus, I shared tips for enhancing flavors and serving. Remember, you can mix it up with different proteins and veggies. Also, I provided storage advice to keep your meal fresh. Embrace your creativity in the kitchen. Enjoy a tasty meal and share it with friends or family!](https://goldendishy.com/wp-content/uploads/2025/06/ee4d0533-23fd-4fc4-b715-1820a1e3e494-768x768.webp)