Spicy Cajun Shrimp Tacos Flavorful and Easy Recipe

Craving a taste of the South? Look no further! My Spicy Cajun Shrimp Tacos are packed with bold flavors and are super easy to make. Whether you’re hosting a gathering or just enjoying a weeknight meal, these tacos will impress. I’ll guide you through every step, from prepping the shrimp to choosing tasty toppings. Get ready to dive into a delicious experience that’ll leave your taste buds singing!
Ingredients
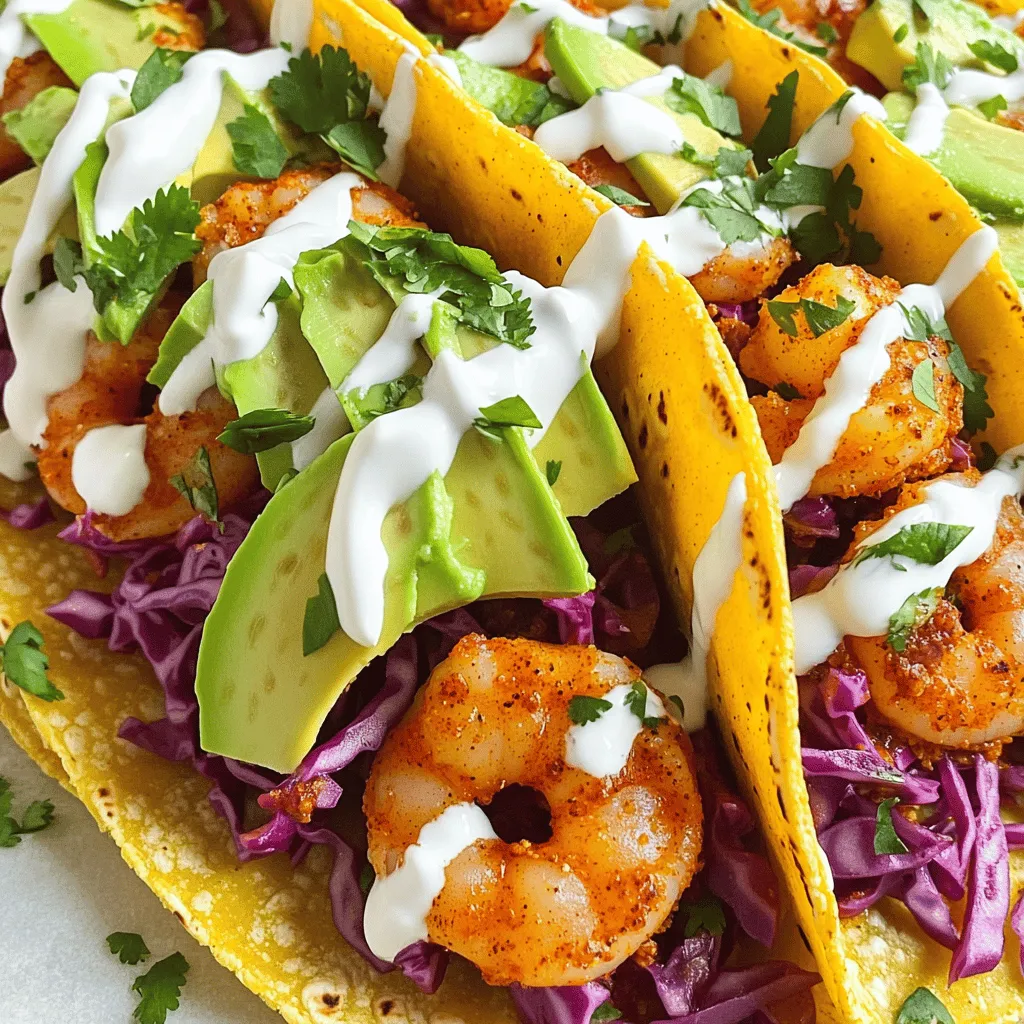
Main Ingredients for Spicy Cajun Shrimp Tacos
To make flavorful spicy Cajun shrimp tacos, gather the following main ingredients:
– 1 lb large shrimp, peeled and deveined
– 2 tablespoons Cajun seasoning
– 2 tablespoons olive oil
– 1 teaspoon garlic powder
– 1 teaspoon onion powder
– Juice of 1 lime
– 8 small corn tortillas
– 1 cup red cabbage, finely shredded
– 1 avocado, sliced
– 1/2 cup sour cream or Greek yogurt
– Fresh cilantro, finely chopped (for garnish)
– Salt and pepper to taste
These ingredients create a flavor-packed dish. The shrimp bring a nice protein, while the spices add a kick. The tortillas hold everything together, and the toppings give texture.
Optional Toppings and Sides
You can add extra toppings to customize your tacos. Here are some tasty ideas:
– Diced tomatoes
– Sliced jalapeños
– Pickled red onions
– Lime wedges
– Crumbled feta or queso fresco
You can also serve your tacos with sides like rice, beans, or a fresh salad. These can enhance your meal and add more flavor.
Recommended Tools for Preparation
To make cooking easier, use these tools:
– Mixing bowl for marinating shrimp
– Large skillet for cooking shrimp
– Spatula for flipping shrimp
– Tongs for assembling tacos
– Knife and cutting board for slicing toppings
Having the right tools can make cooking fun. They help you stay organized and prepare your dish quickly.
Step-by-Step Instructions
Preparing the Shrimp Marinade
To start, gather your shrimp and spices. In a medium bowl, mix the shrimp with Cajun seasoning, garlic powder, onion powder, lime juice, olive oil, salt, and pepper. You want the shrimp to be fully coated in the marinade. This helps them soak in all the tasty flavors. Let the shrimp sit for about 10 minutes. This is key for good flavor.
Cooking the Shrimp Perfectly
Next, heat a large skillet over medium-high heat. When the skillet is hot, add the marinated shrimp in a single layer. Cook the shrimp for 2-3 minutes on each side. They will turn pink and opaque when they are done. Be careful not to overcook them. Once done, remove the skillet from heat and set it aside.
Warming and Assembling the Tacos
While the shrimp cooks, warm your corn tortillas. Use a dry skillet over medium heat. Warm each tortilla for about 30 seconds on each side. They should be soft and slightly toasty. Keep them warm by wrapping them in a clean kitchen towel. Now, it’s time to build your tacos. Take a tortilla, add a scoop of shrimp, and top it with shredded red cabbage and avocado slices. Finally, drizzle on some sour cream or Greek yogurt and sprinkle cilantro on top for a fresh kick. Enjoy the bold flavors!
Tips & Tricks
How to Choose the Best Shrimp
When you pick shrimp, look for a few key signs. Choose shrimp that smells fresh, like the sea. They should be firm and have a shiny appearance. Avoid shrimp that feels mushy or looks dull. If possible, buy wild-caught shrimp. They tend to have better flavor than farmed shrimp.
Best Practices for Marinating
Marinating shrimp is simple and important. Use a bowl that is not metal, as it can react with the acid. Mix your Cajun seasoning, garlic powder, onion powder, lime juice, and olive oil together. Add the shrimp and toss well. Let the shrimp sit for about 10 minutes. This time helps the shrimp absorb the spices. Don’t marinate too long, or the shrimp can become tough.
Tips for Perfect Tortillas
For great tortillas, choose small corn ones. Heating them is key. Use a dry skillet over medium heat. Warm each tortilla for about 30 seconds on both sides. This makes them soft and easy to fold. Keep them wrapped in a clean towel to stay warm. You can also use a slightly damp paper towel for extra softness.

Variations
Vegetarian Alternatives
If you want a meat-free option, try using jackfruit or mushrooms. Both options soak up flavors well. For jackfruit, shred it and cook with Cajun spices. For mushrooms, use large caps like portobello for a hearty feel. Both give you a nice texture and flavor.
Different Spice Levels
You can adjust the heat to your liking. For milder tacos, use less Cajun seasoning. You can also add a touch of honey or brown sugar to balance the heat. If you crave more spice, throw in some cayenne pepper or diced jalapeños. Tailoring spice levels makes it fun for everyone.
Serving Suggestions
Pair your tacos with fresh sides for a complete meal. A simple corn salad or black bean dish works great. For drinks, icy lemonade or a light beer complements the flavors well. You can also serve with chips and salsa for a fun snack. Enjoying these tacos is all about mixing and matching!
Storage Info
How to Store Leftover Tacos
After enjoying your spicy Cajun shrimp tacos, you may have some left. To keep them fresh, separate the shrimp and toppings from the tortillas. Place the shrimp and toppings in airtight containers. This helps avoid soggy tortillas. Store everything in the fridge for up to three days.
Reheating Instructions
When you’re ready to eat, it’s easy to reheat the shrimp. Heat a skillet over medium heat. Add the shrimp and cook for about two minutes, just until warm. You can also warm the tortillas. Place them on a dry skillet for about 30 seconds on each side. This way, your tacos taste fresh again!
Freezing Tips for Meal Prep
If you want to save tacos for later, freezing works well. Place the cooked shrimp in a freezer-safe container. Store for up to three months. Avoid freezing the tortillas. They can get hard or dry. When you want to eat them, thaw the shrimp in the fridge overnight. Reheat as described above for a quick meal.
FAQs
What can I substitute for shrimp?
If you can’t use shrimp, try chicken or tofu. Chicken works great with the same spices. Use bite-sized pieces and cook them until they are done. Tofu is a good choice for a vegetarian option. Press the tofu to remove extra water, then cube it and marinate. Both options will soak up the Cajun flavor well.
Can I make these tacos gluten-free?
Yes, you can make these tacos gluten-free! Use corn tortillas, which are naturally gluten-free. Always check the package to ensure they state that they are gluten-free. For the marinade, make sure the Cajun seasoning has no gluten ingredients. Many brands are gluten-free, but it’s always smart to check.
How can I make the dish less spicy?
To lower the spice level, use less Cajun seasoning. Start with one tablespoon instead of two. You can also add more lime juice to balance the heat. Adding a bit of sugar can help too. If you want more cooling, pile on the avocado and sour cream. These toppings will help tone down the heat.You will love how simple it is to make spicy Cajun shrimp tacos. Let’s dive into the ingredients you need to create this tasty dish.
Ingredients:
– 1 lb large shrimp, peeled and deveined
– 2 tablespoons Cajun seasoning
– 2 tablespoons olive oil
– 1 teaspoon garlic powder
– 1 teaspoon onion powder
– Juice of 1 lime
– 8 small corn tortillas
– 1 cup red cabbage, finely shredded
– 1 avocado, sliced
– 1/2 cup sour cream or Greek yogurt
– Fresh cilantro, finely chopped (for garnish)
– Salt and pepper to taste
You start by marinating the shrimp. In a bowl, mix the shrimp with Cajun seasoning, garlic powder, onion powder, lime juice, olive oil, salt, and pepper. Toss everything well so the shrimp gets full flavor. Let it sit for about 10 minutes. This step lets the shrimp soak in all those great spices.
Next, you cook the shrimp. Heat a skillet over medium-high heat. When hot, add the shrimp in a single layer. Cook each side for 2-3 minutes. The shrimp should turn pink and opaque. Once cooked, remove them from the heat.
While the shrimp cooks, warm the corn tortillas in a separate skillet. Heat them for about 30 seconds on each side. This makes them soft and ready to hold all that delicious filling.
Now, it’s time to assemble! Place a tortilla on a plate. Add a generous scoop of the spicy shrimp in the center. Top it with shredded red cabbage and creamy avocado slices.
For the finishing touch, drizzle sour cream or Greek yogurt over the top. Garnish with fresh cilantro for that extra pop of flavor.
Serve these tacos warm, and enjoy every bite!
In this post, we explored how to make tasty Spicy Cajun Shrimp Tacos. We covered the key ingredients, easy steps for cooking, and helpful tips. We also shared fun variations and smart storage ideas. These tacos can fit anyone’s taste, whether you want spice or a milder flavor.
Remember, cooking is all about fun and creativity. Try these tacos for a delicious meal! Enjoy your cooking journey!


![- 2 boneless, skinless chicken breasts - 1 teaspoon garlic powder - 1 teaspoon smoked paprika - 1 teaspoon dried oregano - Salt and freshly ground black pepper to taste - 1 tablespoon extra-virgin olive oil - 1 cup cooked quinoa or couscous - 1 cucumber, finely diced - 1 cup cherry tomatoes, halved - 1/2 red onion, paper-thin sliced - 1 cup creamy Greek yogurt - 2 tablespoons fresh dill, finely chopped - 1 tablespoon fresh lemon juice - Crisp lettuce leaves for serving - Medium-sized mixing bowl - Grill or grill pan - Spatula or tongs - Knife and cutting board - Serving bowls This simple list of ingredients and tools sets you up for a tasty meal. You can find the full recipe to guide you through each step. Start by making a simple rub. In a bowl, mix garlic powder, smoked paprika, dried oregano, salt, and pepper. Add olive oil to this mix. Rub it all over the chicken breasts. Make sure they are well-coated. For the best taste, let the chicken marinate for at least 30 minutes. If you have time, let it sit in the fridge overnight. This will make the chicken super tasty. While the chicken marinates, let’s make the tzatziki sauce. In a clean bowl, combine Greek yogurt, finely diced cucumber, chopped dill, and lemon juice. Stir well until everything blends nicely. Add a pinch of salt and pepper to taste. Set this aside. Letting it sit helps the flavors come together. Preheat your grill or grill pan to medium heat. Once it’s hot, place the marinated chicken breasts on the grill. Cook them for about 5-6 minutes on each side. You want the chicken to reach an internal temperature of 165°F (75°C). After grilling, take the chicken off the heat. Let it rest for about 5 minutes. This helps keep it juicy. After resting, slice the chicken into bite-sized pieces. Grab your serving bowls and start building your dish. Begin with a layer of cooked quinoa or couscous at the bottom. This will be the base of your bowl. Next, add the grilled chicken pieces on top of the quinoa. Then, layer on the diced cucumber, halved cherry tomatoes, and thinly sliced red onion. This adds a pop of color and flavor. Finally, drizzle the tzatziki sauce generously over everything. This brings a creamy contrast. If you like, add a handful of crisp lettuce leaves on top. This gives an extra crunch. Serve your Chicken Tzatziki Bowls in bright plates. It makes the dish look inviting. For a final touch, sprinkle some fresh dill on top and add a lemon wedge for extra zest. Enjoy your meal! To grill chicken that is juicy and flavorful, follow these tips: - Marinate Well: Use the spice rub with garlic powder, smoked paprika, and oregano. Let the chicken sit for at least 30 minutes. For best results, marinate overnight. - Use Medium Heat: Preheat your grill to a medium setting. This helps cook the chicken evenly without burning it. - Check Temperature: Use a meat thermometer to ensure the chicken reaches 165°F (75°C). This keeps it safe to eat. - Rest the Chicken: After grilling, let the chicken rest for 5 minutes. This keeps the juices inside. You can make tzatziki in different ways to suit your taste: - Add Spice: Mix in a pinch of cayenne or red pepper flakes for heat. - Use Different Herbs: Swap dill with mint or parsley for a fresh twist. - Try Other Veggies: Add grated carrots or chopped bell peppers for extra crunch. Presentation makes your Chicken Tzatziki Bowls shine. Here are some ideas: - Choose Colorful Bowls: Use deep plates to highlight the bright ingredients. - Layer Thoughtfully: Start with quinoa or couscous, then add chicken, veggies, and a drizzle of tzatziki. - Garnish: Add a sprinkle of fresh dill or a lemon wedge for a burst of color. These tips will help you create a delicious and beautiful meal that impresses everyone. For the complete recipe, check [Full Recipe]. {{image_4}} If you want a vegetarian twist, try using tofu or chickpeas. Tofu absorbs flavors well. Press and marinate it like the chicken. Cut it into cubes and grill or sauté until golden. Chickpeas also work great. Use canned or cooked chickpeas. Toss them in the same spices and roast in the oven. Both options are rich in protein and add a nice texture. You can swap grains in your Chicken Tzatziki Bowls for variety. Quinoa is high in protein and gluten-free. Couscous cooks quickly and is light on your stomach. Brown rice is hearty and adds fiber. Each grain brings a unique taste and texture. Try different grains each time for a fun twist! Add more fresh veggies to your bowl for color and crunch. Sliced bell peppers bring sweetness and crunch. Shredded carrots add a bright pop and extra nutrition. You can also use radishes for a peppery kick. Mix and match your favorites! This makes each bowl unique, fresh, and delicious. For the full recipe, check out the complete guide. After enjoying your Chicken Tzatziki Bowls, store leftovers in airtight containers. This keeps the chicken juicy and the veggies fresh. Place the chicken and veggies in one container. Store the tzatziki sauce in another. This helps prevent sogginess. You can keep the leftovers in the fridge for up to three days. To reheat the chicken, use a microwave or a skillet. If using a microwave, cover the chicken with a damp paper towel. This keeps moisture in and prevents it from drying out. Heat it for 30 seconds, check, and repeat if needed. If using a skillet, heat on low. Add a splash of water to keep it juicy. Cook until warmed through, about 3-4 minutes. Store your tzatziki sauce in a sealed container in the fridge. It stays fresh for about four days. If you notice extra water on top, just drain it off. Stir the sauce well before using it again. This keeps all the flavors mixed and tasty. For longer storage, you can freeze tzatziki in ice cube trays. Once frozen, transfer the cubes to a freezer bag. This way, you can enjoy it later in your Chicken Tzatziki Bowls or other dishes. If you don't have Greek yogurt, you can use regular yogurt. You can also try sour cream. Both will give a creamy texture, but they may taste a bit different. For a dairy-free option, use coconut yogurt or a blended cashew cream. These options keep the dish rich and tasty. You can marinate the chicken for at least 30 minutes. For better flavor, marinate it overnight. This gives the spices time to soak in. The longer, the better! Just keep it in the fridge to stay safe. Yes, you can make this dish ahead of time. Prepare the chicken and tzatziki sauce a day before. Store them in separate containers in the fridge. When you're ready to eat, just grill the chicken and assemble your bowls. It saves time and tastes fresh! Chicken Tzatziki Bowls taste great with various sides. Try a simple Greek salad with tomatoes and olives. Pita bread with hummus is also a good match. You can add roasted veggies or a light soup for extra flavor and nutrition. Yes, this dish is gluten-free if you use quinoa. Couscous is not gluten-free, so skip it if needed. Always check the labels on your ingredients to be sure. Enjoy this tasty meal without worry! This blog post covered how to make tasty Chicken Tzatziki Bowls. We explored essential ingredients, step-by-step instructions, and helpful tips. I shared fun variations, storage info, and answers to common questions. Now, you can impress your friends with this easy dish. Enjoy the fresh flavors and simple steps. With practice, you’ll make perfect bowls every time. Dive in and have fun in the kitchen!](https://goldendishy.com/wp-content/uploads/2025/06/3644d9ce-b609-47a4-b270-daf6d08e9407-768x768.webp)
![To make vegan creamy pesto pasta, gather these fresh and simple ingredients. - 12 oz pasta (penne, spaghetti, or your favorite variety) - 2 cups fresh basil leaves, tightly packed - 1/2 cup raw cashews (soaked in water for at least 2 hours) - 1/4 cup nutritional yeast (for a cheesy flavor) - 3 cloves garlic, minced - 1/4 cup extra virgin olive oil - 1 tablespoon fresh lemon juice - Sea salt and freshly ground black pepper, to taste - 1 cup cherry tomatoes, halved (for topping) - Extra fresh basil leaves (for garnish) Each ingredient plays a vital role. The pasta is the base, while basil brings freshness. Cashews create a rich, creamy texture. Nutritional yeast adds a cheesy taste, perfect for vegan dishes. Garlic gives depth, while olive oil provides smoothness. Lemon juice brightens the flavors. Salt and pepper enhance everything. Cherry tomatoes add color and sweetness. Extra basil leaves make the dish look beautiful. For the full recipe, check out the link to ensure a delicious meal! First, fill a large pot with water and add a generous amount of salt. Bring the water to a rapid boil. This step is key; the salt helps flavor the pasta. Once boiling, add 12 ounces of your favorite pasta, like penne or spaghetti. Cook according to the package instructions. You want the pasta to be al dente, which means it should be tender but still firm to bite. Usually, this takes about 8 to 12 minutes. When the pasta is ready, drain it well and set it aside. Next, it’s time to make the vegan pesto. Grab your blender or food processor. Add 2 cups of fresh basil leaves, 1/2 cup of soaked raw cashews, and 1/4 cup of nutritional yeast. Also, include 3 cloves of minced garlic and 1 tablespoon of fresh lemon juice. Season with a pinch of sea salt and freshly ground black pepper. Blend this mixture until it becomes smooth and creamy. If it doesn't blend well, scrape down the sides of the blender and blend again until you get a silky texture. Now, combine the drained pasta with the creamy pesto sauce. Use a large mixing bowl for this. Pour the pesto over the pasta. With a pair of tongs or a spatula, toss everything together. Ensure that each piece of pasta gets coated with the vibrant pesto. If the sauce looks too thick, add a little water, one teaspoon at a time, until it reaches the desired consistency. Don't forget to taste! Adjust the seasoning with more salt, pepper, or lemon juice if needed. Finally, gently fold in 1 cup of halved cherry tomatoes for a fresh burst of flavor. Serve this delicious dish warm, garnished with extra basil leaves. Enjoy your vegan creamy pesto pasta! For the complete recipe, check the [Full Recipe]. Soaked cashews are the secret to a smooth and creamy sauce. They soften and blend well, making the pesto rich. Soak them in water for at least two hours before use. This step is key for a silky texture. If your pesto is too thick, don’t worry. Just add water! Start with a teaspoon at a time. Blend until you reach your desired creaminess. This helps the sauce hug the pasta perfectly. Don’t stop at just basil! You can spice it up with some red pepper flakes for heat. A pinch of black pepper adds depth. Try adding a bit of garlic powder for more flavor. Lemon juice adds freshness, but balance is key. If it’s too tangy, add a pinch of sugar or more cashews. This helps round out the flavors and brings the dish to life. Pair this pasta with roasted vegetables for a colorful plate. A side salad adds crunch and freshness. For a drink, consider a light white wine, like Sauvignon Blanc. As for portion sizes, aim for about one and a half cups per person. This ensures everyone leaves satisfied. Enjoy this dish warm for the best flavor experience! {{image_4}} You can change nuts or seeds in your pesto. Try using almonds or sunflower seeds. Each option brings a unique taste. For those avoiding gluten, select gluten-free pasta. Options like brown rice or chickpea pasta work well. Both choices give a nice texture and flavor. To mix up the flavor, add different herbs like parsley or spinach. These herbs bring extra freshness to your dish. You can also incorporate various vegan cheeses. Options like cashew cheese or nutritional yeast can enhance the creamy taste. This helps create layers of flavor in your pesto. Make your dish fresh by using seasonal veggies. For example, zucchini or asparagus can add crunch and color. You can also try different tomatoes. Roasted tomatoes can bring a sweet touch, while cherry tomatoes add a pop of freshness. Finish with garnishes like pine nuts or extra basil for a lovely look. For the complete recipe, check the Full Recipe. After enjoying your vegan creamy pesto pasta, store any leftovers in an airtight container. This keeps the pasta fresh and tasty. Place it in the fridge right away. The best storage time is up to 3 days. Beyond that, the pasta may lose its flavor and texture. To reheat your pasta, the best method is using a stovetop. Heat a pan over medium heat. Add a splash of water or olive oil to keep it moist. Stir gently to warm it up. When reheating, avoid high heat, as this can dry out the sauce. You want to keep that creamy goodness intact. Enjoy your delicious meal again! To make vegan creamy pesto pasta, follow these simple steps: 1. Cook the Pasta: Bring salted water to a boil. Add 12 oz of your pasta and cook until tender. This usually takes about 8-12 minutes. Drain and set aside. 2. Prepare the Pesto: In a blender, add 2 cups of fresh basil leaves, 1/2 cup of soaked raw cashews, and 3 minced garlic cloves. Pour in 1/4 cup of nutritional yeast and 1 tablespoon of lemon juice. Add a pinch of sea salt and black pepper. Blend until smooth. 3. Emulsify with Olive Oil: While blending, slowly add 1/4 cup of extra virgin olive oil. Keep blending until creamy. If it’s too thick, add water, one teaspoon at a time. 4. Combine Pasta and Pesto: In a large bowl, mix the drained pasta with your creamy pesto. Toss gently to coat the pasta well. 5. Final Touches: Taste the mix and adjust the seasoning. Fold in 1 cup of halved cherry tomatoes for a fresh touch. 6. Serve: Serve warm with extra basil leaves on top. Enjoy your delicious vegan creamy pesto pasta! Yes, you can freeze vegan creamy pesto pasta. Here are some tips to keep it tasty: - Cool Before Freezing: Let the pasta cool down before packing it. - Use Airtight Containers: Store the pasta in airtight containers or freezer bags. - Leave Space: Leave some room in the container for the pasta to expand. - Label and Date: Always label your containers with the date. Use within 2-3 months for best quality. When ready to eat, thaw in the fridge overnight. Reheat gently on the stove or in the microwave. Add a splash of water if it seems dry. If you don’t have nutritional yeast, try these alternatives: - Grated Vegan Cheese: Use a dairy-free cheese for a similar flavor. - Ground Flaxseed: This can add a nutty taste, though it won't mimic the cheese flavor. - T nutritional yeast: You can use this if you want a similar profile. - Parmesan Substitute: Some brands offer vegan parmesan that works well in pesto. Each substitute will change the flavor a bit, so adjust to your taste! This blog post covered how to make vegan creamy pesto pasta. You learned about ingredients, cooking pasta, and blending the pesto. We explored tips for smooth texture and flavor. I shared variations to keep things fresh, plus storage and reheating advice. In the end, making this dish is quick and fun. Enjoy experimenting with flavors and textures. This pasta will please vegans and non-vegans alike!](https://goldendishy.com/wp-content/uploads/2025/07/928f57b2-1357-48f3-b20e-4d7b01e4c937-768x768.webp)
. First, preheat your oven to 400°F (200°C). This step is key for even roasting. Gather your ingredients. You should have baby carrots, honey, olive oil, garlic, thyme, and lemon juice ready. In a large bowl, combine the honey, olive oil, minced garlic, and thyme. Add a good pinch of salt and pepper. Next, squeeze in the lemon juice. Whisk the mixture well until it is smooth. This glaze will give your carrots a sweet and savory flavor. Now, it's time to coat the carrots. Add them to your bowl with the glaze. Toss them gently until they are well coated. Line a baking sheet with parchment paper for easy cleanup. Spread the carrots out in a single layer, avoiding crowding. Place the baking sheet in the preheated oven. Roast the carrots for 25-30 minutes. Halfway through, toss the carrots again for even cooking. They should become tender and caramelized. Once done, let them cool for a few minutes. If you like, drizzle some extra glaze over the top for added flavor. Finally, garnish with fresh parsley before serving. This adds a pop of color and freshness. If you want the full recipe, check it out [Full Recipe]. To ensure your carrots roast perfectly, choose fresh carrots. Baby carrots work well, but regular ones are great too. If using regular carrots, slice them into sticks for even cooking. Spread the carrots out in a single layer on the baking sheet. This step keeps them from steaming and helps them caramelize nicely. Toss them halfway through cooking for even browning. For a great glaze, mix the honey, olive oil, garlic, and thyme well. The oil helps the honey coat the carrots. If your glaze feels too thick, add a splash of water or lemon juice. This can help thin it out and ensure it coats the carrots evenly. Remember, a smooth glaze means more flavor in every bite! To make your dish pop, use a nice platter. Once the carrots are roasted, transfer them carefully. Drizzle with extra honey for shine. Sprinkle fresh parsley or thyme over the top for color. This simple touch makes your dish look gourmet. Enjoy serving them at your next meal! For the full recipe, check out the details above. {{image_4}} You can easily change this dish by adding other vegetables. Try sweet potatoes or parsnips. They roast well and add new flavors. Just cut them to a similar size as the carrots. This helps them cook evenly. If you want to switch up the sweet taste, use maple syrup or agave. Both give a nice flavor and work well with the garlic. You can use the same amount as honey. Just mix it well with the other ingredients. Adding spices can boost the taste of your honey garlic roasted carrots. You might try a pinch of cumin or chili powder for warmth. Fresh herbs like rosemary or dill can also add a bright note. Experiment with what you love! Each change can make this dish new and exciting. You can find the full recipe to guide you through these variations. To store leftover honey garlic roasted carrots, first let them cool down. Use an airtight container to keep them fresh. If you have a lot, divide them into smaller portions. Place the container in the fridge. They will stay good for about 3 to 5 days. Keeping them sealed helps avoid drying out. When you're ready to enjoy the leftovers, preheat your oven to 350°F (175°C). Spread the carrots on a baking sheet. You can drizzle a little olive oil for extra moisture. Heat them for about 10 to 15 minutes, or until they feel warm. You can also use a microwave if you're in a hurry. Just cover them with a damp paper towel and heat in 30-second bursts. If you want to keep the carrots longer, freezing is a great option. First, let the carrots cool completely. Spread them in a single layer on a baking sheet. Freeze them for about 1 hour. This step prevents them from sticking together. After that, transfer the carrots to freezer bags. Remove as much air as possible before sealing. They can last for up to 3 months in the freezer. To eat, thaw them in the fridge overnight before reheating. For more details, check the Full Recipe. Yes, you can use frozen carrots. However, fresh carrots will taste better. Frozen carrots may lose some crunch. If you use them, roast them longer to ensure they cook fully. Just remember to thaw them before roasting for the best results. Honey garlic roasted carrots pair well with many dishes. You can serve them with grilled chicken, beef, or fish. They also taste great with rice or quinoa. Try them with a fresh salad for a balanced meal. Their sweet and savory flavor adds depth to any plate. You can make this dish ahead of time. Prepare the honey garlic glaze and coat the carrots. Store them in the fridge for up to 24 hours. When ready to serve, just roast them in the oven. This saves time and still gives you that amazing flavor. For the full recipe, check out the complete instructions above. We explored the key ingredients and steps to make honey garlic roasted carrots. You learned how to mix the glaze, roast the carrots, and personalize the dish. We also discussed useful tips for perfect roasting and presentation. Lastly, we covered variations and storage tips to keep your dish fresh. Use this guide to make a tasty meal. Enjoy these carrots with your loved ones for a delightful experience.](https://goldendishy.com/wp-content/uploads/2025/06/04a56f10-aefe-4807-b100-2b1e29675843-768x768.webp)

