Snickerdoodle Pumpkin Cookies Flavorful Fall Treat

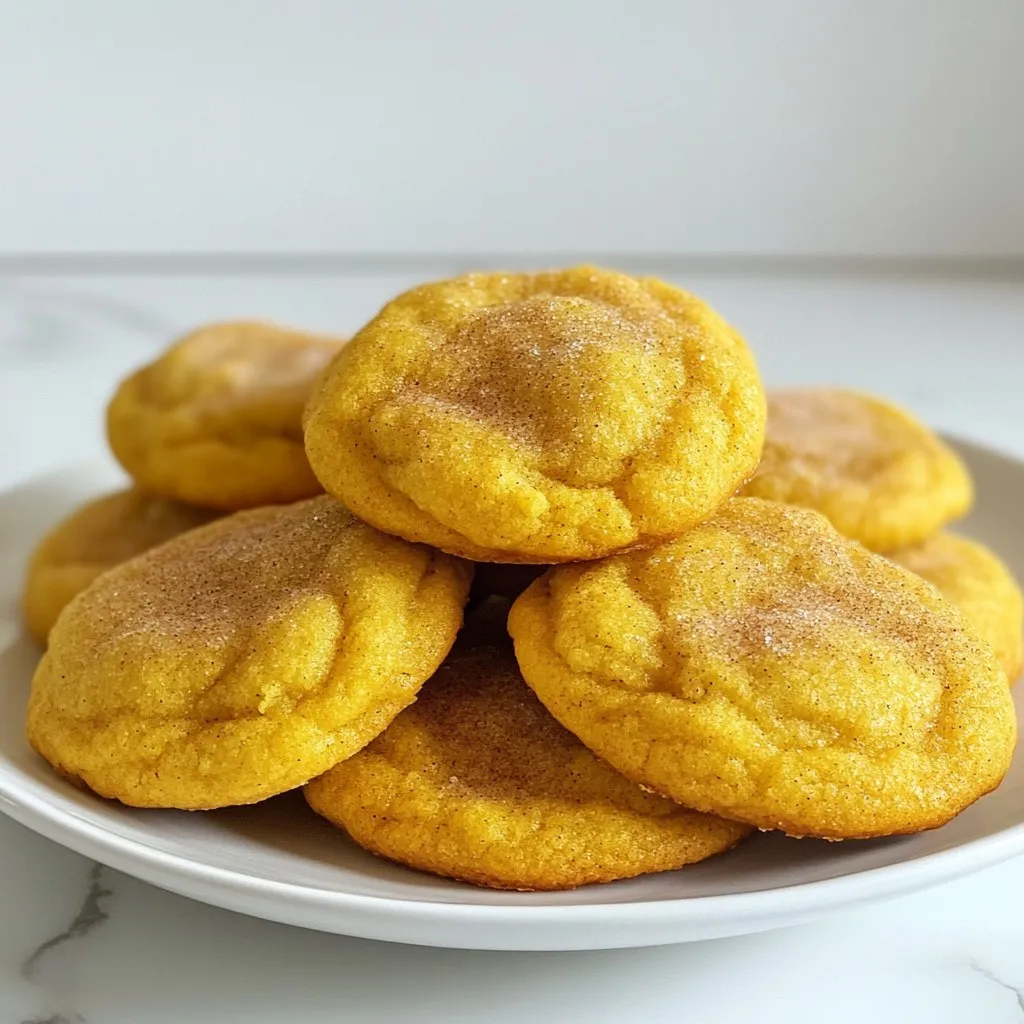
Get ready for fall with my Snickerdoodle Pumpkin Cookies! These cookies combine warm spices with creamy pumpkin for a treat that’s bursting with flavor. Perfect for cozy evenings or sharing with friends, their sweet aroma will fill your kitchen and your heart. Want to master this delightful recipe? Let me guide you through every step, from gathering your ingredients to baking the perfect batch. Your taste buds will thank you!
Why I Love This Recipe
- Comforting Flavor: The combination of pumpkin and warm spices creates a cozy, inviting flavor that is perfect for fall.
- Easy to Make: With straightforward steps, this recipe is perfect for bakers of all skill levels, making it a great choice for family baking time.
- Perfectly Soft: The cookies are soft and chewy, with a slightly crisp edge, making them a delightful treat for all cookie lovers.
- Festive Touch: The cinnamon-sugar coating adds a festive flair, making these cookies ideal for holiday gatherings or cozy evenings at home.
Ingredients
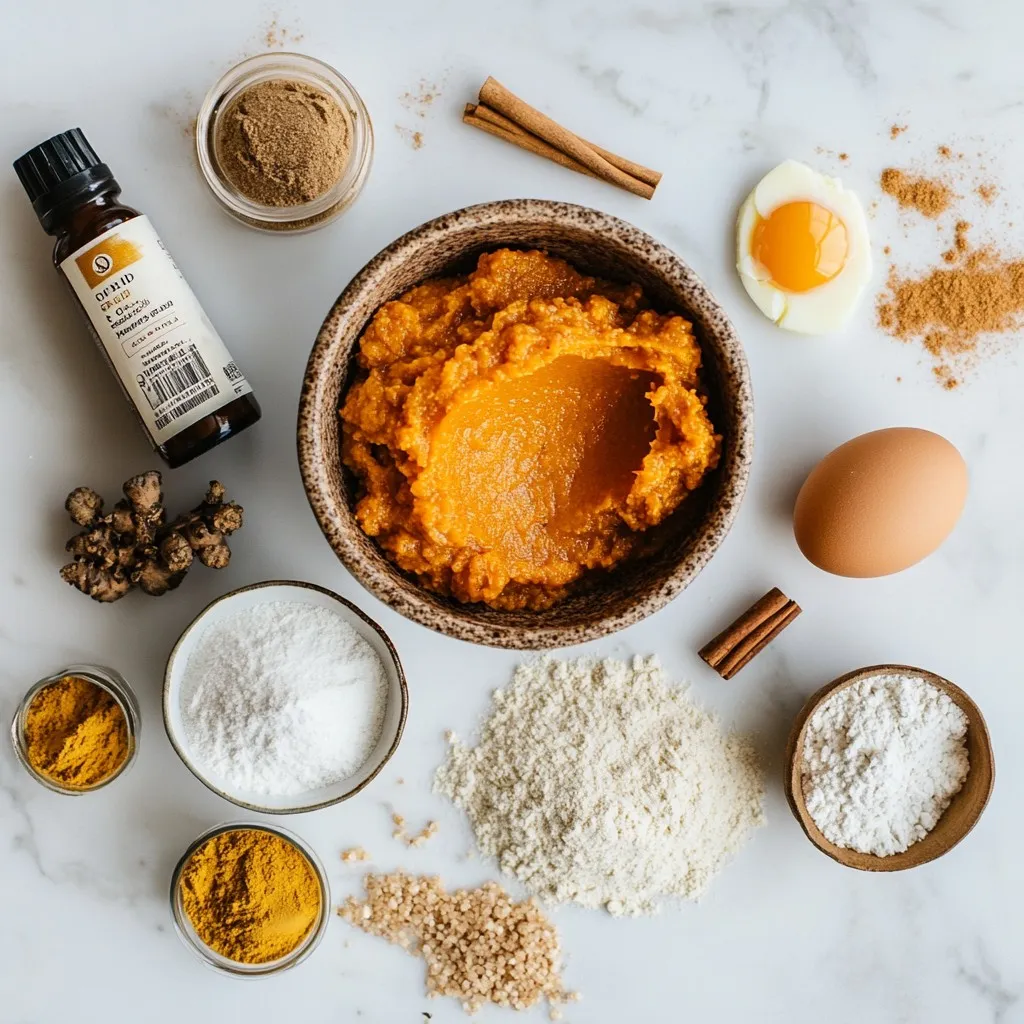
Detailed List of Ingredients
– Pumpkin Puree: This adds moisture and flavor. Use canned or homemade.
– Unsalted Butter: Softened butter helps the dough mix well. It gives cookies a rich taste.
– Granulated Sugar and Brown Sugar: These sugars create sweetness. Brown sugar adds a hint of caramel flavor.
– Egg and Vanilla Extract: The egg binds the dough. Vanilla adds a warm, sweet note.
– Dry Ingredients:
– Flour: All-purpose flour gives structure.
– Cream of Tartar: This keeps cookies soft and chewy.
– Baking Soda: It helps the cookies rise.
– Salt: A pinch balances the sweetness.
– Spices: Cinnamon, nutmeg, and ginger provide that cozy fall flavor.
– Coating Mixture:
– Granulated Sugar: This adds sweetness on the outside.
– Ground Cinnamon: It gives a warm, spicy finish.
These ingredients work together to create a soft, flavorful cookie perfect for fall. Each one plays a key role in texture and taste.

Step-by-Step Instructions
Prepping the Oven and Baking Sheet
– Preheat your oven to 350°F (175°C).
– Line a large baking sheet with parchment paper. This helps cookies not to stick.
Mixing the Wet Ingredients
– In a large bowl, cream together the softened butter, granulated sugar, and brown sugar.
– Use an electric mixer or a wooden spoon. Mix until light and fluffy, about 3-4 minutes.
– Add the pumpkin puree, egg, and vanilla extract. Mix until smooth.
Preparing the Dry Mixture
– In another bowl, whisk together the all-purpose flour, cream of tartar, baking soda, sea salt, ground cinnamon, ground nutmeg, and ground ginger.
– Make sure these ingredients are well combined for even flavor.
Combining Wet and Dry Mixtures
– Gradually add the dry mixture to the wet ingredients.
– Stir gently with a spatula until just combined. Avoid overmixing; this keeps cookies tender.
Forming the Cookies
– Use a cookie scoop or your hands to portion the dough into balls, about 1 inch wide.
– Roll each ball in a cinnamon-sugar mixture. This gives them a sweet, spiced coating.
Baking and Cooling
– Place the coated dough balls on the prepared baking sheet, leaving 2 inches between each.
– Bake for 10-12 minutes. The edges should be lightly golden, and centers may look soft.
– Let the cookies cool on the baking sheet for about 5 minutes. Then, transfer them to a wire rack to cool fully.
Tips & Tricks
Achieving Perfect Texture
Importance of Ingredient Temperature
For the best cookies, use room temperature butter. Softened butter makes it easy to cream with sugars. This step creates air pockets, giving your cookies a light texture. Use cold pumpkin puree straight from the can, as it helps balance the butter warmth.
Not Overmixing the Dough
Be gentle when mixing wet and dry ingredients. Overmixing makes cookies tough. Stir until just combined. You want a soft dough, not a dense one.
Flavor Enhancement Techniques
Suggestions for Extra Flavor
To boost flavor, add a pinch of cloves or allspice. These spices enhance warmth and complexity. You can also add a splash of maple syrup for sweetness.
Using Fresh Spices vs. Ground Spices
Fresh spices provide a stronger, brighter flavor than ground spices. If you can, use fresh ground cinnamon or nutmeg. If not, use quality pre-ground spices. They still add great flavor.
Presentation Ideas
Arranging Cookies
For a festive display, stack cookies on a colorful plate. Sprinkle a little cinnamon on top for a cozy look. Use seasonal leaves or small pumpkins for decoration.
Serving Suggestions with Beverages
Pair these cookies with cold milk or warm coffee. The flavors blend well together. For a fall twist, try serving with spiced apple cider. It adds to the seasonal charm!
Pro Tips
- Chill the Dough: For thicker cookies, chill the dough in the refrigerator for at least 30 minutes before baking. This helps prevent the cookies from spreading too much while baking.
- Use Fresh Spices: For the best flavor, use freshly ground spices instead of pre-ground. This will enhance the overall taste of your cookies, making them aromatic and delicious.
- Check for Doneness: Cookies may look slightly underbaked in the center; this is okay! They will continue to cook on the baking sheet after removing them from the oven. Aim for lightly golden edges.
- Storage Tips: Store cookies in an airtight container at room temperature for up to a week. For longer storage, freeze them in a single layer and transfer to a freezer bag for up to 3 months.

Variations
Gluten-Free Snickerdoodle Pumpkin Cookies
To make gluten-free snickerdoodle pumpkin cookies, swap out the all-purpose flour for a gluten-free blend. Look for a mix that includes xanthan gum, which helps provide structure. You can also use almond flour or coconut flour, but be aware that this may change the texture. Adjust the amount of flour based on the moisture content of your pumpkin puree. Always check your labels to ensure your ingredients are gluten-free.
Vegan Snickerdoodle Pumpkin Cookies
To create vegan snickerdoodle pumpkin cookies, replace the egg with a flax egg. To make a flax egg, mix one tablespoon of ground flaxseed with three tablespoons of water. Let it sit for about five minutes until it thickens. For butter, use vegan butter or coconut oil, softened. Make sure your sugars are vegan as well. These swaps keep the cookies tasty while fitting a plant-based diet.
Alternative Flavor Profiles
Adding chocolate chips or nuts to your cookie dough can elevate the flavor. Semi-sweet chocolate chips pair well with the spices, while nuts like pecans or walnuts add a nice crunch. For seasonal add-ins, try dried cranberries or white chocolate chips. You can also experiment with different spices, like cardamom or cloves, for a unique twist. These variations keep your cookies exciting and fresh every time you bake.
Storage Info
How to Store Cookies
To keep your snickerdoodle pumpkin cookies fresh, use airtight containers. Glass or plastic containers work well. Place parchment paper between layers to avoid sticking. Keep them at room temperature for best taste.
Freezing Instructions
To freeze cookies, first let them cool completely. Place them in a single layer on a baking sheet. Once frozen, transfer them to a freezer bag or container. This keeps them fresh for up to three months. To thaw, simply leave them out for a few hours or microwave them for a few seconds.
Shelf Life
Snickerdoodle pumpkin cookies stay fresh for about one week at room temperature. If stored properly, they last longer in the fridge, around two weeks. Freezing extends their life, but they are best enjoyed fresh!
FAQs
Can I use fresh pumpkin instead of canned?
Yes, you can use fresh pumpkin. Fresh pumpkin adds a vibrant taste. It also has more moisture. This might change the dough’s texture.
– Nutritional Considerations: Fresh pumpkin is rich in vitamins. It has more fiber than canned. You might need to cook and strain it. This helps reduce moisture.
How do I know when the cookies are done baking?
Look for a golden edge and soft center. The cookies should look set but not hard. They will firm up as they cool.
– Visual and Texture Cues: When you bake them, the edges will turn golden. The tops may look a bit shiny. A gentle press will feel soft but not wet.
What to do if the dough is too sticky?
If the dough sticks to your hands, chill it. This makes it easier to handle. You can also dust your hands with flour.
– Tips for Manageable Dough: Use a little flour when rolling the dough. This keeps it from sticking too much. If it’s still sticky, chill the dough for 30 minutes.
Can I make these cookies ahead of time?
Yes, you can make them ahead. Bake the cookies and store them.
– Prepping and Storing Tips: Let the cookies cool completely. Place them in an airtight container. They stay fresh for about a week. You can also freeze the dough. Just scoop it into balls. Freeze them on a tray. Once solid, store in a bag.
In this blog post, we explored the joy of baking Snickerdoodle Pumpkin Cookies. From gathering the right ingredients to mixing, baking, and storage, I shared clear steps to ensure success. I provided tips for perfect texture, flavor boosts, and variations for everyone.
These cookies bring warmth and fun to any season. Whether you enjoy them fresh or freeze some for later, the flavors will keep you coming back. Happy baking as you try out these easy recipe

Snickerdoodle Pumpkin Cookies
Ingredients
- 1 cup pumpkin puree
- 1 2 cup unsalted butter, softened to room temperature
- 1 cup granulated sugar
- 1 2 cup packed brown sugar
- 1 large egg
- 1 teaspoon vanilla extract
- 2 cups all-purpose flour
- 1 teaspoon cream of tartar
- 1 teaspoon baking soda
- 1 2 teaspoon fine sea salt
- 1 teaspoon ground cinnamon
- 1 2 teaspoon ground nutmeg
- 1 4 teaspoon ground ginger
- 1 4 cup granulated sugar (for coating)
- 2 teaspoons ground cinnamon (for coating)
Instructions
- Preheat your oven to 350°F (175°C) and line a large baking sheet with parchment paper to prevent sticking.
- In a large mixing bowl, use an electric mixer or a wooden spoon to cream together the softened butter, granulated sugar, and brown sugar. Beat the mixture until it becomes light and fluffy, approximately 3-4 minutes.
- Next, add the pumpkin puree, egg, and vanilla extract to the butter-sugar mixture. Mix well until all ingredients are fully incorporated and the mixture is smooth.
- In a separate bowl, whisk together the all-purpose flour, cream of tartar, baking soda, fine sea salt, ground cinnamon, ground nutmeg, and ground ginger until evenly combined.
- Gradually add the dry mixture to the wet ingredients, stirring gently with a spatula until just combined. Be careful not to overmix, as this can lead to tougher cookies.
- In a small bowl, mix the 1/4 cup granulated sugar with the 2 teaspoons of cinnamon to create your coating mixture.
- Using a cookie scoop or your hands, portion the dough into balls, each approximately 1 inch in diameter. Roll each cookie ball in the cinnamon-sugar mixture until fully coated.
- Place the coated cookie dough balls onto the prepared baking sheet, allowing 2 inches of space between each ball to ensure even spreading during baking.
- Bake the cookies in the preheated oven for 10-12 minutes, or until they are set and the edges are lightly golden. The centers may look slightly soft, but they will firm up as they cool.
- Once baked, remove the cookies from the oven and allow them to cool on the baking sheet for about 5 minutes before transferring them to a wire rack to cool completely.


![- 1 cup cherries, pitted and chopped - 1 cup unsweetened applesauce - 1/2 cup peanut butter or almond butter - 1/2 cup honey or maple syrup - 1 teaspoon vanilla extract - 2 cups rolled oats - 1/2 cup chocolate protein powder - 1 teaspoon baking powder - 1/2 teaspoon baking soda - 1/4 teaspoon salt - 1/3 cup dark chocolate chips To make the best Cherry Chocolate Protein Muffins, you need fresh ingredients. Start with cherries. Choose ripe cherries for a sweet taste. Pitting and chopping them helps mix them into the batter easily. Next, use unsweetened applesauce. It adds moisture and replaces some fat. This keeps the muffins light and fluffy. If you prefer a nutty flavor, choose between peanut butter or almond butter. Both work well. For sweetness, you can pick honey or maple syrup. Each adds a unique flavor. Don’t forget the vanilla extract. It enhances the overall taste. Now, let’s talk about the dry ingredients. Rolled oats add texture and fiber. They also help bind the muffins. The chocolate protein powder is key for a protein boost. It makes these muffins a healthy snack. Add baking powder and baking soda for lift. This ensures your muffins rise well. Lastly, sprinkle in some salt to balance the sweetness. The dark chocolate chips are the fun part. They melt in the oven and create pockets of gooey chocolate. This makes every bite a treat! For the full recipe, check out the instructions in the next section. Enjoy every step of making these delicious muffins! 1. First, preheat your oven to 350°F (175°C). This step is key to baking muffins evenly. 2. Prepare your muffin tin by lining it with paper liners. You can also lightly grease each cup to help prevent sticking. 3. In a large mixing bowl, combine the unsweetened applesauce, your choice of nut butter, honey, and vanilla extract. Mix well with a whisk or spatula until smooth. 4. Now, it’s time to fold in the chopped cherries. Gently stir them into the wet mixture. Make sure they spread evenly throughout the batter. 5. In another bowl, whisk together the rolled oats, chocolate protein powder, baking powder, baking soda, and salt. This mix will give your muffins a nice rise. 6. Gradually add the dry mix to the wet mixture. Fold them together gently, being careful not to overmix. Overmixing can make your muffins tough. 7. Next, fold in the dark chocolate chips. Ensure they are well-distributed, so you get a chocolate burst in every bite. 8. Use a spoon or an ice cream scoop to pour the batter into the muffin tin. Fill each cup about 2/3 full to allow room for rising. 9. Bake the muffins in your preheated oven for 18-20 minutes. Check for doneness by inserting a toothpick into the center. If it comes out clean, they are ready! 10. Once baked, remove the muffins and let them cool in the tin for 5 minutes. Then, transfer them to a wire rack to cool completely. This step helps keep the texture light and fluffy. For the full recipe, check out the details above. Enjoy your delicious Cherry Chocolate Protein Muffins! To make the best Cherry Chocolate Protein Muffins, avoid overmixing the batter. Overmixing can lead to tough muffins. Mix just until the dry and wet ingredients combine. This keeps your muffins light and fluffy. Measuring ingredients accurately is also key. Use dry measuring cups for solids like oats and protein powder. For liquids, use a liquid measuring cup. This ensures you add the right amounts for great results. I love serving these muffins warm. They taste best right out of the oven. A light dusting of powdered sugar or a drizzle of melted dark chocolate adds a special touch. You can also pair them with Greek yogurt for extra protein and creaminess. For a balanced meal, enjoy these muffins with a side of fruit. Slices of banana or a handful of berries can brighten your plate and add freshness. These muffins are packed with health benefits. Protein powder offers a great source of protein. It helps build and repair muscles. This makes them perfect for post-workout snacks. Cherries are rich in antioxidants. They help fight inflammation and support heart health. Oats provide fiber, which is good for digestion. They also keep you feeling full longer, making these muffins a smart choice for any time of day. For the complete recipe, check out the [Full Recipe]. {{image_4}} You can make Cherry Chocolate Protein Muffins gluten-free by using certified gluten-free oats. Almond flour also works well here. For a vegan option, replace honey with maple syrup. Use a vegan protein powder to keep it plant-based. This way, everyone can enjoy these tasty muffins, no matter their diet. - Gluten-free: Use gluten-free oats and almond flour. - Vegan: Swap honey for maple syrup and use vegan protein powder. Spicing up your muffins can add a fun twist. Try adding 1 teaspoon of cinnamon or nutmeg to the mix. This small change can bring warmth and depth to the flavor. You might also want to mix in nuts or seeds. Chopped walnuts or sunflower seeds can add crunch and nutrition to your muffins. - Spices: Add 1 teaspoon of cinnamon or nutmeg. - Nuts or seeds: Incorporate chopped walnuts or sunflower seeds. You can customize these muffins with fruits that are in season. In summer, try adding blueberries or peaches. In fall, diced apples or pumpkin puree would be delightful. Different types of chocolate can also change the taste. Dark chocolate, milk chocolate, or even white chocolate can make the muffins exciting and unique. - Seasonal fruits: Use blueberries in summer or apples in fall. - Chocolate types: Experiment with dark, milk, or white chocolate. To keep your Cherry Chocolate Protein Muffins fresh, follow these simple steps: - Allow the muffins to cool completely before storage. - Use an airtight container to maintain moisture. - Place parchment paper between layers to avoid sticking. I find that glass containers work best because they help keep the muffins soft and fresh. Freezing muffins is a great way to enjoy them later. Here’s how to do it: - Allow the muffins to cool fully. - Wrap each muffin in plastic wrap or aluminum foil, then place them in a freezer bag. - Label the bag with the date for easy tracking. When you’re ready to eat, thaw the muffins by leaving them out at room temperature. For quicker results, pop them in the microwave for about 20 seconds. This method keeps them moist and tasty. Cherry Chocolate Protein Muffins can last: - At room temperature: 3 to 4 days in an airtight container. - In the fridge: 1 week if stored properly. This means you can enjoy these muffins without worry for several days! Remember to check for freshness before eating. Enjoy your delicious snacks! Can I make these muffins ahead of time? Yes, you can make these muffins ahead of time. They store well for a few days. Just make sure to keep them in an airtight container. You can also freeze them for longer storage. What can I use instead of protein powder? If you don't have protein powder, you can use ground oats or almond flour. This will change the texture a bit but keeps the muffins tasty. You might need to adjust the liquid in the recipe. How can I reduce sugar in the recipe? To cut down on sugar, use less honey or maple syrup. You can also swap in a sugar substitute like stevia. This will help keep the sweetness but lower the sugar content. Is it possible to use fresh cherries instead of frozen? Yes, fresh cherries work great too! Just chop them up and remove the pits. Fresh cherries can add a nice burst of flavor. They may make the muffins a bit moister, so keep an eye on baking time. What is the protein content per muffin? Each muffin has about 7 grams of protein. This comes mainly from the protein powder and nut butter. It makes a healthy snack or breakfast option. Are these muffins suitable for kids? Absolutely! These muffins are great for kids. They are tasty and packed with nutrients. Plus, the chocolate bits make them fun to eat. In this article, we explored how to make delicious Cherry Chocolate Protein Muffins. We covered ingredients, step-by-step instructions, and tips for perfecting the recipe. You learned how to store these muffins and adapt them for different diets. These muffins are not just tasty; they offer health benefits too. Experiment with flavors and enjoy them as snacks or meals. Now, grab your ingredients and start baking your own batch today!](https://goldendishy.com/wp-content/uploads/2025/07/bcf12119-4bc4-4824-810e-f617231ac2e7-768x768.webp)


