Sheet Pan Sweet Chili Glazed Salmon Easy Dinner Recipe

Are you ready to make dinner time easier? This Sheet Pan Sweet Chili Glazed Salmon recipe gives you a tasty meal in one go. With just a few simple ingredients, like salmon fillets and fresh veggies, you’ll whip up a flavorful dish that delights the whole family. Whether you’re a busy parent or a home chef, this easy recipe is perfect for you. Let’s dive into the details and get cooking!
Ingredients
List of Ingredients
– 4 juicy salmon fillets
– 1/4 cup sweet chili sauce
– 2 tablespoons low sodium soy sauce
– 1 tablespoon golden honey
– 2 teaspoons fragrant sesame oil
– 1 teaspoon freshly grated ginger
– 1 vibrant red bell pepper, sliced into strips
– 1 medium zucchini, sliced into half-moons
– 1 small red onion, cut into wedges
– 2 tablespoons extra virgin olive oil
– Sea salt and freshly cracked black pepper to taste
– Toasted sesame seeds and finely chopped green onions for garnish
I love this recipe for its bright flavors and ease. You can find these ingredients at any grocery store. Salmon fillets are the star here. They bring rich taste and healthy fats. Sweet chili sauce adds sweetness with a hint of heat. Low sodium soy sauce balances the flavors without being too salty.
The honey adds a touch of natural sweetness. Sesame oil gives a lovely aroma. Fresh ginger adds a zing that brightens the dish.
For the veggies, I like using colorful bell peppers and zucchini. They cook quickly and add crunch. Red onion brings a bit of sweetness as well. Olive oil helps everything roast nicely.
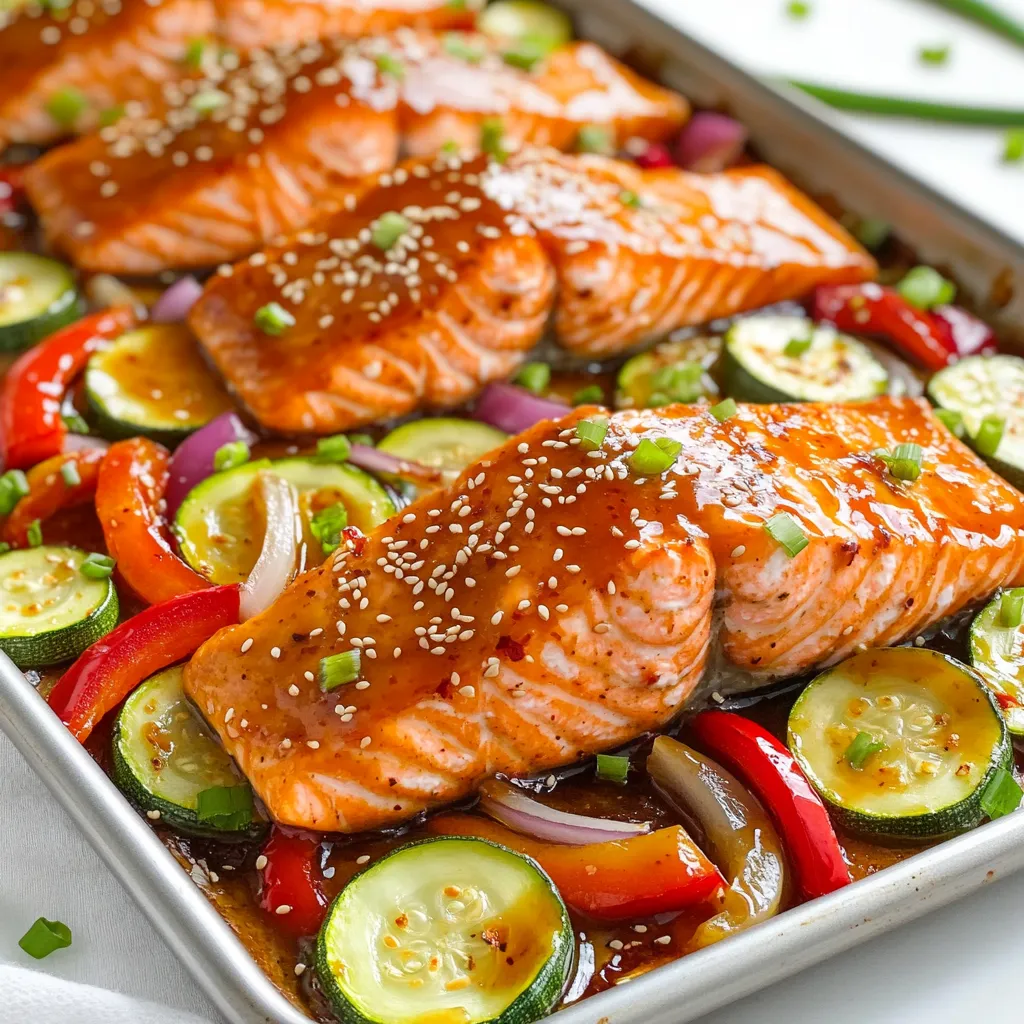
Don’t forget sea salt and black pepper for seasoning. Finally, the sesame seeds and green onions make the dish look pretty and add flavor. This mix of ingredients makes for a colorful, tasty meal that is easy to prepare.
Step-by-Step Instructions
Preheat the Oven
First, set your oven to 400°F (200°C). This high heat cooks the salmon and veggies well. To make cleanup easy, line a large sheet pan with parchment paper. This keeps the food from sticking.
Create the Marinade
In a small bowl, mix together these ingredients:
– 1/4 cup sweet chili sauce
– 2 tablespoons low sodium soy sauce
– 1 tablespoon golden honey
– 2 teaspoons sesame oil
– 1 teaspoon grated ginger
Whisk these well. You want a smooth blend that will coat your salmon nicely.
Marinate the Salmon
Take your salmon fillets and place them in a shallow dish or a resealable bag. Pour half of the marinade over the salmon. Make sure each fillet is covered. Let it marinate for 15-20 minutes. This time helps the flavors soak in while you prep your veggies.
Prepare the Vegetables
Grab a separate bowl and toss together:
– 1 sliced red bell pepper
– 1 sliced medium zucchini
– 1 small red onion cut into wedges
– 2 tablespoons olive oil
– Sea salt and pepper to taste
Mix until all the veggies are coated. Spread them in a single layer on one side of the sheet pan.
Combine Salmon and Vegetables
Once the salmon has marinated, take it out. Place the fillets on the other side of the sheet pan, skin-side down. Brush the tops of the fillets with the rest of the marinade for extra flavor.
Bake to Perfection
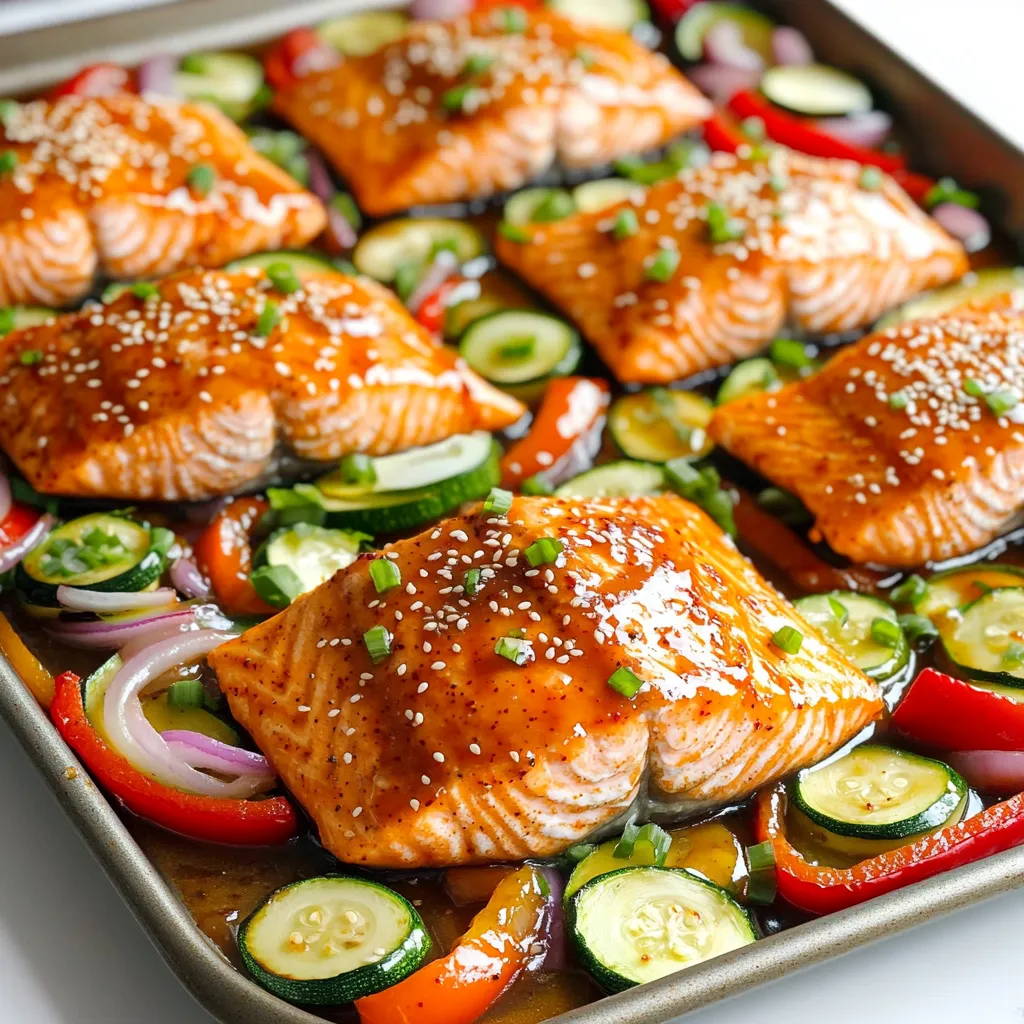
Put the sheet pan in your preheated oven. Bake for 12-15 minutes. The salmon should flake easily with a fork when done, and the veggies should be tender and slightly caramelized.
Garnish and Serve
After baking, take the sheet pan out. Sprinkle toasted sesame seeds and chopped green onions on top of the salmon. This adds great flavor and color. Serve right away, and think about pairing it with rice or quinoa for a full meal.
Tips & Tricks
Perfecting the Sweet Chili Glaze
To make the sweet chili glaze just right, you can tweak the flavors. If you like it sweeter, add more honey. For a kick, mix in some red pepper flakes or a dash of sriracha. If you want less heat, use a mild chili sauce. Taste as you go to find your perfect balance.
Cooking Salmon to Perfection
The best internal temperature for salmon is 145°F (63°C). This ensures it’s safe and tasty. To check, use a food thermometer. Salmon should flake easily with a fork when it’s done. Keep an eye on it while baking. Overcooking can make it dry, so check around the 12-minute mark.
Time-Saving Methods
To speed up your cooking time, prep your ingredients ahead. You can slice the veggies the day before. Store them in the fridge in an airtight container. You can also mix the marinade early. This way, you save time when it’s time to cook. Plan ahead, and dinner will be quick and easy!

Variations
Alternative Proteins
You can swap salmon for chicken or tofu. Chicken works great with the sweet chili glaze. Use chicken breasts or thighs for juicy flavor. Cook them for about 20-25 minutes at the same temperature. Tofu is a fantastic choice for a plant-based meal. Just press the tofu to remove extra water. Cut it into cubes and marinate like the salmon. Both options will soak up the tasty sauce!
Different Vegetable Combinations
Feel free to mix in seasonal veggies. Asparagus, broccoli, or snap peas taste amazing. Brussels sprouts add a nice crunch. Carrots bring color and sweetness. Just chop them to similar sizes. Toss them in olive oil and spices, just like the other veggies. The goal is to have a colorful and healthy mix on your sheet pan.
Flavor Boosters
To enhance the taste, add fresh herbs or spices. Chopped cilantro or basil gives a fresh pop. Try some red pepper flakes for spice. You can also squeeze fresh lime juice over the dish before serving. This brightens the flavors and adds zest. Experiment with your favorite herbs to find your perfect combo!
Storage Info
Storing Leftovers
To store leftovers properly, let the salmon and veggies cool first. Place them in an airtight container. You can keep them in the fridge for up to three days. Make sure to separate the salmon from the vegetables if you want them to stay fresh longer. This helps keep the salmon moist and the veggies crisp.
Reheating Tips
When you want to reheat, the oven is your best friend. Preheat it to 350°F (175°C). Place the salmon and veggies on a baking sheet. Bake for about 10 minutes or until warmed through. This method helps keep the fish tender and the veggies nice. You can also use the microwave for a quick reheat, but it may make the veggies soft.
Freezing Options
If you want to freeze, wrap the salmon tightly in plastic wrap. Then, place it in a freezer bag. You can freeze the veggies too. Make sure to remove as much air as possible. For best taste, use them within three months. When ready to eat, thaw in the fridge overnight. You can then reheat them as mentioned before.
FAQs
How long to cook salmon in the oven?
The cooking time for salmon depends on its thickness. For fillets about 1 inch thick, bake for 12-15 minutes. If your fillet is thicker, add a few more minutes. Always check if it flakes easily with a fork. This shows that it is cooked just right.
Can I use frozen salmon for this recipe?
Yes, you can use frozen salmon. Just remember to thaw it first. You can place it in the fridge overnight or use the quick-thaw method. To do this, seal the salmon in a bag and submerge it in cold water for about an hour. After thawing, follow the recipe as usual.
What can I serve with sweet chili glazed salmon?
You can serve this dish with many sides. Here are some great options:
– Fluffy white rice or quinoa
– Steamed broccoli or green beans
– A fresh mixed salad with a light dressing
– Roasted potatoes or sweet potatoes
These sides balance the meal and add nutrition.
How do I know when salmon is done cooking?
Look for a few signs to know if your salmon is done. The flesh should turn from a deep pink to a light pink. It should also flake easily when you press it with a fork. If you have a food thermometer, the internal temperature should reach 145°F (63°C). When you see these signs, your salmon is ready to enjoy!
The blog post covered how to make a delicious sweet chili glazed salmon. We discussed the ingredients, from salmon fillets to the right seasonings. I shared step-by-step guides on marinating, baking, and serving. Plus, you learned about storing leftovers and variations with other proteins or vegetables.
Cooking is both fun and rewarding. With practice, you can create a meal that shines at any table. Enjoy your cooking journey!


![- 1 pre-made pie crust - 2 medium zucchinis, grated - 2 cups fresh spinach, chopped - 1 small onion, finely chopped - 3 large eggs - 1 cup milk I love using a pre-made pie crust for this quiche. It saves time and effort. The zucchinis bring a fresh taste, while the spinach adds color and nutrients. Eggs and milk create a rich, creamy texture that binds everything together. - 1 teaspoon garlic powder - Salt and pepper to taste - 1 tablespoon olive oil Garlic powder gives this dish a warm flavor. I always add salt and pepper to enhance the taste. Olive oil is perfect for cooking the veggies and adds a nice depth of flavor. - 1 cup shredded mozzarella cheese - 1/2 cup grated Parmesan cheese Cheese is key for a tasty quiche. Mozzarella melts beautifully, while Parmesan adds a sharp, salty kick. Together, they create a delightful flavor mix that elevates your dish. Don't forget to check the full recipe for complete details! First, heat olive oil in a skillet over medium heat. Add the finely chopped onion. Sauté it for about 3-4 minutes until it turns soft and clear. Next, add the grated zucchini and chopped spinach. Stir often and cook for about 5 minutes. The veggies should become tender, and any extra water will cook off. I love adding garlic powder, salt, and pepper to boost the flavor. After cooking, take it off the heat and let it cool for a moment. In a large bowl, whisk together the eggs and milk until they blend smoothly. This is where the magic begins! Next, add in the shredded mozzarella and grated Parmesan cheese. Fold them in gently. This mixture will bring richness to your quiche. It’s important that the cheese mixes well but still keeps some texture. Now, pour the vegetable and egg mixture into the prepared pie crust. Spread it out evenly to help it cook well. Place the quiche in your preheated oven. Bake for 30-35 minutes. You’ll know it’s ready when the edges turn golden brown and a toothpick inserted in the center comes out clean. Let it cool for about 10 minutes before slicing. This resting time helps enhance the flavors. You can find the full recipe in the previous section for all these steps! To get the best texture for your quiche, you must control moisture. Zucchini has a lot of water, which can make your quiche soggy. To fix this, grate the zucchini and lightly salt it. Let it sit for 10 minutes, then squeeze out the excess liquid. This step is key to a firm quiche. The cooking time can vary based on your oven. I find that checking it a few minutes early helps. If the edges look golden and a toothpick comes out clean, it's ready! For more flavor, consider adding fresh herbs like thyme or basil. A pinch of red pepper flakes can add a nice kick. You can also play with spices, like paprika or onion powder. Each of these can change the taste in a fun way. Cheese is another way to boost flavor. While mozzarella and Parmesan are great, try using feta or goat cheese for a tangy twist. These types add both creaminess and a bit of zest to the dish. When serving your zucchini spinach quiche, aim for a bright plate. A colorful plate makes a dish look more appealing. Add fresh basil or parsley on top for an eye-catching touch. You can also serve it with a light salad drizzled with citrus vinaigrette. This adds freshness and balance. For a photo-worthy presentation, slice the quiche into neat pieces. Arrange them in a circle on the plate. This simple trick makes your dish look polished and ready for sharing. Don't forget to snap a picture before you dig in! For the complete recipe, check out the [Full Recipe]. {{image_4}} You can switch up the veggies in your quiche. Broccoli, bell peppers, or mushrooms work great. Each veggie brings its own taste and texture. You can also try seasonal additions. In spring, add asparagus, and in fall, use roasted squash. This keeps your quiche fresh and exciting. If you need a gluten-free quiche, use a gluten-free crust. Many stores sell these now, or you can make your own. If you make your crust, use almond flour or coconut flour for a nice texture. You may need to adjust the liquid in the filling. This helps keep the quiche moist and tasty. Making mini quiches is fun and easy. You can use a muffin tin for individual servings. Just pour the mixture into each cup and fill them about three-quarters full. Bake for about 20-25 minutes. Keep an eye on them to avoid burning. These mini quiches are perfect for snacks or brunch. You can even freeze them for later! Check out the Full Recipe for more details. To keep your quiche fresh, store it in an airtight container. This helps keep moisture out. It stays fresh in the fridge for up to three days. If you plan to eat it later, cover it tightly with plastic wrap or foil. You can freeze your quiche before or after baking. If freezing before baking, wrap it well. This way, you can bake it fresh later. For freezing after baking, let it cool completely first. Store it in an airtight container. It can last up to three months in the freezer. When ready to eat, thaw it in the fridge overnight. For the best taste, reheat your quiche in the oven. Set it to 350°F (175°C) and heat for about 15-20 minutes. This keeps the crust crispy. You can also use a microwave for quick heating. However, the crust may not stay as crunchy. Heat slices for about 1-2 minutes. Always check that it's hot in the middle before serving. You can tell the quiche is done by looking for a few key signs. The edges should be golden brown, and the center should be firm. If you gently shake the quiche, it should not jiggle. Another great way to check is with a toothpick. Insert it into the center of the quiche. If it comes out clean, your quiche is ready to enjoy. Yes, you can use frozen spinach in this recipe. However, it’s important to make a few adjustments. First, thaw the spinach completely and drain any excess water. This helps prevent the quiche from becoming too watery. You may also want to chop the spinach further after thawing. This ensures even distribution in your quiche. Zucchini spinach quiche pairs well with many side dishes. A simple green salad with a light vinaigrette works great. You can also serve it with roasted vegetables for added flavor. If you want something heartier, serve it alongside a bowl of creamy tomato soup. This combination makes for a balanced and tasty meal. This blog post covers how to make a tasty zucchini and spinach quiche. You learned about the main ingredients, like pre-made crust and eggs, plus the best seasonings. I shared step-by-step instructions for preparing and baking. You also got tips for perfecting texture and ideas for variations. Making this dish can be easy and fun. Enjoy experimenting with flavors and ingredients. Whether you serve it for breakfast or dinner, this quiche will impress. Get cooking and enjoy your delicious creation!](https://goldendishy.com/wp-content/uploads/2025/06/2284a9f2-dfec-450d-ba9a-23981f99d5f6-768x768.webp)


![- 1 pound boneless, skinless chicken breasts - 6 cups low-sodium chicken broth - 1 medium onion, finely chopped - 2 cloves garlic, minced - 2 medium carrots, diced - 2 stalks celery, diced - 1 cup orzo pasta - 3 large eggs - 1/2 cup freshly squeezed lemon juice (about 2-3 lemons) This soup starts with tender chicken. I prefer boneless, skinless chicken breasts. They cook fast and stay juicy. Next, low-sodium chicken broth gives the soup its rich base. Fresh veggies add flavor and nutrition. Onion, garlic, carrots, and celery create a perfect mix. I chop them finely for even cooking. Orzo pasta makes the soup filling. It cooks well in the broth, soaking up all the flavors. To achieve that creamy texture, I use eggs and lemon juice. The eggs blend with the broth, creating a silky finish. Fresh lemon juice brightens the soup, making every bite refreshing. - 1 teaspoon dried oregano - 1 teaspoon sea salt - 1/2 teaspoon freshly ground black pepper - 2 tablespoons extra-virgin olive oil Seasoning is key in this recipe. Dried oregano adds a hint of earthiness. Sea salt and black pepper enhance the natural flavors. I always choose extra-virgin olive oil for sautéing. It has a wonderful taste and is healthy too. - Fresh parsley, finely chopped - Lemon wedges for serving Garnishes make a dish special. Fresh parsley adds color and freshness. I sprinkle it on top before serving. Lemon wedges are great for those who want extra zing. They brighten the dish and add a punch of flavor. For the full recipe, check out the Mediterranean Lemon Chicken Orzo Soup! It’s a perfect guide to make this comforting dish. Start by chopping the vegetables. You will need to dice the onion, carrots, and celery. Next, shred the cooked chicken. This can be done easily with two forks. For the egg mixture, whisk together the eggs and lemon juice in a medium bowl. Make sure they blend well. In a large pot, heat two tablespoons of olive oil over medium heat. Once hot, add the chopped onion, diced carrots, and celery. Sauté these vegetables for about 5 to 7 minutes. They should become tender and fragrant. Now, stir in two minced garlic cloves. Cook for one more minute. You want the garlic to smell wonderful, but not brown. Add the chicken breasts into the pot. Pour in six cups of low-sodium chicken broth. Increase the heat slightly and bring it to a gentle simmer. Let the chicken cook for 15 to 20 minutes. Once fully cooked, carefully remove the chicken from the pot and set it aside to cool. When cool, shred the chicken into bite-sized pieces. Return to the pot and add one cup of orzo pasta. Let the soup simmer for 8 to 10 minutes, stirring to prevent sticking. In your mixing bowl, you have the whisked eggs with lemon juice. Now, temper the eggs by slowly adding a ladleful of hot broth from the pot. Whisk constantly to prevent the eggs from cooking too quickly. Gradually mix the egg mixture back into the soup. This will give your soup a creamy texture. Now it’s time to adjust the seasoning. Taste the soup and add sea salt and black pepper as needed. Finally, garnish your soup with fresh parsley before serving. This adds a nice color and fresh flavor. Enjoy your comforting bowl of Greek lemon chicken soup! For the full recipe, see the detailed instructions above. - Choosing the right type of chicken: I recommend using boneless, skinless chicken breasts. This cut cooks quickly and stays tender in the soup. It also absorbs the rich flavors of the broth well. - Adjusting salt levels for broth versus soup: Start with low-sodium chicken broth. Taste as you cook, and add salt as needed. This way, you control the saltiness without overwhelming the dish. - Techniques for tempering eggs properly: To prevent egg curdling, whisk the eggs and lemon juice in a bowl. Slowly add hot broth while whisking. This warms the eggs without cooking them. - Continuous whisking for a smooth texture: Keep whisking as you add the broth. This ensures a creamy, smooth texture in your soup. It’s key for that authentic Greek flavor. - Suggestions for family dinners or special occasions: Greek Lemon Chicken Soup is perfect for family dinners. Serve it on cozy nights or special occasions like holidays. It brings warmth and comfort to the table. - Pairing with sides for a complete meal: I love pairing this soup with a fresh Greek salad or crusty bread. These sides complement the soup and make a full meal. Enjoy your cooking adventure with this classic dish! Check out the [Full Recipe] for step-by-step details on making this delightful soup. {{image_4}} If you can't find orzo, don't worry! You can use other small pasta shapes, like ditalini or acini di pepe. Both work great in this soup. For those who need gluten-free options, try rice or quinoa. These grains add texture and flavor while keeping the dish gluten-free. You can make your soup even better by adding greens. Spinach or kale works well. Simply toss them in during the last few minutes of cooking. This adds color and nutrients. You can also enhance the flavor by using herbs. Fresh dill or basil adds a lovely aroma and taste. Try adding a handful of either herb for a bright twist. If you want a meatless version, you can replace the chicken with plant-based proteins. Tofu or chickpeas are good choices. They soak up the soup's flavors nicely. Use vegetable broth instead of chicken broth to keep the taste rich and savory. This way, everyone can enjoy a bowl of this comforting soup! For the full recipe, check out the Mediterranean Lemon Chicken Orzo Soup . To keep your Greek Lemon Chicken Soup fresh, let it cool first. Pour it into airtight containers. Make sure to store it in the fridge. It should stay good for about 3 to 4 days. Always label your containers with the date. This helps you track how long it’s been there. When reheating, do it gently. You can use the stove or microwave. If using the stove, heat it on low heat. Stir often to prevent sticking. If it seems thick, add a splash of broth or water. This keeps the soup nice and smooth. To freeze Greek Lemon Chicken Soup, let it cool completely. Pour it into freezer-safe bags or containers. Remove as much air as possible. It can last up to 3 months in the freezer. When you’re ready to eat, thaw it in the fridge overnight. Reheat gently to enjoy the same great flavor. Greek Lemon Chicken Soup, also known as Avgolemono, is a classic dish. It features tender chicken, bright lemon, and creamy eggs. This soup warms the heart and soul, especially during cold months. It is a staple in Greek homes and often appears at family gatherings. The mix of flavors showcases the essence of Greek cooking. To achieve a creamy texture, temper the eggs. Whisk eggs and lemon juice together in a bowl. Gradually add hot broth while whisking. This method prevents the eggs from scrambling. Slowly stir the egg mixture back into the soup. This creates a smooth and velvety finish. Avoid boiling the soup after adding the egg to keep it creamy. Yes, you can make this soup ahead of time. Prepare the soup but skip adding the egg mixture until serving. Store the soup in an airtight container in the fridge for up to three days. When ready to serve, reheat gently and add the egg mixture. This keeps the soup fresh and creamy. This soup pairs well with a simple Greek salad. You can also serve it with warm pita bread or crusty bread. For a lighter meal, consider grilled vegetables on the side. These options enhance the flavors and create a lovely dining experience. In this post, I shared how to make Greek Lemon Chicken Soup. You learned about the key ingredients, like chicken, orzo, and the egg-lemon mixture that gives the soup its creamy texture. I provided steps for preparation, cooking, and tips for keeping the soup delicious and authentic. Don't hesitate to mix it up with different ingredients or share it with others. Enjoy this comforting dish anytime!](https://goldendishy.com/wp-content/uploads/2025/06/4ca94f54-e42c-42a8-b75c-f7048ee8bbd9-768x768.webp)

