Savory Spinach Artichoke Chicken Casserole Recipe

Are you ready to whip up a dish that thrills your taste buds? This Savory Spinach Artichoke Chicken Casserole blends tender chicken, creamy spinach, and tangy artichokes into a delightful meal. It’s easy to make and perfect for any night. In this post, I’ll guide you through every step, share tips for a perfect bake, and offer tasty variations. Let’s dive into this comforting casserole recipe that’s sure to impress!
Why I Love This Recipe
- Comforting and Hearty: This casserole combines tender chicken, creamy cheeses, and nutritious greens, creating a satisfying dish that warms the soul.
- Easy to Prepare: With minimal prep time and straightforward steps, this recipe is perfect for busy weeknights or gatherings without compromising flavor.
- Versatile Ingredients: You can easily swap out ingredients based on what you have on hand, making this casserole adaptable to your pantry staples.
- Delicious Leftovers: This dish keeps well, and the flavors only get better the next day, making it an ideal option for meal prep.
Ingredients
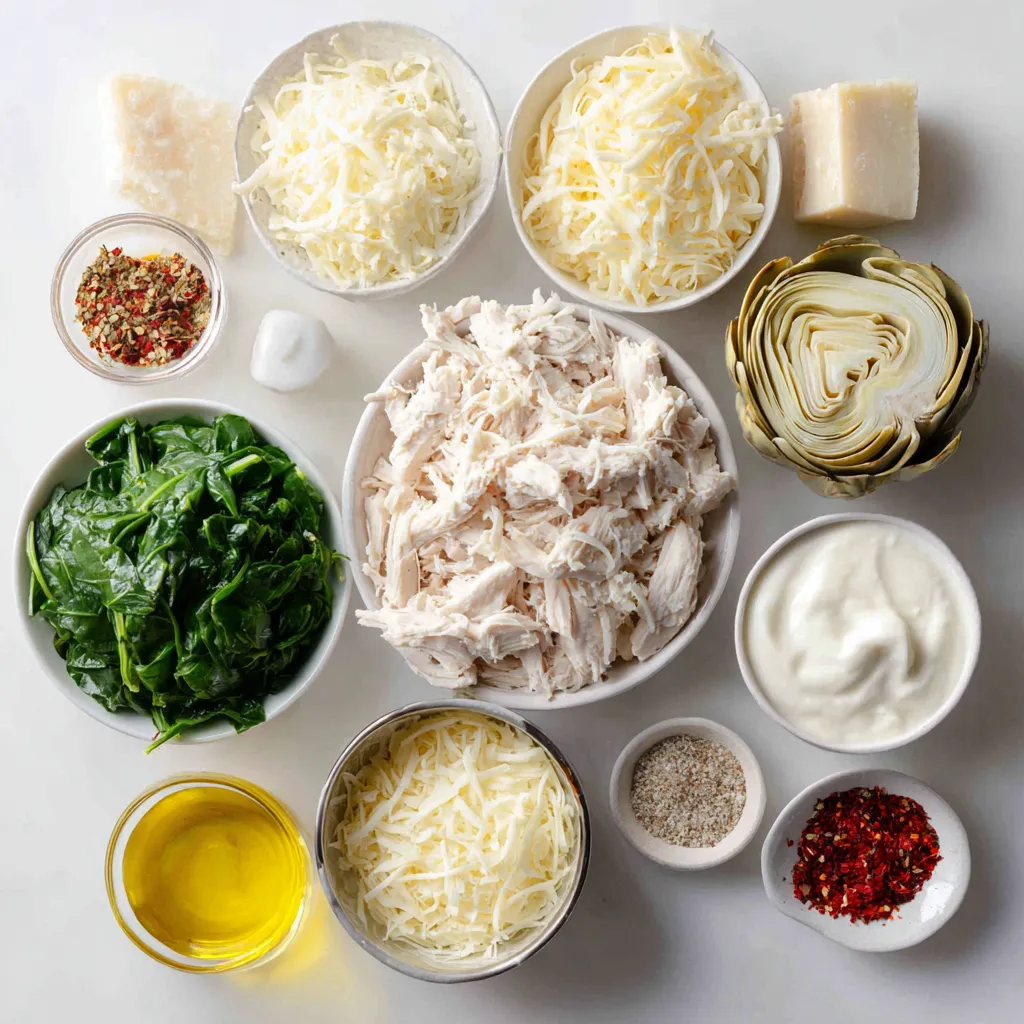
Main ingredients needed for Spinach Artichoke Chicken Casserole
For this tasty casserole, you need:
– 2 cups cooked chicken, shredded
– 1 can (14 oz) artichoke hearts, drained and roughly chopped
– 2 cups fresh spinach, finely chopped
– 1 cup cream cheese, softened
– 1 cup sour cream or Greek yogurt
– 1 cup shredded mozzarella cheese
– 1/2 cup grated Parmesan cheese
– 1 teaspoon garlic powder
– 1 teaspoon onion powder
– Salt and black pepper to taste
– 1/2 teaspoon red pepper flakes (optional)
– 1 cup breadcrumbs
– 2 tablespoons olive oil
These ingredients create a rich and flavorful dish. The combination of creamy cheeses and tender chicken makes every bite special.
Optional ingredients for added flavors
To make your casserole even better, consider adding:
– Fresh herbs like parsley or basil for freshness
– Lemon juice for a tangy kick
– Chopped sun-dried tomatoes for sweetness
– Cooked bacon bits for a smoky flavor
These extras can elevate your dish and make it unique. Feel free to experiment!
Suggested substitutes for a healthier version
You can easily swap out some ingredients for healthier options:
– Use Greek yogurt instead of sour cream for fewer calories and more protein.
– Substitute low-fat cream cheese for regular cream cheese.
– Choose whole wheat breadcrumbs for added fiber.
– Use grilled chicken instead of fried chicken for a leaner choice.
These swaps keep your casserole delicious while making it a bit healthier. Enjoy the process of creating a meal that fits your lifestyle!

Step-by-Step Instructions
Preparation steps before baking
First, preheat your oven to 350°F (175°C). This helps your casserole bake evenly. Next, gather your ingredients. You will need cooked chicken, artichoke hearts, spinach, cream cheese, sour cream or Greek yogurt, mozzarella cheese, Parmesan cheese, garlic powder, onion powder, and seasonings. It’s essential to chop the spinach and artichokes finely. This makes mixing easier and keeps each bite tasty.
Detailed cooking instructions
In a large mixing bowl, combine the shredded chicken, artichoke hearts, and chopped spinach. Stir them well. In another bowl, mix the softened cream cheese, sour cream or Greek yogurt, mozzarella, Parmesan, garlic powder, onion powder, salt, pepper, and optional red pepper flakes. Use a hand mixer or a spatula to blend until smooth.
Now, fold this creamy mixture into the chicken and veggies. Make sure everything is coated well. Transfer the mixture into a greased 9×13 inch casserole dish. Spread it out evenly with a spatula.
In a small bowl, mix the breadcrumbs with olive oil. This helps them become crispy. Sprinkle the breadcrumb mixture over the top of the casserole generously.
How to achieve the perfect golden crust
To get that perfect golden crust, keep an eye on your casserole while it bakes. Bake it for about 30-35 minutes. Look for bubbling edges and a golden brown top. If the top is not golden enough, you can broil it for a few minutes. Just watch it closely, so it doesn’t burn. After baking, let it cool for a few minutes. This helps the flavors blend nicely. Enjoy your savory Spinach Artichoke Chicken Casserole!
Tips & Tricks
Common cooking mistakes to avoid
One big mistake is not seasoning enough. Add salt and pepper to each layer. Another issue is overcooking the chicken. Use cooked chicken and shred it gently. If you skip the preheating, your casserole may not cook evenly. Always preheat your oven to 350°F. Don’t forget to let it cool before serving; this helps the flavors come together.
How to make the casserole creamier
To make your casserole creamier, use full-fat cream cheese and sour cream. Greek yogurt works too, but ensure it’s smooth. Mix the cream cheese well until there are no lumps. If you want even more creaminess, add a splash of milk. This makes the texture rich and velvety. You can also fold in some extra mozzarella cheese right before baking.
Ways to enhance flavors and textures
To boost flavor, try adding herbs like thyme or basil. Fresh herbs can brighten the dish. Adding a squeeze of lemon juice also lifts the flavors. For more texture, mix in some chopped nuts like walnuts or pecans. They add a nice crunch. You can swap breadcrumbs for crushed crackers for extra flavor. This will make your topping even tastier!
Pro Tips
- Perfectly Shredded Chicken: For the best texture, use chicken that has been cooked and cooled before shredding. This helps maintain moisture and makes it easier to mix with other ingredients.
- Cheese Variations: Feel free to mix and match your cheeses! Adding cheddar or pepper jack can give a different flavor profile and enhance the creaminess of the casserole.
- Make-Ahead Option: This casserole can be assembled a day in advance. Just cover it tightly and refrigerate. Bake it straight from the fridge, adding an extra 5-10 minutes to the cooking time.
- Herb Enhancements: Consider adding fresh herbs such as basil or thyme to the filling for an aromatic boost. They pair beautifully with the spinach and artichokes.

Variations
Vegetarian or vegan adaptations
You can easily make this dish vegetarian. Just skip the chicken. Use extra artichoke hearts and spinach instead. For a vegan version, swap cream cheese and sour cream with plant-based options. Cashew cream or tofu works well too. These changes keep the taste rich and creamy.
Substituting proteins or cheese
Want to change the protein? You can use shredded turkey or tofu for a twist. For cheese, try cheddar or gouda for a different flavor. You can mix cheeses for more depth. Each option will still give your casserole a tasty finish.
Adding different vegetables
Feel free to add more veggies. Chopped bell peppers, mushrooms, or zucchini can boost flavor and nutrition. Just make sure to chop them small. This way, they blend well with the other ingredients. You can also use frozen vegetables if you want to save time.
Storage Info
How to store leftovers properly
To keep your Spinach Artichoke Chicken Casserole fresh, let it cool first. Once cool, cover it tightly with plastic wrap or aluminum foil. You can also use an airtight container. This will help prevent drying out. Store it in the fridge for up to three days.
Reheating instructions for the casserole
When you want to enjoy your leftovers, preheat your oven to 350°F (175°C). Place the casserole in an oven-safe dish. Cover it with foil to keep it moist. Heat for about 20 minutes. Check to see if it’s warm all the way through. If you prefer the microwave, heat it for 2-3 minutes on high. Stir halfway through to ensure even heating.
Freezing for future meals
If you want to save the casserole for later, freezing is a great option. First, let it cool completely. Then, portion it into freezer-safe containers. Label each container with the date. Freeze for up to three months. To reheat, thaw in the fridge overnight. Then follow the reheating instructions above. This way, you’ll have a quick meal ready when you need it!
FAQs
Can I use rotisserie chicken for this recipe?
Yes, you can use rotisserie chicken. It saves time and adds great flavor. Just shred the chicken before mixing it into the casserole. This step makes the dish even easier to prepare. Plus, rotisserie chicken is often moist, which enhances the overall taste of the casserole.
What can I serve with Spinach Artichoke Chicken Casserole?
You can pair the casserole with several delicious sides. A fresh side salad is a great choice, adding crunch and freshness. Garlic bread or crusty rolls also work well, soaking up the creamy sauce. For a heartier meal, serve it with rice or quinoa. These options balance the rich flavors of the casserole.
How do I know when the casserole is done baking?
Check the casserole after 30-35 minutes of baking. It should be bubbling hot and golden brown on top. You can also insert a knife in the center. If it comes out warm and clean, it’s ready. Let it cool for a few minutes before serving to let the flavors settle.
This blog covered how to make a delicious Spinach Artichoke Chicken Casserole. We looked at essential ingredients, cooking steps, and tips to avoid common mistakes. You can make it creamier, switch ingredients, or try new veggies for a twist. For storage, we reviewed how to keep leftovers tasty and how to reheat them. With these insights, you’ll create a mouthwatering dish everyone will love. Enjoy your cooking journe

Spinach Artichoke Chicken Casserole
Ingredients
- 2 cups cooked chicken, shredded
- 1 can artichoke hearts, drained and roughly chopped
- 2 cups fresh spinach, finely chopped
- 1 cup cream cheese, softened to room temperature
- 1 cup sour cream or Greek yogurt
- 1 cup shredded mozzarella cheese
- 0.5 cup grated Parmesan cheese
- 1 teaspoon garlic powder
- 1 teaspoon onion powder
- to taste salt and freshly cracked black pepper
- 0.5 teaspoon red pepper flakes (optional)
- 1 cup breadcrumbs
- 2 tablespoons olive oil
Instructions
- Preheat your oven to 350°F (175°C) to prepare for baking.
- In a large mixing bowl, combine the shredded chicken, finely chopped artichoke hearts, and chopped spinach, stirring until evenly distributed.
- In a separate bowl, whip together the softened cream cheese, sour cream (or Greek yogurt), shredded mozzarella, grated Parmesan, garlic powder, onion powder, salt, pepper, and optional red pepper flakes using a hand mixer or spatula until smooth and creamy.
- Carefully fold the cheese mixture into the chicken-vegetable mixture until all ingredients are thoroughly coated and well combined.
- Transfer the hearty mixture into a greased 9x13 inch casserole dish, spreading it out evenly with a spatula.
- In a small bowl, combine the breadcrumbs with olive oil, mixing until all crumbs are perfectly coated. Sprinkle the breadcrumb mixture generously over the casserole to create a crunchy topping.
- Place the casserole in the preheated oven and bake for approximately 30-35 minutes, or until the casserole is bubbling hot and the top is golden brown and crispy.
- Once baked, remove the casserole from the oven, allowing it to cool for a few minutes before serving to let the flavors settle.


![- 1 lb boneless, skinless chicken breast - Soy sauce, honey, rice vinegar, sesame oil - Fresh garlic and ginger The main stars of this dish are the chicken and the sauce. Start with 1 pound of boneless, skinless chicken breast. Cut it into 1-inch cubes for even cooking. You’ll also need soy sauce for that salty umami flavor. Honey adds sweetness, while rice vinegar gives a nice tang. Don't forget the sesame oil, which adds a rich, nutty taste. Fresh garlic and ginger bring a wonderful aroma and flavor to the mix. - Red and green bell peppers - Zucchini - Scallions and sesame seeds for garnish Adding vegetables makes your skewers colorful and tasty. Use red and green bell peppers cut into 1-inch squares. They add crunch and sweetness. Sliced zucchini rounds are great for texture and taste. For garnish, sprinkle chopped scallions and sesame seeds on top. They add a nice pop of flavor and look pretty, too. - Wooden skewers or metal skewers - Cornstarch for sauce thickening You will need skewers to hold all the goodness together. If you choose wooden skewers, soak them in water for about 30 minutes. This helps prevent burning on the grill. Metal skewers are a great option too. For the teriyaki sauce, you will use cornstarch mixed with water to make it thick and glossy. This will give your chicken a beautiful glaze. For the full recipe, check the section above on how to bring these ingredients together into a delightful dish. To start, gather your marinade ingredients. In a bowl, mix the soy sauce, honey, rice vinegar, sesame oil, minced garlic, and grated ginger. Whisk until everything blends well. Add the chicken breast cubes, making sure they are well coated. Cover the bowl with plastic wrap. Place it in the fridge for at least 30 minutes. For a stronger flavor, marinate for up to 2 hours. This step is key to juicy, flavorful chicken. If you use wooden skewers, soak them in water for at least 30 minutes. This helps stop them from burning. While the skewers soak, preheat your grill or grill pan to medium-high heat. A hot grill will give your skewers those perfect grill marks and lock in the flavors. After marinating, take the chicken out of the fridge. Start threading the marinated chicken onto the skewers. Alternate with pieces of red and green bell peppers and zucchini slices. Leave small gaps between each piece for even cooking. Now, place the skewers on the hot grill. Grill them for about 10 to 12 minutes. Turn them occasionally to ensure even cooking. The chicken should reach an internal temperature of 165°F. You’ll know they are done when they have beautiful grill marks and smell amazing. For the best flavor, marinate the chicken for at least 30 minutes. If you have time, let it soak for up to 2 hours. This longer marinating time helps the chicken absorb all the tasty flavors. To boost the flavor even more, add a splash of orange juice or sprinkle some chili flakes into the marinade. These small changes can make a big difference. To get those nice grill marks, preheat your grill to medium-high heat. Once you place the skewers on, resist the urge to move them around too much. Let them cook for about 10-12 minutes. Flip them only when they lift easily from the grill. To know if the chicken is done, use a meat thermometer. The safe internal temperature for chicken is 165°F. This ensures your skewers are juicy and safe to eat. When serving your Chicken Teriyaki Skewers, make it look nice! Arrange them on a platter, maybe on a bed of fresh lettuce. You can also serve them with a small bowl of extra teriyaki sauce for dipping. For sides, consider steamed rice or a fresh salad. The colors of the skewers and the sides will create a beautiful meal. This makes it more fun to eat and share! {{image_4}} You can switch up the protein in your skewers. Shrimp works great, too. Just remember to cook shrimp for only 4-6 minutes. Tofu is another good choice. Use firm tofu and press it first to remove extra water. Then, cut it into cubes. Tofu takes about the same time as chicken to cook. For a plant-based twist, try a marinade with soy sauce, maple syrup, and garlic. It will give you great flavor without meat. You can make vegetable-only skewers with bell peppers, zucchini, mushrooms, and cherry tomatoes. These cook quickly and taste amazing on the grill. You can make your skewers even better with spices. Adding chili flakes or smoked paprika gives a nice kick. You can also try different sauces like peanut or hoisin sauce. Mix in veggies like onions or asparagus for more color and taste. These small changes can make your Chicken Teriyaki Skewers unique and fun. For the full recipe, check out the detailed instructions above. When you have leftover chicken teriyaki skewers, store them properly. Place the skewers in an airtight container. This helps keep them fresh. Refrigerate them within two hours of cooking. It’s best to eat them within three days. Use glass or plastic containers with tight lids. These containers prevent air from getting in. You can also wrap them in aluminum foil. Just make sure they are sealed well. This keeps your skewers moist and tasty. To reheat your skewers, use an oven or a stovetop. Both methods keep the chicken juicy. If using an oven, set it to 350°F. Place the skewers on a baking sheet. Heat for about 10 minutes. For stovetop reheating, use a non-stick pan. Add a splash of water to the pan. Cover it with a lid. This helps steam the skewers and keeps them moist. Avoid reheating them in the microwave. Microwaves can make the chicken dry. Instead, always check the internal temperature. It should reach 165°F for safe eating. If you want to freeze the chicken skewers, do it right after cooking. Let them cool completely first. Wrap each skewer in plastic wrap. Then place them in a freezer bag. This helps prevent freezer burn. To thaw, move the skewers to the fridge a day before you want to eat them. This keeps them safe and tasty. If you need to thaw them faster, use the microwave on the defrost setting. But make sure to cook them right away after. For the best results, enjoy your chicken teriyaki skewers fresh. But if you follow these steps, leftovers can still taste great! For the full recipe, check it out [Full Recipe]. To check if your Chicken Teriyaki Skewers are done, use a meat thermometer. The chicken should reach an internal temperature of 165°F (75°C). This step is key for food safety. If you don't have a thermometer, make sure the juice runs clear when you cut the chicken. No pink should show. Yes, you can make the teriyaki sauce ahead of time. Mix the ingredients and store it in the fridge. This makes your meal prep easier. You can also make a larger batch and freeze it. Just thaw it before use. This way, your meal cooks faster. Chicken Teriyaki Skewers pair well with many side dishes. You might try steamed rice or quinoa for a filling option. A fresh salad adds a nice crunch. You can also serve them with grilled vegetables for a colorful plate. These sides will enhance the flavors and balance the meal. Chicken Teriyaki skewers are easy and fun to make. You learned about key ingredients like chicken, vegetables, and sauce. I shared step-by-step instructions for marinating, preparing, and grilling. You also saw tips for perfecting your dish and some tasty variations. In the end, you can enjoy these skewers any way you like. With proper storage and reheating, leftovers can be just as delicious. I hope this guide helps you create a tasty meal that you will love!](https://goldendishy.com/wp-content/uploads/2025/07/34476f9e-f69f-487d-af01-da0dcfe0a0e7-768x768.webp)
![To make Garlic Butter Shrimp Skewers, you'll need: - 1 pound large shrimp, peeled and deveined - 4 tablespoons unsalted butter - 4 cloves garlic, minced - 1 teaspoon red pepper flakes (adjust based on desired spiciness) - 1 tablespoon fresh parsley, finely chopped - 1 tablespoon freshly squeezed lemon juice - Salt and pepper to taste - 1 teaspoon smoked paprika - Skewers (either wooden, soaked, or metal) When choosing shrimp, fresh is often best. Look for shrimp that smell like the ocean, not fishy. The shells should be shiny and clean. If fresh shrimp isn’t available, frozen shrimp is a great option. Frozen shrimp can be just as good if they are properly handled. - Check for a firm texture. - Avoid shrimp that are mushy or have black spots. - If buying frozen, look for shrimp with no added ingredients. Using quality ingredients makes a big difference. For butter, I recommend brands like Kerrygold or Plugrá. They offer rich flavor that enhances the dish. For spices, consider McCormick or Penzeys. They have high-quality spices that bring out the best in your garlic butter. Using fresh herbs, like parsley, also boosts the flavor. Look for herbs that are bright and fragrant. This ensures your Garlic Butter Shrimp Skewers taste amazing! For the full recipe, check out the complete instructions above. Start by gathering your ingredients. If you use wooden skewers, soak them in water for at least 30 minutes. This step stops them from burning. While they soak, you can mince the garlic. Use a sharp knife to chop the garlic finely. The smaller the pieces, the better the flavor will blend. Next, melt 4 tablespoons of unsalted butter in a medium saucepan over medium heat. As it melts, add the minced garlic and red pepper flakes. Stir it often for about 1-2 minutes. Watch closely; you want the garlic fragrant but not browned. Once ready, remove the pan from heat. Add 1 tablespoon of lemon juice and chopped parsley. Then season with salt, pepper, and smoked paprika to taste. Mix well to create a rich garlic butter flavor. Now, it’s time to grill! Add the shrimp to a large bowl. Pour half of the garlic butter mixture over them. Toss gently to coat each shrimp. Thread 4-5 shrimp onto each skewer. Preheat your grill or grill pan over medium-high heat. Lightly grease the grill with oil. This helps prevent sticking. Place the skewers on the grill. Cook for about 2-3 minutes on each side. You’ll know they are done when the shrimp turn pink and opaque. Brush on some of the reserved garlic butter mixture while grilling for extra flavor. Once cooked, drizzle any remaining garlic butter over the skewers before serving. This dish is ready to impress! For the full recipe, check out the section above. To make perfect shrimp skewers, focus on time and heat. Grill the shrimp for about 2-3 minutes on each side. Use medium-high heat to get a nice sear. If your grill is too hot, the shrimp may cook too fast and become tough. Always keep an eye on them. One common mistake is not soaking wooden skewers. Soak them for at least 30 minutes. This stops them from burning. Another mistake is overcooking the shrimp. They should be pink and opaque when done. If they curl too much, they may be overcooked. Lastly, don’t forget to brush on more garlic butter while grilling. It boosts the flavor! You can easily enhance the flavor of your shrimp skewers. Add fresh herbs like basil or cilantro for a burst of freshness. Consider using spices like cumin or coriander for a warm twist. A dash of lemon zest can also brighten the dish. Feel free to play around with flavors to find your favorite mix. For a detailed recipe, check out the [Full Recipe]. {{image_4}} You can swap shrimp for other proteins. Chicken is a great choice. Use boneless, skinless chicken breast. Cut it into bite-sized pieces. Just marinate it in the same garlic butter mix. You can also use fish. Salmon or swordfish work well. They add a rich flavor. Follow the same steps for grilling. Adding veggies to your skewers makes a full meal. Bell peppers, zucchini, and cherry tomatoes are perfect. They add color and crunch. Cut all veggies into similar sizes. This way, they cook evenly with the shrimp. Thread them onto the skewers with the shrimp. This adds a tasty twist to your dish. You can change up the flavors easily. For a spicy kick, add more red pepper flakes. If you love herbs, try fresh basil or thyme. Mix these herbs into the garlic butter. For a citrus twist, add lime juice instead of lemon. You can even add zest from the citrus fruits. This will bring a fresh taste to your skewers. Enjoy experimenting with different flavors from the Full Recipe! Store leftover shrimp skewers in an airtight container. Let them cool to room temperature first. Place a piece of parchment paper between layers to avoid sticking. Keep them in the fridge for up to three days. To reheat, gently warm the skewers in a skillet over low heat. Add a little butter or oil to keep them moist. Heat for about 3-5 minutes until warm. You can also use a microwave, but be careful not to overcook. Heat for 30 seconds at a time, checking often. If you want to freeze shrimp skewers, first wrap them tightly in plastic wrap. Then, place them in a freezer bag. Remove as much air as possible. They can last up to three months in the freezer. When ready to eat, thaw in the fridge overnight before reheating. For the full recipe, check out the details above. Enjoy your garlic butter shrimp skewers! The best skewers for grilling shrimp are metal or soaked wooden skewers. Metal skewers handle high heat well and are reusable. Soaking wooden skewers for at least 30 minutes prevents them from burning. Both types work great for Garlic Butter Shrimp Skewers. Shrimp are fully cooked when they turn pink and opaque. They also curl into a "C" shape. If they look gray or have a rubbery texture, they need more time. For the best results, grill shrimp for about 2-3 minutes on each side. Yes, you can prepare Garlic Butter Shrimp Skewers ahead of time. Marinate the shrimp in the garlic butter mixture and store them in the fridge. They can stay fresh for up to 24 hours. Just grill them right before serving for the best taste. To sum up, this guide covered Garlic Butter Shrimp Skewers in detail. We explored key ingredients, cooking steps, and tips for the perfect dish. Remember, choosing good shrimp and seasoning well makes a difference. Enjoy grilling with variations like chicken or veggies to switch things up. Proper storage ensures your leftovers stay tasty. Follow these steps for delicious results every time. Your journey to perfect skewers starts here—enjoy every bite you take!](https://goldendishy.com/wp-content/uploads/2025/06/728f68f4-b8bf-4bba-b9a3-49ab34a89912-768x768.webp)


