Roasted Tomato Basil Soup Flavorful Comfort Bowl

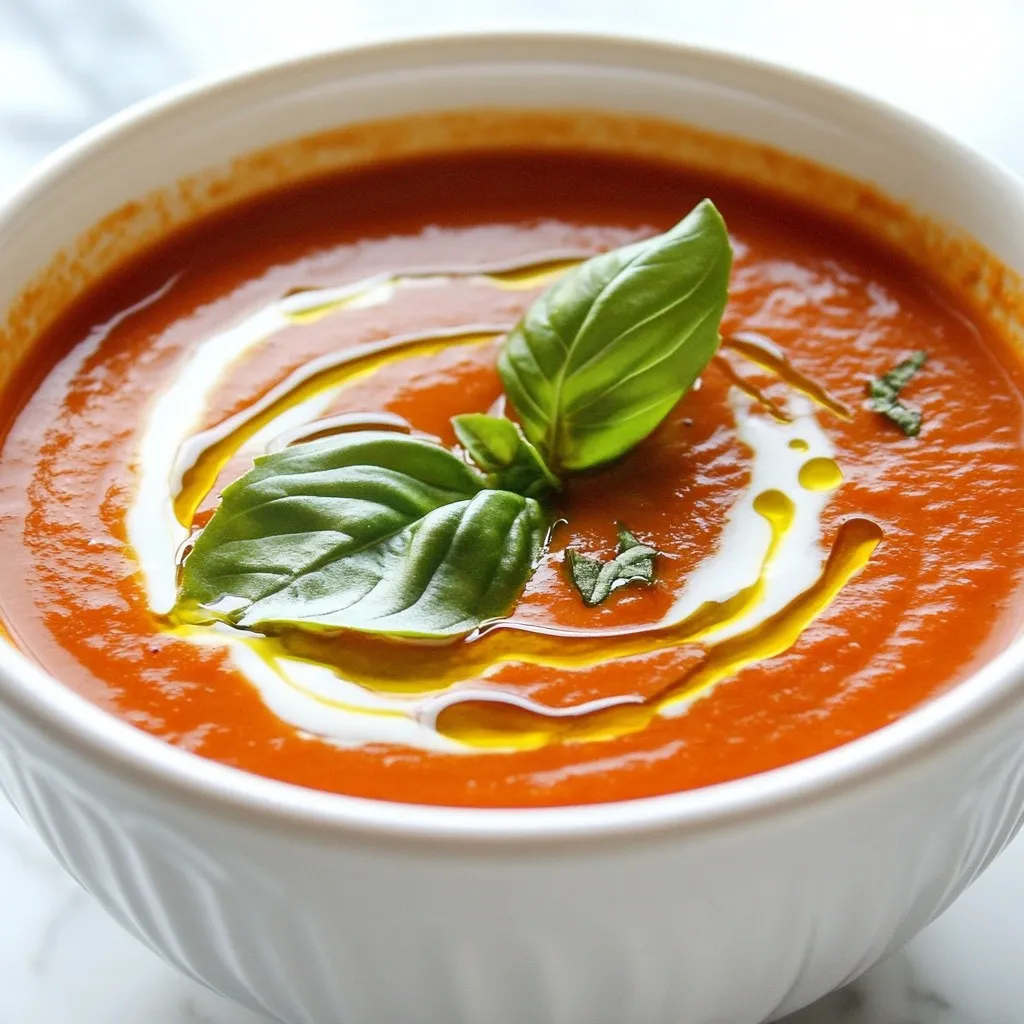
Warm up your day with a comforting bowl of Roasted Tomato Basil Soup! Using fresh tomatoes, fragrant basil, and simple pantry staples, this soup bursts with flavor. I’ll guide you step-by-step to create a rich, velvety texture that will make this dish a go-to favorite. Whether you’re a seasoned cook or a beginner, let’s dive into the delicious details. Your taste buds will thank you!
Why I Love This Recipe
- Fresh Flavors: This recipe captures the essence of summer with its vibrant tomatoes and aromatic basil, making each spoonful a burst of freshness.
- Comforting Texture: The addition of heavy cream (if desired) creates a velvety smooth soup that is both comforting and indulgent, perfect for any occasion.
- Simple Preparation: With minimal prep and straightforward roasting, this recipe allows even novice cooks to create a deliciously complex dish with ease.
- Versatile Serving Options: Whether served as a starter or paired with crusty bread for a light meal, this soup is versatile enough to fit any dining scenario.
“`markdown
H2 – Ingredients
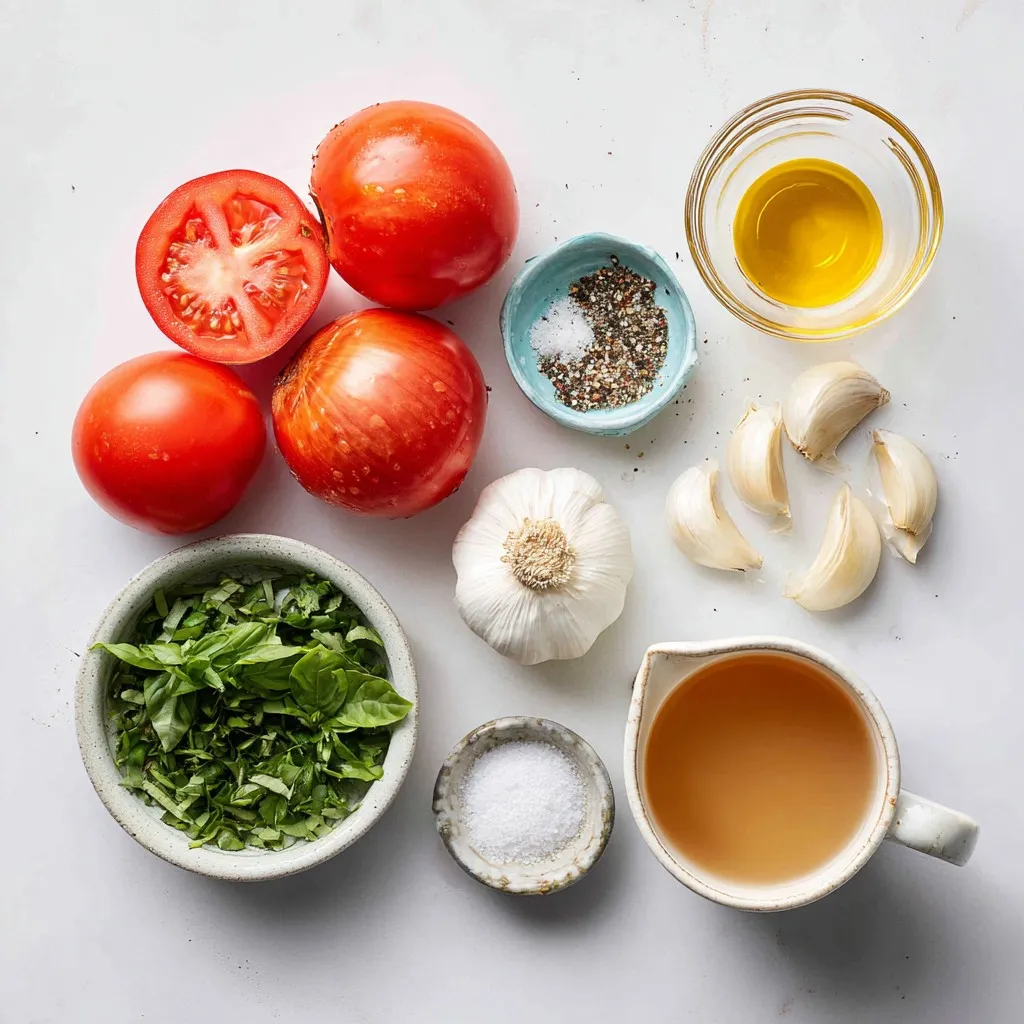
To make a delicious roasted tomato basil soup, gather these fresh ingredients:
– 2 lbs ripe tomatoes, halved
– 1 medium onion, quartered
– 4 cloves garlic, unpeeled
Next, you’ll need some pantry staples:
– 2 tablespoons extra virgin olive oil
– Sea salt and freshly ground black pepper
– 1 teaspoon sugar (optional)
Finally, don’t forget the broth and cream for rich flavor:
– 4 cups vegetable broth
– 1 cup fresh basil leaves
– 1/2 cup heavy cream (optional)
Each ingredient plays a vital role in creating a warm, comforting bowl of soup. The ripe tomatoes provide sweetness and acidity, while the onion adds depth. Garlic gives a lovely aroma and flavor when roasted. Olive oil brings richness, and the sugar balances the flavors. The vegetable broth adds body, while fresh basil brightens the soup. If you choose to add cream, it gives a smooth, luxurious texture. This simple list helps you create a bowl that warms both your heart and soul.
“`

Step-by-Step Instructions
Preheating and Preparing the Oven
Preheat your oven to 400°F (200°C). This step helps cook the vegetables evenly.
Arranging and Drizzling
Place the halved tomatoes, quartered onion, and unpeeled garlic on a baking sheet. Make sure the tomato cut sides face up. Drizzle extra virgin olive oil over the veggies. Add sea salt and freshly ground black pepper to taste.
Roasting the Vegetables
Put the baking sheet in the oven. Roast for 30-35 minutes. Look for the tomatoes to be tender and aromatic. A little char on the edges makes the flavor pop.
Blending and Finalizing the Soup
Once roasted, take the pan out and let it cool. Squeeze the garlic from its skin and discard the peels. Combine the roasted veggies with vegetable broth in a large pot. Add sugar if you want to balance the acidity. Bring this mixture to a gentle boil over medium heat.
Lower the heat and let it simmer for 10-15 minutes. This lets the flavors blend well. Blend the soup until smooth using an immersion blender. If you use a countertop blender, do it in batches. Let steam escape to avoid splatters.
Stir in the fresh basil leaves and heavy cream if you like. Let the soup simmer for another 5 minutes. Taste and adjust seasoning with salt and pepper. Enjoy this warm, flavorful soup!
Tips & Tricks
Enhancing Flavor
For the best taste, always use fresh ingredients. Ripe tomatoes bring out the sweetness and depth. If your soup tastes too tangy, add a teaspoon of sugar. This helps balance the acidity and brightens all the flavors.
Blending Techniques
I love using an immersion blender for this soup. It’s easy and minimizes mess. If you don’t have one, you can use a regular blender. Just make sure to blend in small batches. This way, steam can escape and you avoid splatters.
Presentation Tips
When serving, ladle the soup into warm bowls. Drizzle a bit of olive oil on top for a rich finish. Garnish with fresh basil leaves for color and aroma. This adds a nice touch and makes your soup look inviting.
Pro Tips
- Choose the Right Tomatoes: Use ripe tomatoes for the best flavor. Heirloom or vine-ripened varieties can add a rich taste to your soup.
- Don’t Skip the Garlic: Roasting garlic in its skin mellows its flavor, adding a sweet and caramelized depth to the soup.
- Adjust the Consistency: If you prefer a thinner soup, add more vegetable broth until you reach your desired texture.
- Make It Ahead: This soup can be made in advance and stored in the fridge for up to three days. The flavors will develop even further!

Variations
Vegan Option
If you want a vegan version of this soup, it’s easy to adapt. You can substitute the heavy cream with coconut milk. This change adds a nice creaminess without dairy. If you prefer, you can leave out the cream entirely. The soup will still taste great and be warm and comforting.
Added Ingredients
Want to mix things up? Try adding roasted red peppers for a sweet twist. They add depth and a new flavor layer. You can also sprinkle in some spices like smoked paprika or cayenne for a hint of heat. These small changes can make your soup unique each time.
Adjusting Flavor Profiles
Feel free to play with the herbs in this soup. Adding fresh thyme or oregano can change the taste profile. Each herb brings its own flair. You can even try a blend of herbs for a more complex flavor. Don’t hesitate to experiment and find your favorite combination!
Storage Info
Refrigeration
Store leftover soup in an airtight container. Allow the soup to cool first. Place it in the fridge. It will stay fresh for about 3 to 4 days. When ready to eat, check for any changes in smell or color.
Freezing Guidelines
To freeze the soup, let it cool completely. Pour it into freezer-safe containers. Leave some space at the top for expansion. Seal tightly. It can last up to 3 months in the freezer. Label the containers with the date for easy tracking.
Reheating Tips
When reheating, use a pot on medium heat. Stir often to prevent sticking. You can add a splash of broth or water if it’s too thick. Heat until it reaches your desired temperature. For the best taste, avoid boiling the soup again. Enjoy your warm bowl of comfort!
FAQs
Can I use canned tomatoes for this recipe?
Yes, you can use canned tomatoes. Look for whole peeled tomatoes in juice. Use two 14-ounce cans for this recipe. Drain the tomatoes and add them to the baking sheet with onion and garlic. Roasting will enhance their flavor. You will miss some natural sweetness from fresh tomatoes, but the soup will still be tasty.
How long does Roasted Tomato Basil Soup last?
Roasted Tomato Basil Soup lasts about four days in the fridge. Store it in an airtight container. Make sure to cool it before sealing. If you want to keep it longer, freeze the soup for up to three months. Just leave out the cream until you reheat it. This keeps the soup fresh and tasty.
Can I enhance the soup with other ingredients?
Yes! You can add many ingredients. Try roasted red peppers for a smoky taste. A pinch of chili flakes adds heat. You can also stir in some spinach for extra nutrition. Fresh herbs like thyme or oregano can give new flavors. Experiment to find your favorite mix!
This blog post provided a clear guide to making roasted tomato basil soup. We covered fresh and pantry ingredients, cooking steps, tips for flavor, and variations. You can easily customize this soup to fit your taste. Remember, fresh ingredients lead to better flavor. Storing leftovers properly allows you to enjoy this dish later. With these techniques and tips, you can create a delicious meal that everyone will love. I hope you try this recipe and enjoy every bow

Roasted Tomato Basil Bliss
Ingredients
- 2 lbs ripe tomatoes, halved
- 1 medium onion, quartered
- 4 cloves garlic, unpeeled
- 2 tablespoons extra virgin olive oil
- to taste sea salt and freshly ground black pepper
- 1 teaspoon sugar (optional)
- 4 cups vegetable broth
- 1 cup fresh basil leaves, roughly chopped
- 1 2 cup heavy cream (optional)
Instructions
- Preheat your oven to 400°F (200°C). This will ensure even roasting of the vegetables.
- On a large baking sheet, arrange the halved tomatoes with the cut side facing up, the quartered onion, and the unpeeled garlic cloves. Drizzle the olive oil generously over the vegetables, then season with sea salt and freshly ground black pepper.
- Roast in the preheated oven for approximately 30-35 minutes, or until the tomatoes are tender and caramelized with a rich aroma.
- Once roasted, remove the pan from the oven and allow the vegetables to cool slightly. After a few minutes, carefully squeeze the garlic cloves out of their skins, discarding the peels.
- In a large pot, combine the roasted vegetables with the vegetable broth. If desired, add the teaspoon of sugar to balance the acidity of the tomatoes. Bring this mixture to a gentle boil over medium heat.
- Once boiling, reduce the heat and let the soup simmer for 10-15 minutes.
- Using an immersion blender, blend the soup until it reaches a velvety smooth consistency.
- Stir in the freshly chopped basil leaves and the heavy cream if you're using it. Allow the soup to simmer for an additional 5 minutes on low heat.
- Taste your soup and adjust the seasoning with additional sea salt and fresh pepper as needed.


. First, preheat your oven to 400°F (200°C). This step is key for even roasting. Gather your ingredients. You should have baby carrots, honey, olive oil, garlic, thyme, and lemon juice ready. In a large bowl, combine the honey, olive oil, minced garlic, and thyme. Add a good pinch of salt and pepper. Next, squeeze in the lemon juice. Whisk the mixture well until it is smooth. This glaze will give your carrots a sweet and savory flavor. Now, it's time to coat the carrots. Add them to your bowl with the glaze. Toss them gently until they are well coated. Line a baking sheet with parchment paper for easy cleanup. Spread the carrots out in a single layer, avoiding crowding. Place the baking sheet in the preheated oven. Roast the carrots for 25-30 minutes. Halfway through, toss the carrots again for even cooking. They should become tender and caramelized. Once done, let them cool for a few minutes. If you like, drizzle some extra glaze over the top for added flavor. Finally, garnish with fresh parsley before serving. This adds a pop of color and freshness. If you want the full recipe, check it out [Full Recipe]. To ensure your carrots roast perfectly, choose fresh carrots. Baby carrots work well, but regular ones are great too. If using regular carrots, slice them into sticks for even cooking. Spread the carrots out in a single layer on the baking sheet. This step keeps them from steaming and helps them caramelize nicely. Toss them halfway through cooking for even browning. For a great glaze, mix the honey, olive oil, garlic, and thyme well. The oil helps the honey coat the carrots. If your glaze feels too thick, add a splash of water or lemon juice. This can help thin it out and ensure it coats the carrots evenly. Remember, a smooth glaze means more flavor in every bite! To make your dish pop, use a nice platter. Once the carrots are roasted, transfer them carefully. Drizzle with extra honey for shine. Sprinkle fresh parsley or thyme over the top for color. This simple touch makes your dish look gourmet. Enjoy serving them at your next meal! For the full recipe, check out the details above. {{image_4}} You can easily change this dish by adding other vegetables. Try sweet potatoes or parsnips. They roast well and add new flavors. Just cut them to a similar size as the carrots. This helps them cook evenly. If you want to switch up the sweet taste, use maple syrup or agave. Both give a nice flavor and work well with the garlic. You can use the same amount as honey. Just mix it well with the other ingredients. Adding spices can boost the taste of your honey garlic roasted carrots. You might try a pinch of cumin or chili powder for warmth. Fresh herbs like rosemary or dill can also add a bright note. Experiment with what you love! Each change can make this dish new and exciting. You can find the full recipe to guide you through these variations. To store leftover honey garlic roasted carrots, first let them cool down. Use an airtight container to keep them fresh. If you have a lot, divide them into smaller portions. Place the container in the fridge. They will stay good for about 3 to 5 days. Keeping them sealed helps avoid drying out. When you're ready to enjoy the leftovers, preheat your oven to 350°F (175°C). Spread the carrots on a baking sheet. You can drizzle a little olive oil for extra moisture. Heat them for about 10 to 15 minutes, or until they feel warm. You can also use a microwave if you're in a hurry. Just cover them with a damp paper towel and heat in 30-second bursts. If you want to keep the carrots longer, freezing is a great option. First, let the carrots cool completely. Spread them in a single layer on a baking sheet. Freeze them for about 1 hour. This step prevents them from sticking together. After that, transfer the carrots to freezer bags. Remove as much air as possible before sealing. They can last for up to 3 months in the freezer. To eat, thaw them in the fridge overnight before reheating. For more details, check the Full Recipe. Yes, you can use frozen carrots. However, fresh carrots will taste better. Frozen carrots may lose some crunch. If you use them, roast them longer to ensure they cook fully. Just remember to thaw them before roasting for the best results. Honey garlic roasted carrots pair well with many dishes. You can serve them with grilled chicken, beef, or fish. They also taste great with rice or quinoa. Try them with a fresh salad for a balanced meal. Their sweet and savory flavor adds depth to any plate. You can make this dish ahead of time. Prepare the honey garlic glaze and coat the carrots. Store them in the fridge for up to 24 hours. When ready to serve, just roast them in the oven. This saves time and still gives you that amazing flavor. For the full recipe, check out the complete instructions above. We explored the key ingredients and steps to make honey garlic roasted carrots. You learned how to mix the glaze, roast the carrots, and personalize the dish. We also discussed useful tips for perfect roasting and presentation. Lastly, we covered variations and storage tips to keep your dish fresh. Use this guide to make a tasty meal. Enjoy these carrots with your loved ones for a delightful experience.](https://goldendishy.com/wp-content/uploads/2025/06/04a56f10-aefe-4807-b100-2b1e29675843-768x768.webp)


![For this soup, fresh broccoli is key. Use about 4 cups of broccoli florets, roughly chopped. This gives the soup its vibrant green color and healthy crunch. You also need 1 medium onion, finely chopped, and 2 cloves of garlic, minced. These aromatics build a rich flavor base. Dairy makes this soup creamy and rich. You will need 1 cup of heavy cream. If you prefer a lighter option, substitute with coconut cream. For the broth, use 3 cups of low-sodium vegetable broth. This adds depth without overpowering the other flavors. Seasonings elevate the taste of your soup. Use 1 teaspoon of garlic powder and 1/2 teaspoon of onion powder. Don’t forget to add salt and freshly ground black pepper to taste. If you want a crunchy finish, top your soup with toasted croutons. They add a delightful texture and flavor contrast. This combination of ingredients creates a comforting, flavorful Broccoli Cheddar Soup. For a complete guide, check the Full Recipe. Start by melting the butter in a large pot over medium heat. Add the finely chopped onion. Sauté for about five minutes. You want the onion to be soft and clear. Next, add the minced garlic and cook for one to two minutes. This will make your kitchen smell amazing! Be careful not to burn the garlic. Now it’s time for the broccoli. Add the roughly chopped florets to the pot. Sauté them for about three to four minutes. This helps them soften a bit before the next step. Pour in the vegetable broth and raise the heat to bring it to a boil. Once boiling, reduce the heat to a simmer. Let it cook for about ten to twelve minutes until the broccoli is tender. After the broccoli is tender, it’s blending time! Use an immersion blender right in the pot. If you have a regular blender, transfer the soup in batches. Just be careful with the hot liquid. Blend until smooth. Return the soup to the pot and stir in the heavy cream, keeping the heat low. Slowly add the shredded sharp cheddar cheese. Stir until it melts and mixes well. Finally, add garlic powder and onion powder, and season with salt and pepper. Let it warm for a few more minutes. Serve your soup hot, and add toasted croutons if you like. Enjoy this cheesy broccoli bliss! You can find the full recipe above. To get that creamy feel, blend the soup well. Use an immersion blender for ease. If you want a chunkier soup, blend only half. This keeps some broccoli bits for a nice bite. Make sure to blend until smooth. This step makes all the difference in your final dish. Add more depth to your soup by using fresh herbs. Parsley or thyme brings bright notes. You can also toss in a dash of nutmeg for warmth. Adjust the salt and pepper to your taste. A squeeze of lemon juice can brighten flavors, too. Experiment with these extras until you find your favorite mix. Store leftover soup in an airtight container. It will keep well in the fridge for up to three days. Reheat gently on the stove to avoid curdling the cream. If you freeze it, leave out the cheese. Add it back when you reheat for the best flavor. Store in portions to make it easy to enjoy later. {{image_4}} You can make a vegan version of this soup. Replace the heavy cream with coconut cream. Use nutritional yeast instead of cheddar cheese. This option keeps the cheesy flavor while being dairy-free. Blend the soup until smooth, just like the original. You can still enjoy that creamy texture without any animal products. For a low-carb soup, swap the heavy cream for cauliflower. Cook the cauliflower with the broccoli, then blend it all together. This change cuts carbs while keeping the soup rich and hearty. You can also use a low-carb cheese to enhance the flavor without adding too many carbs. Want to boost the protein? Add cooked chicken or beans. They pair well with the flavors of broccoli and cheese. You can also toss in other veggies like carrots or spinach. This adds color and nutrients to your soup. Just make sure to cook them until tender before blending. For the full recipe, check out the main article. A serving of broccoli cheddar soup contains about 350 calories. The calorie count may vary based on the ingredients you use. For instance, using heavy cream adds more calories than coconut cream. If you add croutons, that will increase the total calories too. This soup packs a punch of nutrients. Here are some key nutrients you get in each serving: - Protein: About 12 grams, mostly from cheese and cream. - Fat: Approximately 25 grams, primarily from cheddar and cream. - Carbohydrates: Around 20 grams, mainly from broccoli and onion. - Fiber: Offers about 4 grams, thanks to the broccoli. Broccoli is more than just tasty. It is a superfood! Here are some reasons to love it: - Rich in Vitamins: It's high in vitamins C and K. - Antioxidants: Broccoli has powerful antioxidants. They help fight free radicals in your body. - Supports Digestion: The fiber helps keep your digestive system healthy. - Boosts Immunity: Eating broccoli may help strengthen your immune system. This nutritional information shows why broccoli cheddar soup is a great choice for a meal. It is not just delicious; it also nourishes your body. To store leftover broccoli cheddar soup, let it cool first. Then, pour it into an airtight container. It keeps well in the fridge for about three to four days. When you want to eat it, just reheat it on the stove or in the microwave. Stir well to mix the flavors again before serving. Yes, you can freeze broccoli cheddar soup. First, let it cool down completely. Then, place it in a freezer-safe container. Make sure to leave some space at the top, as the soup will expand when frozen. It can last for about three months in the freezer. To use, thaw it overnight in the fridge and reheat gently. To make broccoli cheddar soup gluten-free, use gluten-free broth. Most vegetable broths are gluten-free, but always check the label. Also, use cornstarch instead of flour if you want to thicken it. Just mix cornstarch with a little water before adding it to the soup. This way, you will enjoy a creamy soup without gluten. For the full recipe, check out [Full Recipe]. This blog covered how to make a tasty broccoli cheddar soup. We discussed key ingredients, including fresh broccoli and flavor-packed aromatics. I outlined helpful steps for cooking and blending the soup. You learned tips for great texture and flavor as well as how to store leftovers. Try variations like vegan options or low-carb versions to fit your needs. Broccoli brings healthy nutrients, making this soup a smart choice. Enjoy this dish, knowing you can customize it just the way you like!](https://goldendishy.com/wp-content/uploads/2025/06/c21049f2-ac49-4cf8-bdd7-9e479da09cd5-768x768.webp)

