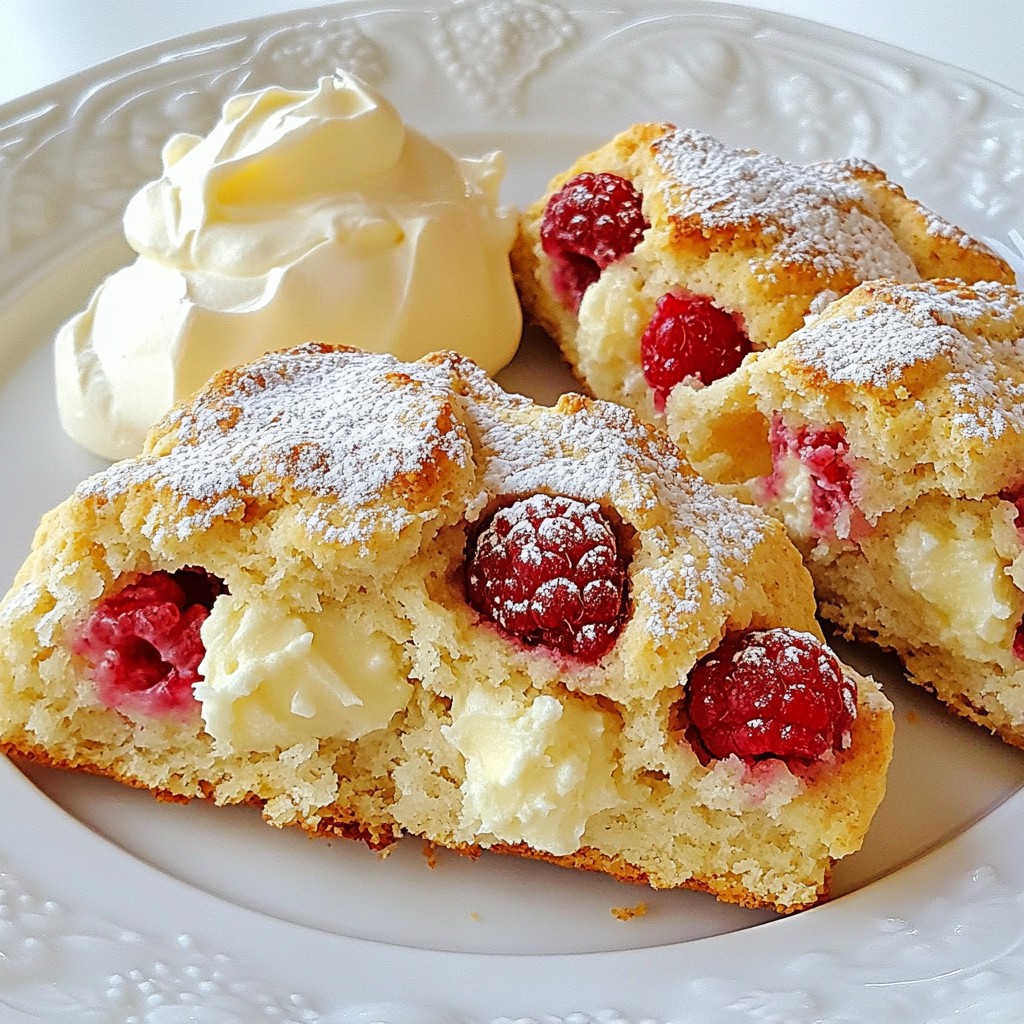
Looking to bake something yummy and unique? Try making Raspberry White Chocolate Scones! These treats blend tart raspberries with sweet white chocolate, creating the perfect flavor balance. You’ll love how easy they are to make, and your kitchen will smell wonderful. In this post, I'll guide you step-by-step, share tips for success, and show you how to create variations. Get ready to impress your friends and family with this delightful recipe!
Why I Love This Recipe
- Delicious Flavor Combination: The tartness of fresh raspberries paired with the sweetness of white chocolate creates a delightful balance that tantalizes the taste buds.
- Easy to Make: This scone recipe requires minimal ingredients and steps, making it accessible for both novice and experienced bakers alike.
- Perfect for Any Occasion: Whether for breakfast, brunch, or a cozy afternoon tea, these scones are versatile and always impress.
- Freezable for Later: You can prepare the dough in advance and freeze the shaped scones, allowing you to enjoy fresh scones anytime with just a quick bake.
Ingredients
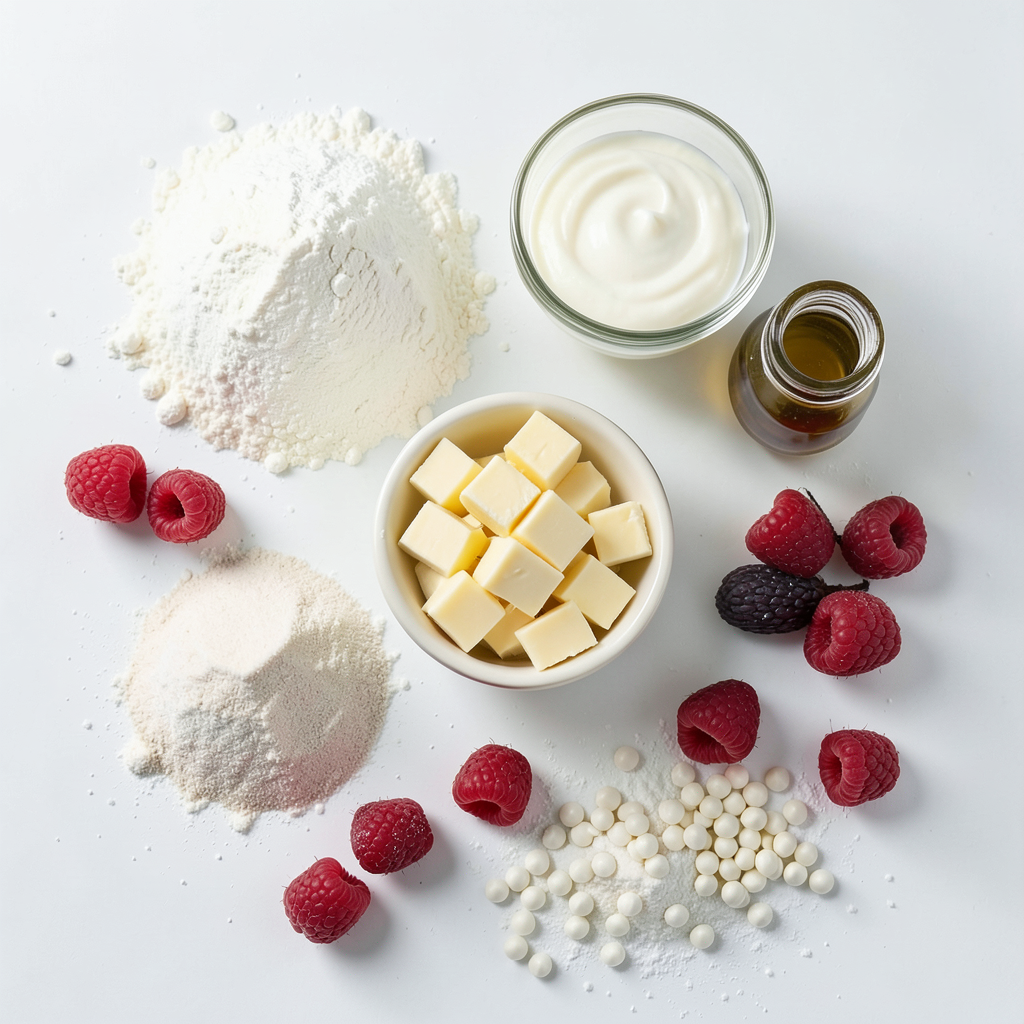
To make Raspberry White Chocolate Scones, you will need the following ingredients:
- 2 cups all-purpose flour
- 1/4 cup granulated sugar
- 1 tablespoon baking powder
- 1/2 teaspoon salt
- 1/2 cup cold unsalted butter, cut into small cubes
- 1/2 cup heavy cream
- 1 large egg
- 1 teaspoon vanilla extract
- 1 cup fresh raspberries, gently rinsed
- 1/2 cup white chocolate chips
- Extra flour for dusting
These ingredients work together to create a tasty treat. The all-purpose flour forms the base. Sugar adds sweetness, while baking powder helps the scones rise. Salt balances the flavors.
Cold unsalted butter gives scones a rich taste and flaky texture. Heavy cream and the egg add moisture. Vanilla extract provides a warm note. Fresh raspberries add tartness, while white chocolate chips bring sweetness.
Using fresh ingredients makes a big difference in taste. Raspberries should be plump and bright. White chocolate should be creamy and smooth. When you combine these, you create a delightful mix of flavors.
Before you start baking, gather all your ingredients. Measure them out to ensure you have enough. This will help you bake with ease. Prepare your work area to stay organized. Let's get ready for some fun in the kitchen!
Step-by-Step Instructions
Preheat the Oven
Start by preheating your oven to 400°F (200°C). This ensures your scones bake evenly. Line a baking sheet with parchment paper. This step helps prevent sticking and makes cleaning easy.
Combining Dry Ingredients
In a large bowl, sift together the 2 cups of all-purpose flour, 1/4 cup of granulated sugar, 1 tablespoon of baking powder, and 1/2 teaspoon of salt. Using a whisk, mix these well. This step helps blend the flavors and ensures even baking.
Incorporating Butter
Now, add 1/2 cup of cold, unsalted butter, cut into small cubes, into your flour mix. Use a pastry cutter or your fingertips. Work the butter into the flour until it looks like coarse crumbs. You should see small bits of butter throughout.
Mixing Wet Ingredients
In another bowl, whisk together 1/2 cup of heavy cream, 1 large egg, and 1 teaspoon of vanilla extract. Make sure to mix until it’s well combined and slightly frothy. This mixture will add moisture and flavor to your scones.
Combining Wet and Dry Mixtures
Pour the wet mixture into the dry ingredients. Use a spatula or wooden spoon to stir gently. Mix until just combined. Be careful not to overmix; some flour streaks are okay. This will keep your scones light and fluffy.
Adding Raspberries and Chocolate
Gently fold in 1 cup of fresh raspberries and 1/2 cup of white chocolate chips. Make sure they are spread out in the dough. Be careful not to crush the berries as you mix. This adds bursts of flavor and sweetness to every bite.
Shaping the Dough
Lightly dust a clean surface with extra flour. Turn the dough onto this floured surface. Pat it gently into a circle, about 1 inch thick. This helps shape the scones without overworking the dough.
Cutting the Scones
Use a sharp knife or pizza cutter to slice the circle into 8 even wedges. Place each wedge on your prepared baking sheet. Space them about an inch apart to allow for even baking.
Baking the Scones
Place the baking sheet in your preheated oven. Bake for about 15-20 minutes. Keep an eye on them until the tops are golden brown. A toothpick inserted into the center should come out clean.
Cooling and Serving
Once they are done, remove the scones from the oven. Let them cool on the baking sheet for a few minutes. Then, transfer them to a wire rack to cool slightly. Serve warm, dusted with powdered sugar, or with whipped cream. Enjoy every bite!
Tips & Tricks
Achieving Perfect Texture
Using cold ingredients is key for scones. Cold butter helps create a flaky texture. When you mix it into the flour, do it gently. You want small pieces of butter. This method keeps the scones light and airy. Handle the dough as little as possible. Overworking it can make scones tough.
Customizing Flavor
You can swap out white chocolate for dark chocolate. This change gives a richer taste. Fresh blueberries or blackberries work well too. Feel free to mix different berries for a fun twist. Just remember to fold them in gently. You want to keep their shape for beautiful scones.
Serving Suggestions
These scones pair great with tea or coffee. A dollop of clotted cream adds richness. You could also try whipped cream for a lighter option. For a pop of flavor, serve with lemon curd. Adding a few extra raspberries on the side looks nice too. Enjoy your scones fresh from the oven for the best taste.
Pro Tips
- Chill the Dough: For the flakiest scones, after shaping the dough, consider chilling it in the refrigerator for about 15 minutes before baking. This helps maintain the butter's cold temperature, resulting in a better rise.
- Fresh Ingredients Matter: Ensure your raspberries are fresh and not overly ripe. This will help maintain their shape and prevent them from breaking down too much during mixing and baking.
- Customize Flavors: Feel free to experiment by adding lemon zest or almond extract to the wet ingredients for an extra layer of flavor that complements the white chocolate and raspberries.
- Storage Tips: Store leftover scones in an airtight container at room temperature for up to two days. For longer storage, freeze them after baking and simply reheat in the oven when ready to enjoy.
Variations
Gluten-Free Option
You can make these scones gluten-free! Simply swap the all-purpose flour for a gluten-free blend. Look for a blend that has xanthan gum. This gum helps give the scones structure. You can also use almond flour or coconut flour, but you may need to adjust the liquid. Add a bit more cream to keep the dough moist.
Add-In Alternatives
Feel free to get creative with your scones! Instead of raspberries, try blueberries or chopped strawberries. You could also mix in nuts like pecans or almonds for crunch. For a fun twist, add lemon zest or a dash of almond extract. These small changes can make your scones unique and exciting!
Making Mini Scones
Want smaller bites? You can make mini scones easily. Just divide the dough into smaller pieces, about the size of a golf ball. Space them out on the baking sheet. Bake them for around 10-15 minutes. Keep an eye on them, as smaller scones bake faster. These mini treats are perfect for brunch or a sweet snack!
Storage Info
Short-Term Storage
To keep your scones fresh for two days, store them in an airtight container. Place parchment paper between layers to prevent sticking. Keep the container in a cool, dry place. This method helps the scones retain their soft texture and flavor.
Long-Term Storage
For long-term storage, freeze your scones. Wrap each scone in plastic wrap and place them in a freezer-safe bag. They can last up to three months this way. When ready to enjoy, remove a scone and let it sit at room temperature for about 30 minutes. You can also reheat it in the oven at 350°F (175°C) for 10-15 minutes.
Refreshing Leftovers
If your scones lose their freshness, don’t worry! You can revive them. Reheat in the oven, as mentioned above, or microwave for about 10-15 seconds. Another trick is to wrap them in a damp paper towel before microwaving. This method helps restore moisture, making your scones soft again.
FAQs
Can I use frozen raspberries?
Yes, you can use frozen raspberries. They work well in scones. However, they may make the dough a bit wetter. This can affect the texture slightly. Frozen berries often release more juice while baking. You might want to add a bit more flour to balance the moisture. Also, check the baking time. They may need a minute or two longer.
How do I know when scones are done?
Look for a golden-brown top. The scones should feel firm to the touch. A toothpick inserted in the center should come out clean. If you see wet batter, bake them a little longer. The edges should look set but not dark. Trust your eyes and touch for the best results.
What can I substitute for white chocolate?
Dark chocolate works great and adds a rich flavor. Milk chocolate is another sweet option. You can also try adding nuts or dried fruits for a twist. If you want a healthier choice, use coconut flakes or yogurt chips. These swaps can change the taste and texture nicely.
Can I make the dough ahead of time?
Yes, you can make the dough ahead. Just wrap it tightly in plastic wrap and chill it. You can keep it in the fridge for up to 24 hours. When you’re ready, just cut and bake as usual. If you freeze it, thaw it in the fridge overnight before baking.
How do I store scones for maximum freshness?
Store your scones in an airtight container. They stay fresh for two days at room temperature. For longer storage, freeze them in a freezer bag. To refresh them, warm in the oven for a few minutes. This helps to bring back their softness and flavor.
In this blog post, we covered the key ingredients and steps for making delicious raspberry and white chocolate scones. I shared tips for perfect texture and ways to customize your recipe. You can even explore gluten-free options or mini-sized treats. Remember, storing your scones properly helps keep them fresh. With practice and creativity, you can make scones that impress everyone. Enjoy baking and savor each bite of your tasty creation!


