Are you ready for a breakfast treat that blends fall flavors with sweetness? These Pumpkin Spice Cinnamon Roll Pancakes will change your mornings forever! With fluffy pancakes swirled with a rich cinnamon filling and topped with creamy glaze, they’re not just delicious—they’re an experience. Join me as we dive into the easy steps to create this mouthwatering dish that’s perfect for any fall day!
Ingredients
Main Ingredients for Pancakes
– 1 cup all-purpose flour
– 1 tablespoon baking powder
– 1 teaspoon pumpkin spice mix
– 1/2 teaspoon salt
– 1 cup milk or alternative
– 1/2 cup pumpkin puree
– 1 large egg
– 2 tablespoons granulated sugar
– 1 tablespoon vanilla extract
– 1/4 cup unsalted butter, melted
The main ingredients for the pancakes include all-purpose flour, baking powder, and pumpkin spice mix. The pumpkin spice mix adds that warm, cozy flavor that pairs so well with fall. You also need milk, pumpkin puree, and an egg. The butter adds richness and keeps the pancakes moist. Do not forget the sugar and vanilla extract for sweetness and flavor.
Key Ingredients for Cinnamon Filling
– 1/4 cup brown sugar
– 2 tablespoons ground cinnamon
– 2 tablespoons unsalted butter
For the cinnamon filling, brown sugar is key. It gives a nice caramel flavor. Ground cinnamon adds warmth and sweetness. The butter helps blend everything and makes it spreadable. Mix these well for a swirl that brings your pancakes to life.
Cream Cheese Glaze Ingredients
– 4 oz cream cheese
– 1/2 cup powdered sugar
– 2 tablespoons milk
– 1/2 teaspoon vanilla extract
The glaze is what makes these pancakes special. Cream cheese gives it a rich texture. You mix it with powdered sugar for sweetness. Milk helps thin it down to a drizzle. The vanilla extract adds extra flavor. This glaze will take your pancakes from good to amazing!
Step-by-Step Instructions
Preparing the Pancake Batter
First, grab a large mixing bowl. In this bowl, whisk together the following dry ingredients:
– 1 cup all-purpose flour
– 1 tablespoon baking powder
– 1 teaspoon pumpkin spice mix
– 1/2 teaspoon salt
Make sure these dry ingredients mix well. This step is key for fluffy pancakes. Next, in a separate bowl, combine the wet ingredients:
– 1 cup milk (or your preferred milk alternative)
– 1/2 cup pumpkin puree
– 1 large egg
– 2 tablespoons granulated sugar
– 1 tablespoon vanilla extract
Use a whisk to blend until smooth and creamy. Slowly pour the wet mix into the dry mix. Stir gently with a spoon or spatula. Avoid overmixing; it’s fine if some lumps remain.
Mixing the Cinnamon Filling
Now, let’s create the cinnamon filling. In a small bowl, mix together:
– 1/4 cup brown sugar, packed
– 2 tablespoons ground cinnamon
– 2 tablespoons unsalted butter, softened
Stir until you have a smooth paste. This filling should be easy to spread.
Cooking Directions
Time to cook! Preheat a non-stick skillet or griddle over medium heat. Lightly grease it with butter or oil. For each pancake, pour about 1/4 cup of batter onto the skillet. Using a spoon or squeeze bottle, swirl about 1 teaspoon of the cinnamon filling on top.
Cook the pancake until bubbles form on the surface and edges look set, about 2-3 minutes. Then, carefully flip it using a spatula. Cook for another 2 minutes, until both sides are golden brown.
Continue this process with the remaining batter and filling. Adjust the heat if needed. You want even cooking without burning. While the pancakes cook, prepare the cream cheese glaze: Beat together softened cream cheese, powdered sugar, milk, and vanilla in a bowl until creamy. If it’s too thick, just add a bit more milk.
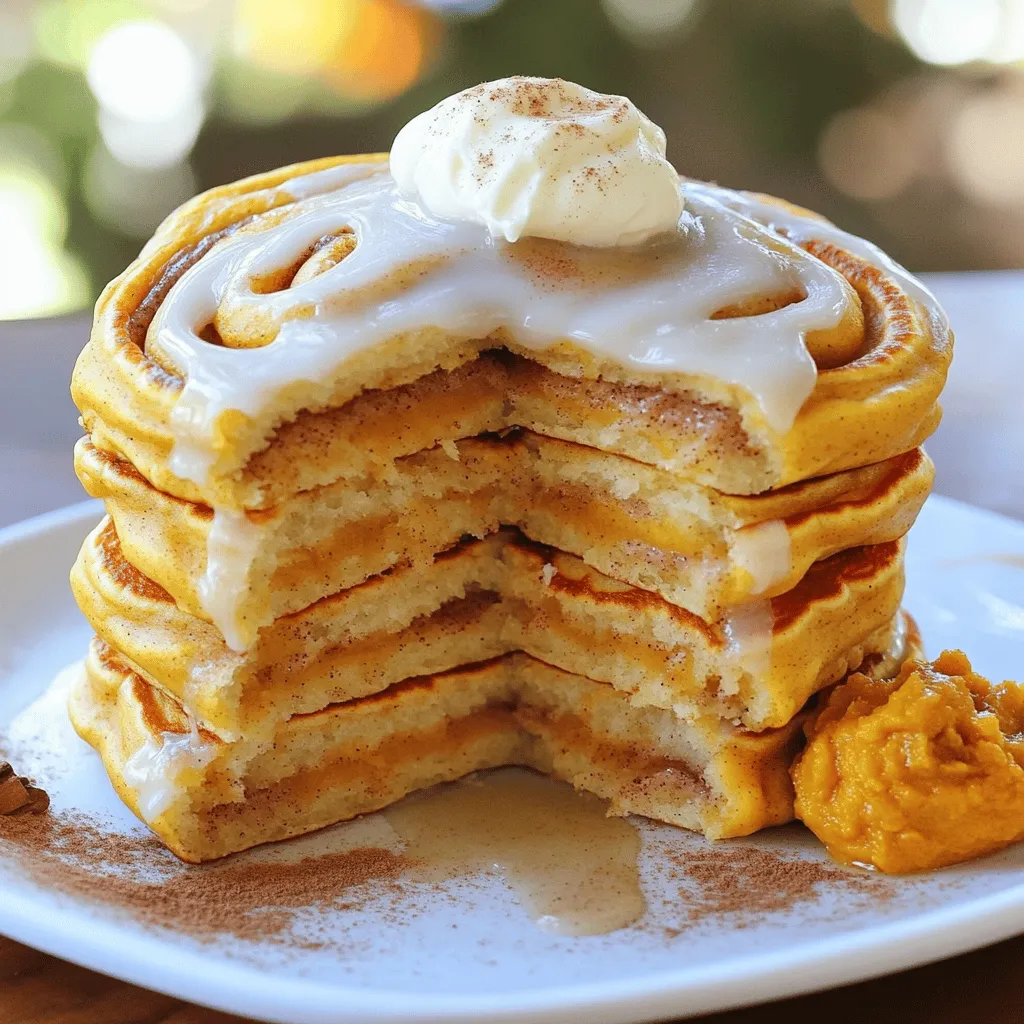
To serve, stack the pancakes high on a plate. Drizzle with the cream cheese glaze. Add a sprinkle of cinnamon or chopped pecans for a tasty finish. You can also add a dollop of pumpkin puree on the side for extra flair. Enjoy these delightful pumpkin spice cinnamon roll pancakes!
Tips & Tricks
Achieving Perfect Pancake Texture
To make your pancakes fluffy, avoid overmixing the batter. Mix until the ingredients are just combined. A few lumps are fine; they help keep the pancakes light. Next, adjust the heat on your skillet. Too high will burn the pancakes, while too low will leave them raw inside. Aim for medium heat. This ensures an even cook and golden-brown finish.
Serving Suggestions
Presentation matters! Stack your pancakes high for a stunning look. Drizzle the cream cheese glaze over the top to create a delicious waterfall effect. Add a sprinkle of cinnamon or a handful of chopped pecans for a crunchy contrast. For extra flair, serve a dollop of pumpkin puree on the side. This adds color and ties back to the pumpkin flavor.
Enhancing Flavor
Want to customize your pancakes? You can add chocolate chips or walnuts to the batter. These add-ins create tasty surprises in every bite. For the glaze, mix in some maple syrup or a hint of nutmeg for an extra kick. Adjust the sweetness by adding more powdered sugar or a splash of cream. This makes the glaze richer and more enjoyable.

Variations
Gluten-Free Version
For a gluten-free version of pumpkin spice cinnamon roll pancakes, you can use gluten-free flour. Options like almond flour or a gluten-free all-purpose blend work well. Make sure to check that the blend contains xanthan gum for better binding.
Adjust the batter consistency by adding a bit more liquid if needed. Gluten-free flour can absorb more moisture, so keep an eye on the thickness. You want it to be pourable but not runny.
Vegan Adaptation
To make these pancakes vegan, replace the egg with a flaxseed egg. Mix one tablespoon of ground flaxseed with two and a half tablespoons of water. Let it sit for five minutes until it thickens.
Use almond milk or another plant-based milk for dairy. You can also use coconut cream instead of cream cheese for the glaze. Just make sure to keep the flavors rich and tasty.
Seasonal Additions
You can spice things up with different spices. Try adding nutmeg or ginger for a unique twist. These spices add warmth and depth to the flavor.
Fruits like chopped apples or pears can be added to the batter. Nuts, such as pecans or walnuts, offer a delightful crunch. Both options enhance the texture and flavor while keeping it festive.
Storage Info
How to Store Leftover Pancakes
To keep your leftover pancakes fresh, place them in an airtight container. Layer them with parchment paper to prevent sticking. Store them in the fridge for up to three days. For longer storage, freeze the pancakes. Wrap each pancake tightly in plastic wrap, then place them in a freezer bag. They can last up to two months in the freezer.
Reheating Suggestions
When it’s time to enjoy your pancakes, reheating them right is key. For the microwave, place a pancake on a microwave-safe plate. Heat for about 20 to 30 seconds, checking to avoid drying out. If you prefer the oven, preheat it to 350°F (175°C). Place the pancakes on a baking sheet and cover with foil. Heat for about 10 minutes for a soft, warm treat.
Storing the Cream Cheese Glaze
To store your cream cheese glaze, transfer it to a clean, airtight container. Seal it well to keep out air. You can keep it in the fridge for up to one week. If you need to store it longer, freeze it in a freezer-safe container. Just remember to thaw it in the fridge before using it again.
FAQs
Can I make these pancakes ahead of time?
Yes, you can prepare these pancakes in advance. Make the batter and store it in the fridge for up to 24 hours. This keeps the pancakes fresh and tasty. Cook them when you are ready to eat. If you want to make them even earlier, you can cook and freeze the pancakes. Just place them in a single layer with parchment paper between them. This way, they won’t stick together. When you are ready, reheat them in the microwave or toaster for a quick breakfast.
What can I substitute for pumpkin puree?
If you don’t have pumpkin puree, you can use sweet potato puree or butternut squash puree. Both of these will give a similar texture and flavor. Applesauce is another option but will make the pancakes sweeter and softer. You can also use mashed bananas, but this will change the taste a bit. Each substitute will give your pancakes a unique twist while still tasting great.
How long do these pancakes last in the fridge?
These pancakes can last in the fridge for about three days. Store them in an airtight container to keep them fresh. If you want to keep them longer, you can freeze them. Just remember to separate them with parchment paper. When you are ready to eat, you can reheat them in the microwave or toaster. They will still taste delicious!
Can I make these pancakes without cinnamon?
Yes, you can make these pancakes without cinnamon. If you skip the cinnamon, consider adding a bit more pumpkin spice mix for extra flavor. You can also try adding vanilla extract or a dash of nutmeg for a different taste. Experimenting with flavors can lead to a fun, new pancake recipe!
Pancakes are simple but fun to make. We covered main ingredients like flour, baking powder, and milk. Then we mixed up a tasty cinnamon filling and a smooth cream cheese glaze.
Remember to avoid overmixing the batter for the best texture. You can customize flavors too. Use gluten-free or vegan options based on your needs.
Now, you are ready to make delicious pancakes that impress! Enjoy every bite and share them with friends and family.


