Pumpkin Spice Cheesecake Bars Irresistible Fall Treat

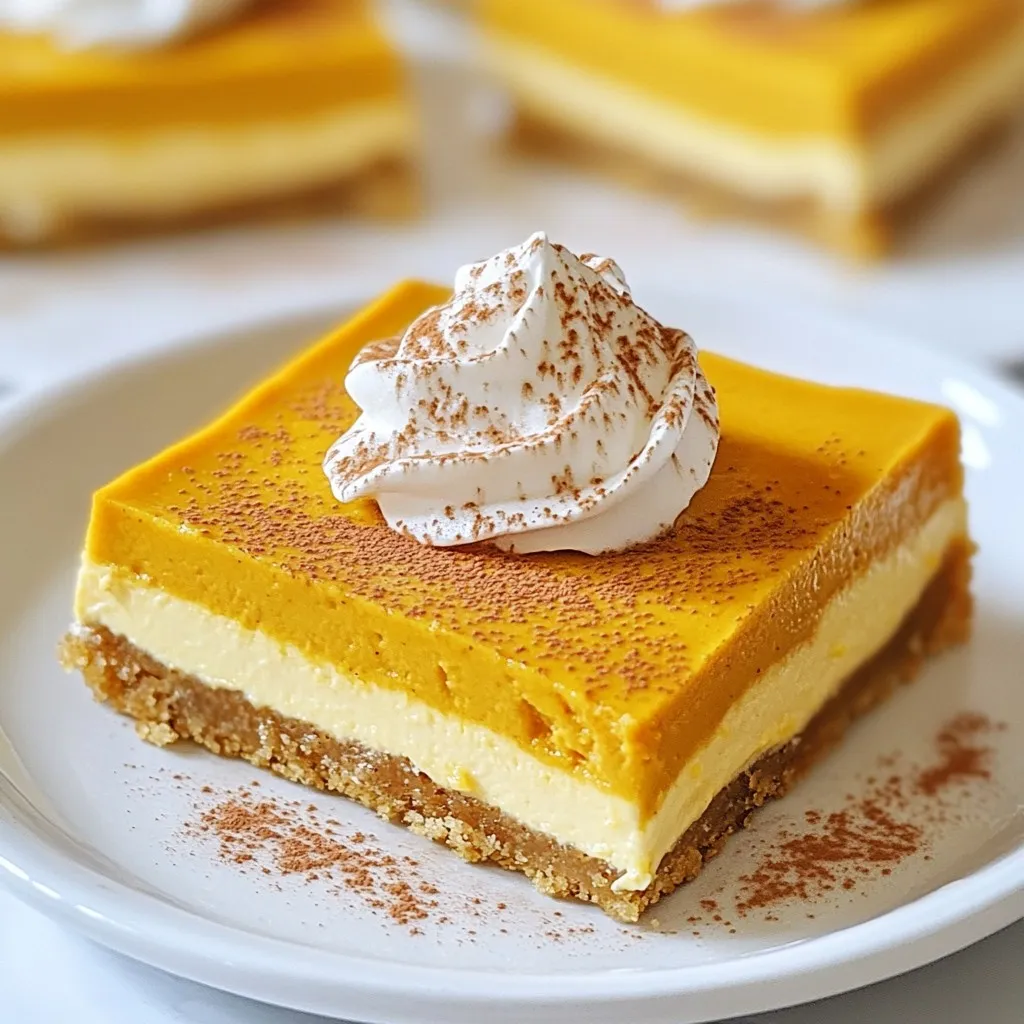
Get ready to delight your taste buds! These Pumpkin Spice Cheesecake Bars are the ultimate fall treat. With a rich and creamy filling and a buttery graham cracker crust, they capture all the cozy flavors of autumn. Whether you’re hosting a gathering or just craving something sweet, these bars are easy to make and share. Dive in as I guide you through each simple step to create this delicious dessert!
Why I Love This Recipe
- Perfect Fall Flavor: These Pumpkin Spice Cheesecake Bars capture the essence of fall with their rich pumpkin flavor and warm spices, making them a seasonal favorite.
- Easy to Make: This recipe is straightforward and doesn’t require any special baking skills, making it accessible for both novice and experienced bakers.
- Deliciously Creamy Texture: The combination of cream cheese and pumpkin puree creates a silky, creamy texture that melts in your mouth, making each bite irresistible.
- Perfect for Sharing: With 16 bars in a batch, these cheesecake squares are perfect for gatherings, parties, or simply sharing with friends and family!
Ingredients
List of Ingredients
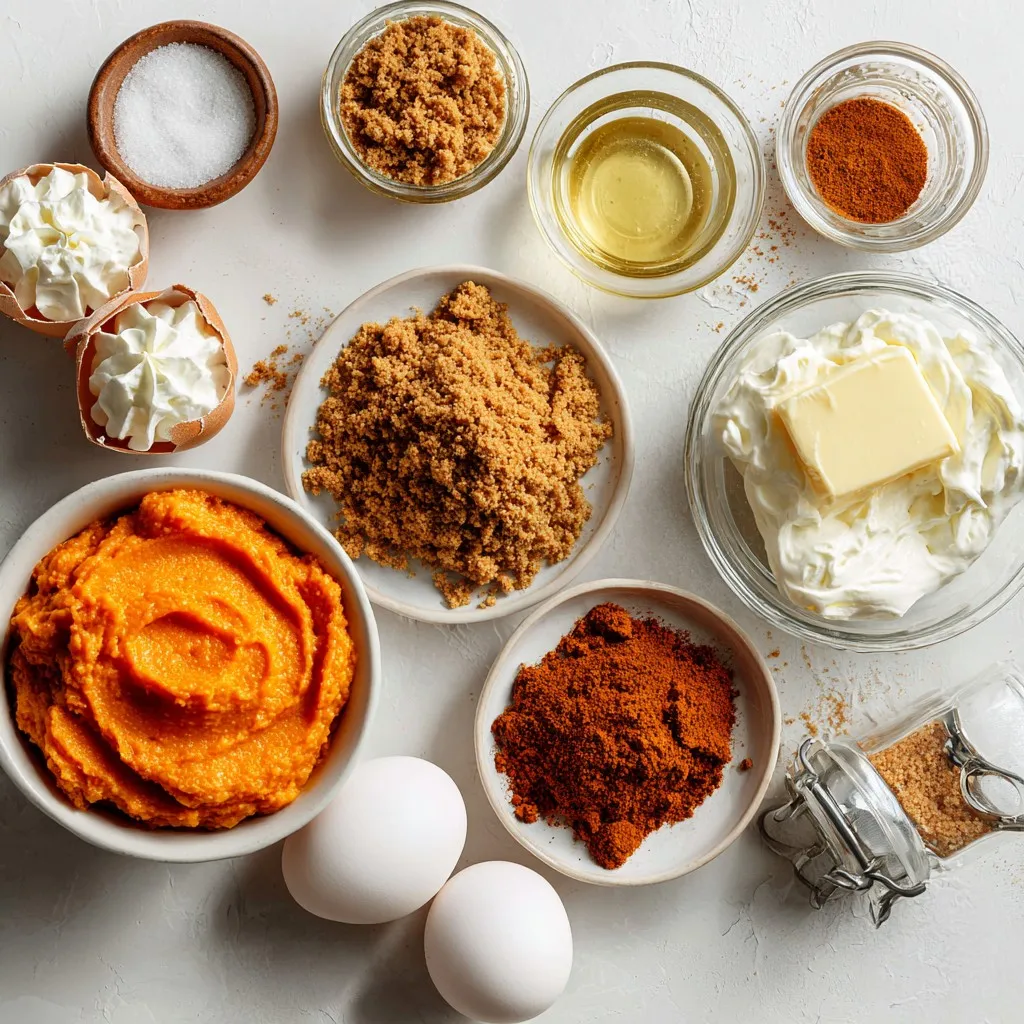
– 1 ½ cups graham cracker crumbs
– ½ cup unsalted butter, melted
– 1/4 cup granulated sugar
– 2 (8 oz) packages cream cheese, softened to room temperature
– 1 cup pumpkin puree
– 3/4 cup granulated sugar
– 2 large eggs, at room temperature
– 1 teaspoon vanilla extract
– 1 teaspoon ground cinnamon
– 1/2 teaspoon ground nutmeg
– 1/4 teaspoon ground ginger
– 1/4 teaspoon ground clove
– Pinch of salt
– Whipped cream for garnish (optional)
You need a mix of cream cheese and pumpkin for a rich flavor. The graham cracker crumbs form a crunchy base. The melted butter helps the crust stick together. The sugars add sweetness, while the spices give that classic fall taste.
You can add whipped cream on top for extra creaminess. A sprinkle of cinnamon or nutmeg can make your bars look fancy. The right blend of spices brings warmth to your dessert. This combo creates a treat you won’t forget.

Step-by-Step Instructions
Preparation Steps
1. Preheat your oven to 350°F (175°C).
2. Prepare an 8×8 inch baking pan. Line it with parchment paper. Let some paper hang over the sides for easy removal.
3. In a medium bowl, mix 1 ½ cups of graham cracker crumbs, ½ cup melted unsalted butter, and ¼ cup granulated sugar. Stir until the mixture is crumbly and even.
4. Press this crumb mix firmly into the bottom of the prepared pan. This will form a solid crust layer.
5. In a large bowl, beat 2 packages of softened cream cheese using a mixer. Mix on medium speed until smooth.
6. Gradually add 1 cup of pumpkin puree, ¾ cup granulated sugar, 2 large eggs, and 1 teaspoon of vanilla extract.
7. Add 1 teaspoon ground cinnamon, ½ teaspoon ground nutmeg, ¼ teaspoon ground ginger, ¼ teaspoon ground clove, and a pinch of salt. Mix until fully combined and smooth.
Baking Process
8. Pour the pumpkin cheesecake mixture over the crust. Use a spatula to spread it evenly.
9. Place the pan in the preheated oven and bake for 30-35 minutes. The edges should be set, while the center remains slightly jiggly.
Cooling and Serving
10. After baking, remove the pan and let the bars cool completely at room temperature.
11. Refrigerate the bars for at least 4 hours or overnight. This step is important for setting the bars.
12. Once chilled, lift the bars out of the pan using the parchment paper. Cut into equal squares with a sharp knife.
13. Optionally, top each square with a dollop of whipped cream before serving. This adds a nice touch.
Tips & Tricks
Perfecting the Recipe
To avoid cracks in the cheesecake, watch the baking time. Bake the bars until the edges are set, but the middle should still jiggle a bit. This ensures a creamy texture without cracks. Also, let the bars cool slowly. Rapid changes in temperature cause cracks.
For a smoother filling, beat the cream cheese first until it is creamy. This removes lumps. Add the pumpkin and sugar slowly, mixing well after each addition. Ensure all ingredients are at room temperature. This helps them blend better and creates a silky filling.
Serving Suggestions
Garnishing these bars can elevate their look. Top each square with a dollop of whipped cream. A sprinkle of cinnamon or nutmeg adds a nice touch. You can also drizzle caramel sauce for extra flavor.
Pair these cheesecake bars with a warm drink, like spiced cider or coffee. The warmth of your drink will balance the cool, creamy cheesecake. Serve them on a decorative platter for a festive feel at any gathering.
Common Mistakes to Avoid
One common mistake is overmixing the filling. Mixing too much can add air and lead to cracks. Mix just until combined for a dense, creamy texture.
Another mistake is baking at the wrong temperature or time. Always preheat your oven well. If the bars bake too long, they can dry out. Check them at the 30-minute mark and remember, a jiggly center means they are just right.
Pro Tips
- Use Room Temperature Ingredients: Ensure all your dairy ingredients, like cream cheese and eggs, are at room temperature to achieve a smooth and creamy cheesecake filling.
- Don’t Overbake: Keep an eye on the cheesecake bars; they should be slightly jiggly in the center when you take them out of the oven for the best texture.
- Chill Thoroughly: Allow the bars to cool completely at room temperature before refrigerating them for at least 4 hours or overnight to set properly.
- Garnish Creatively: For a festive touch, consider garnishing with caramel sauce, chocolate drizzle, or toasted pecans along with whipped cream before serving.

Variations
Flavor Variations
Want to mix things up? You can add chocolate or caramel to your bars. Swirl in chocolate chips or drizzle caramel on top before baking. These flavors blend well with pumpkin spice. You can also try different spices. Use cardamom or allspice for a unique twist. Almond or maple extract can add extra depth to the filling. Just remember to adjust the amounts to keep balance.
Dietary Adjustments
If you need gluten-free options, look for gluten-free graham crackers. Many stores sell these. You can also make your own using gluten-free oats or nuts. For vegan versions, swap the cream cheese with a nut-based cheese. Silken tofu blended with maple syrup works too. You can replace eggs with flaxseed meal or chia seeds mixed with water. This keeps the texture without losing flavor.
Serving Style Variations
Want to serve something different? Turn these bars into cupcakes. Use the same filling but pour it into cupcake liners. Bake for about 20 minutes. You can also make mini cheesecakes using a muffin tin. For a cool treat, freeze the bars instead. Just cut them after chilling and pop them into the freezer. They can be a refreshing dessert on warm days.
Storage Info
How to Store Pumpkin Spice Cheesecake Bars
To keep your pumpkin spice cheesecake bars fresh, follow these tips:
– Let the bars cool completely after baking.
– Place them in an airtight container.
– Store in the refrigerator for up to five days.
Using parchment paper helps with easy removal and keeps the bars intact. If you cut them into squares, layer them with parchment in between. This prevents sticking.
Freezing Instructions
Freezing cheesecake bars is simple. Here’s how:
– Wrap each square in plastic wrap.
– Place the wrapped bars in a freezer-safe bag or container.
– They can stay frozen for up to three months for best quality.
To thaw, move the bars to the fridge overnight. For a quicker option, leave them at room temperature for about an hour. Enjoy them chilled or at room temp!
FAQs
What are the best serving suggestions for Pumpkin Spice Cheesecake Bars?
You can serve these bars warm or cold. They shine with toppings like whipped cream or caramel sauce. A sprinkle of cinnamon or nutmeg adds a nice touch. You could also serve them with a scoop of vanilla ice cream. For a fun twist, pair them with apple cider or a spiced latte.
Can I substitute fresh pumpkin for pumpkin puree?
Yes, you can use fresh pumpkin. First, cook and puree the pumpkin until smooth. Make sure to drain any excess water. This helps keep the bars from being too watery. Fresh pumpkin adds a vibrant flavor, but the texture must be right for the best results.
How long do the cheesecake bars last?
These cheesecake bars last about 5 days in the fridge. To tell if they are bad, check for any off smells or mold. If they look dry or cracked, it is best to toss them. Keep them well-covered to maintain their freshness.
What can I use instead of graham crackers?
If you don’t have graham crackers, you can use cookies like Oreos or digestive biscuits. You can also use crushed nuts mixed with melted butter for a gluten-free option. Just make sure to press the crust firmly to keep it together.
Can I make this recipe dairy-free?
Yes, you can make it dairy-free. Use dairy-free cream cheese and a dairy-free butter substitute. You can also try coconut cream for a rich texture. Make sure the pumpkin puree is pure and free of dairy ingredients for the best outcome.
This blog post covered everything you need to know about making pumpkin spice cheesecake bars. We explored ingredients, preparation steps, baking tips, and how to store your creation. I shared common mistakes to avoid, flavor variations, and even serving suggestions.
Remember, a little care will help you make the best dessert. Enjoy experimenting with different flavors and techniques. This recipe is fun and perfect for the season. Happy bakin

Pumpkin Spice Cheesecake Bars
Ingredients
- 1.5 cups graham cracker crumbs
- 0.5 cups unsalted butter, melted
- 0.25 cups granulated sugar
- 2 packages cream cheese, softened to room temperature
- 1 cups pumpkin puree
- 0.75 cups granulated sugar
- 2 large eggs, at room temperature
- 1 teaspoon vanilla extract
- 1 teaspoon ground cinnamon
- 0.5 teaspoon ground nutmeg
- 0.25 teaspoon ground ginger
- 0.25 teaspoon ground clove
- a pinch salt
- to taste whipped cream for garnish (optional)
Instructions
- Preheat your oven to 350°F (175°C). Prepare an 8x8 inch baking pan by lining it with parchment paper, allowing some overhang on the sides for easy removal later.
- In a medium mixing bowl, combine the graham cracker crumbs, melted butter, and 1/4 cup of granulated sugar. Stir the mixture until it achieves a uniform, crumbly texture.
- Press the crumb mixture firmly and evenly into the bottom of the prepared baking pan, forming a solid crust layer.
- In a large mixing bowl, use a hand mixer or stand mixer to beat the softened cream cheese on medium speed until it is completely smooth and creamy, ensuring no lumps remain.
- Gradually add the pumpkin puree, 3/4 cup of granulated sugar, eggs, vanilla extract, along with the spices (cinnamon, nutmeg, ginger, clove, and a pinch of salt) to the cream cheese. Mix everything together until fully combined and silky smooth.
- Pour the pumpkin cheesecake mixture over the previously prepared graham cracker crust, using a spatula to spread it evenly across the surface.
- Place the baking pan in the preheated oven and bake for 30-35 minutes. The cheesecake is done when the edges are set but the center remains slightly jiggly.
- Once baked, remove the pan from the oven and allow the bars to cool completely at room temperature. Then, refrigerate for at least 4 hours or overnight to ensure they set properly.
- After chilling, carefully lift the cheesecake bars out of the pan using the parchment paper overhang. Cut into equal squares using a sharp knife.
- If desired, top each cheesecake square with a dollop of whipped cream just before serving to add a delightful finish.


![- 2 cups fresh blueberries, rinsed and drained - 2 cups ripe peaches, diced (approximately 3 medium-sized peaches) - 1 tablespoon freshly squeezed lemon juice - 1/2 cup granulated sugar (adjust based on your sweetness preference) - 1 tablespoon cornstarch - 1 teaspoon pure vanilla extract - 1 1/2 cups rolled oats - 1 cup all-purpose flour - 1/2 cup packed brown sugar - 1/2 teaspoon baking powder - 1/4 teaspoon fine salt - 1/2 cup unsalted butter, melted and slightly cooled - 1 teaspoon ground cinnamon (optional, for added warmth) These simple ingredients create a tasty balance of sweet and tart flavors. The fresh blueberries and ripe peaches shine in each bite. You can change the sugar to fit your taste. I often add a bit more if the fruit is not very sweet. I love using oats for texture; they give a nice chewiness. This recipe is so flexible. You can swap out fruit or adjust flavors based on what you have at home. For example, try adding a pinch of nutmeg for a warm spice twist. This recipe takes only 15 minutes to prepare. It bakes in about 30 to 35 minutes. You will get about 12 bars from this batch, perfect for sharing with friends or family. If you want the full recipe, check the section below. - Preheat your oven to 350°F (175°C). - Grease a 9x13-inch baking dish or line it with parchment paper. - In a medium mixing bowl, combine 2 cups of fresh blueberries, 2 cups of diced peaches, 1 tablespoon of lemon juice, 1/2 cup of granulated sugar, 1 tablespoon of cornstarch, and 1 teaspoon of vanilla extract. - Gently mix the ingredients until the fruit is coated. Let it sit for a few minutes to enhance the flavor. - In a large mixing bowl, whisk together 1 1/2 cups of rolled oats, 1 cup of all-purpose flour, 1/2 cup of brown sugar, 1/2 teaspoon of baking powder, 1/4 teaspoon of salt, and 1 teaspoon of cinnamon if desired. - This mixture will give your bars that perfect crumb texture. - Pour 1/2 cup of melted butter into the dry mixture and stir until it looks like coarse crumbs. - Reserve about 1 cup of this crumb mixture for later. - Press the remaining crumb mixture into the bottom of your greased dish to form the crust. - Spread the fruit mixture evenly over the crust, then sprinkle the reserved crumbs on top. - Bake in your preheated oven for about 30-35 minutes. - Look for golden brown color and bubbling filling to know it's done. - Once baked, let the bars cool on a wire rack for 15-20 minutes before slicing into squares. - This cooling time helps the bars set well for easy serving. Enjoy making these Blueberry Peach Crumble Bars with the [Full Recipe]. - Check for doneness by ensuring the filling is bubbling and the top is golden brown. - Letting the bars cool completely aids in easier slicing. This step prevents squishing the filling and keeps the layers intact. - Use frozen blueberries or peaches if fresh ones are unavailable. Frozen fruit works well and saves time. - Substitute brown sugar with coconut sugar for a healthier option. Coconut sugar adds a nice depth to the flavor. - Serve warm or at room temperature. This allows the flavors to shine. - Pair with vanilla ice cream or whipped cream. This adds a creamy texture that balances the tartness of the fruit. For an extra touch, garnish with fresh blueberries or peach slices. You can find the Full Recipe above for detailed instructions on making these delightful bars! {{image_4}} You can mix things up with different fruits. For a fresh twist, switch blueberries and peaches for raspberries and apples. The tartness of raspberries pairs well with sweet apples. You can also try plums or cherries. Both add their unique flavors and keep the bars fun and exciting. Want to make these bars gluten-free? No problem! Just replace all-purpose flour with a gluten-free flour blend. Many good mixes are available at stores. Also, ensure that your oats are certified gluten-free. This small change lets everyone enjoy this tasty dessert. For a vegan version, swap unsalted butter for coconut oil or vegan butter. Both options work well and keep the bars rich and tasty. If your recipe includes eggs, you can use flax eggs instead. To make a flax egg, mix one tablespoon of ground flaxseed with two and a half tablespoons of water. Let it sit for five minutes. This creates a great egg substitute that still binds everything together. Store your Blueberry Peach Crumble Bars in an airtight container. They stay fresh at room temperature for up to 3 days. This makes them great for quick snacks or dessert. To keep them longer, refrigerate the bars. They will stay fresh for up to a week. For even longer storage, you can freeze the bars. Wrap them tightly in plastic wrap or aluminum foil. They can be frozen for up to 3 months. When you're ready to enjoy your frozen bars, reheating is easy. Simply pop them in the microwave for a few seconds. You can also warm them in the oven at 350°F (175°C). This brings back their delicious taste and texture. For the full recipe and tips, check out the detailed instructions above. Enjoy your tasty treat! Yes, you can make these bars a day in advance. Just store them in the fridge. This helps the flavors blend nicely. Look for bubbling filling and a golden brown topping. This shows they are ready to eat. Yes, you can add chopped nuts like almonds or walnuts. They give the bars extra crunch and flavor. I love pairing them with a scoop of ice cream or yogurt. It makes a delicious treat. Store them in an airtight container at room temperature. You can also refrigerate them for up to a week. - Blueberry Peach Crumble Bars 🫐 To make these delicious Blueberry Peach Crumble Bars, you need simple, fresh ingredients. Here’s what you will need: - 2 cups fresh blueberries, rinsed and drained - 2 cups ripe peaches, diced (approximately 3 medium-sized peaches) - 1 tablespoon freshly squeezed lemon juice - 1/2 cup granulated sugar (adjust based on your sweetness preference) - 1 tablespoon cornstarch - 1 teaspoon pure vanilla extract - 1 1/2 cups rolled oats - 1 cup all-purpose flour - 1/2 cup packed brown sugar - 1/2 teaspoon baking powder - 1/4 teaspoon fine salt - 1/2 cup unsalted butter, melted and slightly cooled - 1 teaspoon ground cinnamon (optional, for added warmth) These ingredients come together to create a wonderful balance of sweet and tart flavors. The fresh blueberries and peaches mix well with the lemon juice. This adds a nice zing to the bars. The sugar and cornstarch help create a thick, juicy filling. The crumble topping is a blend of oats, flour, and sugars. It gives the bars a crunchy texture that pairs perfectly with the soft fruit layer. The butter adds richness, while the cinnamon gives a warm, cozy vibe to each bite. If you want to try this recipe, check the Full Recipe for step-by-step instructions. You'll love making and sharing these bars! These Blueberry Peach Crumble Bars are easy to make and full of flavor. You learned about the key ingredients, simple steps, and different variations. Remember, you can swap fruits or adjust sweetness to fit your taste. Store leftovers in a container for later. Enjoy these bars warm or with ice cream for a tasty treat. Happy baking!](https://goldendishy.com/wp-content/uploads/2025/06/77e155cd-d820-4acd-a50c-b849e6ba2e1e-768x768.webp)

![- 1 cup cherries, pitted and chopped - 1 cup unsweetened applesauce - 1/2 cup peanut butter or almond butter - 1/2 cup honey or maple syrup - 1 teaspoon vanilla extract - 2 cups rolled oats - 1/2 cup chocolate protein powder - 1 teaspoon baking powder - 1/2 teaspoon baking soda - 1/4 teaspoon salt - 1/3 cup dark chocolate chips To make the best Cherry Chocolate Protein Muffins, you need fresh ingredients. Start with cherries. Choose ripe cherries for a sweet taste. Pitting and chopping them helps mix them into the batter easily. Next, use unsweetened applesauce. It adds moisture and replaces some fat. This keeps the muffins light and fluffy. If you prefer a nutty flavor, choose between peanut butter or almond butter. Both work well. For sweetness, you can pick honey or maple syrup. Each adds a unique flavor. Don’t forget the vanilla extract. It enhances the overall taste. Now, let’s talk about the dry ingredients. Rolled oats add texture and fiber. They also help bind the muffins. The chocolate protein powder is key for a protein boost. It makes these muffins a healthy snack. Add baking powder and baking soda for lift. This ensures your muffins rise well. Lastly, sprinkle in some salt to balance the sweetness. The dark chocolate chips are the fun part. They melt in the oven and create pockets of gooey chocolate. This makes every bite a treat! For the full recipe, check out the instructions in the next section. Enjoy every step of making these delicious muffins! 1. First, preheat your oven to 350°F (175°C). This step is key to baking muffins evenly. 2. Prepare your muffin tin by lining it with paper liners. You can also lightly grease each cup to help prevent sticking. 3. In a large mixing bowl, combine the unsweetened applesauce, your choice of nut butter, honey, and vanilla extract. Mix well with a whisk or spatula until smooth. 4. Now, it’s time to fold in the chopped cherries. Gently stir them into the wet mixture. Make sure they spread evenly throughout the batter. 5. In another bowl, whisk together the rolled oats, chocolate protein powder, baking powder, baking soda, and salt. This mix will give your muffins a nice rise. 6. Gradually add the dry mix to the wet mixture. Fold them together gently, being careful not to overmix. Overmixing can make your muffins tough. 7. Next, fold in the dark chocolate chips. Ensure they are well-distributed, so you get a chocolate burst in every bite. 8. Use a spoon or an ice cream scoop to pour the batter into the muffin tin. Fill each cup about 2/3 full to allow room for rising. 9. Bake the muffins in your preheated oven for 18-20 minutes. Check for doneness by inserting a toothpick into the center. If it comes out clean, they are ready! 10. Once baked, remove the muffins and let them cool in the tin for 5 minutes. Then, transfer them to a wire rack to cool completely. This step helps keep the texture light and fluffy. For the full recipe, check out the details above. Enjoy your delicious Cherry Chocolate Protein Muffins! To make the best Cherry Chocolate Protein Muffins, avoid overmixing the batter. Overmixing can lead to tough muffins. Mix just until the dry and wet ingredients combine. This keeps your muffins light and fluffy. Measuring ingredients accurately is also key. Use dry measuring cups for solids like oats and protein powder. For liquids, use a liquid measuring cup. This ensures you add the right amounts for great results. I love serving these muffins warm. They taste best right out of the oven. A light dusting of powdered sugar or a drizzle of melted dark chocolate adds a special touch. You can also pair them with Greek yogurt for extra protein and creaminess. For a balanced meal, enjoy these muffins with a side of fruit. Slices of banana or a handful of berries can brighten your plate and add freshness. These muffins are packed with health benefits. Protein powder offers a great source of protein. It helps build and repair muscles. This makes them perfect for post-workout snacks. Cherries are rich in antioxidants. They help fight inflammation and support heart health. Oats provide fiber, which is good for digestion. They also keep you feeling full longer, making these muffins a smart choice for any time of day. For the complete recipe, check out the [Full Recipe]. {{image_4}} You can make Cherry Chocolate Protein Muffins gluten-free by using certified gluten-free oats. Almond flour also works well here. For a vegan option, replace honey with maple syrup. Use a vegan protein powder to keep it plant-based. This way, everyone can enjoy these tasty muffins, no matter their diet. - Gluten-free: Use gluten-free oats and almond flour. - Vegan: Swap honey for maple syrup and use vegan protein powder. Spicing up your muffins can add a fun twist. Try adding 1 teaspoon of cinnamon or nutmeg to the mix. This small change can bring warmth and depth to the flavor. You might also want to mix in nuts or seeds. Chopped walnuts or sunflower seeds can add crunch and nutrition to your muffins. - Spices: Add 1 teaspoon of cinnamon or nutmeg. - Nuts or seeds: Incorporate chopped walnuts or sunflower seeds. You can customize these muffins with fruits that are in season. In summer, try adding blueberries or peaches. In fall, diced apples or pumpkin puree would be delightful. Different types of chocolate can also change the taste. Dark chocolate, milk chocolate, or even white chocolate can make the muffins exciting and unique. - Seasonal fruits: Use blueberries in summer or apples in fall. - Chocolate types: Experiment with dark, milk, or white chocolate. To keep your Cherry Chocolate Protein Muffins fresh, follow these simple steps: - Allow the muffins to cool completely before storage. - Use an airtight container to maintain moisture. - Place parchment paper between layers to avoid sticking. I find that glass containers work best because they help keep the muffins soft and fresh. Freezing muffins is a great way to enjoy them later. Here’s how to do it: - Allow the muffins to cool fully. - Wrap each muffin in plastic wrap or aluminum foil, then place them in a freezer bag. - Label the bag with the date for easy tracking. When you’re ready to eat, thaw the muffins by leaving them out at room temperature. For quicker results, pop them in the microwave for about 20 seconds. This method keeps them moist and tasty. Cherry Chocolate Protein Muffins can last: - At room temperature: 3 to 4 days in an airtight container. - In the fridge: 1 week if stored properly. This means you can enjoy these muffins without worry for several days! Remember to check for freshness before eating. Enjoy your delicious snacks! Can I make these muffins ahead of time? Yes, you can make these muffins ahead of time. They store well for a few days. Just make sure to keep them in an airtight container. You can also freeze them for longer storage. What can I use instead of protein powder? If you don't have protein powder, you can use ground oats or almond flour. This will change the texture a bit but keeps the muffins tasty. You might need to adjust the liquid in the recipe. How can I reduce sugar in the recipe? To cut down on sugar, use less honey or maple syrup. You can also swap in a sugar substitute like stevia. This will help keep the sweetness but lower the sugar content. Is it possible to use fresh cherries instead of frozen? Yes, fresh cherries work great too! Just chop them up and remove the pits. Fresh cherries can add a nice burst of flavor. They may make the muffins a bit moister, so keep an eye on baking time. What is the protein content per muffin? Each muffin has about 7 grams of protein. This comes mainly from the protein powder and nut butter. It makes a healthy snack or breakfast option. Are these muffins suitable for kids? Absolutely! These muffins are great for kids. They are tasty and packed with nutrients. Plus, the chocolate bits make them fun to eat. In this article, we explored how to make delicious Cherry Chocolate Protein Muffins. We covered ingredients, step-by-step instructions, and tips for perfecting the recipe. You learned how to store these muffins and adapt them for different diets. These muffins are not just tasty; they offer health benefits too. Experiment with flavors and enjoy them as snacks or meals. Now, grab your ingredients and start baking your own batch today!](https://goldendishy.com/wp-content/uploads/2025/07/bcf12119-4bc4-4824-810e-f617231ac2e7-768x768.webp)


