Pineapple Teriyaki Chicken Skewers Savory Grilled Delight

Are you ready to take your grilling game to the next level? Pineapple Teriyaki Chicken Skewers offer a perfect mix of savory and sweet flavors. These skewers blend juicy chicken thighs, fresh pineapple, and vibrant veggies for a delightful meal. In this guide, I’ll share easy steps, pro tips, and tasty variations to help you grill the perfect skewers. Let’s fire up that grill and create a mouthwatering dish together!
Why I Love This Recipe
- Flavorful Marinade: The combination of teriyaki sauce, honey, and sesame oil creates a sweet and savory marinade that elevates the chicken to new heights.
- Vibrant Ingredients: The addition of fresh pineapple, bell peppers, and red onion not only adds color but also brings a delightful crunch and freshness to each bite.
- Grill Marks Perfection: Cooking these skewers on the grill gives them beautiful char marks and that irresistible smoky flavor, making them visually appealing and delicious.
- Easy to Assemble: This recipe is simple to prepare, making it perfect for weeknight dinners or outdoor gatherings with friends and family.
Ingredients
Main Ingredients
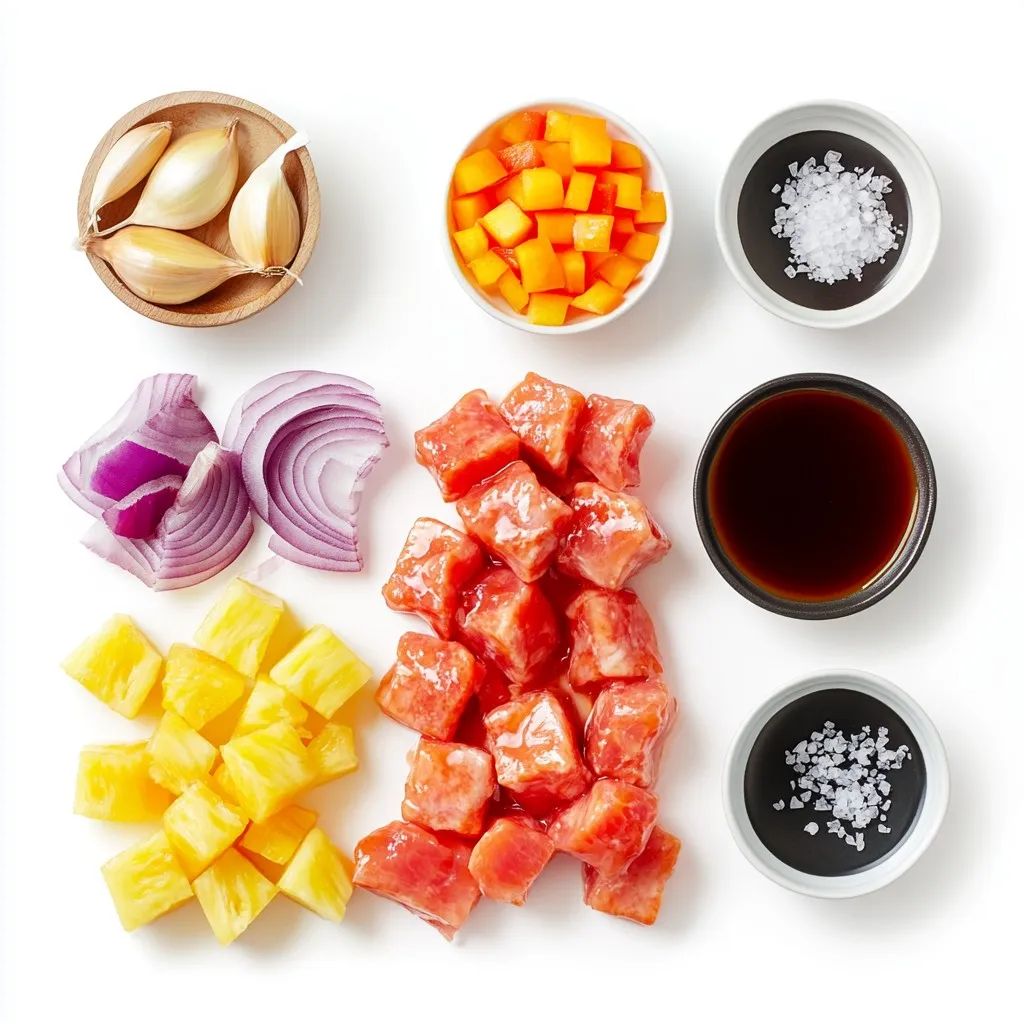
– 1 lb boneless, skinless chicken thighs, cut into 1-inch pieces
– 1 cup fresh pineapple, diced into 1-inch chunks
– 1 bell pepper (red or yellow), diced into 1-inch pieces
– 1 small red onion, cut into wedges
– 1/2 cup teriyaki sauce
Marinade Components
– 2 tablespoons soy sauce
– 1 tablespoon honey
– 1 tablespoon sesame oil
– 2 cloves garlic, minced
– 1 teaspoon ginger, grated
– Salt and pepper to taste
Necessary Equipment
– Skewers (soaked in water for 30 minutes if wooden)
– Grill or grilling pan
These ingredients come together to create a delightful dish. The chicken thighs provide a juicy base, while the fresh pineapple adds a sweet punch. The bell pepper and red onion bring color and crunch. Teriyaki sauce gives everything a savory glaze that ties it all together.
For the marinade, soy sauce, honey, sesame oil, garlic, and ginger blend perfectly. These flavors penetrate the chicken, making it tender and tasty. Salt and pepper add a simple touch to enhance the taste.
Gathering the right equipment is key. Soak wooden skewers to prevent burning. A grill or grilling pan helps achieve those perfect grill marks. With these ingredients and tools, you are ready to make Pineapple Teriyaki Chicken Skewers that everyone will love.

Step-by-Step Instructions
Marinating the Chicken
– To start, mix the marinade. In a large bowl, whisk together:
– 1/2 cup teriyaki sauce
– 2 tablespoons soy sauce
– 1 tablespoon honey
– 1 tablespoon sesame oil
– 2 cloves garlic (minced)
– 1 teaspoon ginger (grated)
– Add salt and pepper to taste.
This mix creates a tasty base for your chicken.
– Next, add 1 pound of boneless, skinless chicken thighs cut into 1-inch pieces. Make sure each piece is coated well. Cover the bowl with plastic wrap. Let it sit in the fridge for at least 30 minutes. For a stronger flavor, marinate for up to 2 hours.
Preparing Skewers
– If you use wooden skewers, soak them in water for 30 minutes. This keeps them from burning on the grill.
– Now, it’s time to assemble. Take the marinated chicken and thread it onto the skewers. Alternate with 1-inch chunks of fresh pineapple, bell pepper, and red onion. This adds color and taste. Leave small gaps between the pieces for even cooking.
Grilling the Skewers
– Preheat your grill to medium-high heat. Clean the grill surface and lightly grease it. This helps prevent sticking.
– Place the skewers on the hot grill. Cook them for about 12 to 15 minutes. Turn the skewers every few minutes. This ensures they cook evenly. The chicken should reach an internal temperature of 165°F (75°C). Look for nice grill marks as a sign of doneness.
– In the last few minutes, brush the skewers with any leftover teriyaki sauce. This gives them a delicious glaze.
– Once cooked, take the skewers off the grill and let them rest for a few minutes. This step keeps them juicy and tender.
Tips & Tricks
Achieving Perfect Cooked Chicken
To ensure your chicken is fully cooked, check its internal temperature. Use a meat thermometer to confirm it reaches 165°F (75°C). This will keep the chicken safe to eat and juicy. For perfect grill marks, avoid moving the skewers too much. Let them sit for a couple of minutes on each side before flipping.
Enhancing Flavor
Brushing the skewers with teriyaki sauce while grilling adds a rich flavor. Do this in the last few minutes of cooking for a nice glaze. For a colorful and tasty finish, consider garnishing with sesame seeds and chopped green onions. These add a fresh touch and make your dish look appealing.
Ensuring Ingredient Integrity
Cut your chicken and vegetables into 1-inch pieces for even cooking. This size helps everything cook at the same rate. When assembling the skewers, alternate chicken with pineapple, bell pepper, and onion. This not only looks good but also ensures that all ingredients get the heat they need for a perfect bite.
Pro Tips
- Marinate for Maximum Flavor: The longer you marinate the chicken, the more flavorful it becomes. For best results, aim for at least 2 hours of marination, or overnight if you have the time.
- Choose the Right Skewers: If you prefer wooden skewers, remember to soak them in water for at least 30 minutes. This prevents burning and ensures they hold up on the grill.
- Check for Doneness: To ensure the chicken is fully cooked, use a meat thermometer. The internal temperature should reach 165°F (75°C) for safe consumption.
- Garnish for Presentation: A sprinkle of sesame seeds and chopped green onions not only enhances the dish’s visual appeal but also adds a burst of flavor that complements the skewers.

Variations
Alternative Proteins
You can switch the chicken for shrimp or tofu. Shrimp cooks fast and offers a sweet taste. Tofu absorbs flavors well and is great for vegans. If you want beef or pork, they work well too. Just remember to adjust cooking times for these proteins.
Different Vegetables
Adding zucchini or mushrooms can change the dish. Zucchini gives a nice crunch, while mushrooms add a rich flavor. You can also use cherry tomatoes. They burst with juice when cooked, adding freshness to your skewers.
Flavor Enhancements
For a spicy kick, try a hot teriyaki sauce. It adds heat and depth. You can also make a citrus-infused marinade. Just mix in orange or lime juice for a bright twist. This enhances the sweetness of the pineapple and chicken.
Storage Info
Storing Leftovers
After grilling, let your skewers cool down. Place them in an airtight container. This helps keep moisture in. Store the container in the fridge. Leftover skewers last up to three days in the fridge.
Reheating Instructions
To reheat, use a microwave or an oven. For the microwave, place skewers on a plate. Heat for about 1-2 minutes. If using an oven, preheat to 350°F (175°C). Heat for about 10 minutes. Serve with a drizzle of teriyaki sauce for extra flavor.
Freezing for Later
To freeze, wrap each skewer in plastic wrap. Place them in a freezer-safe bag. Remove as much air as possible. They’ll stay fresh for up to three months. Thaw in the fridge overnight before grilling. This keeps the chicken tender and tasty.
FAQs
How long should I marinate the chicken for optimal flavor?
You should marinate the chicken for at least 30 minutes. This will infuse some flavor into the meat. For a deeper taste, I suggest marinating for 2 hours. Longer marination helps the chicken soak up the marinade’s goodness. Just make sure not to exceed 4 hours, as it can become too salty.
Can I use store-bought teriyaki sauce?
Yes, you can use store-bought teriyaki sauce. This option saves time and works well. However, homemade sauce lets you control the taste. Store-bought sauces may have added sugar or preservatives, while homemade can be fresh and clean. If you want a richer flavor, I recommend making your own.
What can I serve with pineapple teriyaki chicken skewers?
These skewers pair great with rice or noodles. Steamed jasmine rice or fried rice complements their flavors well. You can also serve a fresh salad on the side. Try a simple cucumber salad or a green salad for added crunch. The sweetness of the pineapple brings a nice contrast to savory sides.
This blog post outlined how to make tasty pineapple teriyaki chicken skewers. We discussed the main ingredients, like chicken thighs and fresh pineapple, along with key marinade components. I detailed the necessary equipment and provided clear step-by-step grill instructions. We also explored tips for perfect chicken, different protein variations, and storage information.
Enjoy experimenting with flavors and ingredients. Your skewers will impress friends and family! Get grilling, and savor each bit

Pineapple Teriyaki Chicken Skewers
Ingredients
- 1 lb boneless, skinless chicken thighs, cut into 1-inch pieces
- 1 cup fresh pineapple, diced into 1-inch chunks
- 1 whole bell pepper (red or yellow), diced into 1-inch pieces
- 1 small red onion, cut into wedges
- 0.5 cup teriyaki sauce
- 2 tablespoons soy sauce
- 1 tablespoon honey
- 1 tablespoon sesame oil
- 2 cloves garlic, minced
- 1 teaspoon ginger, grated
- to taste salt and pepper
- as needed skewers (soaked in water for 30 minutes if wooden)
Instructions
- In a large mixing bowl, whisk together the teriyaki sauce, soy sauce, honey, sesame oil, minced garlic, and grated ginger until well combined. Add the chicken pieces, ensuring they are thoroughly coated in the marinade. Cover the bowl with plastic wrap and refrigerate for at least 30 minutes.
- If you are using wooden skewers, soak them in water for 30 minutes prior to grilling.
- Thread the marinated chicken pieces onto each skewer, alternating with chunks of fresh pineapple, bell pepper, and onion.
- Preheat your grill to medium-high heat and ensure the grilling surface is clean and lightly greased.
- Carefully place the assembled skewers on the hot grill. Cook for approximately 12-15 minutes, turning them every few minutes until the chicken is cooked through and reaches an internal temperature of 165°F (75°C).
- During the last few minutes of grilling, generously brush the skewers with any remaining teriyaki sauce.
- Once fully cooked, remove the skewers from the grill and allow them to rest for a couple of minutes.
- Serve the skewers on a large platter and garnish with sesame seeds and finely chopped green onions.


![To make Ranch Chicken and Rice Casserole, gather these items: - 1 lb (450g) boneless, skinless chicken breasts, cut into bite-sized pieces - 1 cup uncooked white rice (e.g., jasmine or basmati) - 2 cups low-sodium chicken broth - 1 cup creamy ranch dressing - 1 cup frozen mixed vegetables (a colorful blend of peas, carrots, and corn) - 1 cup shredded sharp cheddar cheese - 1 teaspoon onion powder - 1 teaspoon garlic powder - Salt and freshly ground black pepper to taste - Fresh parsley, chopped (for garnish, optional) Garnishes add beauty and taste to your dish. Here are a few: - Fresh parsley, chopped - Extra shredded cheddar cheese - A drizzle of ranch dressing These add color and a fresh taste to the casserole. You can mix and match based on what you like! Sometimes, you may need to swap out ingredients. Here are some ideas: - Chicken: Use turkey breast or cooked rotisserie chicken for a quicker option. - Rice: Brown rice or quinoa can work well. Just adjust the cooking time. - Vegetables: Feel free to use any frozen veggies you have, like broccoli or bell peppers. - Dressing: If you prefer, swap ranch dressing for other creamy dressings like blue cheese or Caesar. With these swaps, you can make the dish fit your taste or what you have on hand. First, preheat your oven to 375°F (190°C). This step is key for even cooking. A hot oven helps the chicken cook well and the cheese melt perfectly. In a large bowl, add the diced chicken, uncooked rice, chicken broth, and creamy ranch dressing. Then, sprinkle in the onion powder and garlic powder. Use a spatula to mix everything well. Make sure the chicken and rice are coated with the ranch dressing. Add salt and pepper to taste. Next, fold in the frozen mixed vegetables. This gives your casserole color and nutrition. Make sure the veggies are spread throughout the mixture. Pour your chicken and rice mixture into a greased 9x13-inch baking dish. Spread it out evenly for best results. Cover the dish tightly with aluminum foil. This traps moisture and helps the dish cook well. Bake in the preheated oven for 25 minutes. After 25 minutes, remove the foil carefully. Watch out for steam! Now, sprinkle the shredded cheddar cheese on top. Return the dish to the oven, uncovered, for another 15-20 minutes. You will know it’s ready when the chicken is cooked through, and the cheese is melted and bubbly. Once done, take it out and let it cool for about 5 minutes. This resting time helps the flavors settle. If you like, add freshly chopped parsley for a nice touch before serving. To make perfect rice, rinse it first. This removes extra starch. Use a 1:2 ratio of rice to broth. This keeps the rice moist. Cook it covered for even heat. If you want extra flavor, add herbs to the broth. You can mix in extras to change the taste. Try adding diced bell peppers for crunch. Use different frozen veggies like broccoli or green beans. You can also swap ranch dressing for a spicy sauce. This gives it a kick. For a cheesy twist, add cream cheese with the ranch. One mistake is not covering the dish while baking. This can dry out the rice. Another error is using too much liquid. Stick to the right amounts in the recipe. Don’t skip the resting time after baking. This helps the flavors blend well. Always taste before serving. Adjust salt and pepper as needed. For a full recipe with all these tips, check out the [Full Recipe]. {{image_4}} You can make a tasty vegetarian version of this dish. Start by swapping the chicken for a mix of beans or lentils. Use 2 cups of cooked black beans or chickpeas instead. Then, keep all the other ingredients the same. The ranch dressing adds great flavor, and the veggies provide crunch. This version is hearty and filling, perfect for a meatless meal. If you love heat, try a spicy twist on the classic recipe. Add diced jalapeños or a pinch of cayenne pepper to the mix. You can also use spicy ranch dressing in place of the regular one. This gives the dish a nice kick. Top it off with pepper jack cheese instead of cheddar for extra spice. Your taste buds will thank you! For a one-pan meal, mix everything in a large oven-safe skillet. This saves on clean-up time. Just add the rice and broth to the skillet along with the chicken and veggies. Cover and bake as you normally would. The flavors blend well, and you still get that creamy goodness from the ranch dressing. This method makes dinner even easier and quicker. You can find the full recipe linked above, allowing you to create these delicious variations! You can keep leftover Ranch Chicken and Rice Casserole in the fridge. Place it in an airtight container. It will stay fresh for up to three days. Make sure the casserole is cool before sealing it. This helps prevent moisture from building up. If you want to save some for later, freezing is easy. Use a freezer-safe container or heavy-duty freezer bag. Store the casserole in portions for easy meals. It will keep well for up to three months. To freeze, let it cool completely first. Label the container with the date to track freshness. When you’re ready to enjoy your casserole again, you can reheat it in different ways. The oven gives the best results. Preheat it to 350°F (175°C). Bake the casserole for about 20-30 minutes, covered with foil. This keeps it moist. You can also use a microwave. Heat in short bursts, stirring in between to ensure even warming. Always check that the chicken is heated all the way through. For extra flavor, add a little ranch dressing before serving. To adjust the recipe for fewer servings, simply halve the ingredients. Use ½ lb of chicken and ½ cup of rice. Also, cut the broth and dressing in half. This way, you keep the same flavors. Make sure to check the baking time. Smaller portions may cook faster, so keep an eye on them. Yes, you can use brown rice. However, brown rice takes longer to cook. It may need more liquid too. I recommend cooking it for a few minutes before adding it to the casserole. This helps it soften. Follow the same steps, but adjust the cooking time. Ranch Chicken and Rice Casserole goes well with many sides. Here are a few tasty options: - Simple green salad with a light dressing - Steamed broccoli or green beans for a crunchy bite - Garlic bread for a cozy touch - Roasted vegetables for extra flavor and color These sides add balance and make your meal complete. Enjoy the casserole with your favorite sides! For the full recipe, check out the link above. In this blog post, we covered the key steps to make a delicious Ranch Chicken and Rice Casserole. We explored the ingredients, sharing options for garnishes and substitutions. The step-by-step instructions guide you from preheating the oven to baking. I also shared tips to perfect your dish and variations for added flavor. Finally, we discussed how to store leftovers for later enjoyment. Follow these tips, and you’ll create a tasty meal that everyone will love!](https://goldendishy.com/wp-content/uploads/2025/06/349f3b9c-e648-45ce-b7ed-2f76b31339ac-768x768.webp)
![Zesty Spaghetti Aglio e Olio Ingredients: - 400g spaghetti - 6 cloves garlic, thinly sliced - ½ cup extra virgin olive oil - 1 teaspoon red pepper flakes (or to taste) - Zest of 1 lemon - Juice of 1 lemon - ¼ cup fresh parsley, finely chopped - Salt, to taste - Freshly grated Parmesan cheese (optional, for garnish) Spaghetti Aglio e Olio shines with simple, fresh ingredients. Each plays a vital role. - Spaghetti: This serves as the base of the dish. Choose high-quality pasta for the best texture. - Garlic: Fresh garlic gives a rich flavor. Use thin slices for even cooking. - Olive Oil: Extra virgin olive oil adds depth. It also helps infuse the garlic flavor. - Red Pepper Flakes: These provide heat. Adjust the amount to match your spice level. - Lemon: Zest and juice add brightness. They balance the richness of the oil. - Parsley: Fresh parsley adds color and freshness. It complements the garlic. Sometimes, you may need to swap ingredients. Here are some great options: - Pasta: Use any long pasta, like linguine or fettuccine. - Garlic: Garlic powder can work in a pinch, but fresh is best. - Olive Oil: Avocado oil is a good alternative. It has a similar flavor. - Red Pepper Flakes: Fresh chili or hot sauce can replace flakes for heat. - Lemon: Lime juice can work if you’re out of lemons. - Parsley: Basil or chives can add a different yet tasty note. This dish is all about the balance of flavors. Each ingredient enhances the others. Enjoy your cooking journey with Spaghetti Aglio e Olio! Start by filling a large pot with water. Add a lot of salt to the water. This step helps to flavor the spaghetti. Bring the water to a rolling boil. Add the spaghetti and cook it according to the package instructions. Usually, this takes about 8-10 minutes for 'al dente' pasta. Once it is cooked, save 1 cup of the pasta water. Drain the spaghetti in a colander. In a large skillet, heat the extra virgin olive oil over medium heat. When the oil is warm, add the thinly sliced garlic and red pepper flakes. Sauté the garlic gently, stirring often for about 2-3 minutes. Watch the garlic closely; you want it golden brown and fragrant, not burnt. Burnt garlic can turn the dish bitter, which is not what we want! Once the garlic is ready, carefully add the drained spaghetti to the skillet. Use tongs or a pasta fork to toss the spaghetti. Make sure each strand is coated in the garlic oil. If the pasta looks dry, add some reserved pasta water, one tablespoon at a time. Keep tossing until you reach the sauciness you like. Now, remove the skillet from the heat. Add the lemon zest and juice to the pasta. Toss everything well to mix. Season with salt according to your taste. Then, gently fold in the finely chopped parsley. This adds color and flavor to your dish. To get the best spaghetti, cook it until it is 'al dente.' This means it should still have a little bite. Fill a large pot with water and add a good amount of salt. Bring the water to a boil. Add the spaghetti and follow the package instructions. Usually, this takes about 8 to 10 minutes. Before draining, save a cup of the cooking water. This water helps to moisten the pasta later. Garlic is key in Spaghetti Aglio e Olio. Use fresh cloves and slice them thinly. Heat the olive oil in a skillet on medium heat. Add the sliced garlic and red pepper flakes. Stir gently for 2 to 3 minutes until the garlic turns golden. Be careful not to burn it! After mixing in lemon zest and juice, you add a bright taste. The lemon cuts through the richness and lifts the dish. Serving matters! Use warm bowls to keep your pasta hot. After plating, drizzle some of the leftover garlic oil over the spaghetti. This adds flavor and shine. Garnish with fresh parsley for color. A lemon wedge on the side adds a fun touch. When your guests squeeze it over their pasta, the dish becomes even more zesty. For a special finish, you can sprinkle on some grated Parmesan cheese. This makes the dish look gourmet, even though it’s simple to make. Enjoy your flavorful garlic pasta dish! For the complete recipe, check out the full recipe. {{image_4}} You can easily make Spaghetti Aglio e Olio heartier by adding proteins like shrimp or chicken. For shrimp, use raw, peeled shrimp. Sauté them in the garlic oil for about 3-4 minutes until they are pink and cooked through. If you prefer chicken, use diced chicken breast. Cook it in the oil until it's no longer pink. This adds great flavor and makes the dish more filling. If you want a vegetarian twist, consider adding greens. Spinach or kale works great. Add them to the skillet after the garlic has cooked. Stir until the greens wilt and mix well with the garlic oil. This not only adds color but also boosts the nutrition of your meal. You can also use peas for a pop of sweetness. For those who love heat, you can adjust the red pepper flakes to your taste. Start with the recommended amount, then add more if you want it spicier. If you want a unique twist, try adding sliced fresh chili peppers or a dash of hot sauce. This will give your dish a vibrant kick and enhance the overall flavor profile. Experimenting with these variations makes Spaghetti Aglio e Olio fun and exciting. You can enjoy it just the way you like! For the full recipe, check out the details above. To keep your leftover spaghetti aglio e olio fresh, follow these steps: - Let the pasta cool down to room temperature. - Place it in an airtight container. - Store it in the fridge for up to three days. This method helps maintain the flavors and texture of your dish. When reheating spaghetti aglio e olio, I recommend these tips: - Use a skillet over medium heat. - Add a splash of olive oil for moisture. - Stir frequently to prevent sticking. You can also microwave it. Just cover it and add a little water. Heat in short bursts, stirring in between. If you want to freeze spaghetti aglio e olio, do this: - Place cooled pasta in a freezer-safe bag. - Remove excess air and seal tightly. - Store in the freezer for up to two months. When ready to eat, thaw in the fridge overnight. Reheat on the stove for the best taste. Enjoy your flavorful garlic pasta dish again! For the full recipe, check out the [Full Recipe]. Spaghetti Aglio e Olio is a simple pasta dish from Italy. It features spaghetti tossed with garlic and olive oil. The dish gets a kick from red pepper flakes. It’s quick to make and uses few ingredients. This makes it perfect for a weeknight meal. You can find the full recipe [here](#). Yes, you can easily make this dish vegan. Just skip the Parmesan cheese that some people use. The rest of the recipe is naturally vegan. The garlic oil and pasta create a rich flavor on their own. You won’t miss the cheese at all! To make Spaghetti Aglio e Olio less spicy, reduce the red pepper flakes. Start with half a teaspoon instead of a full teaspoon. You can also omit them if you prefer no heat. The garlic and olive oil will still give great flavor. Adjusting the spice level allows everyone to enjoy this dish. You’ve learned how to make Spaghetti Aglio e Olio. We covered essential ingredients and tasty substitutes. The step-by-step guide helped simplify cooking and mixing. Tips showed how to perfect texture and flavor. The variations let you customize your dish, making it unique. Lastly, we talked about storing and reheating leftovers. Now, you can enjoy this dish any time. With simple steps, you’ll impress family and friends. Dive into your kitchen and try it out today!](https://goldendishy.com/wp-content/uploads/2025/06/d19134da-6fc7-4b27-a706-dd24852a29ee-768x768.webp)

![- 2 boneless, skinless chicken breasts - 1 cup buttermilk - 1 cup all-purpose flour - 1 teaspoon baking powder - 1 teaspoon smoked paprika - 1/2 teaspoon garlic powder - 1/2 teaspoon cayenne pepper - Salt and freshly ground black pepper, to taste - 4 ready-made waffles (or homemade) - 2 tablespoons honey - Maple syrup, for drizzling - Fresh parsley, chopped, for garnish In this easy chicken and waffles recipe, you start with two boneless, skinless chicken breasts. Soak them in one cup of buttermilk. This step makes the chicken juicy and tender. Next, prepare the breading mix. You need one cup of all-purpose flour, one teaspoon of baking powder, one teaspoon of smoked paprika, half a teaspoon of garlic powder, and half a teaspoon of cayenne pepper. Don’t forget to add salt and pepper to taste. For the waffles, you can use four ready-made waffles or make your own. To finish, you will need two tablespoons of honey and maple syrup for drizzling. Chop some fresh parsley for garnish. This dish combines sweet and savory flavors, making it a favorite for many. Check out the Full Recipe to see how to put it all together. - Immerse chicken in buttermilk. - Cover and refrigerate. Start by taking two boneless, skinless chicken breasts. Place them in a bowl and pour in one cup of buttermilk. Make sure the chicken is fully coated. Cover the bowl with plastic wrap and set it in the fridge. Let it sit for at least one hour, or overnight for the best flavor. The buttermilk helps tenderize the chicken and adds a nice tang. - Combine flour and spices. - Mix to create a uniform dry mixture. Next, grab a shallow dish. In it, combine one cup of all-purpose flour with one teaspoon of baking powder, one teaspoon of smoked paprika, half a teaspoon of garlic powder, and half a teaspoon of cayenne pepper. Add salt and black pepper to taste. Mix well until everything is even. This blend will give your chicken a delicious crust. - Dredge marinated chicken in flour mixture. - Shake off excess flour. After marinating, take the chicken out of the fridge. Let the extra buttermilk drip off. Now, dredge each piece in the flour mixture. Make sure to coat both sides well. Once coated, shake off any excess flour. This step is key for achieving a crispy texture. - Heat oil in a skillet. - Fry chicken until golden-brown. In a large skillet, heat about half an inch of oil over medium-high heat. Wait until the oil is shimmering. Carefully place the coated chicken breasts into the skillet. Fry each piece for about 5-7 minutes on each side. They should turn a beautiful golden-brown color. Check the internal temperature; it should reach 165°F. Once cooked, transfer the chicken to a plate lined with paper towels to soak up excess oil. - Toast waffles according to instructions. While the chicken fries, it’s time to warm the waffles. You can use ready-made waffles or make your own if you prefer. Just toast them according to the package instructions until they are crispy and heated through. This will balance the hot chicken nicely. - Layer waffle and chicken. - Drizzle with honey and maple syrup. To assemble, take a warm waffle and place it on a serving plate. Top it with a piece of the golden fried chicken. Now, for the fun part! Drizzle honey generously over the chicken. Then, add a touch of maple syrup according to your taste. This sweet and savory combo makes every bite a delight. - Ensure oil is hot before frying. Hot oil makes the chicken crispy. - Don’t overcrowd the skillet. This helps keep the oil hot and even. - Stack chicken slightly off-center. This adds height and looks appealing. - Garnish with parsley and drizzle syrup. It gives color and extra flavor. - Consider brining chicken overnight. This makes it juicier and more flavorful. - Experiment with different spices. Try herbs or blends for new tastes. For a detailed guide, check out the Full Recipe. {{image_4}} You can switch things up with grilled chicken instead of fried. Grilled chicken has a nice smoky flavor. Plus, it's a lighter option. I love using chicken thighs for this dish. They are more juicy and tender than breasts. Thighs also add great flavor to the meal. For the waffles, try adding flavors like cinnamon or vanilla. These will give your dish a fun twist. You can also make mini waffles. They are perfect for a bite-sized treat. Kids love them, and they are easy to share. If you want to change the sweet element, try agave syrup instead of honey. It’s a nice alternative for a sweeter touch. You can also use a fruit compote. Fresh berries or peaches work great and add a fruity burst. These options make your chicken and waffles even more special. For the full recipe, check out the ingredients and steps above! After you savor your chicken and waffles, store any leftovers in an airtight container. This keeps the food fresh and safe. The dish is best consumed within 2 days. If you wait too long, the taste and texture will suffer. You can freeze the cooked chicken and waffles for later. Be sure to store them separately. This way, the waffles do not get soggy. When you are ready to eat, reheat the chicken and waffles in the oven for best results. This helps keep everything crispy and tasty. When it's time to enjoy leftovers, use an oven or air fryer to reheat the chicken. This method preserves the crispy coating. Avoid using a microwave, as it can make the chicken chewy and wet. Keeping the texture nice is key to enjoying your meal again. To make homemade waffles, start with a simple batter. Mix together: - 1 cup all-purpose flour - 1 tablespoon sugar - 1 teaspoon baking powder - 1/2 teaspoon salt - 1 cup milk - 1 large egg - 2 tablespoons melted butter Combine all the dry ingredients in one bowl. In another bowl, whisk the wet ingredients. Mix them together until just combined. Cook in a preheated waffle maker for about 5 minutes until golden brown. You can also use my [Full Recipe] for a quick option with ready-made waffles. Yes! You can explore using turkey or even tofu for a vegetarian option. Turkey breast works well as a leaner choice. For tofu, press it to remove excess moisture, then marinate like the chicken. This adds great flavor and keeps it moist. To get crispy chicken, keep the oil hot. Heat it to about 350°F before frying. This helps form a crust. Don't overcrowd the skillet; fry in batches if needed. Cook until golden brown, about 5-7 minutes per side. Yes, meal prepping is easy! You can marinate the chicken in advance. Also, cook and freeze the chicken separately from the waffles. Store in airtight containers. This meal stays tasty for up to two days in the fridge. You can spice up your chicken with different seasonings. Try adding more cayenne pepper or smoked paprika for heat. Top your waffles with fresh fruit or whipped cream. Maple syrup adds sweetness, but feel free to experiment! For sides, think about fresh fruit or a light salad. Sliced strawberries or mixed berries add a nice touch. A simple green salad can balance the dish’s richness. You can also serve it with sweet potato fries for a fun twist. You learned how to make a tasty chicken and waffles dish. We covered marinating chicken, preparing breading, and frying until golden-brown. You also saw tips for storage and variations. Don't be afraid to try different spices or use grilled chicken. This dish is fun and delicious. Enjoy making it and sharing with friends!](https://goldendishy.com/wp-content/uploads/2025/06/c6fcab88-53c4-4cda-8439-7edbb7c77c72-768x768.webp)