Pesto Chicken Stuffed Peppers Flavorful Dinner Idea

Looking for a fun and tasty dinner idea? Try my Pesto Chicken Stuffed Peppers! They are colorful, easy to make, and packed with flavors. This dish combines juicy chicken, fresh pesto, and vibrant peppers for a meal that your family will love. Plus, it’s simple enough for a weeknight dinner. Get ready to impress with this quick guide to yummy stuffed peppers! Let’s dive into the ingredients and steps!
Ingredients
List of Ingredients
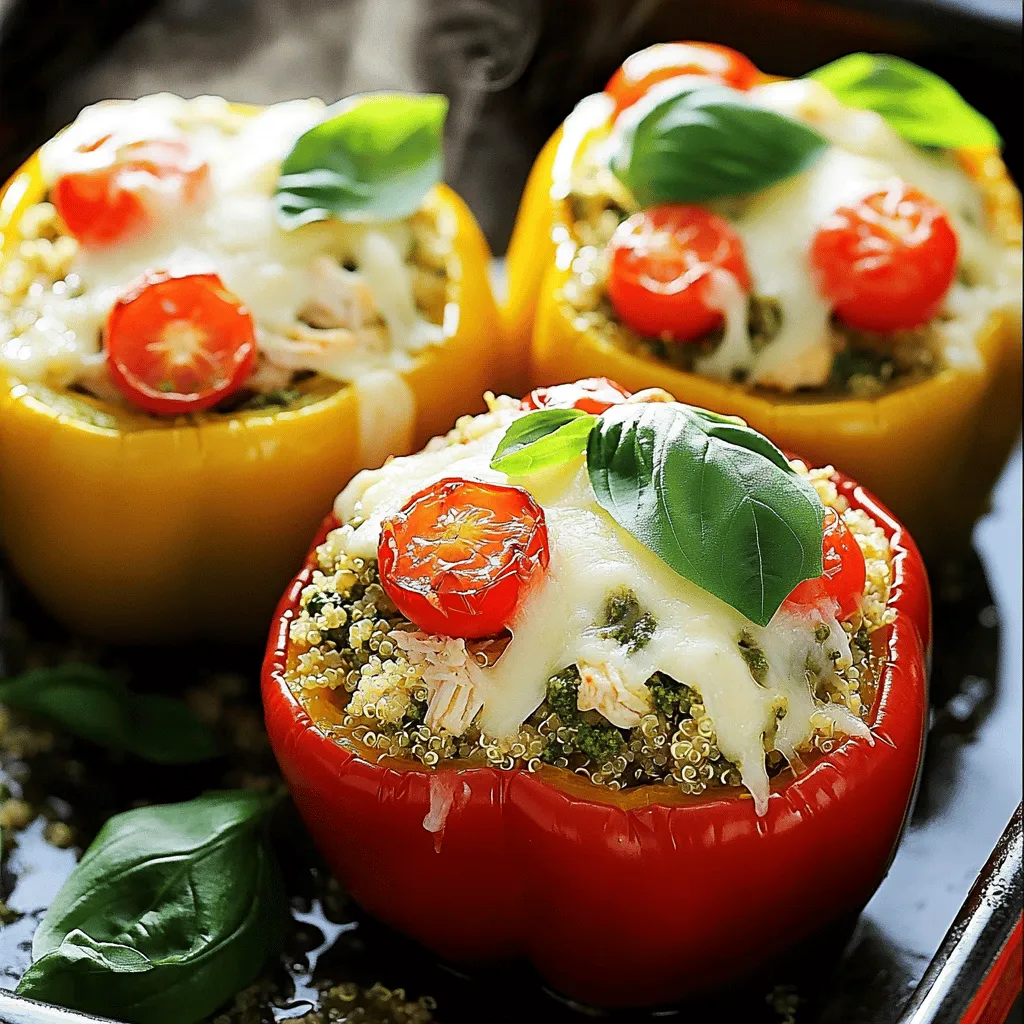
– 4 large bell peppers (any color works well)
– 2 cups cooked chicken, shredded
– 1 cup fresh basil pesto
– 1 cup cooked quinoa or rice
– 1 cup cherry tomatoes, halved
– 1 cup mozzarella cheese, shredded
– 1/4 cup grated Parmesan cheese
– Salt and black pepper to taste
– Fresh basil leaves for garnish (optional)
Optional Ingredient Substitutions
If you want to mix things up, here are some ideas:
– Use rotisserie chicken instead of cooking your own.
– Swap quinoa or rice for couscous or farro.
– Try using spinach or arugula pesto for a twist.
– Replace mozzarella with cheddar or feta cheese.
– Use zucchini or eggplant instead of bell peppers for a low-carb option.
Notes on Ingredient Freshness
Fresh ingredients make a big difference in flavor.
– Choose firm bell peppers without blemishes.
– Use freshly cooked chicken for the best taste.
– Opt for homemade or high-quality pesto for rich flavor.
– Fresh basil should smell sweet and look bright green.
– Always check the expiration dates on cheeses for peak freshness.
Step-by-Step Instructions
Prepping the Bell Peppers
Start by preheating your oven to 375°F (190°C). This gets it hot and ready for baking. Next, take four large bell peppers. You can pick any color you like. Cut off the tops carefully. Then, remove the seeds and membranes inside. Stand the peppers upright in a baking dish. Make sure they are stable so they won’t tip over.
Mixing the Filling
In a large mixing bowl, add 2 cups of cooked chicken. Shred it into small pieces for easy mixing. Next, add 1 cup of fresh basil pesto. Then, pour in 1 cup of cooked quinoa or rice—your choice! Add 1 cup of halved cherry tomatoes. Now, mix in half of the shredded mozzarella cheese and 1/4 cup of grated Parmesan cheese. Stir everything gently until well combined. Season with salt and black pepper to taste.
Baking the Stuffed Peppers
Now it’s time to stuff the peppers! Use a spoon to fill each bell pepper with the chicken and pesto mix. Pack it down gently but don’t overflow. Sprinkle the remaining mozzarella cheese on top of each pepper for extra flavor. Pour about 1/4 cup of water into the bottom of the baking dish. This will help steam the peppers. Cover the dish tightly with aluminum foil.
Place the baking dish in the oven and bake for 25 minutes. After that, carefully take off the foil. Bake for another 10 to 15 minutes. You want the peppers to be fork-tender and the cheese to be bubbly and golden. Once they are done, take them out and let them cool for a few minutes. If you want, add fresh basil leaves on top for a beautiful finish!
Tips & Tricks
Cooking Timing Tips
Timing is key for perfect stuffed peppers. Bake them at 375°F (190°C) for a total of 35-40 minutes. Start by covering the dish with foil for the first 25 minutes. This traps steam and helps cook the peppers evenly. Afterward, remove the foil to brown the cheese. Check the peppers with a fork; they should be soft, but not mushy.
Seasoning and Flavor Enhancements
Season your filling well. Add salt and black pepper to taste. You can also mix in garlic powder for depth. A splash of lemon juice brightens the dish. Consider adding red pepper flakes for a kick. Fresh herbs like parsley or thyme can add a nice touch. Don’t forget to top with fresh basil before serving for a burst of freshness.
Best Practices for Stuffing Peppers
Stuffing peppers can be tricky, but here are some tips. Use a spoon to pack the filling firmly, but don’t overfill. Leave a little space at the top. This helps the cheese melt nicely without spilling over. Make sure the peppers stand upright in the baking dish. You can add a bit of water to the bottom to keep them moist while baking.

Variations
Vegetarian Version
You can easily make a vegetarian version of pesto chicken stuffed peppers. Replace the chicken with black beans or lentils. This change keeps the dish hearty and filling. Use the same amount of pesto. You can also add some diced zucchini or spinach for extra veggies. This option is great for meat-free meals.
Spicy Pesto Chicken Stuffed Peppers
For a spicy kick, add red pepper flakes to the chicken mixture. You can also mix in diced jalapeños for more heat. This will make your dish bold and fun. Top the peppers with pepper jack cheese instead of mozzarella. It gives a creamy texture and a spicy flavor boost.
Different Cheese Options
Cheese can change the flavor of your stuffed peppers. Try using feta cheese for a tangy taste. You can also use goat cheese for a creamier texture. If you love strong flavors, blue cheese is a great choice. Mix and match cheeses to find your perfect blend. This way, you can make each meal unique and exciting.
Storage Info
How to Store Leftovers
To store your leftover pesto chicken stuffed peppers, first let them cool. Place the peppers in an airtight container. This keeps them fresh and tasty. You can store them in the fridge for up to three days. If you want to enjoy them later, freezing is a good option.
Reheating Instructions
When you’re ready to eat the leftovers, preheat your oven to 350°F (175°C). Cover the stuffed peppers with aluminum foil to keep them moist. Bake them for about 20 minutes or until they are heated through. You can also microwave them for 2-3 minutes, but the oven gives better results.
Freezing Guidelines
If you want to freeze the stuffed peppers, do it right after they cool. Wrap each pepper in plastic wrap and then place them in a freezer-safe bag. They will keep well for up to three months. When you’re ready to eat, thaw them in the fridge overnight before reheating. This way, they stay delicious and full of flavor.
FAQs
Can I use different types of peppers?
Yes, you can use different types of peppers. Bell peppers are great, but you can try poblano, jalapeño, or even banana peppers for a fun twist. Just remember to adjust the filling based on the size of the peppers you choose. Smaller peppers will hold less filling, while larger ones will need more. This allows you to experiment with flavors and spice levels to match your taste.
How can I make this recipe ahead of time?
You can prepare this dish in advance easily. First, mix the filling and stuff the peppers as usual. Then, cover them and refrigerate for up to 24 hours. When you are ready to bake, just pop them in the oven straight from the fridge. You may need to add an extra few minutes to the baking time since they will be cold. This makes it convenient for busy nights or meal prep.
What side dishes pair well with stuffed peppers?
Stuffed peppers are versatile and pair well with many sides. Here are some great options:
– A simple green salad with a light vinaigrette
– Garlic bread to soak up the delicious juices
– Steamed broccoli or green beans for a healthy crunch
– A side of quinoa or rice for extra grains
These sides enhance the meal and make it feel complete. Enjoy mixing and matching to find your favorite combinations!
We explored the key ingredients for stuffed peppers, including fresh choices and substitutions. I shared clear steps for prepping, mixing, and baking. You learned tips for timing, seasoning, and best practices for stuffing. I offered tasty variations and useful storage advice. This recipe is adaptable and makes meals easy. Stuffed peppers are fun to make, and you can enjoy them anytime. Embrace your creativity in the kitchen and have fun cooking!


![- 1 pound boneless, skinless chicken breasts, cut into 1-inch cubes - 1/4 cup fresh basil leaves, finely chopped - Zest from 2 lemons (about 2 tablespoons) - 3 tablespoons freshly squeezed lemon juice The chicken breast serves as a great base. It’s lean, tender, and perfect for grilling. Fresh basil adds a bright, herbal note. The lemon zest and juice provide a refreshing tang that makes this dish stand out. - 2 tablespoons extra virgin olive oil - 2 cloves garlic, finely minced - 1 teaspoon honey (optional, for a touch of sweetness) Olive oil keeps the chicken moist and helps the flavors blend. Garlic adds depth and aroma, while honey can balance the tart lemon if you want a hint of sweetness. - Salt and freshly ground black pepper to taste - Wooden or metal skewers Salt and pepper are essential for enhancing flavors. If you use wooden skewers, soak them in water for 30 minutes. This prevents burning during grilling. For the Full Recipe, check the detailed instructions along with cooking tips. You’ll need these ingredients to create a fantastic summer delight. To start, mix the marinade ingredients in a bowl. Combine: - 1/4 cup fresh basil leaves, finely chopped - Zest from 2 lemons (about 2 tablespoons) - 3 tablespoons freshly squeezed lemon juice - 2 tablespoons extra virgin olive oil - 2 cloves garlic, finely minced - 1 teaspoon honey (optional) - Salt and pepper to taste Whisk these together until they blend well. This step builds flavor. The lemon and basil create a bright, fresh taste that makes the chicken sing. Marination is key for juicy chicken. It helps the meat soak up the marinade's flavors. Once you prepare the marinade, add the cubed chicken to the bowl. Make sure each piece is coated. Cover the bowl tightly with plastic wrap. Let the chicken marinate in the fridge for at least 30 minutes. For best results, aim for 1-2 hours. This allows the chicken to become tender and flavorful. While the chicken marinates, preheat your grill or grill pan over medium-high heat. A hot grill helps create a nice sear on the chicken. Once the chicken is ready, thread the cubes onto skewers. Leave small gaps between pieces for even cooking. Place the skewers on the grill. Cook them for about 10-12 minutes, turning them often. To ensure the chicken is done, use a meat thermometer. The internal temperature should reach 165°F. After grilling, let the skewers rest for a few minutes. This helps keep the chicken moist. For the full recipe, check the section above. Enjoy making your lemon basil chicken skewers! To get juicy chicken, monitor the grill's temperature. Aim for medium-high heat. This helps cook the chicken quickly while keeping it tender. Use a meat thermometer to check the inside. The chicken should reach 165°F. Avoid over-charring by turning the skewers. Rotate them every few minutes for even cooking. If you see dark spots, move the skewers to a cooler part of the grill. This way, the chicken cooks well without burning. You can add more spices and herbs to the marinade. Consider using oregano or thyme for extra zest. A pinch of red pepper flakes can give it a nice kick. Just be careful not to overpower the lemon and basil. For marinating, let the chicken soak for at least 30 minutes. If you have time, marinate it for a few hours. The longer it sits, the more flavor it absorbs. This step makes a big difference in taste. For plating, arrange the skewers on a wooden board or a nice platter. Adding fresh basil leaves and lemon wedges makes it look vibrant. This adds a pop of color and gives a hint of what’s inside. Pair the skewers with side dishes like grilled vegetables or a fresh salad. You can also serve them with rice or quinoa for a filling meal. These sides enhance the overall experience of your lemon basil chicken skewers. Check the Full Recipe for more ideas! {{image_4}} You can change things up with lemon basil chicken skewers. Try adding vegetable skewers. Bell peppers, zucchini, and cherry tomatoes make great choices. They add color and crunch. If you want to swap proteins, shrimp is a tasty option. Shrimp cooks fast and absorbs flavors well. Just marinate them the same way as chicken. Dipping sauces can take your skewers to new heights. A simple garlic aioli pairs well with the fresh flavors. You can also try tzatziki for a cool and creamy contrast. For a spicy kick, sriracha or a sweet chili sauce is perfect. These sauces work with the lemon and basil, enhancing each bite. If you need gluten-free options, check your sauces and marinades. Most of the ingredients are safe, but read labels. For vegan alternatives, use tofu or tempeh instead of chicken. Marinate them just like the chicken for the best taste. You can still enjoy the bright lemon and basil flavors in a plant-based version. For the full recipe, check the [Full Recipe]. Refrigeration Guidelines After cooking, allow the chicken skewers to cool. Place them in an airtight container. Refrigerate within two hours. The chicken can stay fresh for up to four days. Always check for any signs of spoilage before eating. Freezing Tips If you want to keep them longer, freezing is a great option. Wrap the skewers tightly in plastic wrap. Then, place them in a freezer bag. They can last for up to three months in the freezer. When ready to use, thaw them in the fridge overnight before reheating. Best Methods The best way to reheat your skewers is in the oven. Preheat it to 350°F (175°C). Place the skewers on a baking tray for about 10 to 15 minutes. This method helps keep the chicken juicy. You can also reheat them on the grill for a nice char. Maintaining Flavor and Texture To maintain the flavor, add a splash of water or broth while reheating. Cover the skewers with foil to keep moisture in. This prevents the chicken from drying out and keeps it tasty. How Long Can They Last? When stored properly, cooked lemon basil chicken skewers can last for about four days in the fridge. If frozen, they can last up to three months without losing quality. Signs of Spoilage Always check for signs of spoilage. If the chicken smells off or has a slimy texture, it's best to toss it. Color change can also indicate spoilage. Trust your senses; when in doubt, throw it out. If you want to swap chicken, many tasty options exist. You can use: - Turkey breast: It has a mild flavor like chicken. - Tofu: Great for a plant-based option. - Shrimp: Cooks fast and absorbs flavors well. - Pork tenderloin: Offers a different texture and taste. Each of these options works well with the lemon and basil marinade. Adjust cooking times based on the protein you choose. Yes! Preparing the marinade ahead saves time. Here are some tips: - Mix all marinade ingredients in a bowl. - Store it in a sealed container in the fridge for up to 2 days. - When ready, add your chicken and let it soak up those flavors. Make sure to mix well before using. This keeps the flavors fresh and vibrant. To make sure your chicken is safe to eat, use a meat thermometer. Here’s how: - Insert the thermometer into the thickest part of the chicken. - Look for a temperature of 165°F. This means it’s fully cooked. - If you don't have a thermometer, cut a piece open. The meat should be white, not pink. Using a thermometer helps you avoid undercooked chicken, keeping your meal safe and tasty. You now know how to make delicious grilled chicken skewers. Start with fresh chicken, herbs, and a tasty marinade. Marinade time is key for flavor. Grilling tips help you serve juicy chicken every time. You can try different add-ins or sauces for variety. Store leftovers properly to keep them fresh. This recipe is simple yet satisfying, perfect for meals anytime. Enjoy creating your perfect skewers!](https://goldendishy.com/wp-content/uploads/2025/06/c554147d-c949-48f7-8e40-7e32e563b89e-768x768.webp)
