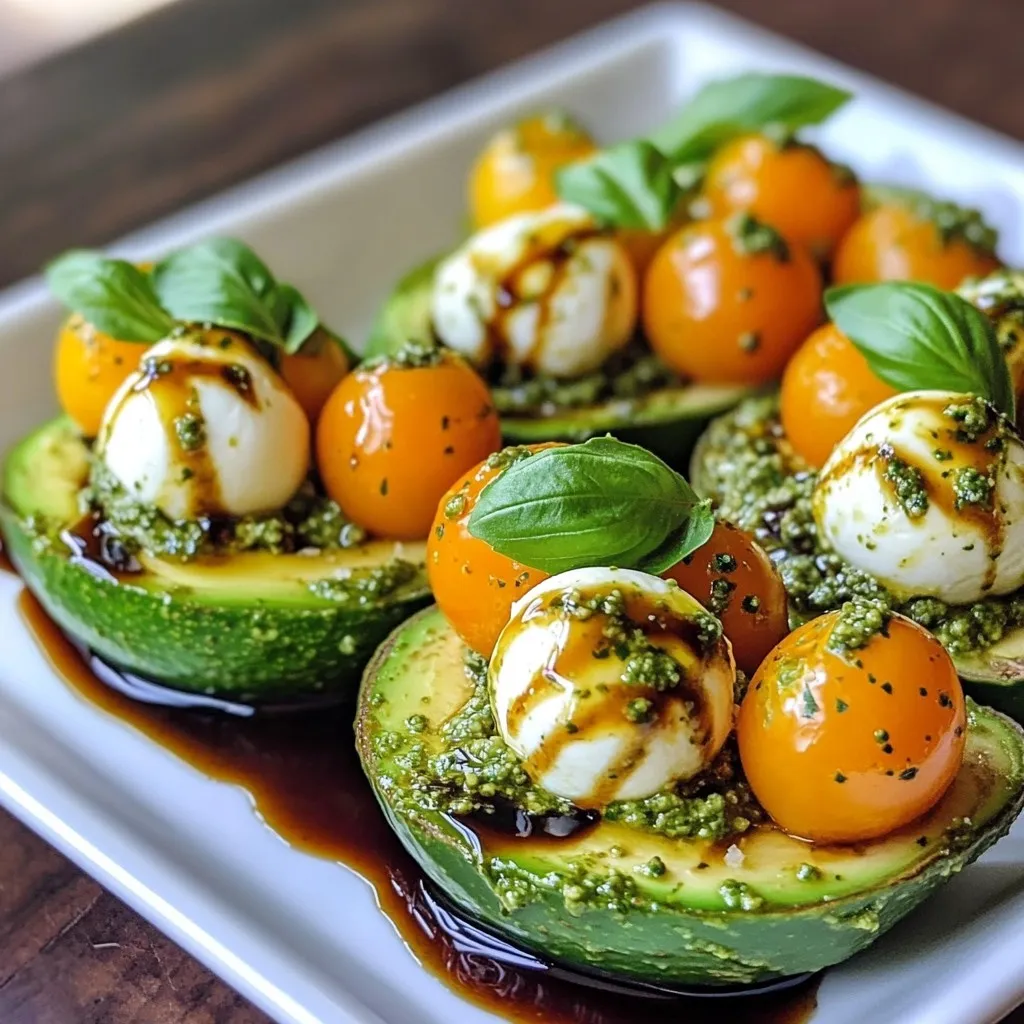
Looking for a fresh and flavorful dish to impress your guests? Try my Pesto Caprese Stuffed Avocado! This vibrant recipe combines creamy avocado with juicy cherry tomatoes and fresh mozzarella, all drizzled with rich balsamic glaze. It’s simple to make, healthy, and bursting with taste. Ready to elevate your next meal? Join me as we explore the easy steps to create this delightful dish that will have everyone asking for seconds!
Why I Love This Recipe
- Fresh and Flavorful: This recipe combines the freshness of ripe avocados with the vibrant flavors of cherry tomatoes and creamy mozzarella, creating a dish that’s bursting with taste.
- Quick and Easy: With just 10 minutes of prep time, this recipe is perfect for those busy days when you want something delicious without spending all day in the kitchen.
- Customizable: You can easily switch up the ingredients by using different types of cheese or adding other vegetables, making it versatile for any palate.
- Healthy and Nutritious: Packed with healthy fats, vitamins, and minerals, this dish not only tastes great but is also good for you!
Ingredients
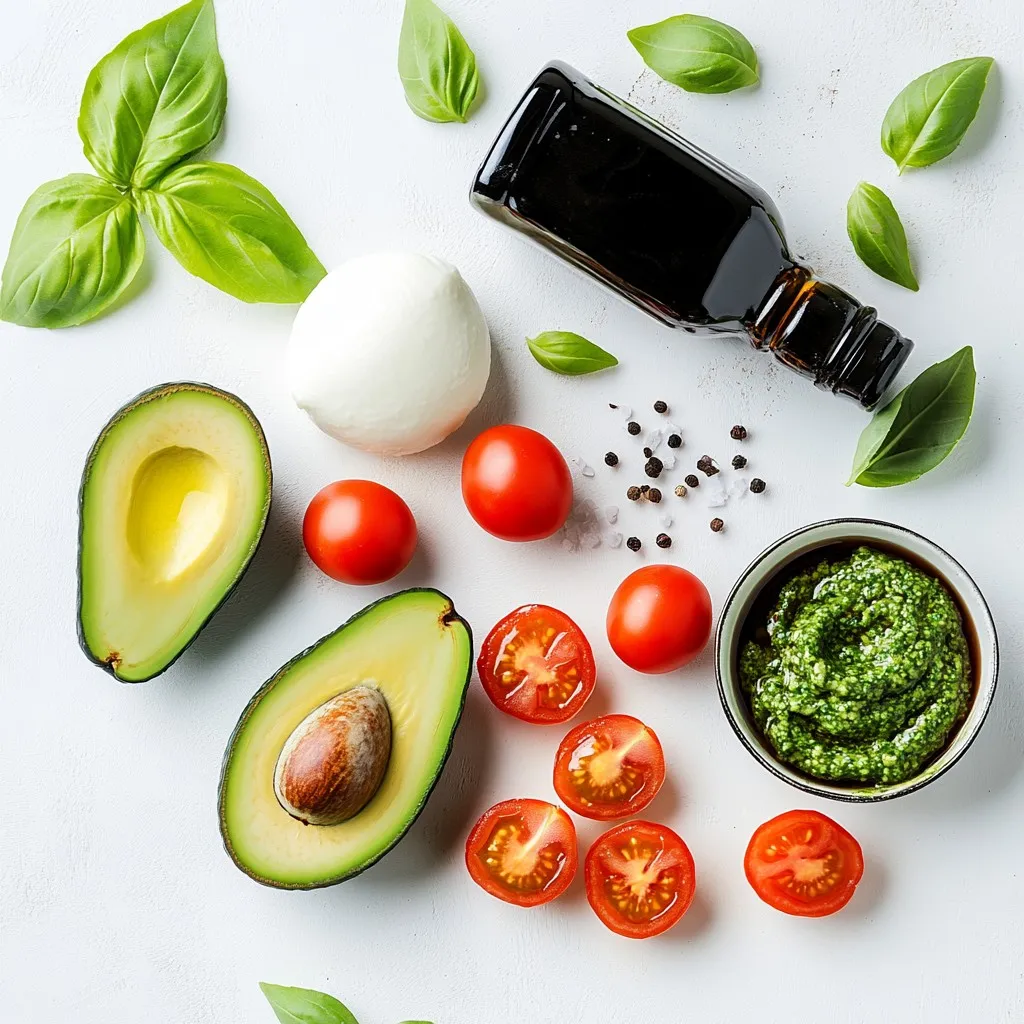
List of Ingredients
– Ripe avocados
– Cherry tomatoes
– Fresh mozzarella balls
– Basil pesto
– Balsamic glaze
– Salt and pepper
– Fresh basil leaves for garnish
You will need ripe avocados for this dish. They should feel soft but not mushy. The cherry tomatoes add a sweet burst of flavor. Choose bright, firm ones for the best taste. Fresh mozzarella balls, known as bocconcini, provide a creamy texture. They should be drained well to avoid excess moisture in the filling.
Basil pesto is the heart of this recipe. You can use homemade or store-bought. Just make sure it has fresh basil for that vibrant flavor. Balsamic glaze adds a sweet and tangy finish. A little salt and pepper enhance all the flavors. Finally, fresh basil leaves are perfect for garnish. They add color and aroma.
Gather all your ingredients before you start. This makes cooking easier and more fun. Each element plays a role in creating a fresh and flavorful dish. These ingredients combine to make a delightful treat that impresses at any meal.
Step-by-Step Instructions
Preparing the Avocados
– Start by slicing the avocados in half. Be careful to cut lengthwise.
– Remove the pits gently. Use a spoon to scoop them out.
– Next, scoop out a bit of the avocado flesh. This makes space for your filling.
– Place the avocado halves on a plate, cut side up. This helps them look nice.
Creating the Filling
– In a bowl, mix the halved cherry tomatoes with the mozzarella balls.
– Add the basil pesto to the bowl. This gives the filling its great flavor.
– Sprinkle in salt and pepper to taste. Mix everything together gently.
– Use a spatula to combine the ingredients. Be careful not to break the mozzarella balls.
Stuffing the Avocados
– Take a spoon and fill each avocado half with the mixture.
– Pack the filling in slightly to ensure a tasty bite.
– Make sure each half is full and looks colorful.
Final Touches
– Drizzle balsamic glaze over the stuffed avocados. This adds a nice tangy flavor.
– Garnish with fresh basil leaves on top. This makes the dish pop with color.
– Enjoy your beautiful and tasty Pesto Caprese Stuffed Avocado!
Tips & Tricks
Choosing the Right Avocados
To make perfect pesto caprese stuffed avocados, start with ripe avocados. Look for these signs of ripeness:
– They should feel slightly soft when you press them gently.
– The skin should be dark green or almost black, depending on the type.
Selecting quality ingredients is key for great taste. Buy avocados from a trusted source. Make sure they are free from dark spots or blemishes.
Enhancing the Flavor
Adjusting seasonings can elevate your dish. After mixing in the salt and pepper, taste the filling. You can add more salt if needed or a pinch of garlic powder for extra flavor.
If you want alternatives to balsamic glaze, consider using:
– A squeeze of fresh lemon juice for brightness.
– A drizzle of honey for a touch of sweetness.
These options can give your dish a unique twist.
Presentation Tips
Serving suggestions make your dish more appealing. Place stuffed avocados on a colorful plate. Add a few whole cherry tomatoes around them for color.
For plating ideas, try these:
– Use a sprig of basil on top for a fresh look.
– Drizzle some extra pesto around the plate for added flair.
These simple tips will make your pesto caprese stuffed avocados look as good as they taste!
Pro Tips
- Choose Ripe Avocados: Ensure your avocados are ripe but still firm to the touch, as they will hold their shape better when stuffed.
- Use Fresh Ingredients: Opt for fresh mozzarella and basil for the best flavor and texture in your stuffed avocados.
- Customize Your Pesto: Feel free to add nuts or cheese to your basil pesto for an extra depth of flavor that complements the dish.
- Serve Immediately: For optimal freshness and taste, serve the stuffed avocados right after preparation; they are best enjoyed fresh.
Variations
Additional Ingredients
You can change up the recipe by adding proteins. Chicken or shrimp works great. Just grill or sauté them first. Then, chop and mix them in with the tomatoes and mozzarella. This adds a tasty twist and makes it heartier.
You can also play with herbs. Instead of just basil, try parsley or arugula. You could even mix in some cilantro for a fresh kick. Each herb brings its own flavor, making the dish unique.
Creative Serving Ideas
These stuffed avocados can be a fun salad. Just chop up some greens like spinach or arugula. Place the stuffed avocados on top for color and crunch. Drizzle with extra balsamic glaze for added flavor.
Another idea is to use it as a sandwich topping. Spread some pesto on your bread, then top with the stuffed avocado. It adds a delicious twist to your regular sandwich. You can impress your friends with this fresh idea.
Dietary Modifications
For vegan adjustments, swap the mozzarella with plant-based cheese. There are many options that melt well and taste great. You can also use a nut-based pesto if you want to keep it dairy-free.
If you need gluten-free options, this dish is already safe! Just make sure your balsamic glaze does not contain any gluten. Enjoy this fresh meal with no worries about gluten.
Storage Info
Storing Leftovers
To keep your stuffed avocados fresh, store them in the fridge. Place them in an airtight container. This helps prevent them from browning. Use lemon juice on the cut avocado to slow browning. The best time frame for freshness is one day. After that, the taste and texture may change.
Freezing Unused Ingredients
Freezing avocados is tricky. If you freeze them whole, they may turn mushy. Instead, mash them with a bit of lemon juice before freezing. This keeps their color and flavor. For pesto, freezing is better. Place pesto in an ice cube tray. Once frozen, transfer cubes to a bag. This way, you can use them later without losing flavor.
FAQs
How to ripen avocados quickly?
To ripen avocados fast, place them in a paper bag. The bag traps ethylene gas, helping the fruit ripen. You can add a banana or an apple to the bag for even quicker results. Check the avocados daily. Once they feel soft, they are ready to eat.
Can I use store-bought pesto?
Yes, you can use store-bought pesto. It saves time and is convenient. However, store-bought pesto may lack the freshness of homemade. You might notice a difference in flavor. If you prefer a bold taste, try making your own.
How long do stuffed avocados last in the fridge?
Stuffed avocados last about one day in the fridge. After that, the avocado may turn brown. To keep them fresh, cover them tightly with plastic wrap. You can also squeeze lemon juice on the exposed flesh. This helps slow down browning.
Can I prepare these in advance?
You can prep some ingredients ahead of time. Cut the avocados and store them in the fridge with lemon juice. You can also mix the filling early. Just stuff the avocados right before serving. This keeps them fresh and tasty.
This blog post covered how to make a delicious stuffed avocado dish. We looked at fresh ingredients, easy step-by-step instructions, and tips for flavor and presentation. Remember to choose ripe avocados and try variations to suit your taste. These stuffed avocados are versatile and fun to make. You can even prep them ahead for quick meals. Enjoy creating and sharing this healthy dish with others. Your cooking will impress friends and family alik


