Parmesan Herb Roasted Potatoes Crisp and Flavorful Dish

Looking for a simple and tasty side dish? Parmesan Herb Roasted Potatoes might be your new favorite. These crispy, golden bites burst with flavor and are perfect for any meal. You can whip them up with just a few ingredients you likely have at home. Ready to impress your family and friends? Let’s get started on making this easy, savory dish that will leave everyone asking for seconds!
Why I Love This Recipe
- Flavor-Packed: The combination of Parmesan cheese and fresh herbs creates a deliciously savory flavor that elevates simple roasted potatoes to a gourmet side dish.
- Easy Preparation: With just a few simple steps and minimal prep time, this recipe is perfect for busy weeknights or entertaining guests without stress.
- Crispy Texture: Roasting the potatoes at a high temperature ensures they develop a crispy exterior while remaining tender inside, making each bite satisfying.
- Versatile Side: These roasted potatoes pair beautifully with a variety of main dishes, from grilled meats to vegetarian plates, making them a versatile addition to any meal.
Ingredients
List of Ingredients for Parmesan Herb Roasted Potatoes
To make Parmesan Herb Roasted Potatoes, gather these ingredients:
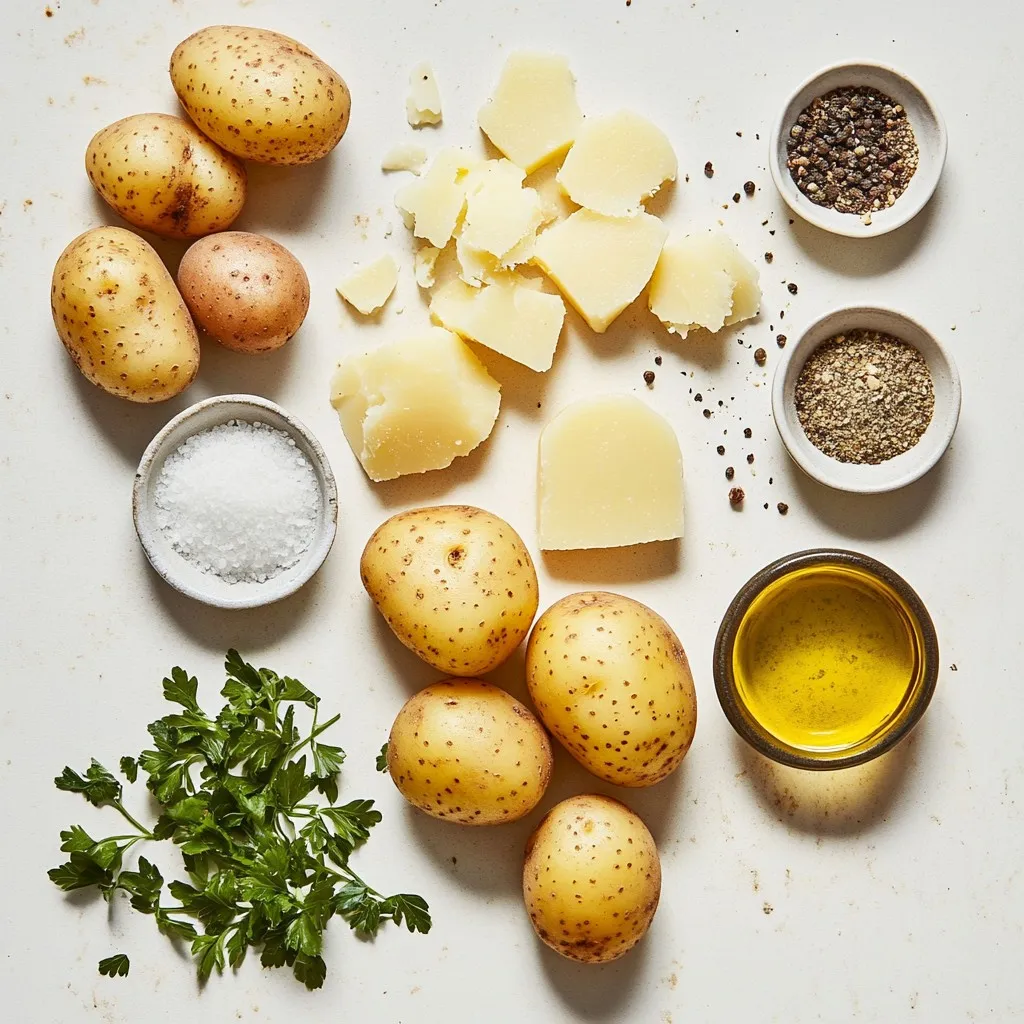
– 2 pounds baby potatoes, halved
– ½ cup freshly grated Parmesan cheese
– 4 tablespoons extra-virgin olive oil
– 1 teaspoon garlic powder
– 1 teaspoon onion powder
– 1 teaspoon dried oregano
– 1 teaspoon dried thyme
– Salt and freshly ground black pepper to taste
– Fresh parsley, finely chopped (for garnish)
Ingredient Substitutions
You can swap some ingredients for variety or dietary needs:
– Use regular potatoes instead of baby potatoes.
– Substitute Parmesan with Pecorino Romano for a stronger flavor.
– If you prefer fresh herbs, use 1 tablespoon of each herb instead of dried.
– For a vegan option, skip the cheese or use a plant-based alternative.
Recommended Tools for Preparation
To prepare this dish, gather these tools:
– A large mixing bowl for tossing the ingredients.
– A baking sheet lined with parchment paper or foil.
– A sharp knife and cutting board for halving the potatoes.
– A spatula for flipping the potatoes during roasting.
– A grater for the Parmesan cheese.
These tools make the process easier and help you create a tasty dish!

Step-by-Step Instructions
Prepping the Oven and Baking Sheet
Start by preheating your oven to 425°F (220°C). This high heat helps the potatoes get crispy. While the oven warms up, grab a baking sheet and line it with parchment paper or aluminum foil. This step makes cleanup easier later. Make sure your baking sheet is large enough to hold all the potatoes in one layer.
Coating the Potatoes
Next, take 2 pounds of baby potatoes and cut them in half. Place the halved potatoes in a large mixing bowl. Add 4 tablespoons of extra-virgin olive oil to the bowl. Sprinkle in 1 teaspoon each of garlic powder, onion powder, dried oregano, and dried thyme. Season with salt and pepper to taste. Toss everything well until all the potatoes are coated.
Now, it’s time to add the star ingredient: ½ cup of freshly grated Parmesan cheese. Toss the potatoes again, making sure the cheese sticks to each piece. This cheese adds a rich flavor that makes the potatoes shine.
Roasting and Flipping for Crispiness
Carefully arrange the potatoes on the lined baking sheet, cut side down. This position helps them get that golden, crispy exterior. Make sure they are in a single layer so they cook evenly.
Roast the potatoes in the oven for 25-30 minutes. About halfway through, take the baking sheet out and flip the potatoes. This flip helps them brown on all sides and adds to the crispiness.
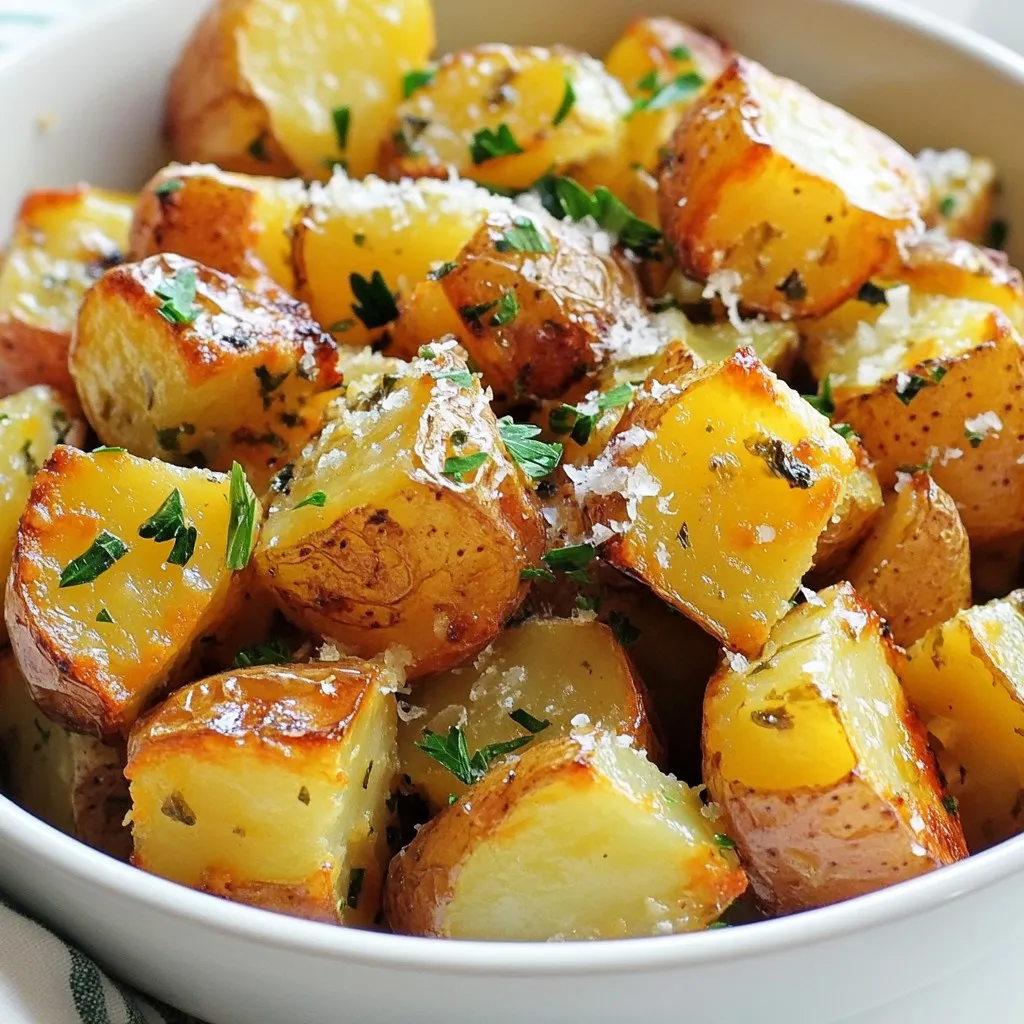
Once they look golden brown, remove the baking sheet from the oven. Let the potatoes cool for a few minutes. Before serving, sprinkle some finely chopped fresh parsley on top for a fresh touch. This dish is not just tasty; it also looks great!
Tips & Tricks
Ensuring Maximum Crispiness
To get those potatoes really crispy, you need to start right. First, always place the potatoes cut side down on the baking sheet. This helps them brown nicely. Also, make sure they are not crowded. Give them space to breathe! If they touch, they will steam instead of roast. Don’t forget to flip them halfway through cooking. This way, both sides get that perfect golden color.
How to Check Doneness
Checking for doneness is easy. Simply poke a potato with a fork or knife. If it slides in with little effort, they are done. Look for a nice golden-brown color on the outside. You want that crunch! If they need more time, put them back in the oven for a few more minutes. Just keep an eye on them to avoid burning.
Presentation Tips for Serving
Presentation makes food more appealing. For the best look, serve the roasted potatoes in a large bowl. Top them with extra Parmesan cheese and fresh parsley. You can also use mini cast iron skillets. They add a charming touch! This way, each guest gets their own serving. It looks great and keeps the potatoes warm.
Pro Tips
- Choose the Right Potatoes: For the best texture, opt for waxy baby potatoes, as they hold their shape well during roasting and develop a crispy exterior.
- Don’t Skip the Toss: Make sure to toss the potatoes thoroughly with the oil and seasonings. This ensures an even coating, leading to balanced flavors in every bite.
- Use Fresh Cheese: Freshly grated Parmesan cheese melts better and provides a deeper flavor compared to pre-grated varieties, enhancing the overall taste of the dish.
- Experiment with Herbs: Feel free to customize the herb blend based on your taste preference. Fresh herbs like rosemary or basil can elevate the dish even further.

Variations
Adding Different Herbs and Spices
You can change the flavor of your Parmesan herb roasted potatoes by using different herbs. Try adding fresh rosemary for a woodsy taste. Basil brings a sweet, fresh note. If you want some heat, add red pepper flakes. You can even mix your favorite spices, like smoked paprika or cumin, to create a unique dish. Don’t be afraid to experiment!
Cheese Alternatives
Parmesan cheese adds a great flavor, but you can swap it out. Try Pecorino Romano for a sharper taste. Nutritional yeast is a great choice for a vegan option. It gives a cheesy flavor without dairy. You might also try a vegan cheese that melts well. Each cheese will change the taste, so pick one that excites you!
Gluten-Free and Vegan Options
You can easily make this dish gluten-free. The ingredients listed are already gluten-free, so no changes are needed. For a vegan version, just omit the Parmesan cheese or replace it with a vegan cheese. You will still enjoy crispy, flavorful potatoes. This way, everyone can enjoy this tasty treat!
Storage Info
Proper Storage Techniques
After you make Parmesan Herb Roasted Potatoes, let them cool down for a bit. Store any leftovers in an airtight container. This keeps them fresh and tasty. You can keep them in the fridge for up to three days. For best results, keep them away from moisture to avoid sogginess.
Reheating Instructions
To reheat, turn your oven to 350°F (175°C). Spread the potatoes on a baking sheet. Heat them for about 10 to 15 minutes. This will make them warm again and crispy on the outside. You can also use a microwave if you’re in a rush. Just heat them for 1 to 2 minutes but know they won’t be as crispy.
Freezing for Later Use
You can freeze Parmesan Herb Roasted Potatoes too! First, cool them completely. Place them in a freezer-safe bag. Try to remove as much air as possible. They will last up to three months in the freezer. When ready to eat, thaw them overnight in the fridge. Reheat them in the oven to bring back their crunch.
FAQs
How long do Parmesan Herb Roasted Potatoes last in the fridge?
Parmesan Herb Roasted Potatoes last about 3 to 5 days in the fridge. Make sure to store them in an airtight container to keep them fresh. The cheese may lose some crispiness, but the flavor stays strong.
Can I make these potatoes in advance?
Yes, you can make these potatoes in advance. Cook them fully and let them cool. Store them in the fridge. When you’re ready to serve, just reheat them in the oven for crispiness. This makes meal prep easy and fast.
What dips or sauces pair well with roasted potatoes?
Roasted potatoes go well with many dips and sauces. Here are some tasty options:
– Sour cream mixed with chives
– Creamy ranch dressing
– Garlic aioli
– Spicy ketchup
– Homemade tzatziki
These sauces add extra flavor and make your meal even more fun!
You learned how to make Parmesan Herb Roasted Potatoes today. We covered the ingredients, tools, and step-by-step instructions to create crispy perfection. Don’t forget the tips for serving and storing your tasty dish. You can also explore exciting variations to fit your taste. Enjoy experimenting with herbs and spices. With practice, your roasted potatoes will be a hit at any meal. Now it’s time to cook and share your creations with friends and famil

Parmesan Herb Roasted Potatoes
Ingredients
- 2 pounds baby potatoes, halved
- 0.5 cup freshly grated Parmesan cheese
- 4 tablespoons extra-virgin olive oil
- 1 teaspoon garlic powder
- 1 teaspoon onion powder
- 1 teaspoon dried oregano
- 1 teaspoon dried thyme
- to taste Salt and freshly ground black pepper
- for garnish Fresh parsley, finely chopped
Instructions
- Begin by preheating your oven to 425°F (220°C). Prepare a baking sheet by lining it with parchment paper or aluminum foil for easy cleanup later.
- In a sizable mixing bowl, add the halved baby potatoes along with the extra-virgin olive oil, garlic powder, onion powder, dried oregano, dried thyme, as well as salt and pepper. Toss all the ingredients thoroughly until every potato half is neatly coated in the oil and spices.
- Next, generously sprinkle the freshly grated Parmesan cheese over the seasoned potatoes. Gently toss again, ensuring that the cheese adheres well to each piece for added flavor.
- Carefully arrange the coated potatoes on the baking sheet, placing them cut side down to attain maximum crispiness during roasting. Ensure they are in a single layer for even cooking.
- Roast the potatoes in the preheated oven for 25-30 minutes. About halfway through the cooking time, flip the potatoes to ensure they become evenly golden brown and crispy on all sides.
- Once done, remove the baking sheet from the oven and allow the potatoes to cool for a few minutes. Just before serving, beautifully garnish with the finely chopped fresh parsley for a burst of color and freshness.


![- 1 lb boneless, skinless chicken breast - Soy sauce, honey, rice vinegar, sesame oil - Fresh garlic and ginger The main stars of this dish are the chicken and the sauce. Start with 1 pound of boneless, skinless chicken breast. Cut it into 1-inch cubes for even cooking. You’ll also need soy sauce for that salty umami flavor. Honey adds sweetness, while rice vinegar gives a nice tang. Don't forget the sesame oil, which adds a rich, nutty taste. Fresh garlic and ginger bring a wonderful aroma and flavor to the mix. - Red and green bell peppers - Zucchini - Scallions and sesame seeds for garnish Adding vegetables makes your skewers colorful and tasty. Use red and green bell peppers cut into 1-inch squares. They add crunch and sweetness. Sliced zucchini rounds are great for texture and taste. For garnish, sprinkle chopped scallions and sesame seeds on top. They add a nice pop of flavor and look pretty, too. - Wooden skewers or metal skewers - Cornstarch for sauce thickening You will need skewers to hold all the goodness together. If you choose wooden skewers, soak them in water for about 30 minutes. This helps prevent burning on the grill. Metal skewers are a great option too. For the teriyaki sauce, you will use cornstarch mixed with water to make it thick and glossy. This will give your chicken a beautiful glaze. For the full recipe, check the section above on how to bring these ingredients together into a delightful dish. To start, gather your marinade ingredients. In a bowl, mix the soy sauce, honey, rice vinegar, sesame oil, minced garlic, and grated ginger. Whisk until everything blends well. Add the chicken breast cubes, making sure they are well coated. Cover the bowl with plastic wrap. Place it in the fridge for at least 30 minutes. For a stronger flavor, marinate for up to 2 hours. This step is key to juicy, flavorful chicken. If you use wooden skewers, soak them in water for at least 30 minutes. This helps stop them from burning. While the skewers soak, preheat your grill or grill pan to medium-high heat. A hot grill will give your skewers those perfect grill marks and lock in the flavors. After marinating, take the chicken out of the fridge. Start threading the marinated chicken onto the skewers. Alternate with pieces of red and green bell peppers and zucchini slices. Leave small gaps between each piece for even cooking. Now, place the skewers on the hot grill. Grill them for about 10 to 12 minutes. Turn them occasionally to ensure even cooking. The chicken should reach an internal temperature of 165°F. You’ll know they are done when they have beautiful grill marks and smell amazing. For the best flavor, marinate the chicken for at least 30 minutes. If you have time, let it soak for up to 2 hours. This longer marinating time helps the chicken absorb all the tasty flavors. To boost the flavor even more, add a splash of orange juice or sprinkle some chili flakes into the marinade. These small changes can make a big difference. To get those nice grill marks, preheat your grill to medium-high heat. Once you place the skewers on, resist the urge to move them around too much. Let them cook for about 10-12 minutes. Flip them only when they lift easily from the grill. To know if the chicken is done, use a meat thermometer. The safe internal temperature for chicken is 165°F. This ensures your skewers are juicy and safe to eat. When serving your Chicken Teriyaki Skewers, make it look nice! Arrange them on a platter, maybe on a bed of fresh lettuce. You can also serve them with a small bowl of extra teriyaki sauce for dipping. For sides, consider steamed rice or a fresh salad. The colors of the skewers and the sides will create a beautiful meal. This makes it more fun to eat and share! {{image_4}} You can switch up the protein in your skewers. Shrimp works great, too. Just remember to cook shrimp for only 4-6 minutes. Tofu is another good choice. Use firm tofu and press it first to remove extra water. Then, cut it into cubes. Tofu takes about the same time as chicken to cook. For a plant-based twist, try a marinade with soy sauce, maple syrup, and garlic. It will give you great flavor without meat. You can make vegetable-only skewers with bell peppers, zucchini, mushrooms, and cherry tomatoes. These cook quickly and taste amazing on the grill. You can make your skewers even better with spices. Adding chili flakes or smoked paprika gives a nice kick. You can also try different sauces like peanut or hoisin sauce. Mix in veggies like onions or asparagus for more color and taste. These small changes can make your Chicken Teriyaki Skewers unique and fun. For the full recipe, check out the detailed instructions above. When you have leftover chicken teriyaki skewers, store them properly. Place the skewers in an airtight container. This helps keep them fresh. Refrigerate them within two hours of cooking. It’s best to eat them within three days. Use glass or plastic containers with tight lids. These containers prevent air from getting in. You can also wrap them in aluminum foil. Just make sure they are sealed well. This keeps your skewers moist and tasty. To reheat your skewers, use an oven or a stovetop. Both methods keep the chicken juicy. If using an oven, set it to 350°F. Place the skewers on a baking sheet. Heat for about 10 minutes. For stovetop reheating, use a non-stick pan. Add a splash of water to the pan. Cover it with a lid. This helps steam the skewers and keeps them moist. Avoid reheating them in the microwave. Microwaves can make the chicken dry. Instead, always check the internal temperature. It should reach 165°F for safe eating. If you want to freeze the chicken skewers, do it right after cooking. Let them cool completely first. Wrap each skewer in plastic wrap. Then place them in a freezer bag. This helps prevent freezer burn. To thaw, move the skewers to the fridge a day before you want to eat them. This keeps them safe and tasty. If you need to thaw them faster, use the microwave on the defrost setting. But make sure to cook them right away after. For the best results, enjoy your chicken teriyaki skewers fresh. But if you follow these steps, leftovers can still taste great! For the full recipe, check it out [Full Recipe]. To check if your Chicken Teriyaki Skewers are done, use a meat thermometer. The chicken should reach an internal temperature of 165°F (75°C). This step is key for food safety. If you don't have a thermometer, make sure the juice runs clear when you cut the chicken. No pink should show. Yes, you can make the teriyaki sauce ahead of time. Mix the ingredients and store it in the fridge. This makes your meal prep easier. You can also make a larger batch and freeze it. Just thaw it before use. This way, your meal cooks faster. Chicken Teriyaki Skewers pair well with many side dishes. You might try steamed rice or quinoa for a filling option. A fresh salad adds a nice crunch. You can also serve them with grilled vegetables for a colorful plate. These sides will enhance the flavors and balance the meal. Chicken Teriyaki skewers are easy and fun to make. You learned about key ingredients like chicken, vegetables, and sauce. I shared step-by-step instructions for marinating, preparing, and grilling. You also saw tips for perfecting your dish and some tasty variations. In the end, you can enjoy these skewers any way you like. With proper storage and reheating, leftovers can be just as delicious. I hope this guide helps you create a tasty meal that you will love!](https://goldendishy.com/wp-content/uploads/2025/07/34476f9e-f69f-487d-af01-da0dcfe0a0e7-768x768.webp)


