Parmesan Crusted Tilapia Crispy and Flavorful Dish

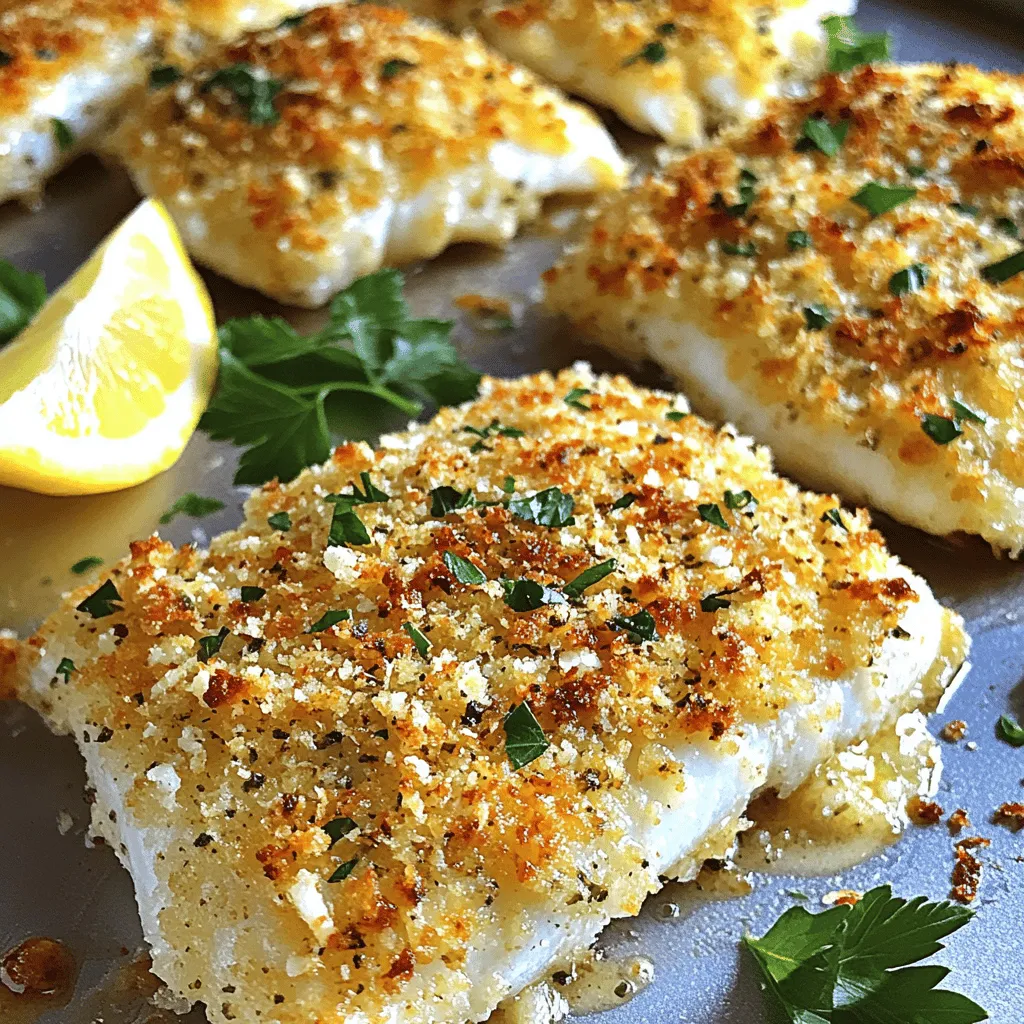
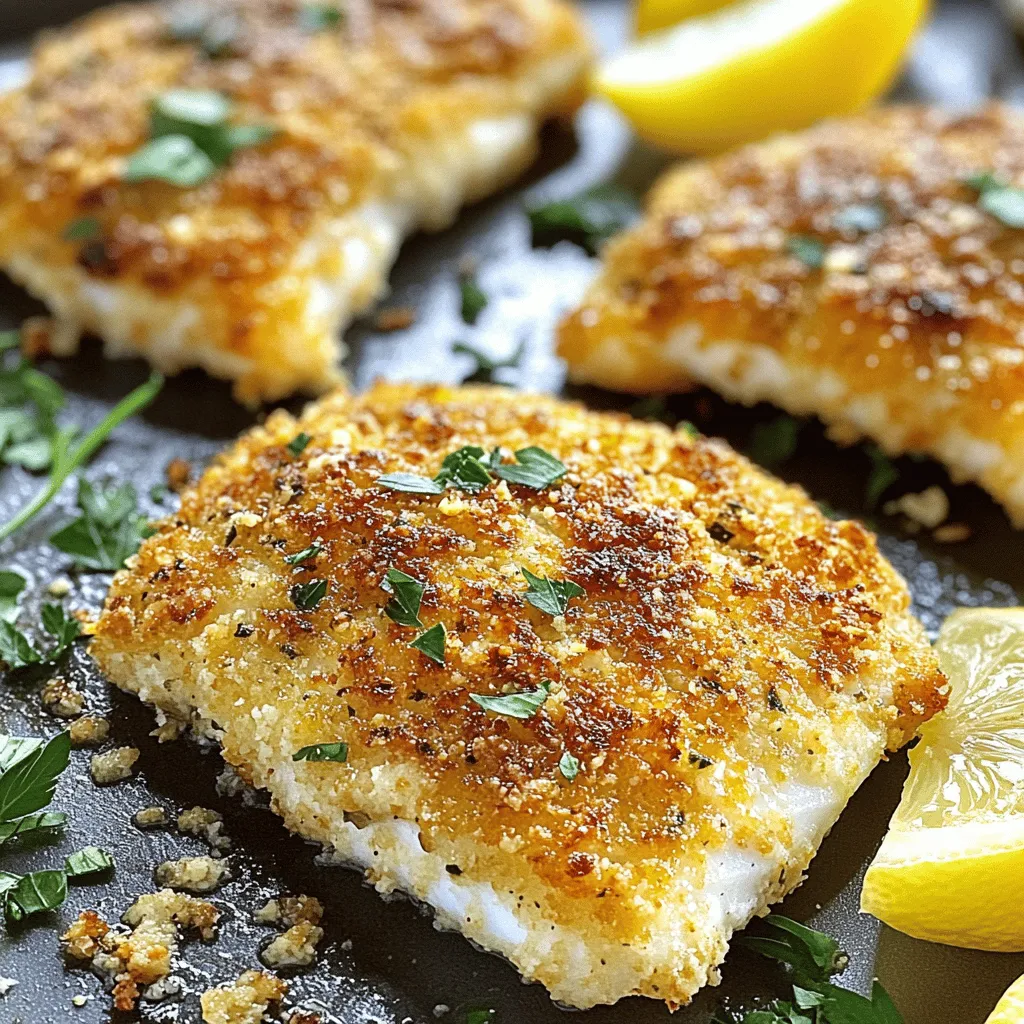
Looking for a quick and tasty dinner? Try my Parmesan Crusted Tilapia! This dish is crispy, flavorful, and easy to make. You’ll use fresh tilapia fillets coated in a delicious mix of Parmesan cheese and panko breadcrumbs. In just 20 minutes, you’ll have a meal that impresses everyone at the table. Keep reading to learn how to make this mouthwatering dish and discover tips for even more flavor!
Ingredients
List of Required Ingredients
– 4 tilapia fillets
– 1 cup grated Parmesan cheese
– 1/2 cup panko breadcrumbs
– 2 cloves garlic, minced
– 1 teaspoon dried oregano
– 1/2 teaspoon black pepper
– 1/4 teaspoon salt
– 2 tablespoons fresh parsley, chopped (for garnish)
– 3 tablespoons olive oil
– 1 lemon, cut into wedges for serving
Optional Ingredients for Variation
– Additions like paprika or cayenne pepper for extra flavor
– Alternative fish types or plant-based substitutes
For this recipe, I use fresh tilapia fillets. They have a mild taste that pairs well with the crispy coating. The Parmesan cheese gives a rich flavor and a nice crunch. You can find panko breadcrumbs at most grocery stores. They make the crust extra crispy.
I often add minced garlic to the mix. It enhances the taste and adds a lovely aroma. Dried oregano brings warmth and earthiness too. If you like some heat, sprinkle in paprika or cayenne pepper. You can also swap tilapia for other fish, like cod or salmon. If you prefer a plant-based option, try tofu or eggplant.
This dish is simple yet full of flavor. I love serving it with lemon wedges. The lemon adds a fresh touch that brightens the meal. Don’t forget to sprinkle fresh parsley on top for color and taste.
Step-by-Step Instructions
Prepping the Oven and Ingredients
– Preheat the oven to 425°F (220°C).
– Line a baking sheet with parchment paper.
First, set your oven. This helps the fish cook evenly. Lining the sheet makes cleanup easy.
Making the Parmesan Coating
– Combine all dry ingredients in a mixing bowl.
– Mix thoroughly until well-blended.
In a large bowl, mix the grated Parmesan, panko breadcrumbs, minced garlic, dried oregano, black pepper, and salt. Stir well so every piece is covered with flavor. This coating adds a crispy, cheesy layer to the fish.
Preparing and Coating the Fish
– Pat tilapia fillets dry.
– Coat fillets in olive oil, then dredge in the Parmesan mixture.
Take your tilapia fillets and dry them with a paper towel. This step is key! A dry surface helps the coating stick better. Next, drizzle olive oil on both sides of each fillet. Finally, dip each fillet into the Parmesan mix. Press down gently to make sure it sticks well.
Baking the Tilapia
– Place coated fillets on the baking sheet.
– Bake for 15-20 minutes until golden crispy.
Lay the coated tilapia on your baking sheet, making sure they have space. Slide the sheet into your oven. Bake for 15 to 20 minutes. The fish should be golden brown and flaky when done. You just made a crispy, flavorful dish!
Tips & Tricks
Enhancing Flavor and Texture
To make your Parmesan crusted tilapia even better, try adding herbs. You can mix in some chopped thyme or basil. A hint of lemon zest in the coating brings freshness. Use fresh garlic instead of minced garlic for a stronger flavor.
For a crispy crust, ensure the tilapia is dry. Use paper towels to pat the fillets well. Drizzle a good amount of olive oil on each side. Press the Parmesan mixture firmly onto the fish. This helps the crust stick better. Bake the fish on a hot oven for that perfect crunch.
Serving Suggestions
Pair your tilapia with sides that balance its flavor. Steamed broccoli or green beans work great. A light salad with arugula adds a nice touch. You can also serve it with rice or quinoa for a filling meal.
Garnish the dish with fresh parsley for color. A slice of lemon on the side adds brightness. You can also sprinkle some extra Parmesan on top before serving for added richness.
Common Mistakes to Avoid
One common mistake is overcooking the fish. Keep an eye on your tilapia while it bakes. It should flake easily with a fork. If it looks dry or hard, it’s overdone.
Another mistake is not coating evenly. Make sure each fillet gets a nice, thick layer of the Parmesan mixture. This ensures a crispy bite every time. Press down gently on the coating to make sure it sticks well.

Variations
Alternative Recipes Using Different Fish
If you want to switch things up, you can use other fish. Good substitutes for tilapia include:
– Cod
– Haddock
– Catfish
– Snapper
Each fish has its own texture and flavor. Cod is flaky and mild, while haddock has a slightly sweet taste. When using thicker fish like cod, you may need to bake it a bit longer. Adjust cooking time to about 20-25 minutes. The key is to check that the fish flakes easily with a fork when done.
Gluten-Free Version
For a gluten-free version, simply swap out the panko breadcrumbs. You can use:
– Almond flour
– Gluten-free breadcrumbs
– Crushed rice crackers
Make sure to check labels when buying these items. They should not contain any hidden gluten. When using these alternatives, the baking time stays about the same. Just keep an eye on the crust to ensure it stays crispy.
Flavor Profile Adjustments
To change the flavor, add herbs or spices. Here are some ideas:
– Basil for an Italian twist
– Paprika for a smoky flavor
– Cumin for a warm, earthy taste
You can also try creative toppings. A fresh salsa or a lemon butter sauce can elevate the dish. Drizzle a sauce on top after baking for an extra kick. These adjustments can make your meal feel new and exciting.
Storage Info
Proper Storage Techniques
To store leftovers safely, let the tilapia cool first. Place it in an airtight container. This keeps moisture in and prevents drying. You can store it in the fridge for up to three days. For best results, use glass or plastic containers with tight lids. These containers help keep the fish fresh longer.
Reheating Recommendations
To reheat and keep it crispy, use the oven. Preheat the oven to 350°F (175°C). Place the tilapia on a baking sheet for about 10 minutes. This method keeps the crust crunchy. Avoid using the microwave if you want to maintain texture. The microwave can make the fish soggy and less appetizing.
Freezing Guidelines
To freeze uncooked tilapia, wrap each fillet in plastic wrap and place in a freezer bag. This helps prevent freezer burn. For cooked tilapia, let it cool completely first. Then, place it in a freezer-safe container. You can store it this way for up to three months. When ready to eat, thaw in the fridge overnight for best results.
FAQs
What is the best side dish for Parmesan Crusted Tilapia?
I love serving Parmesan crusted tilapia with fresh vegetables. Here are my top picks:
– Steamed broccoli
– Roasted asparagus
– Garlic mashed potatoes
– Quinoa salad
These sides add color and nutrition to your plate. They also balance the flavors of the fish well. You can try mixing some lemon juice into your veggies. It brings a bright taste that pairs nicely.
Can I use frozen tilapia for this recipe?
Yes, you can use frozen tilapia! Just follow these tips:
– Thaw the fish overnight in the fridge.
– If you’re short on time, submerge the package in cold water for about 30 minutes.
Make sure to pat the fillets dry before coating. This helps the crust stick better. Using frozen fish can still lead to a delicious meal.
How do I know when tilapia is fully cooked?
To check if tilapia is done, look for these signs:
– The fish should flake easily with a fork.
– It should turn opaque and lose its shiny look.
I recommend using a food thermometer, too. The internal temperature should reach 145°F (63°C). This ensures your fish is safe to eat.
Is it possible to make this recipe dairy-free?
Yes, you can make this dish dairy-free! Here are some ideas:
– Use nutritional yeast instead of Parmesan for a cheesy flavor.
– Try dairy-free cheese alternatives.
– You can also skip cheese and focus on herbs for taste.
These swaps allow everyone to enjoy the dish. You still get great flavor with these changes. Don’t forget to check the labels for allergens!Enjoy your cooking!
This blog post guided you through making delicious Parmesan crusted tilapia. We covered the necessary ingredients, simple steps, and helpful tips for great flavor. You learned about variations and how to store leftovers too.
Cooking fish can be fun and easy. With these steps, you can create a tasty meal. Enjoy experimenting with different flavors and sides. Happy cooking!


. - Heat your skillet over medium heat. - Add the unsalted butter and let it melt. - Once melted, watch for it to bubble gently. - Next, add the minced garlic. - Sauté the garlic for about one minute. - Stir often until it smells great and turns lightly golden. - Now, add the peeled and deveined shrimp to the skillet. - Season the shrimp with salt and pepper. - If you like spice, sprinkle in some red pepper flakes. - Cook the shrimp for 2-3 minutes on one side. - Flip the shrimp to cook the other side evenly. - Add the lemon zest and juice as they cook. - Keep cooking until the shrimp are opaque. - Remove the skillet from the heat. - Stir in the chopped parsley for a fresh taste. - Serve the shrimp over warm pasta or fluffy rice. - Drizzle the leftover lemon-garlic butter sauce on top for extra flavor. - For a lovely presentation, you can garnish with lemon wedges. For more details, check the Full Recipe. - Achieving the perfect shrimp texture: To get tender shrimp, avoid overcooking. Cook them just until they turn pink. This usually takes about 2-3 minutes per side. - Best practices for sautéing garlic: Start with a hot skillet and melted butter. Add minced garlic and stir for about 1 minute. Keep an eye on it so it doesn’t burn; burnt garlic tastes bitter. - Presentation ideas for a beautiful dish: Serve the shrimp in shallow bowls to make it look elegant. Add a sprinkle of parsley on top for color. Include lemon wedges on the side for a fresh touch. - Pairing options with side dishes: Lemon garlic butter shrimp goes well with cooked pasta or fluffy rice. You can also serve it with a side salad for a light meal. - Additional herbs or spices to try: Consider adding fresh basil or thyme for extra flavor. These herbs pair well with lemon and shrimp. - Adjusting spice levels with red pepper flakes: If you like heat, add more red pepper flakes. Start with a teaspoon and adjust to your taste. This will make your dish more exciting! For more details, check the Full Recipe. {{image_4}} You can change the seafood in this recipe. Try scallops or even crab. These swaps add new tastes while keeping the dish simple. If you want a healthier fat, swap butter for olive oil. Olive oil works well and gives a light, fresh flavor. To mix things up, add other citrus flavors. Lime or orange juice can brighten the dish. You can also infuse the recipe with herbs. Try basil or thyme for a different twist. These herbs can make the dish feel more seasonal. If you need a gluten-free option, serve the shrimp over quinoa or zucchini noodles. Both are great gluten-free choices. For a low-calorie meal, cut back on the butter. You can use less or replace it with vegetable broth. This keeps the dish tasty but lighter. After enjoying your lemon garlic butter shrimp, store any leftovers in the fridge. Use an airtight container to keep them fresh. These shrimp will stay good for about 2-3 days. Always check for freshness before eating. To freeze lemon garlic butter shrimp, let them cool completely first. Place them in a freezer-safe bag, removing as much air as possible. They can last for about 2 months in the freezer. When you're ready to eat, thaw the shrimp in the fridge overnight. Reheat them gently in a skillet over low heat. This keeps them tender and tasty. Always ensure your shrimp is safe to eat after storage. Check for any off smells or changes in color. If the shrimp look slimy or smell bad, it’s best to discard them. Trust your senses to keep your meals safe and enjoyable. Cook shrimp for 4-6 minutes. They cook quickly. In a hot skillet, shrimp turn pink when done. Avoid overcooking; it makes them tough. Yes, you can use frozen shrimp. Thaw them first for best results. Place them in cold water for about 15 minutes. This way, they cook evenly and taste fresh. I love serving lemon garlic butter shrimp with: - Cooked pasta - Fluffy rice - Fresh salad - Garlic bread These sides balance the rich flavors well. Check for color and texture. Cooked shrimp turn pink and opaque. They should feel firm but not hard. When in doubt, cut one open. It should be white inside, not translucent. You’ve learned how to make lemon garlic butter shrimp. We covered essential ingredients, easy steps, tips for cooking, and variations to try. Remember to adjust flavors to your taste and pair with your favorite sides. Store leftovers safely for later enjoyment. Cooking shrimp can be simple and satisfying. Enjoy every bite, and don't hesitate to experiment. Whether for a cozy night in or impressing guests, this dish shines every time. Let your kitchen be a place of fun and flavor!](https://goldendishy.com/wp-content/uploads/2025/06/8ad1771e-7d26-4dd4-879b-9e464bbb0647-768x768.webp)

![- 1 cup green or brown lentils, thoroughly rinsed - 1 tablespoon coconut oil - 1 medium onion, finely chopped - 3 garlic cloves, minced - 1-inch piece of fresh ginger, grated - 1 can (14 oz) full-fat coconut milk - 2 ripe tomatoes, diced - 1 tablespoon curry powder - 1 teaspoon ground cumin - 1 teaspoon ground turmeric - 1 cup vegetable broth (use low-sodium if preferred) - 2 cups fresh spinach or kale, chopped - Sea salt and freshly ground black pepper to taste - Fresh cilantro, chopped (for garnish, optional) To make this Easy Vegan Lentil Curry, you need a few key items. The lentils are the base. They bring protein and texture. I prefer green or brown lentils because they hold their shape well. Rinsing them removes dust and ensures you start with clean lentils. Next, the coconut oil adds a rich, creamy taste. It helps sauté the onion, garlic, and ginger. These three ingredients create a fragrant base. They add depth and warmth to the curry. Tomatoes add sweetness and acidity. They balance the creamy coconut milk perfectly. The spices—curry powder, cumin, and turmeric—bring warmth and flavor. They transform the dish into a vibrant, colorful meal. For added nutrition, I recommend spinach or kale. These greens are packed with vitamins. They also bring a lovely color to the curry. Finally, fresh cilantro adds a bright, fresh flavor. You can use it as a garnish or mix it in for extra taste. For the full recipe, check out the detailed instructions. This dish is not only simple but full of flavor! - Heat 1 tablespoon of coconut oil in a medium pot over medium heat. - Once the oil is hot, add 1 finely chopped onion. Sauté for about 5 minutes. The onion should become soft and clear. - Next, add 3 minced garlic cloves and 1-inch grated ginger. Cook for 1 to 2 minutes. You want the kitchen to smell amazing! - Now, add 2 diced tomatoes, 1 tablespoon of curry powder, 1 teaspoon of ground cumin, and 1 teaspoon of ground turmeric. - Stir and cook this mix for about 2 to 3 minutes. This step helps the spices release their lovely flavors and soften the tomatoes. - Add 1 cup of rinsed lentils to the pot. Then, pour in 1 can of full-fat coconut milk and 1 cup of vegetable broth. - Stir well to combine, then bring the mix to a gentle boil. Once it boils, turn the heat down and cover the pot. Let it simmer for 25 to 30 minutes. Check the lentils to see if they are tender and creamy. - After the lentils are cooked, fold in 2 cups of chopped spinach or kale. Cook for about 5 minutes. The greens should be bright and wilted. - Taste the curry and add sea salt and freshly ground black pepper to make it just right for you. For the full recipe, you can check out the details above. Enjoy your cooking! You can adjust spices to suit your taste. If you love heat, add more curry powder. A dash of lime juice brightens the dish. It adds a fresh twist that wakes up the flavors. To save time, use pre-cooked lentils. They cook faster and save you at least 20 minutes. Vegetable broth can boost flavor without much work. It gives your curry a rich taste. Serve your curry in shallow bowls. A sprinkle of cilantro on top creates a nice look. Pair it with fluffy rice or warm naan. This makes your meal more filling and fun to eat. For the full recipe, check out the details above. {{image_4}} You can change the type of lentils in your curry. - Red lentils cook faster and give a smoother texture. - Black or French lentils add more firmness and bite. Using different lentils can change the dish's look and feel. I find red lentils to be a great option for a quick meal. They break down nicely, making the curry creamy. Black lentils keep their shape, adding a nice texture. Spices can make your curry unique. - Try garam masala or chili powder for a spicy kick. - Fresh herbs like cilantro or mint can brighten the flavor. Experimenting with spices can lead to exciting new tastes. Garam masala adds warmth and depth, while chili powder can increase heat. Fresh herbs not only taste great but also add color to your dish. Adding extra vegetables boosts nutrition and flavor. - Carrots or bell peppers add sweetness and crunch. - Swap kale for other leafy greens like Swiss chard. Incorporating more veggies is a fun way to customize your curry. Carrots add a lovely sweetness, while bell peppers bring crunch and color. Swiss chard can be a great substitute for kale and offers a different taste profile. To keep your Easy Vegan Lentil Curry fresh, store leftovers in an airtight container. This method helps maintain flavor and texture. You can keep it in the fridge for up to 4 days. If you want to save it for later, freeze portions for up to 3 months. Just make sure to label the container with the date. When you're ready to enjoy your curry again, reheat it on the stove. Add a splash of vegetable broth to keep it creamy and delicious. Stir it often to ensure even heating. If you're in a hurry, you can microwave it too. Do this in short bursts, stirring frequently to avoid hot spots. Always check for signs of spoilage before eating. Look for any off smells or changes in color. If your curry looks or smells strange, it’s best to discard it. Safety first! Enjoy your meal knowing you stored it well. For the full recipe, check out the earlier sections. - Prep time: 10 minutes, Total time: 40 minutes Making this curry is quick and easy. You will spend about 10 minutes getting ready. Cooking takes an additional 30 minutes. This means you can enjoy a tasty meal in just 40 minutes! - Yes, the flavors meld nicely if made a day ahead You can make this curry in advance. If you prepare it a day before, the flavors will blend well. This makes the dish even tastier when you eat it later. - Great with rice, quinoa, or naan for a hearty meal This curry pairs perfectly with many side dishes. Rice is a classic choice, but quinoa works well too. You can also serve it with warm naan for a filling meal. - Yes, all ingredients are naturally gluten-free You will be glad to know this recipe is gluten-free. All the ingredients, like lentils and coconut milk, do not contain gluten. This makes it a safe choice for anyone avoiding gluten. For the full recipe, check out the [Full Recipe]. This Easy Vegan Lentil Curry is tasty and simple to make. You learned about the main ingredients, step-by-step instructions, flavor tips, and storage info. Customization options, like different lentils and spices, let you make it your own. This dish is perfect for meal prep and serving with rice or naan. Remember to store leftovers properly and watch for spoilage signs. Enjoy this dish that is not only healthy but full of flavor! You will love experimenting with it for your next meal.](https://goldendishy.com/wp-content/uploads/2025/06/33b3e4d2-4af0-4f09-8df6-36adfea2fbd1-768x768.webp)


