No Bake S’mores Bars Easy and Delicious Treat

Looking for a treat that’s both easy and delicious? Let me introduce you to No Bake S’mores Bars! These bars combine the classic flavors of chocolate, marshmallow, and graham crackers without the fuss of baking. With just a few simple steps, you can whip up a dessert that satisfies your sweet tooth and impresses your friends. Ready to dive in? Let’s make your next snack a total hit!
Ingredients
List of Ingredients
– 1 ½ cups graham cracker crumbs
– ½ cup unsweetened cocoa powder
– ½ cup granulated sugar
– ½ cup unsalted butter, melted
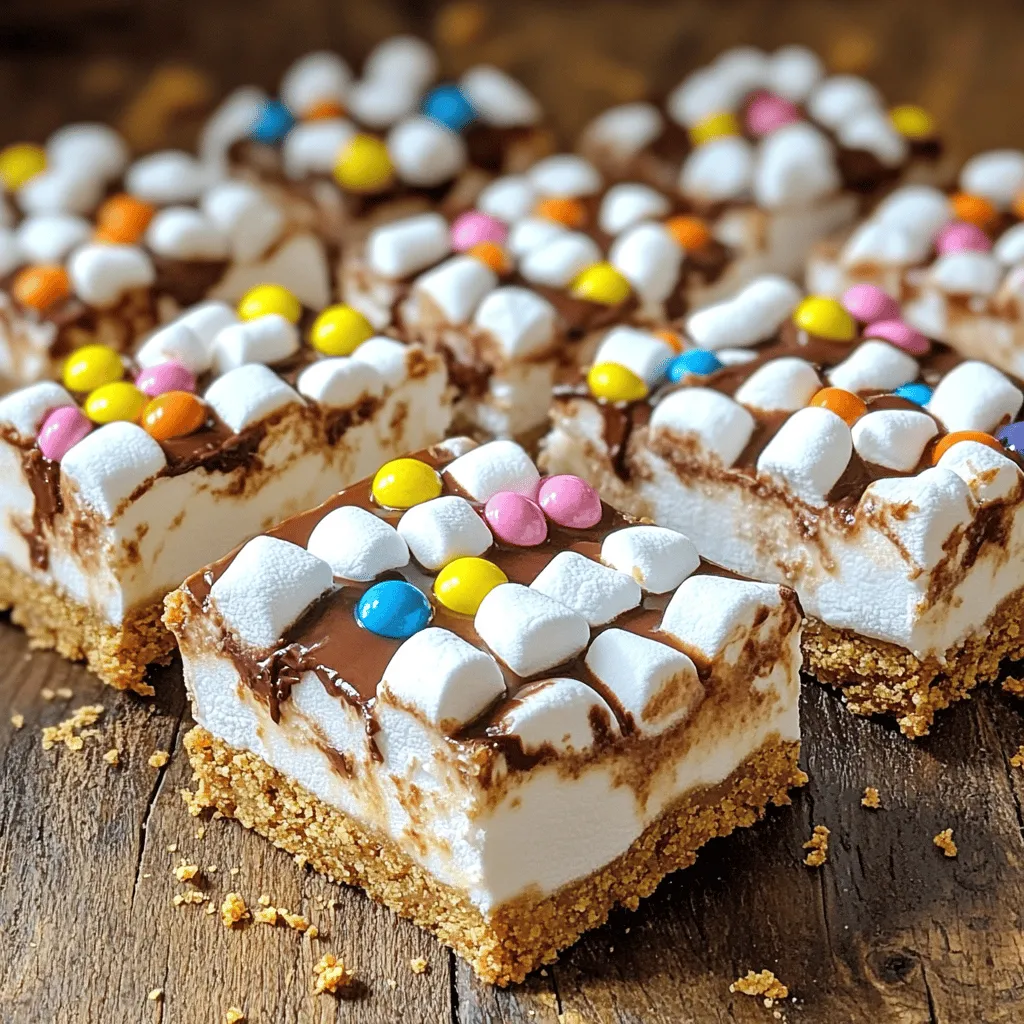
– 1 cup mini marshmallows
– 1 cup semi-sweet chocolate chips
– ½ cup mini chocolate candies (optional for garnish)
– 1 teaspoon vanilla extract
– 1 pinch of salt
These ingredients create the perfect blend of flavors and textures. The graham cracker crumbs provide that classic s’mores base. Cocoa powder adds deep chocolate flavor. Sugar gives sweetness, while melted butter binds everything together.
The mini marshmallows bring that gooey, fun texture we all love. Semi-sweet chocolate chips melt just right to create a rich topping. If you want extra flair, mini chocolate candies make a fun garnish.Enjoy gathering these ingredients. They come together quickly for a delicious treat!
Step-by-Step Instructions
Preparation of Base Mixture
Combine the dry ingredients in a large bowl:
– 1 ½ cups graham cracker crumbs
– ½ cup unsweetened cocoa powder
– ½ cup granulated sugar
– 1 pinch of salt
Mix them thoroughly until everything blends well. You want a nice, even mix.
Incorporate Wet Ingredients
Pour in the melted butter and vanilla extract. The mixture should start to come together. Mix until it feels moist. It should look like wet sand.
Forming the Base Layer
Line a 9×9-inch square baking pan with parchment paper. This helps with easy removal later. Transfer the graham mixture into the pan. Press it down firmly with your hands or a measuring cup. Make sure it’s compact and level.
Adding the Topping
In a separate bowl, combine the mini marshmallows and semi-sweet chocolate chips. Spread this mixture evenly over the pressed graham cracker base. Cover the whole surface.
Chilling to Set
Place the pan in the refrigerator for about 30 minutes. This step firms up the layers. It makes cutting into bars much easier.
Cutting and Garnishing
After chilling, take the pan out of the fridge. Use a sharp knife to cut the mixture into equal-sized bars. If you want, sprinkle mini chocolate candies on top for a fun touch.
Tips & Tricks
Ensuring the Perfect Texture
To get the best texture, mix your ingredients until they feel like wet sand. This helps create a compact base. If your mixture is too dry, the bars may crumble. You want a blend that holds together well. Press it firmly into your pan to get a nice, solid layer.
Storing for Freshness
Keep your bars fresh by storing them in an airtight container. Place them in the refrigerator to maintain their flavor and texture. They will stay tasty for up to a week. If you have extra bars, this is the best way to enjoy them later.
Timing Tips
Timing is key. Make sure you chill the bars for at least 30 minutes before cutting them. This will help them set properly. When they are firm to the touch, you can slice them easily. Clean edges make for a beautiful presentation.

Variations
Alternative Ingredients
You can switch up the chocolate in your bars. Try dark chocolate for a rich taste. Milk chocolate gives a sweet flavor. You can also use flavored graham crackers. Cinnamon or chocolate graham crackers add a fun twist.
Dietary Substitutions
Want a vegan version? Use vegan butter and dairy-free chocolate. This keeps the taste while being plant-based. Many brands offer great options for both.
Presentation Ideas
For a special touch, serve your bars with whipped cream or ice cream. This adds creaminess and makes them feel extra indulgent. You can even drizzle some chocolate sauce on top. This creates a dessert that looks as good as it tastes.
Storage Info
Best Practices for Storage
To keep your No Bake S’mores Bars fresh, store them in an airtight container. This keeps moisture out and helps maintain their delicious taste. I recommend using a container that fits the bars snugly.
Shelf Life
These bars can last up to one week in the refrigerator. This means you can make them ahead of time for a party or just for your own snack cravings. Just remember to keep them sealed tightly.
Freezing Options
If you want to save them for later, consider freezing the bars. They can stay fresh for up to three months in the freezer. When you’re ready to enjoy, thaw them in the fridge overnight. This method keeps them tasty and ready to serve with ease.
FAQs
Can I make No Bake S’mores Bars ahead of time?
Yes, they can be made a day in advance and stored properly. This makes them a great option for parties or snacks.
Can I use regular marshmallows instead of mini?
Yes, but you may need to chop them into smaller pieces. This helps them spread evenly in the bars.
What can I substitute for graham cracker crumbs?
Use crushed cookies or other types of crackers as a base alternative. This allows for fun flavor twists.
How do I know when the bars are set enough to cut?
Ensure they are firm to the touch after chilling for the recommended time. This guarantees clean cuts and a nice texture.
This blog post covers the easy steps to make no bake s’mores bars. You learned about the ingredients, mixing processes, and tips for the best texture. Remember to chill the bars long enough for easy cutting. Keep them fresh by storing in an airtight container. Feel free to explore variations to make them your own. I hope you enjoy creating these delicious treats and sharing them with friends and family!


![To make the Easy Lemon Raspberry Loaf, you need a few simple ingredients. Here’s the list you will use: - 1 ¾ cups all-purpose flour - 1 cup granulated sugar - ½ cup unsalted butter - 2 large eggs - 1 teaspoon pure vanilla extract - 1 tablespoon fresh lemon zest - ½ cup freshly squeezed lemon juice - 1 teaspoon baking powder - ½ teaspoon baking soda - ¼ teaspoon fine sea salt - 1 cup fresh raspberries - Powdered sugar for dusting (optional) These ingredients help create a moist and zesty loaf. The lemon zest and juice add bright flavor. Fresh raspberries give you sweet bursts in every bite. Use unsalted butter to control the saltiness. It’s best to use fresh raspberries, but frozen will work too. Make sure to measure everything carefully. Baking is all about balance. Each ingredient plays a role in the final taste and texture. If you want to learn more about the steps to make this treat, check out the Full Recipe. - Setting the Temperature First, set your oven to 350°F (175°C). This step is crucial for even baking. - Preparing the Loaf Pan Grease a 9x5-inch loaf pan. You can also line it with parchment paper. This helps the loaf come out easily after baking. - Method of Mixing In a large bowl, combine softened butter and granulated sugar. Use a hand mixer or stand mixer to beat them together. - Desired Consistency Mix until the blend is light and fluffy. This should take about 3-4 minutes. The mixture should look pale and creamy. - Adding Eggs One at a Time Add the eggs one by one. Mix well after each egg to ensure they are fully blended. - Mixing Techniques After adding the eggs, stir in the vanilla extract and lemon zest. Mix gently but thoroughly to keep the batter smooth. - Combining Flour and Leavening Agents In another bowl, whisk together flour, baking powder, baking soda, and salt. This ensures even distribution of leavening agents. - Proper Mixing Technique Gradually add the dry mix to the wet mixture, alternating with lemon juice. Start and end with the dry ingredients. Mix gently, and don’t overmix. - Techniques to Preserve Raspberry Shape Carefully fold in the raspberries. Use a spatula to gently mix. This keeps the raspberries intact. - Ensuring Even Distribution Make sure the raspberries are evenly spread throughout the batter. This enhances the flavor in every slice. - Baking Time and Techniques for Doneness Pour the batter into the loaf pan. Bake for 55-60 minutes. To check doneness, insert a toothpick into the center of the loaf. It should come out clean. - Cooling Tips for Best Texture Once done, let the loaf cool in the pan for 10-15 minutes. Then, transfer it to a wire rack to cool completely. This helps achieve a perfect texture. Feel free to check the Full Recipe for more details! To make the best lemon raspberry loaf, avoid overmixing. Mixing too much can make the loaf dense. When you combine wet and dry ingredients, mix just until you see no flour. To check for doneness, insert a toothpick into the center. If it comes out clean or with a few crumbs, your loaf is ready. If not, bake a little longer. If the top is browning too fast, cover it with foil halfway through. Measuring ingredients incorrectly can lead to issues. Always use dry measuring cups for flour and sugar. Spoon the flour into the cup, then level it off with a knife. This keeps the correct ratio. Adjust baking time if you use a dark pan. Dark pans can cook faster, so start checking for doneness a few minutes early. Fresh lemon juice makes a big difference. Squeeze the lemons right before you use them. This keeps the juice bright and zesty. You can also add extras like nuts or spices. Chopped walnuts or a touch of cinnamon can add great depth. For a sweet twist, consider a lemon glaze on top for extra shine. {{image_4}} You can switch out raspberries for other fruits. Blueberries make a great choice. They add a sweet touch and look pretty too. Strawberries can also work well. Just chop them into smaller pieces. If you like seasonal fruits, use what is fresh. In summer, try peaches or cherries. In fall, apples or pears can add a nice twist. Each fruit brings its own flavor and charm to the loaf. If you need a gluten-free loaf, don’t worry. You can use almond flour or coconut flour. Both work great as substitutes. Just remember, the texture may change a bit. You might need to adjust the liquid too. Gluten-free flours absorb more moisture. Adding an extra egg or some yogurt can help keep it moist and fluffy. Want to jazz up your loaf? Adding nuts can give it a nice crunch. Chopped walnuts or pecans are perfect. Just fold them in gently with the raspberries. You can also add spices for warmth. Cinnamon or nutmeg can enhance the flavor. For a sweet finish, create a lemon glaze. Mix powdered sugar with lemon juice. Drizzle this over the cooled loaf for a zesty touch. These variations keep your lemon raspberry loaf exciting and fun! For the full recipe, check out the details provided earlier. Room Temperature Storage Store your lemon raspberry loaf at room temperature. Use an airtight container to keep it fresh. This will help it stay moist and tasty. It can last for up to three days this way. Refrigeration Guidelines If you want to keep it longer, put the loaf in the fridge. Wrap it tightly in plastic wrap or foil. This will keep it from drying out. It can last up to one week in the fridge. How to Freeze the Loaf Freezing the lemon raspberry loaf is easy. Wait until it cools completely. Then, wrap it in plastic wrap and foil. This protects it from freezer burn. You can freeze it for up to three months. Thawing Tips To thaw, take it out of the freezer. Leave it in the fridge overnight. If you want it warm, slice and heat it in the microwave for a few seconds. Freshness Indicators Check for signs of spoilage. Look for mold or a change in smell. If the loaf feels dry or hard, it’s time to toss it. Maximum Storage Duration In total, the loaf can last up to one week in the fridge or three months in the freezer. Proper storage helps maintain its delicious flavor and texture. To keep the loaf moist, use a few key ingredients. Butter adds fat and moisture. Eggs also help with texture. Additionally, use fresh lemon juice for tang and juiciness. Baking techniques matter too. Do not overmix the batter. This keeps air in the loaf. Bake at the right temperature and check for doneness with a toothpick. A little moist crumb is perfect! Yes, you can use frozen raspberries! Just make sure to thaw them first. Drain any extra juice to avoid a soggy loaf. Using frozen fruit may change the texture. Fresh raspberries give a firmer bite. However, frozen raspberries still add great flavor and color. You can substitute lemon juice with lime or orange juice. Lime juice adds a tart zing. Orange juice gives a sweeter flavor. Keep in mind that this changes the flavor profile. The loaf will taste different but still delicious! This loaf pairs well with tea or coffee. The bright lemon flavor complements hot drinks nicely. For a fun twist, serve it with whipped cream. Fresh berries on the side add a lovely touch too. For the full recipe, feel free to check the [Full Recipe]. You now know how to make a delicious Lemon Raspberry Loaf. We covered key ingredients, step-by-step instructions, and helpful tips for success. Remember, watch your mixing and baking time to avoid mistakes. Try different fruits or flavors to put your spin on it. Store it properly to keep it fresh. Whether for breakfast or dessert, this loaf will please everyone. Enjoy your baking adventure and the tasty treats you create!](https://goldendishy.com/wp-content/uploads/2025/07/5ff44623-bcfe-47fa-965b-01d738fc2f08-768x768.webp)