Minute Garlic Chili Rice Bowls Flavorful Quick Meal

Looking for a quick and tasty meal? You’re in the right place! My Minute Garlic Chili Rice Bowls pack bold flavor and fresh veggies into just one bowl. With easy steps and simple ingredients, you can enjoy a delicious dinner in minutes. Whether you crave spicy heat or a veggie-filled delight, this dish has you covered. Let’s dive into how to make this fast and flavorful meal!
Ingredients
List of Ingredients
– 2 cups cooked jasmine rice
– 4 cloves of garlic, finely minced
– 1 red chili, finely chopped
– 3 tablespoons soy sauce
– 1 tablespoon sesame oil
– 1 tablespoon olive oil
– 1 cup baby spinach
– 1 cup mixed vegetables
– 1 green onion, thinly sliced
– Sesame seeds
– Salt and pepper to taste
Gathering the right ingredients makes this dish easy and fun. I love using jasmine rice for its light and fluffy texture. The garlic and chili add a great kick. Feel free to adjust the chili to suit your spice level.
The soy sauce and sesame oil bring rich flavors that blend well. Baby spinach is my go-to leafy green, but you can choose any you like. Mixed vegetables add color and crunch. I use a mix of carrots, peas, and bell peppers for the best taste.
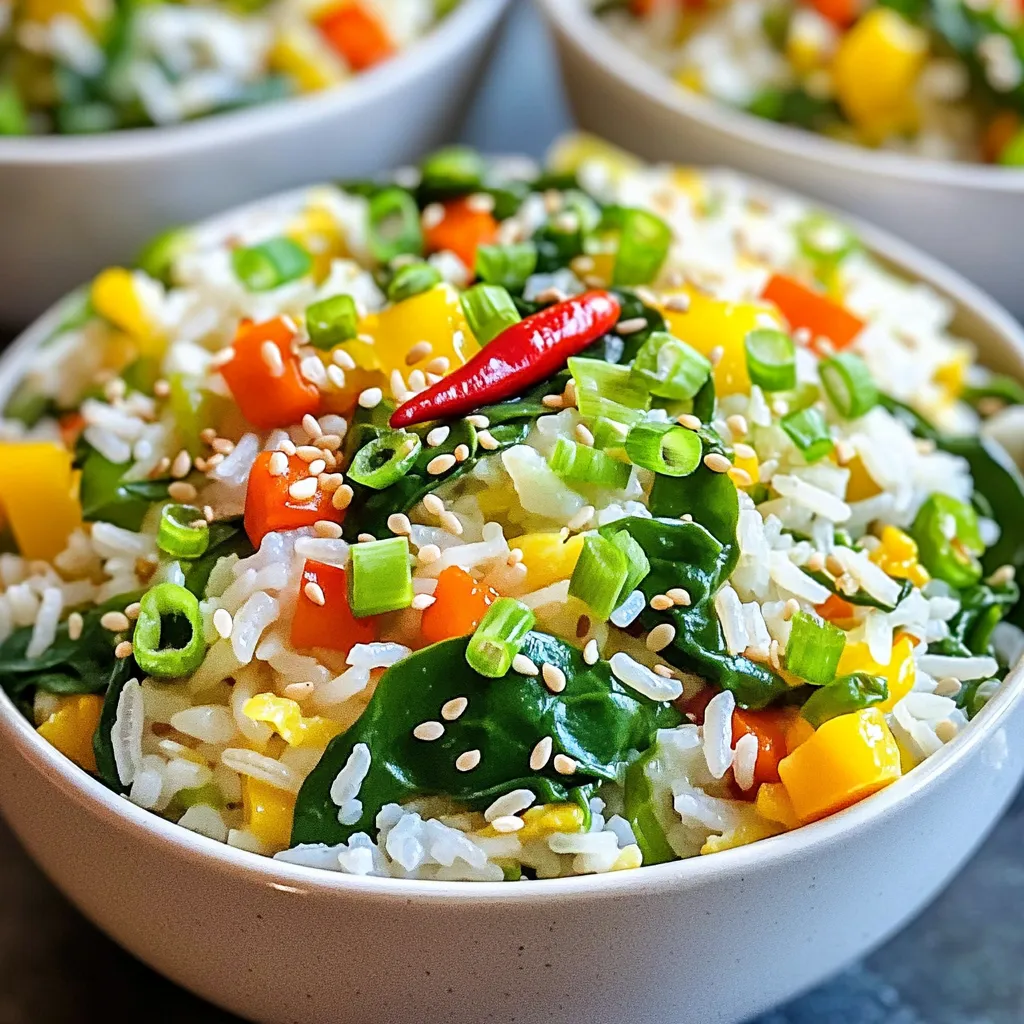
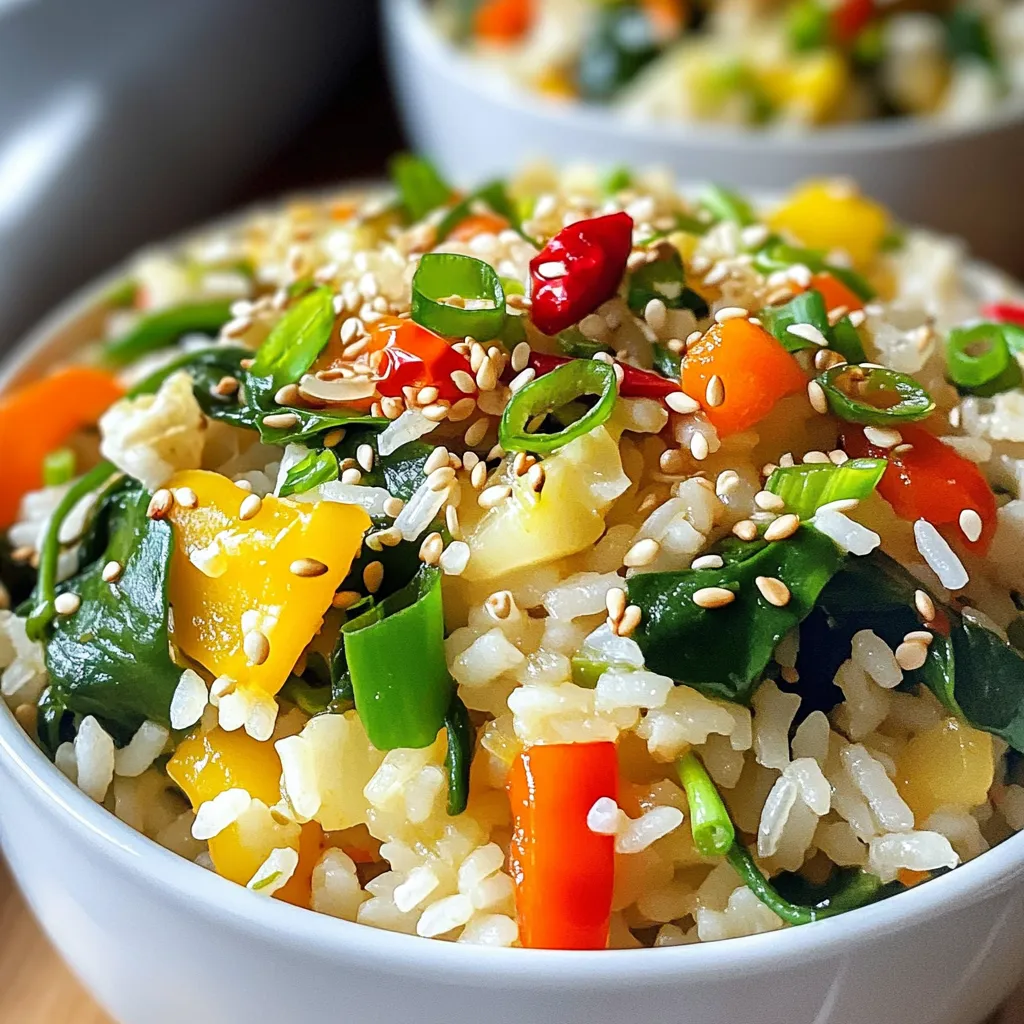
Don’t forget to garnish with sliced green onions and sesame seeds. They add a nice touch and boost the dish’s look. Remember, season with salt and pepper to match your taste. This simple list of ingredients ensures you can whip up a delicious meal in no time!
Step-by-Step Instructions
Preparation Steps Overview
– Cooking jasmine rice: Start with 2 cups of jasmine rice. Cook it according to package instructions. Fluff it once done and set aside.
– Chopping vegetables: Chop your mixed vegetables like carrots, peas, and bell peppers. This adds color and flavor.
– Mince garlic and chili: Finely mince 4 cloves of garlic and 1 red chili. Adjust the chili based on your heat preference.
Detailed Instructions
– Heat the oils and sauté garlic and chili: In a large skillet, pour in 1 tablespoon of olive oil and heat it over medium heat. Add the minced garlic and chopped chili. Sauté for about 1 minute. Stir constantly until fragrant. Be careful not to let the garlic burn.
– Sauté mixed vegetables and wilt spinach: Add the mixed vegetables to the skillet. Stir them for 3-4 minutes until they soften. Then, add 1 cup of baby spinach. Cook for another minute until it wilts down.
– Incorporate jasmine rice and season: Add the cooked jasmine rice to the skillet. Gently break up any clumps with a spatula. Mix well with the sautéed veggies. Drizzle 3 tablespoons of soy sauce and 1 tablespoon of sesame oil over the rice. Stir everything to blend flavors. Season with salt and pepper to taste.
Final Touches
– Crisp the rice mixture: Let the rice cook for an extra 2-3 minutes without stirring. This helps form a crispy layer on the bottom if you want that texture.
– Serve and garnish: Remove the skillet from heat. Transfer the rice to serving plates. Garnish with sliced green onions and a sprinkle of sesame seeds. Enjoy your vibrant, flavorful meal!
Tips & Tricks
Cooking Tips
To get crispy rice, let it cook without stirring. After mixing in the rice, press it down. Cook for 2-3 minutes. This will let it stick to the pan, creating a nice crust.
To adjust the spice level, choose your chili wisely. Use a mild chili for less heat. If you want more spice, add another chili or some chili flakes. Taste as you go.
Ingredient Tips
For soy sauce, you can use tamari or coconut aminos. Both give similar flavors. For sesame oil, try using olive oil or peanut oil. They can add a nice touch too.
When picking vegetables, focus on freshness. Use bright, crisp veggies. Carrots, peas, and bell peppers work great. You can mix in any veggies you like. Just ensure they are fresh and colorful.

Variations
Vegetarian and Vegan Options
You can easily make this dish vegetarian or vegan. Instead of using meat, swap it for tofu or tempeh. Both options soak up flavors well and add protein.
– For tofu: Press it for 30 minutes to remove water, then cut it into cubes.
– For tempeh: Slice it thin and sauté for a few minutes.
Add either option to the skillet after you cook the garlic and chili. This gives them time to absorb the savory taste.
Flavor Variations
Want to spice things up? You can change the flavor profile with a few simple additions.
– Add ginger: Grate a small piece and sauté it with garlic for warmth.
– Citrus zest: Use lemon or lime zest for a bright touch.
You can also change the type of rice. Jasmine rice is great, but brown rice or basmati can add a nutty flavor. Just make sure to adjust cooking time as needed.
Accompaniments
Pair your rice bowl with a few side dishes.
– A simple cucumber salad adds crunch and coolness.
– Steamed broccoli or snap peas provide more greens.
These sides enhance your meal while keeping it light and fresh. Enjoy exploring these variations for your Minute Garlic Chili Rice Bowls!
Storage Info
Storing Leftovers
To keep your Minute Garlic Chili Rice Bowls fresh, store them in an airtight container. This helps seal in the flavors and moisture. You can refrigerate leftovers for up to three days. If you want to keep them longer, freeze the rice bowls for up to one month. Make sure to separate the rice and veggies if you prefer. This keeps textures better when reheating.
Reheating Guidelines
When it’s time to enjoy leftovers, follow these simple steps for reheating. If you use a microwave, place the rice in a microwave-safe bowl. Add a splash of water to keep it moist. Cover the bowl with a damp paper towel or lid. Heat it for 1-2 minutes, stirring halfway through.
If you prefer a skillet, heat a tiny bit of oil over medium heat. Add the rice mix and stir. Cook for about 5 minutes, stirring often, until heated through. This method helps retain the nice texture and flavor. Enjoy your meal just as tasty as the first time!
FAQs
Can I use other types of rice?
Yes, you can use other types of rice. Brown rice, basmati rice, or even quinoa work well. Just adjust the cooking time as needed. Each type of rice adds a unique taste and texture.
How can I make it gluten-free?
To make this dish gluten-free, use tamari instead of soy sauce. Tamari is a gluten-free soy sauce. Check your sesame oil for gluten, too, as some brands may include it.
What can I substitute for garlic if allergic?
If you are allergic to garlic, try using shallots or green onions for flavor. You can also use garlic-infused oil for a hint of garlic taste without the actual cloves.
Is this dish suitable for meal prep?
Yes, this dish is perfect for meal prep! Cook a large batch and store it in airtight containers. It keeps well in the fridge for about 3-4 days. Just reheat it when you are ready to eat.
This blog post gave you a clear recipe for a tasty rice dish. We covered ingredients, step-by-step cooking methods, and helpful tips. You learned how to make this dish crispy, spicy, and easy to customize. Plus, you got insights on storage and reheating. Now you can enjoy delicious meals any day. Try different flavors or vegetables to make it yours. Remember, cooking is fun, so feel free to experiment!


![- 4 salmon fillets (approximately 6 oz each) - 3 tablespoons miso paste (white or yellow) - 2 tablespoons honey - 1 tablespoon soy sauce (or tamari for gluten-free) - 1 tablespoon rice vinegar - 1 tablespoon sesame oil - 2 cloves garlic, minced - 1 teaspoon freshly grated ginger - Green onions, thinly sliced (for garnish) - Sesame seeds (for garnish) This list has everything you need for a tasty miso glazed salmon. The salmon fillets are the star of the show. Miso paste adds a rich flavor. Honey gives it a touch of sweetness. Soy sauce or tamari brings in saltiness. Rice vinegar adds a bit of tang. Sesame oil gives a nice nutty taste. Garlic and ginger add warmth and depth. Don't forget the green onions and sesame seeds! They make the dish look great and add a bit of crunch. You can find the full recipe to see how to combine these ingredients into a delicious meal. To start, gather your ingredients. In a mixing bowl, combine the miso paste, honey, soy sauce, rice vinegar, sesame oil, minced garlic, and grated ginger. Use a whisk to blend the ingredients. Mix until smooth and creamy. This glaze adds a sweet and savory flavor to the salmon. Next, place the salmon fillets in a shallow dish or a sealable bag. Pour the miso glaze over the salmon. Make sure each piece is well-coated. Cover the dish or seal the bag and marinate the salmon in the fridge. For best results, allow it to marinate for at least 30 minutes. If you have time, two hours gives a richer flavor. Now, preheat your oven to 400°F (200°C). Line a baking sheet with parchment paper to prevent sticking. After marinating, take the salmon out of the glaze. Let any excess glaze drip off, then place the fillets skin-side down on the sheet. Bake the salmon for 12 to 15 minutes. The fish is done when it turns opaque and flakes easily with a fork. You can find the complete instructions in the [Full Recipe]. You can boost the taste of miso glazed salmon by adding fresh herbs. Try using cilantro or basil for a fresh kick. You can also add spices like chili flakes for heat or black sesame seeds for extra crunch. These small tweaks can take your dish to a whole new level. For the best flavor, I suggest marinating the salmon for at least 30 minutes. If you have time, let it sit for up to 2 hours. This longer marinating lets the flavors soak in deeply. Just remember not to marinate too long, as the acid in the marinade can make the fish mushy. While baking the salmon is great, you can also broil or grill it. Broiling gives a nice char and caramelization, making it even tastier. If you grill, keep the heat medium to avoid burning the glaze. Whichever method you choose, keep an eye on the salmon. It cooks fast! {{image_4}} You can switch the salmon for other fish, like cod or trout. Both work well with miso glaze. Chicken is another great option. You can use chicken breasts or thighs. The cooking time will change, so check for doneness. For plant-based choices, try tofu or tempeh. Both absorb flavors well. Marinate them just like you do with salmon. Bake them until golden brown and firm. You can adjust the taste of the miso glaze. If you like it sweeter, add more honey. For a saltier flavor, increase the soy sauce. You can also try adding a splash of citrus juice. Lime or lemon will brighten the dish. Feel free to add other ingredients too. A spoonful of sriracha gives a spicy kick. You can also mix in chopped herbs like cilantro or basil for freshness. To make a full meal, serve the salmon with sides. Steamed vegetables like broccoli or green beans add color and nutrition. Jasmine rice or quinoa pairs well too. You can also add a simple salad for crunch. For a fun twist, serve the salmon on a bed of noodles. Drizzle some leftover glaze for extra flavor. Check out the Full Recipe for more tips on creating a balanced plate. To store leftover miso glazed salmon, let it cool first. Place it in an airtight container. Make sure to cover it well so it stays fresh. It can last in the fridge for up to three days. If your salmon has a strong smell, it’s best to throw it away. To freeze the salmon, wrap each piece tightly in plastic wrap. Then, place them in a freezer-safe bag. This method helps prevent freezer burn. Miso glazed salmon can be frozen for up to three months. When you’re ready to eat it, move it to the fridge for a night to thaw. For reheating, use an oven or a stovetop. If using the oven, preheat it to 350°F (175°C). Place the salmon on a baking sheet. Heat it for about 10 minutes. This method keeps it moist. If you prefer the stovetop, heat a pan over low heat. Add a splash of water to keep the fish from drying out. Cook for a few minutes until warmed through. You should marinate the salmon for at least 30 minutes. This gives the flavors time to soak in. For a richer taste, I recommend marinating for up to 2 hours. The longer the fish sits in the marinade, the better the flavor will be. Yes, you can use different types of miso. White miso is sweeter and milder. Yellow miso is a bit stronger but still smooth. Red miso is more intense and salty. Each type brings a unique flavor to the salmon. Experiment with what you like best! I love serving Miso Glazed Salmon with steamed rice. Jasmine or brown rice works great. You can also add some roasted veggies or a fresh salad. These sides balance the rich glaze. They make your plate colorful and fun! Check out the Full Recipe for more ideas. This blog post showed how to make miso-glazed salmon. You learned about the key ingredients, preparation, and cooking steps. I shared tips to enhance flavor and offered variations if you want to try something new. Proper storage can keep leftovers tasty for later. Remember, cooking should be fun! Experiment with flavors and enjoy your meal. With these insights and tips, you will create a dish that’s both delicious and satisfying. Happy cooking!](https://goldendishy.com/wp-content/uploads/2025/07/7f43d765-f0ef-46f9-86e2-eabd5628ba72-768x768.webp)

![- 2 boneless, skinless chicken breasts - 8 oz fettuccine pasta - 2 cups fresh spinach, roughly chopped - 1 cup heavy cream - 1 cup finely grated Parmesan cheese - 2 tablespoons olive oil - 2 cloves garlic, minced - Salt and freshly ground black pepper, to taste - Fresh basil leaves, for garnish (optional) - Red pepper flakes, for a spicy kick (optional) When I cook Chicken and Spinach Alfredo, I gather these key ingredients first. The chicken breasts are a must because they add protein and flavor. I prefer fettuccine pasta for its wide shape, which holds the creamy sauce well. Fresh spinach adds a pop of green and nutrients, making the dish feel lighter. Next, I grab heavy cream. It’s the star of the sauce, bringing that rich, smooth texture. Of course, Parmesan cheese can't be skipped. It gives depth and a savory taste that blends perfectly with the cream. In the additional ingredients, olive oil is essential for cooking. It adds a nice flavor base. Minced garlic brings a wonderful aroma and a bit of zing. I always keep salt and pepper handy to season the dish just right. Lastly, I suggest garnishing with fresh basil for that extra flair. A sprinkle of red pepper flakes can bring heat if you like a spicy bite. For the full list of ingredients, check out the Full Recipe. First, I boil a large pot of salted water. Once it bubbles, I add the fettuccine. I cook it until it's al dente, which takes about 8-10 minutes. After cooking, I drain the pasta but keep a small cup of the pasta water for later. While the pasta cooks, I heat olive oil in a skillet over medium heat. I take the chicken breasts and season them with salt and pepper on both sides. I place the chicken in the hot skillet and cook for about 6-7 minutes on each side. When they turn golden brown and are fully cooked, I remove them from the skillet. I let them rest for a few minutes before slicing them into thin strips. In the same skillet, I lower the heat and add minced garlic. I sauté it for about 30 seconds until it smells amazing. Then, I slowly pour in heavy cream while stirring. I let it simmer gently, making sure it doesn’t boil. Next, I whisk in grated Parmesan cheese until the sauce is smooth and creamy. I add the chopped spinach and let it cook for 1-2 minutes until it wilts. Now, I carefully fold the cooked fettuccine into the creamy sauce. I mix it well so each strand is coated. If the sauce is too thick, I add a bit of the reserved pasta water to get the right consistency. Finally, I arrange the sliced chicken on top of the pasta. If I want a spicy touch, I sprinkle some red pepper flakes over everything. For the full recipe, check out the earlier section. - Adjusting seasoning: Start by tasting your sauce as you cook. Add more salt or pepper if needed. A pinch of nutmeg can also enhance the flavor. This small touch makes a big difference. - Whisking technique for smooth sauce: When you add the cream and cheese, whisk constantly. This helps to blend everything smoothly. It prevents lumps and ensures a creamy texture. - Presentation tips: Serve the Chicken and Spinach Alfredo in shallow bowls. Drizzle extra sauce on top for a rich look. Finish with freshly grated Parmesan and a basil sprig. This adds color and makes the dish pop. - Best accompaniments: Garlic bread or a fresh salad pairs perfectly. The crunch of the salad balances the creaminess of the dish. A glass of white wine complements the flavors well too. - Multitasking during prep: While the pasta cooks, focus on the chicken. Season it and cook it in the same skillet. This saves time and adds flavor to the sauce. Always keep an eye on the pasta so it doesn’t overcook. By using these tips, you can make your Chicken and Spinach Alfredo even better. Each step adds to the dish's overall experience, making it truly enjoyable. Enjoy the process and get creative! {{image_4}} You can switch out the chicken for other proteins. Shrimp works great in this dish. It adds a nice flavor and cooks quickly. Tofu is a good option for a vegetarian meal. Just make sure to season it well before cooking. For pasta, fettuccine is classic, but you can try penne or whole wheat. Penne holds the sauce well due to its shape. Whole wheat adds a nutty flavor and more fiber. Want to boost nutrition? Add seasonal vegetables. Broccoli brings crunch and color. You can steam it lightly before adding. Bell peppers add sweetness and vibrancy. Slice them thinly to mix in easily. Feel free to experiment! Seasonal vegetables can change the dish each time. Enhancing flavor is simple. You can add herbs like Italian seasoning for a savory kick. A sprinkle of lemon zest brightens the dish and adds freshness. For a bit of heat, red pepper flakes are great. Just a pinch goes a long way. These variations keep your Chicken and Spinach Alfredo fun and fresh. Check out the Full Recipe to get started! After you enjoy your Chicken and Spinach Alfredo, store any leftovers in the fridge. Use an airtight container to keep it fresh. You can keep it for about 3 to 4 days. To reheat, put the pasta in a pan over low heat. Add a splash of water or cream to help it warm evenly. Stir often to keep it creamy and avoid burning. If you want to keep it longer, you can freeze Chicken and Spinach Alfredo. Place it in a freezer-safe container or bag. Make sure to remove as much air as possible. It can last in the freezer for up to 2 months. When you are ready to eat it, take it out and thaw it in the fridge overnight. To reheat, warm it in a pan over low heat, adding a bit of water or cream to restore its creaminess. For the complete recipe, check the [Full Recipe]. Chicken and Spinach Alfredo lasts about 3 to 4 days in the fridge. Store it in an airtight container to keep it fresh. Make sure to cool it down before placing it in the fridge. This helps prevent condensation, which can make the dish soggy. Yes, you can make this recipe ahead of time. Cook the pasta and chicken in advance. Store them separately from the sauce. When you’re ready to eat, just heat everything together. This keeps the pasta from getting mushy. For the best taste, try to eat it within a few days. You can use half-and-half for a lighter option. If you want a dairy-free choice, try coconut cream or cashew cream. Both options give a nice creamy texture. You may need to adjust the seasonings to match your taste. Yes, you can make this dish gluten-free. Use gluten-free pasta such as rice or corn pasta. For the sauce, just check the labels on your cream and cheese. Most are gluten-free, but it’s good to be sure. This way, everyone can enjoy your Chicken and Spinach Alfredo. For the full recipe, check the details above! This blog post covered the key ingredients and steps for making Chicken and Spinach Alfredo. We discussed how to prepare the pasta, cook the chicken, and create a creamy sauce. Plus, I shared tips for enhancing flavors and serving. Remember, you can mix it up with different proteins and veggies. Also, I provided storage advice to keep your meal fresh. Embrace your creativity in the kitchen. Enjoy a tasty meal and share it with friends or family!](https://goldendishy.com/wp-content/uploads/2025/06/ee4d0533-23fd-4fc4-b715-1820a1e3e494-768x768.webp)

