Mini Pumpkin Cheesecakes Delightful Autumn Treats

Are you ready to embrace the warm, cozy flavors of fall? These Mini Pumpkin Cheesecakes are delightful autumn treats that blend creamy goodness with seasonal spices. They’re easy to make and perfect for sharing! Follow my simple steps to create bite-sized delights that your friends and family will rave about. Let’s dive into the ingredients and get started on this tasty fall journey together!
Why I Love This Recipe
- Perfect Fall Flavor: These mini pumpkin cheesecakes capture the essence of autumn with their rich pumpkin and warm spice flavors, making them an ideal dessert for the season.
- Easy to Make: The simple steps and minimal ingredients make this recipe accessible, even for novice bakers, allowing everyone to enjoy a delicious treat.
- Individual Servings: These mini cheesecakes are perfect for parties or gatherings, providing a delightful individual dessert that is easily shared.
- Customizable Toppings: You can get creative with toppings such as whipped cream, caramel drizzle, or even nuts, allowing for a personalized touch to each cheesecake.
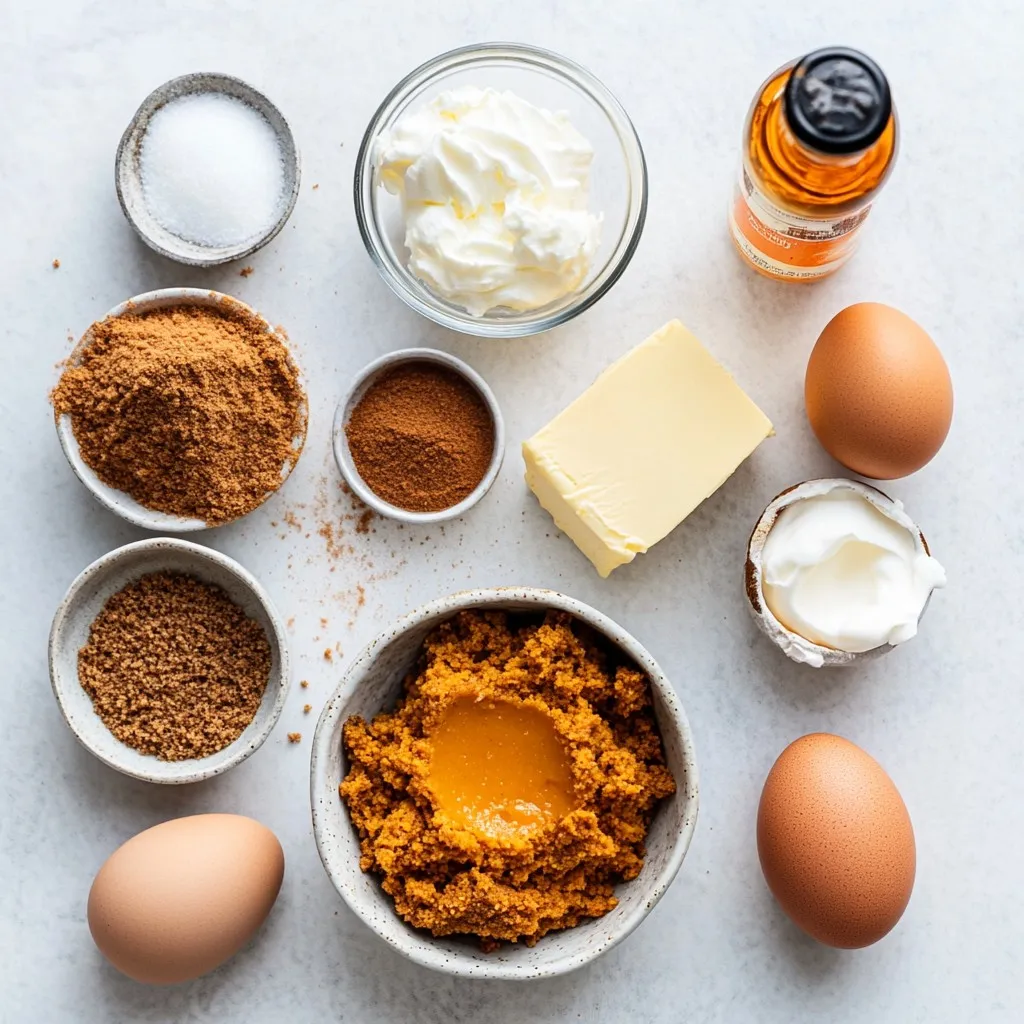
Ingredients
Required Ingredients for Mini Pumpkin Cheesecakes
– 1 cup graham cracker crumbs
– 1/4 cup granulated sugar (for crust)
– 1/4 cup unsalted butter, melted
– 12 oz cream cheese, softened
– 1/2 cup pumpkin puree
– 1/2 cup granulated sugar (for filling)
First, you need the main ingredients. The graham cracker crumbs form a tasty crust. The sugar adds sweetness, while melted butter binds it all together. Cream cheese gives the cake its rich, creamy texture. Pumpkin puree brings that autumn touch and flavor. Finally, a bit more sugar sweetens the filling.
Spices and Flavorings
– 2 large eggs
– 1 teaspoon vanilla extract
– 1 teaspoon ground cinnamon
– 1/2 teaspoon ground nutmeg
– 1/4 teaspoon ground ginger
– 1/4 teaspoon salt
Next, we add spices and flavorings. The eggs help the filling set and add richness. Vanilla extract enhances the flavors. Ground cinnamon gives warmth, and nutmeg adds depth. Ground ginger adds a slight kick. A pinch of salt balances the sweetness.
Optional Toppings
– Whipped cream for topping
– Ground cinnamon for garnish
Lastly, optional toppings make it special. Whipped cream adds lightness and creaminess. A sprinkle of ground cinnamon on top makes it pretty and adds more flavor. You can get creative with the toppings to make them your own!

Step-by-Step Instructions
Preparing the Crust
1. Preheat your oven to 325°F (160°C). This step warms the oven for even baking.
2. In a bowl, mix 1 cup of graham cracker crumbs, 1/4 cup of granulated sugar, and 1/4 cup of melted unsalted butter. Use your hands or a fork to blend until it feels like wet sand.
3. Take about 1 tablespoon of this mixture and press it into the bottom of each paper liner in your muffin tin. Make sure it is compact and even.
Making the Filling
1. In a clean bowl, use an electric mixer to beat 12 oz of softened cream cheese until it is smooth. You want it creamy without lumps.
2. Add 1/2 cup of pumpkin puree, 1/2 cup of granulated sugar, 2 large eggs, and 1 teaspoon of vanilla extract to the cream cheese. Sprinkle in 1 teaspoon of ground cinnamon, 1/2 teaspoon of ground nutmeg, 1/4 teaspoon of ground ginger, and 1/4 teaspoon of salt.
3. Mix everything on low speed until it is silky smooth. This step brings all the flavors together.
Baking the Mini Cheesecakes
1. Carefully spoon the filling into each prepared crust. Fill each cup about three-quarters full.
2. Bake in your preheated oven for 18-20 minutes. The centers should look set but still jiggle a little when you shake the pan.
3. After baking, turn off the oven and open the door slightly. Let the cheesecakes cool inside the oven for about 10 minutes. This helps prevent cracks.
Chilling and Serving
1. Once cooled, take out the cheesecakes and let them cool to room temperature.
2. Place them in the fridge for at least 2 hours. This helps set the filling perfectly.
3. When ready to serve, top each cheesecake with whipped cream and sprinkle with ground cinnamon. Enjoy the festive taste!
Tips & Tricks
Ensuring Smooth Filling
To make your filling creamy, use room temperature ingredients. Cold cream cheese will stay lumpy. So, take it out of the fridge at least 30 minutes before mixing. When you beat the cream cheese, do so until it’s very smooth. This ensures no lumps. You want a silky texture for the perfect cheesecake.
Perfecting the Baking Process
Baking your mini cheesecakes can be tricky. You must avoid overbaking them. Overbaked cheesecakes can crack and dry out. To check for doneness, gently shake the pan. The centers should jiggle slightly. If they look set but still have a wobble, they are done. Once out of the oven, let them cool slowly to avoid cracks.
Presentation Notes
For a beautiful display, arrange your mini cheesecakes on a nice platter. You can add a drizzle of caramel for extra sweetness. This not only tastes great but also looks stunning. To make them even prettier, consider adding a small cinnamon stick or a sprinkle of nutmeg on top. These small touches create a warm, autumn feel.
Pro Tips
- Use Room Temperature Ingredients: Ensure your cream cheese and eggs are at room temperature for a smoother filling without lumps.
- Don’t Overmix: When adding the eggs to the filling, mix just until combined to prevent cracks in your cheesecakes.
- Chill Before Serving: Allow the mini cheesecakes to chill thoroughly in the refrigerator for at least 2 hours for the best texture and flavor.
- Customize Toppings: Experiment with different toppings like caramel sauce, chocolate drizzle, or even crushed nuts for added texture and flavor.

Variations
Flavor Modifications
You can change the flavor of your mini pumpkin cheesecakes in fun ways. Try adding chocolate or caramel to the filling. This adds a rich sweetness that pairs well with pumpkin. Just swirl in melted chocolate or caramel before baking.
You can also play with spices for more flavor. Along with cinnamon, nutmeg, and ginger, try adding allspice or cardamom. These spices add warmth and complexity. Experimenting with flavors makes each cheesecake unique and exciting.
Dietary Considerations
If you or your guests have dietary needs, you can still enjoy these cheesecakes. For a gluten-free crust, use crushed gluten-free cookies or almond flour. Mix these with melted butter and sugar just like the regular crust.
For a vegan-friendly option, substitute cream cheese with a plant-based cream cheese. Use flax eggs instead of regular eggs. Combine one tablespoon of ground flaxseed with two and a half tablespoons of water for each egg. This keeps the texture creamy and delicious without using animal products.
Serving Suggestions
Mini pumpkin cheesecakes fit perfectly into your holiday meals. Serve them as a sweet treat after dinner. They also make great snacks for fall gatherings.
For a fun touch, present them in creative serving dishes. Use small jars or colorful cupcake liners to make them stand out. You can even place a mini cheesecake on a small plate with a drizzle of caramel. It adds a lovely visual and tasty element.
Storage Info
How to Store Mini Pumpkin Cheesecakes
To keep your mini pumpkin cheesecakes fresh, follow these steps:
– Refrigeration: Place the cheesecakes in an airtight container. This prevents them from drying out. They can stay in the fridge for up to 5 days. If you want to keep them longer, freezing is a great option.
– Freezing: To freeze, wrap each cheesecake in plastic wrap. Then, place them in a freezer-safe container. They can last up to 3 months in the freezer. When you’re ready to enjoy, thaw them in the fridge overnight.
Shelf Life
How long do mini cheesecakes last? In the fridge, they last about 5 days. Check for signs of spoilage:
– Texture Change: If they become dry or crumbly, it’s time to toss them.
– Off Smell: If they smell sour, do not eat them.
– Mold: Always check for mold before consuming.
Reheating Tips
How do you serve mini cheesecakes again? First, remove them from the fridge. Here’s what I recommend:
– Room Temperature: Let them sit out for about 15 minutes before serving. This brings back the creamy texture.
– Avoid Heat: Do not reheat in the microwave or oven. This can make them lose their smooth texture.
Enjoy your mini pumpkin cheesecakes as delightful autumn treats, even after storage!
FAQs
Can I make Mini Pumpkin Cheesecakes ahead of time?
Yes, you can make them in advance. I recommend baking them a day before your event. After baking, let the cheesecakes cool to room temperature. Then, refrigerate them for at least two hours. This allows the flavors to meld and improves the texture. You can top them with whipped cream just before serving. This keeps them fresh and delightful.
Can I use fresh pumpkin instead of canned?
Yes, fresh pumpkin works well. To prepare fresh pumpkin, first, cut it in half and remove the seeds. Roast the halves in the oven at 350°F (175°C) for about 45 minutes or until soft. Once cooked, scoop out the flesh and blend it until smooth. Using fresh pumpkin can enhance the flavor. However, canned pumpkin is convenient and consistent.
How do I know when the cheesecakes are done baking?
Watch for a slight jiggle in the center of the cheesecakes. They should look set but not overcooked. Bake them for 18 to 20 minutes. If you see cracks forming, they may be overbaked. After baking, let them cool in the oven for about 10 minutes. This helps them set perfectly without cracking.
Mini pumpkin cheesecakes are simple to make and delicious to eat. We covered the must-have ingredients and shared easy steps to whip them up. Remember to use room temperature ingredients for a smooth filling. You can change the flavors or make them gluten-free as needed. Storing them properly ensures they stay fresh longer.
With these tips and techniques, you can impress friends and family with your baking skills. Enjoy every bite of your tasty mini pumpkin cheesecake

Mini Pumpkin Cheesecakes
Ingredients
- 1 cup graham cracker crumbs
- 1 4 cup granulated sugar (for crust)
- 1 4 cup unsalted butter, melted
- 12 oz cream cheese, softened to room temperature
- 1 2 cup pumpkin puree
- 1 2 cup granulated sugar (for filling)
- 2 large eggs
- 1 teaspoon vanilla extract
- 1 teaspoon ground cinnamon
- 1 2 teaspoon ground nutmeg
- 1 4 teaspoon ground ginger
- 1 4 teaspoon salt
- Whipped cream, for topping
- Ground cinnamon, for garnish
Instructions
- Preheat your oven to 325°F (160°C) and prepare a 12-cup muffin tin by lining it with paper liners.
- In a medium mixing bowl, combine the graham cracker crumbs, 1/4 cup granulated sugar, and melted butter. Use a fork or your hands to mix until the mixture resembles wet sand.
- Evenly distribute approximately 1 tablespoon of the crumb mixture into the bottom of each paper liner, pressing down firmly to create a compact crust.
- In a large mixing bowl, use an electric mixer to beat the softened cream cheese until it becomes smooth and creamy without any lumps.
- To the cream cheese, add the pumpkin puree, 1/2 cup granulated sugar, eggs, vanilla extract, ground cinnamon, ground nutmeg, ground ginger, and salt. Mix on low speed until all ingredients are fully combined and the mixture is silky smooth.
- Carefully spoon the pumpkin cheesecake filling into each prepared crust, filling each cup about three-quarters full to allow for rising.
- Bake in the preheated oven for 18-20 minutes. The centers should look set but still have a slight jiggle when you gently shake the pan.
- Once baking is complete, turn off the oven and open the oven door slightly to let the heat escape. Allow the cheesecakes to cool in the oven for about 10 minutes.
- Remove the cheesecakes from the oven and let them cool completely to room temperature. Once cooled, refrigerate them for at least 2 hours, or until thoroughly chilled.
- When ready to serve, generously top each chilled cheesecake with whipped cream and dust with ground cinnamon for a festive finish.


![- 1 ripe avocado, peeled and pitted - 1/2 cup unsweetened cocoa powder - 1/2 cup maple syrup or honey - 1/4 cup almond butter or peanut butter - 1/2 cup whole wheat flour - 1/2 teaspoon baking soda - 1/4 teaspoon salt - 1 teaspoon pure vanilla extract - 1/2 cup dark chocolate chips The key ingredient here is the avocado. Why choose avocado for brownies? It adds creaminess and healthy fats. This makes the brownies moist without extra oil. Next, we have cocoa powder. It gives the brownies a rich chocolate taste. The maple syrup or honey acts as a natural sweetener. I prefer maple syrup for its unique flavor. Almond butter or peanut butter brings a nutty taste. Whole wheat flour adds fiber, making these brownies healthier. Baking soda helps the brownies rise. Salt enhances all the flavors. Finally, dark chocolate chips are a must for that gooey chocolate burst. Using avocado offers many perks. It is rich in vitamins and healthy fats. These fats can help lower bad cholesterol. The fiber in avocado also aids digestion. Cocoa powder is full of antioxidants. It can improve heart health while making brownies delicious. Maple syrup is a lower glycemic option. It can provide a steady energy boost without a sugar crash. Switching to whole wheat flour adds more nutrients. It has more fiber than white flour. This helps keep you full longer. If you need gluten-free options, use almond flour instead of whole wheat. It works well and keeps the taste rich. For a vegan-friendly version, replace honey with maple syrup. Use a nut butter that fits your diet. You can also find dairy-free chocolate chips easily. These easy swaps ensure everyone can enjoy these healthy chocolate avocado brownies! - Preheat your oven to 350°F (175°C). - Line an 8x8 inch baking pan with parchment paper. Leave some paper hanging over the edges. This helps with easy removal later. - Take your ripe avocado and mash it in a bowl. You want it smooth and creamy. You can also use a food processor for this step. - In the same bowl, add maple syrup (or honey), almond butter, and vanilla extract. Mix until everything is blended well. - In a different bowl, whisk together cocoa powder, whole wheat flour, baking soda, and salt. Make sure these dry ingredients are mixed well. - Gradually add the dry mix to the wet mix. Stir gently until just combined. It’s okay to have a few lumps; this helps keep the brownies soft. - Fold in dark chocolate chips so they are evenly spread in the batter. - Pour the batter into your prepared pan. Use a spatula to smooth it out evenly. - Place the pan in your oven. Bake for 20-25 minutes. - To check if they are done, insert a toothpick into the center. It should come out with a few moist crumbs but not wet batter. - Once baked, let the brownies cool in the pan on a wire rack for 15 minutes. Use the parchment paper to lift them out. Let them cool further before cutting into squares. Enjoy making these Healthy Chocolate Avocado Brownies with the [Full Recipe]. To make your brownies just right, avoid overmixing. When you combine wet and dry ingredients, mix gently. A few lumps are okay. This keeps your brownies soft and fudgy. Even baking is also key. Make sure to spread the batter evenly in the pan. This helps them bake at the same time. For a lovely presentation, dust the brownies with cocoa powder or powdered sugar. You can also serve them with fresh berries. A dollop of yogurt adds creaminess and balances the rich chocolate. These simple touches make your brownies look great on any plate. You can boost the taste of your brownies easily. Try adding spices like cinnamon or a pinch of sea salt. A splash of almond or peppermint extract gives a fun twist. Using flavored chocolate chips adds another layer of taste. Think about using orange or hazelnut chips for a unique flavor profile. Check out the Full Recipe for more ideas! {{image_4}} To make these brownies gluten-free, swap whole wheat flour for almond flour or coconut flour. These options keep the texture rich and moist while avoiding gluten. Just remember to adjust the amount, as almond flour is more absorbent. For a vegan twist, replace honey with maple syrup. You can also use a plant-based nut butter, like almond or sunflower seed butter, instead of peanut butter. This keeps the flavor intact without any animal products. You can add a fresh twist to these brownies by mixing in mint extract. Use about 1 teaspoon of pure mint extract for a refreshing flavor. This makes mint chocolate avocado brownies that are perfect for any mint lover! Another fun option is to create a peanut butter swirl. Drop spoonfuls of peanut butter into the brownie batter before baking. Use a knife to swirl it around for a beautiful marbled look. This adds a delicious peanut flavor that pairs well with chocolate. If you want to change the serving size, you can easily convert the recipe. For a smaller batch, halve the ingredients. Use a smaller pan, like 6x6 inches, and keep an eye on the baking time. Smaller brownies will bake faster. You can also bake these brownies in a larger pan for thinner squares. A 9x13 inch pan works well, but adjust the baking time to about 15-20 minutes. Check for doneness with a toothpick, just like before. For the full recipe, check out the details above! To keep your brownies fresh, store them in an airtight container. This prevents air from making them dry. You can also place a slice of bread in the container. The bread helps maintain moisture. Always let brownies cool before storing. This avoids steam build-up, which can make them soggy. If you want to freeze brownies, first cut them into squares. Wrap each piece tightly in plastic wrap. Then, place them in a freezer-safe bag or container. This helps avoid freezer burn. When you're ready to eat them, just take out a piece and let it thaw at room temperature. You can also warm them in the microwave for a few seconds. Brownies last about 3-4 days at room temperature. If you see any mold, throw them away. To keep them fresh longer, refrigerate or freeze them. Refrigeration can extend their life to about a week. For best taste, enjoy them within a few days. For the full recipe, check out the provided details. Can I use ripe bananas instead of avocado? Yes, you can use ripe bananas. They add sweetness and moisture. However, the flavor changes slightly. Bananas may make the brownies taste fruitier. If you love banana, give it a try! How can I make these brownies less sweet? To reduce sweetness, cut back on the maple syrup or honey. You can also swap some sweetener for unsweetened applesauce. This keeps the texture but lowers the sugar. What is the best way to test brownies for doneness? The best way is to use a toothpick. Insert it in the center. If it comes out with a few moist crumbs, the brownies are done. If it has wet batter, bake a bit longer. Can these brownies be made without flour? Yes, you can make them without flour. Use a blend of nut flour or almond flour instead. This gives a nutty flavor and keeps the brownies moist. How many calories are in a serving? Each brownie has about 100 calories. This can change based on the ingredients you use. For example, using less sweetener or different nut butter may alter the calorie count. What are good dairy-free alternatives for chocolate chips? Look for dairy-free dark chocolate chips. Many brands make these with coconut or almond milk. You can also chop up a dairy-free chocolate bar for chunks. In this article, I covered a delicious brownie recipe that uses healthy ingredients. You learned about the key components, their nutritional benefits, and how to adapt the recipe for dietary needs. I shared step-by-step instructions for baking these brownies to perfection. With tips on flavor and texture, you can create the best version. Remember to store your leftovers properly to keep them fresh. Enjoy baking these brownies, knowing they are a tasty treat that can fit your diet!](https://goldendishy.com/wp-content/uploads/2025/06/19347e51-2d6e-4328-baa5-83086a8293f2-768x768.webp)