Mediterranean Stuffed Peppers Flavorful and Easy Meal

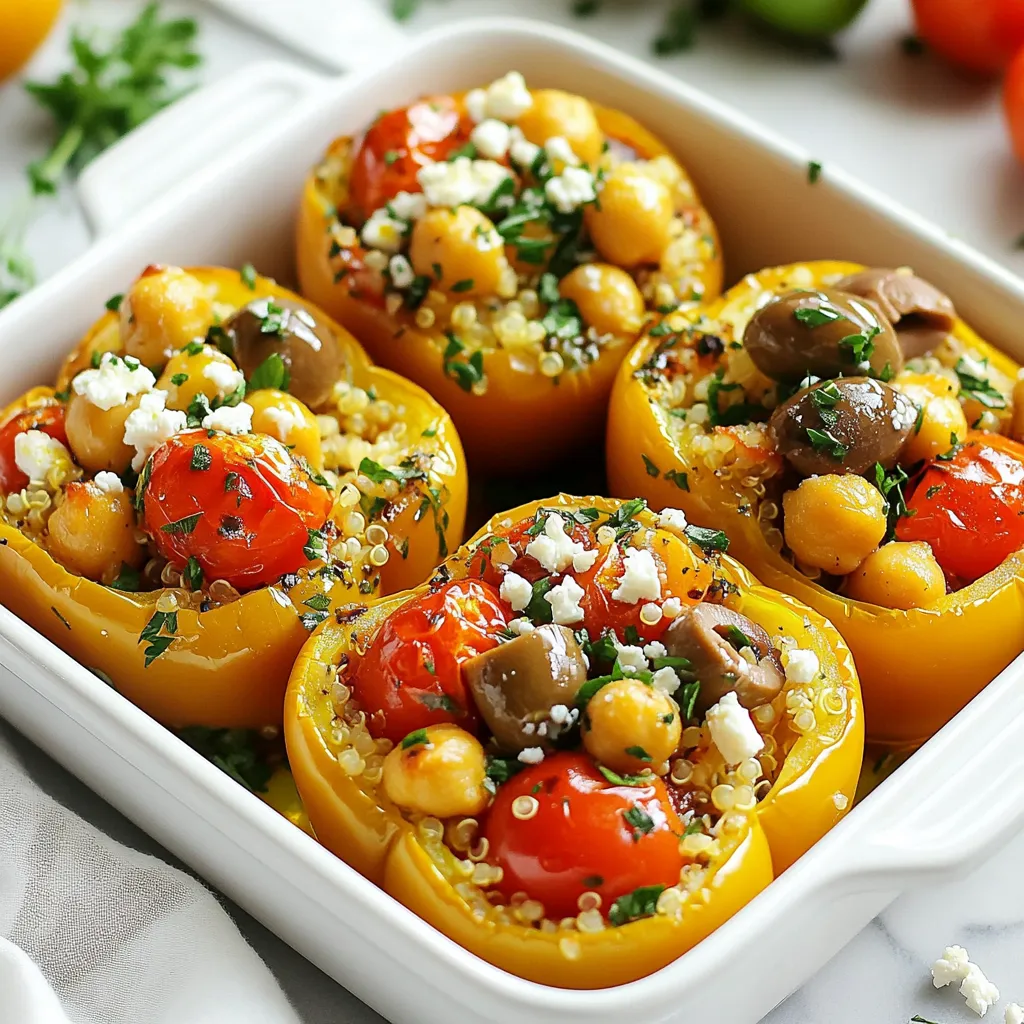
Looking for a tasty and easy meal? Mediterranean stuffed peppers are your answer! Packed with vibrant flavors and wholesome ingredients, these colorful dishes are perfect for any weeknight dinner. You’ll love working with fresh veggies, hearty quinoa, and zesty feta cheese. Join me as I guide you step-by-step to make a dish that’s not only delicious but also fun to prepare and share. Let’s dive into this culinary adventure!
Why I Love This Recipe
- Healthy and Nutritious: This recipe is packed with wholesome ingredients like quinoa, chickpeas, and fresh veggies, making it a nutrient-rich choice for any meal.
- Versatile and Customizable: You can easily swap in your favorite vegetables or proteins, allowing you to tailor the dish to your personal taste or dietary needs.
- Colorful Presentation: The vibrant colors of the bell peppers and fresh ingredients create an eye-catching dish that is sure to impress at any gathering.
- Easy to Prepare: With minimal prep and cook time, this recipe is perfect for busy weeknights or when you want a delicious, home-cooked meal without the hassle.
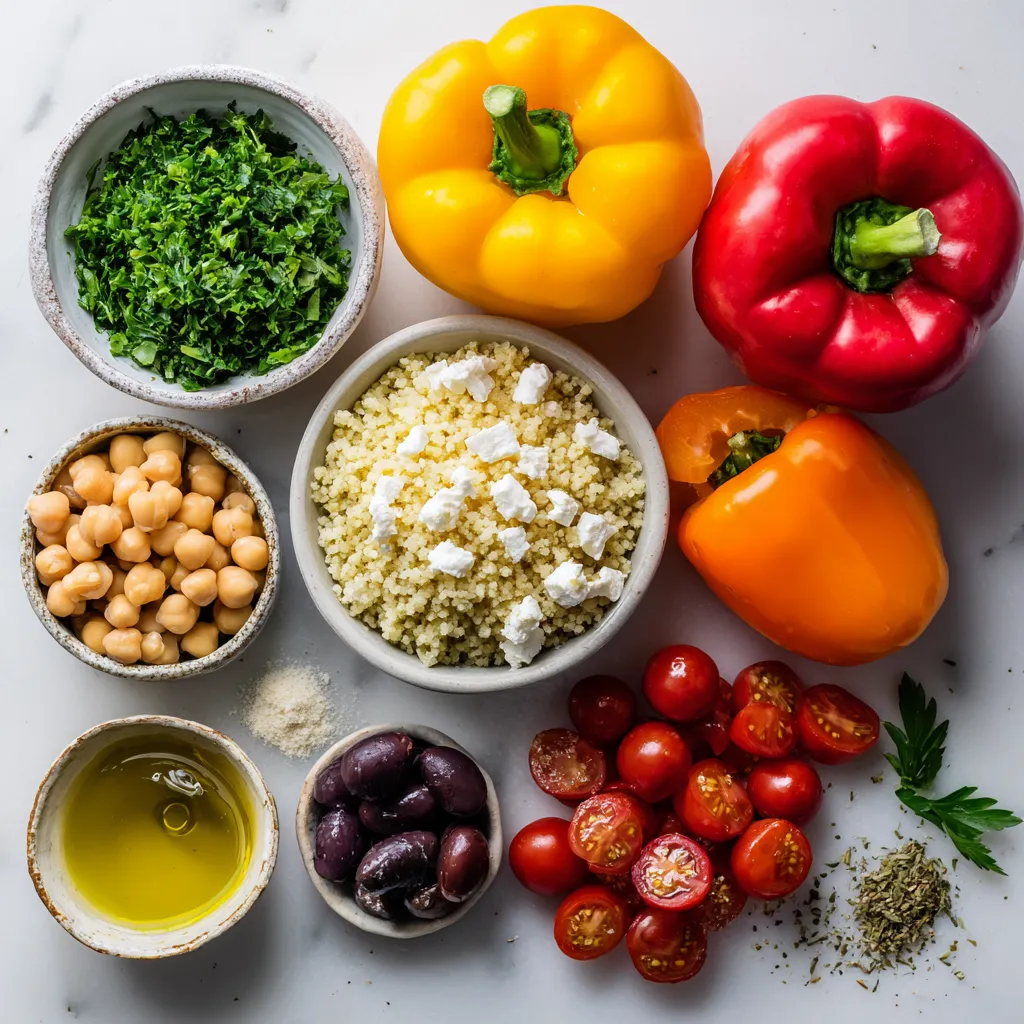
Ingredients
Main Ingredients for Mediterranean Stuffed Peppers
– 4 large bell peppers (any color of your choice)
– 1 cup quinoa, thoroughly rinsed
– 2 cups vegetable broth
– 1 can (15 oz) chickpeas, drained and rinsed
– 1 cup cherry tomatoes, sliced in half
– 1/2 cup Kalamata olives, pitted and sliced
– 1/2 cup feta cheese, crumbled
– 1/4 cup fresh parsley, finely chopped
– 2 tablespoons olive oil, plus extra for drizzling
– 1 teaspoon dried oregano
– 1 teaspoon garlic powder
– Salt and pepper to taste
Optional Garnishes and Additions
– Additional herbs (like basil or mint)
– Lemon zest for brightness
– Spinach or kale for extra veggies
When making Mediterranean stuffed peppers, you want fresh and vibrant ingredients. Start with bell peppers. They are colorful and sweet. You can choose red, yellow, or green. Each color has a unique flavor.
Next, quinoa is the base. It cooks fluffy and adds a nice texture. Rinse it well before cooking. This helps remove bitterness. You will also need chickpeas. They add protein and creaminess.
Cherry tomatoes bring a juicy burst of flavor. Slice them in half for easy mixing. Kalamata olives add a briny kick, while feta cheese gives a creamy touch. Fresh parsley adds brightness and color.
For seasoning, use olive oil, dried oregano, garlic powder, salt, and pepper. These ingredients bring out the flavors of the dish. You can also add optional garnishes. Fresh herbs like basil or mint offer extra aroma. A sprinkle of lemon zest gives a fresh taste. Spinach or kale adds more greens and nutrition.
These ingredients come together to create a colorful and tasty meal. Enjoy making it!

Step-by-Step Instructions
Preparing the Peppers
1. Preheat your oven to 375°F (190°C). This heat helps cook the peppers well.
2. Take four large bell peppers and cut the tops off. Remove the seeds and membranes. This step makes sure the peppers can stand up in the dish.
Cooking the Quinoa
1. In a medium pot, boil two cups of vegetable broth. This liquid will cook the quinoa.
2. Add one cup of rinsed quinoa to the boiling broth. Stir it once, cover, and lower the heat. Let it simmer for 15-20 minutes. The quinoa should be fluffy when done. Use a fork to fluff it up.
Mixing the Stuffing
1. In a large bowl, mix the cooked quinoa with drained chickpeas, halved cherry tomatoes, sliced Kalamata olives, crumbled feta cheese, chopped parsley, olive oil, dried oregano, garlic powder, and salt and pepper.
2. Stir all the ingredients well. This ensures every bite is packed with flavor.
Stuffing the Peppers
1. Spoon the quinoa mixture into each bell pepper. Fill them to the top without letting it overflow. This makes the peppers hearty and tasty.
2. Drizzle a little olive oil on top of each stuffed pepper. This adds moisture and flavor.
Baking the Stuffed Peppers
1. Cover the baking dish tightly with aluminum foil. This keeps the steam in while baking.
2. Bake the peppers for 30 minutes. Then, remove the foil and bake for another 10-15 minutes. This step allows the tops to caramelize and become deliciously golden.
After baking, let the peppers cool for a few minutes. They are now ready to serve and enjoy!
Tips & Tricks
How to Choose the Best Peppers
When picking bell peppers, look for bright colors. Red, yellow, or green, any color works. Choose peppers that feel firm in your hand. They should have shiny skin, not dull. Make sure they can stand on their own. This helps when you stuff them later.
What to Do with Leftover Filling
If you have extra filling, don’t toss it! You can use it in many ways. Add it to salads for a hearty boost. It makes a tasty wrap too. Just scoop some into a tortilla and roll it up. You can even use it as a topping for baked potatoes.
Ensuring Peppers are Tender
To keep your peppers tender, watch the cooking time. Bake them covered with foil for 30 minutes. This helps them steam and soften. After that, remove the foil. Bake for an extra 10-15 minutes. This lets the tops brown nicely while the insides stay soft.
Pro Tips
- Choose Colorful Peppers: Using a mix of colored bell peppers not only makes the dish visually appealing but also adds a variety of flavors.
- Flavor Variations: Feel free to experiment with different herbs, such as basil or thyme, for a unique twist to the stuffing mixture.
- Make Ahead: Prepare the stuffed peppers a day in advance and store them in the fridge. Just bake them when you’re ready to serve!
- Serve with Dips: Pair these stuffed peppers with a side of tzatziki sauce or hummus for an extra layer of flavor.

Variations
Different Grains to Use
You can switch up the grain in your stuffed peppers. Brown rice is a hearty choice. Farro adds a nutty flavor. Couscous cooks quickly and absorbs taste well. For those needing gluten-free options, quinoa is perfect. It’s light and fluffy. You can also try millet or rice blends. These grains work great with the other ingredients.
Protein Enhancements
Add protein to your stuffed peppers for a filling meal. Ground meat, like lamb or turkey, can give a nice flavor boost. You can mix it right into the stuffing. If you prefer cheese, more feta can enhance the taste. For a vegan option, use lentils or more chickpeas. Tofu crumbles also add protein. These choices keep the dish satisfying and delicious.
Spice Level Adjustments
Want some heat? Add red pepper flakes to the filling. It gives a nice kick without overpowering. You can also use fresh chili peppers for more heat. If you like herbs, add fresh basil or oregano for flavor. These herbs pair well with the Mediterranean taste. Don’t be afraid to experiment! Each adjustment can make your dish unique and exciting.
Storage Info
Storing Leftover Stuffed Peppers
To keep your stuffed peppers fresh, use these best practices:
– Cool them first: Allow the peppers to cool to room temperature.
– Use airtight containers: Store them in a sealed container to prevent drying.
– Label with date: Write the date on the container to track freshness.
Refrigerate your stuffed peppers. They stay good for about 3 to 5 days. If you want to keep them longer, consider freezing.
Freezing Stuffed Peppers
You can freeze stuffed peppers before or after baking. Here’s how:
– Before baking: Prepare the stuffed peppers, then wrap them tightly in plastic wrap and foil. Place them in a freezer-safe bag.
– After baking: Let them cool completely. Then, place them in a container or wrap them securely.
To reheat frozen stuffed peppers:
– Oven method: Thaw overnight in the fridge. Preheat your oven to 375°F (190°C), cover with foil, and bake for 25-30 minutes.
– Microwave method: Remove from the container and place on a microwave-safe plate. Heat for about 5-7 minutes or until heated through.
These methods help keep the taste and texture of your Mediterranean stuffed peppers. Enjoy them again later!
FAQs
Can I use frozen bell peppers for stuffing?
Yes, you can use frozen bell peppers. Freezing peppers is simple. Just wash and cut them. Remove the seeds, and then freeze them whole or in halves. When you thaw them, they can become soft. This won’t hurt the taste, but it may change the texture. For stuffing, they work well. Just make sure to drain any extra water after thawing.
How long can stuffed peppers be stored?
Stuffed peppers can last in the fridge for about three to four days. Keep them in an airtight container. If you freeze them, they can last for about three months. To enjoy them later, just thaw in the fridge overnight before reheating. Reheat in the oven for the best taste.
What can I serve with Mediterranean stuffed peppers?
You have many tasty options! Here are a few ideas:
– A fresh green salad with lemon dressing
– Crusty bread or pita for dipping
– Tzatziki sauce for a cool touch
– Roasted vegetables for added flavor
These sides will balance the meal and enhance the flavors of your stuffed peppers.
You now know how to make Mediterranean stuffed peppers. We covered the key ingredients, found tips, and explored variations. Preparing these stuffed peppers is easy and fun. Plus, you can customize them to fit your taste! Remember to store leftovers properly to enjoy your meal later. Whether you make them for a quick dinner or impress guests, these peppers bring great flavor and nutrition. Dive into cooking and enjoy the healthy, tasty reward

Mediterranean Stuffed Bell Peppers
Ingredients
- 4 large bell peppers (any color of your choice)
- 1 cup quinoa, thoroughly rinsed
- 2 cups vegetable broth
- 1 can (15 oz) chickpeas, drained and rinsed
- 1 cup cherry tomatoes, sliced in half
- 1 2 Kalamata olives, pitted and sliced
- 1 2 feta cheese, crumbled
- 1 4 fresh parsley, finely chopped
- 2 tablespoons olive oil, plus extra for drizzling
- 1 teaspoon dried oregano
- 1 teaspoon garlic powder
- to taste salt and pepper
Instructions
- Preheat your oven to 375°F (190°C).
- Carefully slice the tops off the bell peppers and remove the seeds and membranes, ensuring the peppers can stand upright. Arrange the cleaned peppers in a baking dish, standing proudly.
- In a medium saucepan, bring the vegetable broth to a rolling boil. Add the rinsed quinoa, stir briefly, cover with a lid, and reduce the heat to a gentle simmer. Cook for 15-20 minutes, or until the quinoa is fluffy and all the liquid has been absorbed. Once done, remove from heat and fluff with a fork.
- In a large mixing bowl, combine the cooked quinoa, chickpeas, halved cherry tomatoes, sliced Kalamata olives, crumbled feta cheese, chopped parsley, two tablespoons of olive oil, dried oregano, garlic powder, and a generous pinch of salt and pepper. Mix thoroughly until all the ingredients are well incorporated.
- Carefully spoon and pack the quinoa mixture into each prepared bell pepper, ensuring they are filled to the brim without overflowing.
- Drizzle a bit of olive oil over the tops of the stuffed peppers for an added layer of flavor and moisture.
- To create a steaming effect for the peppers, cover the baking dish tightly with aluminum foil and bake in the preheated oven for 30 minutes.
- After 30 minutes, remove the foil and continue to bake for another 10-15 minutes, allowing the peppers to become tender and allow the tops to caramelize slightly for additional uniqueness.
- Take the baking dish out of the oven and let it cool for a few minutes before serving.


. In this post, we covered essential ingredients for cornbread, substitutions, and tips for fresh picks. I shared step-by-step instructions to ensure your cornbread turns out great. We discussed ways to perfect texture, enhance flavor, and explore different variations. Proper storage and reheating tips help keep your cornbread fresh for later. Remember, cornbread can be sweet or savory, so choose what you love. Get creative and enjoy the process! Your next batch will be delicious and fun to make.](https://goldendishy.com/wp-content/uploads/2025/07/3215032b-f688-44a5-9882-4fc644314e18-768x768.webp)
![- 2 boneless, skinless chicken breasts - 1 teaspoon garlic powder - 1 teaspoon smoked paprika - 1 teaspoon dried oregano - Salt and freshly ground black pepper to taste - 1 tablespoon extra-virgin olive oil - 1 cup cooked quinoa or couscous - 1 cucumber, finely diced - 1 cup cherry tomatoes, halved - 1/2 red onion, paper-thin sliced - 1 cup creamy Greek yogurt - 2 tablespoons fresh dill, finely chopped - 1 tablespoon fresh lemon juice - Crisp lettuce leaves for serving - Medium-sized mixing bowl - Grill or grill pan - Spatula or tongs - Knife and cutting board - Serving bowls This simple list of ingredients and tools sets you up for a tasty meal. You can find the full recipe to guide you through each step. Start by making a simple rub. In a bowl, mix garlic powder, smoked paprika, dried oregano, salt, and pepper. Add olive oil to this mix. Rub it all over the chicken breasts. Make sure they are well-coated. For the best taste, let the chicken marinate for at least 30 minutes. If you have time, let it sit in the fridge overnight. This will make the chicken super tasty. While the chicken marinates, let’s make the tzatziki sauce. In a clean bowl, combine Greek yogurt, finely diced cucumber, chopped dill, and lemon juice. Stir well until everything blends nicely. Add a pinch of salt and pepper to taste. Set this aside. Letting it sit helps the flavors come together. Preheat your grill or grill pan to medium heat. Once it’s hot, place the marinated chicken breasts on the grill. Cook them for about 5-6 minutes on each side. You want the chicken to reach an internal temperature of 165°F (75°C). After grilling, take the chicken off the heat. Let it rest for about 5 minutes. This helps keep it juicy. After resting, slice the chicken into bite-sized pieces. Grab your serving bowls and start building your dish. Begin with a layer of cooked quinoa or couscous at the bottom. This will be the base of your bowl. Next, add the grilled chicken pieces on top of the quinoa. Then, layer on the diced cucumber, halved cherry tomatoes, and thinly sliced red onion. This adds a pop of color and flavor. Finally, drizzle the tzatziki sauce generously over everything. This brings a creamy contrast. If you like, add a handful of crisp lettuce leaves on top. This gives an extra crunch. Serve your Chicken Tzatziki Bowls in bright plates. It makes the dish look inviting. For a final touch, sprinkle some fresh dill on top and add a lemon wedge for extra zest. Enjoy your meal! To grill chicken that is juicy and flavorful, follow these tips: - Marinate Well: Use the spice rub with garlic powder, smoked paprika, and oregano. Let the chicken sit for at least 30 minutes. For best results, marinate overnight. - Use Medium Heat: Preheat your grill to a medium setting. This helps cook the chicken evenly without burning it. - Check Temperature: Use a meat thermometer to ensure the chicken reaches 165°F (75°C). This keeps it safe to eat. - Rest the Chicken: After grilling, let the chicken rest for 5 minutes. This keeps the juices inside. You can make tzatziki in different ways to suit your taste: - Add Spice: Mix in a pinch of cayenne or red pepper flakes for heat. - Use Different Herbs: Swap dill with mint or parsley for a fresh twist. - Try Other Veggies: Add grated carrots or chopped bell peppers for extra crunch. Presentation makes your Chicken Tzatziki Bowls shine. Here are some ideas: - Choose Colorful Bowls: Use deep plates to highlight the bright ingredients. - Layer Thoughtfully: Start with quinoa or couscous, then add chicken, veggies, and a drizzle of tzatziki. - Garnish: Add a sprinkle of fresh dill or a lemon wedge for a burst of color. These tips will help you create a delicious and beautiful meal that impresses everyone. For the complete recipe, check [Full Recipe]. {{image_4}} If you want a vegetarian twist, try using tofu or chickpeas. Tofu absorbs flavors well. Press and marinate it like the chicken. Cut it into cubes and grill or sauté until golden. Chickpeas also work great. Use canned or cooked chickpeas. Toss them in the same spices and roast in the oven. Both options are rich in protein and add a nice texture. You can swap grains in your Chicken Tzatziki Bowls for variety. Quinoa is high in protein and gluten-free. Couscous cooks quickly and is light on your stomach. Brown rice is hearty and adds fiber. Each grain brings a unique taste and texture. Try different grains each time for a fun twist! Add more fresh veggies to your bowl for color and crunch. Sliced bell peppers bring sweetness and crunch. Shredded carrots add a bright pop and extra nutrition. You can also use radishes for a peppery kick. Mix and match your favorites! This makes each bowl unique, fresh, and delicious. For the full recipe, check out the complete guide. After enjoying your Chicken Tzatziki Bowls, store leftovers in airtight containers. This keeps the chicken juicy and the veggies fresh. Place the chicken and veggies in one container. Store the tzatziki sauce in another. This helps prevent sogginess. You can keep the leftovers in the fridge for up to three days. To reheat the chicken, use a microwave or a skillet. If using a microwave, cover the chicken with a damp paper towel. This keeps moisture in and prevents it from drying out. Heat it for 30 seconds, check, and repeat if needed. If using a skillet, heat on low. Add a splash of water to keep it juicy. Cook until warmed through, about 3-4 minutes. Store your tzatziki sauce in a sealed container in the fridge. It stays fresh for about four days. If you notice extra water on top, just drain it off. Stir the sauce well before using it again. This keeps all the flavors mixed and tasty. For longer storage, you can freeze tzatziki in ice cube trays. Once frozen, transfer the cubes to a freezer bag. This way, you can enjoy it later in your Chicken Tzatziki Bowls or other dishes. If you don't have Greek yogurt, you can use regular yogurt. You can also try sour cream. Both will give a creamy texture, but they may taste a bit different. For a dairy-free option, use coconut yogurt or a blended cashew cream. These options keep the dish rich and tasty. You can marinate the chicken for at least 30 minutes. For better flavor, marinate it overnight. This gives the spices time to soak in. The longer, the better! Just keep it in the fridge to stay safe. Yes, you can make this dish ahead of time. Prepare the chicken and tzatziki sauce a day before. Store them in separate containers in the fridge. When you're ready to eat, just grill the chicken and assemble your bowls. It saves time and tastes fresh! Chicken Tzatziki Bowls taste great with various sides. Try a simple Greek salad with tomatoes and olives. Pita bread with hummus is also a good match. You can add roasted veggies or a light soup for extra flavor and nutrition. Yes, this dish is gluten-free if you use quinoa. Couscous is not gluten-free, so skip it if needed. Always check the labels on your ingredients to be sure. Enjoy this tasty meal without worry! This blog post covered how to make tasty Chicken Tzatziki Bowls. We explored essential ingredients, step-by-step instructions, and helpful tips. I shared fun variations, storage info, and answers to common questions. Now, you can impress your friends with this easy dish. Enjoy the fresh flavors and simple steps. With practice, you’ll make perfect bowls every time. Dive in and have fun in the kitchen!](https://goldendishy.com/wp-content/uploads/2025/06/3644d9ce-b609-47a4-b270-daf6d08e9407-768x768.webp)


