Mediterranean Chickpea Salad Flavorful and Fresh Dish

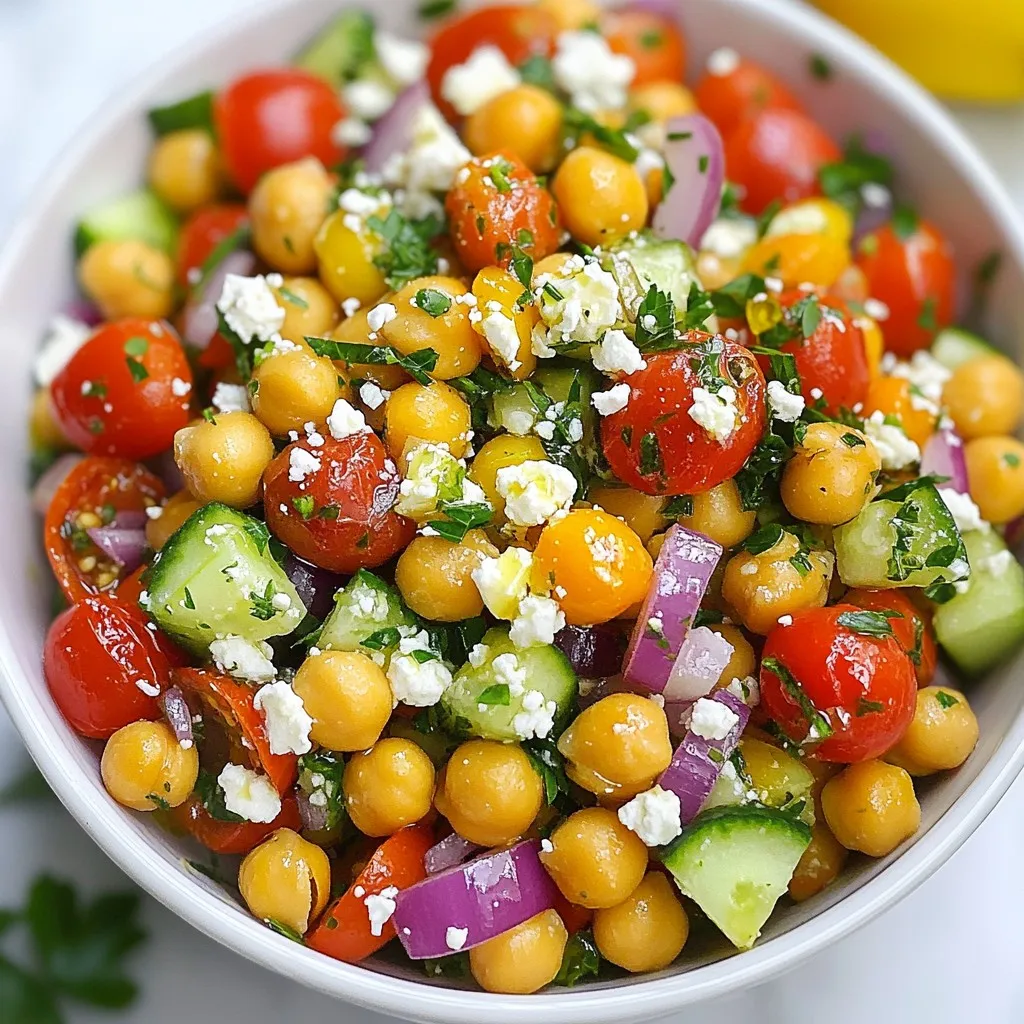
Are you ready to dive into a bowl of fresh flavor? This Mediterranean Chickpea Salad is not only vibrant and delicious, but it’s also packed with healthy ingredients. Using canned chickpeas and fresh veggies, you can whip up a quick and nutritious dish perfect for any meal. Plus, I’ll share tips and tricks to make it your own. Let’s get started on this tasty journey!
Why I Love This Recipe
- Fresh and Vibrant: This salad bursts with fresh ingredients that are not only colorful but also packed with nutrients, making it a healthy choice any time of day.
- Quick to Prepare: With a prep time of just 15 minutes, this salad is perfect for those busy days when you need a nutritious meal in a hurry.
- Versatile Ingredients: You can easily customize this salad by adding or substituting vegetables and proteins to suit your taste preferences or dietary needs.
- Deliciously Satisfying: The combination of chickpeas, olives, and feta cheese creates a satisfying and filling dish that can serve as a main or side.
Ingredients
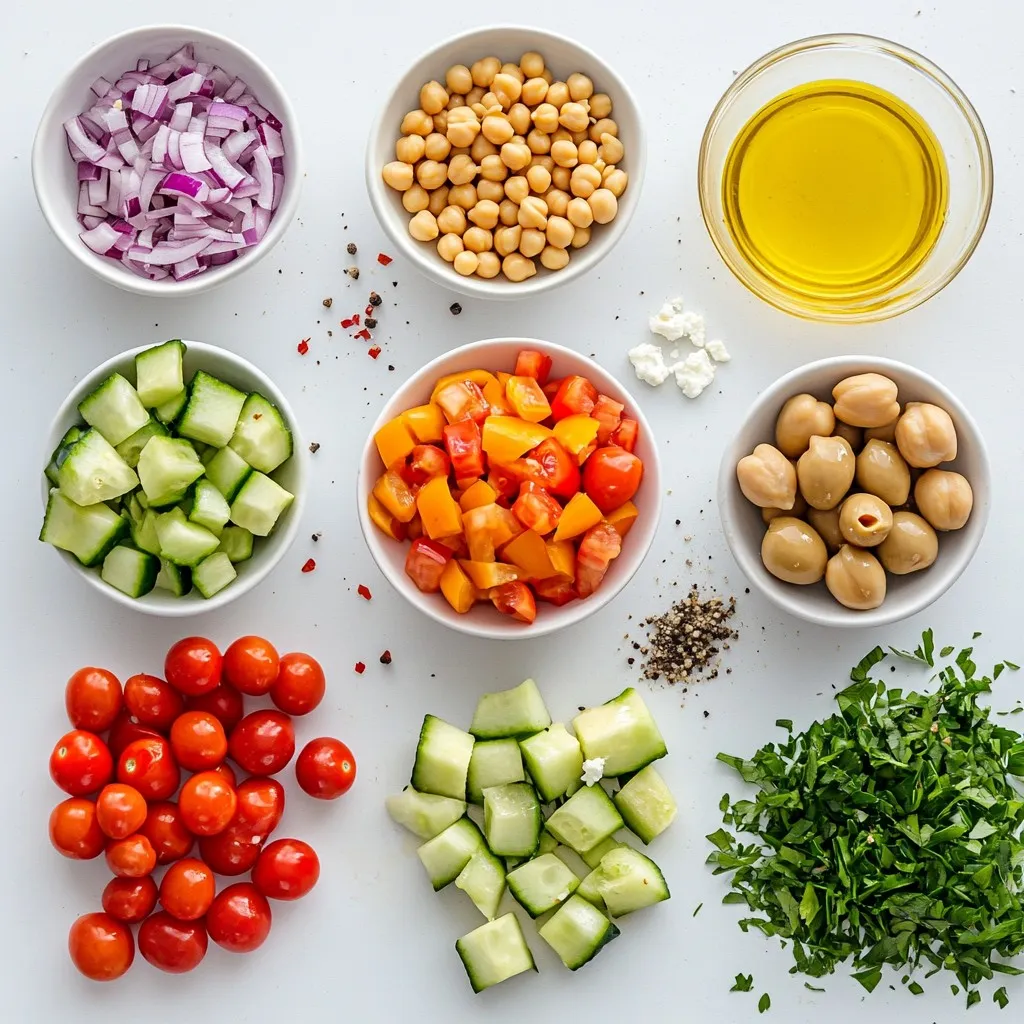
To make a delicious Mediterranean Chickpea Salad, you need fresh and simple ingredients. Here’s what you’ll need:
– Canned Chickpeas
– Fresh Vegetables:
– 1 cup cherry tomatoes, halved
– 1/2 cucumber, diced into small cubes
– 1/4 red onion, finely chopped
– 1/2 bell pepper, diced
– Kalamata Olives:
– 1/4 cup, pitted and sliced
– Feta Cheese:
– 1/4 cup, crumbled (or use vegan cheese)
– Fresh Herbs:
– 1/4 cup fresh parsley, coarsely chopped
– Seasonings:
– 3 tablespoons high-quality olive oil
– 1 tablespoon freshly squeezed lemon juice
– 1 teaspoon dried oregano
– Salt and freshly cracked black pepper to taste
Each ingredient plays a role in creating bright flavors. The chickpeas provide protein and texture. The vegetables add crunch and color. The olives and feta give a salty kick. Fresh herbs bring brightness, while the dressing ties it all together. This mix creates a salad that is not just tasty but also vibrant and healthy.

Step-by-Step Instructions
Preparation of Ingredients
Rinsing and Draining Chickpeas
Start with one can of chickpeas. Rinse them well under cold water. This removes any salty brine. Then, drain them in a colander. Make sure they are dry. This helps the salad stay fresh.
Chopping Vegetables
Next, take your fresh veggies. Cut one cup of cherry tomatoes in half. Dice half a cucumber into small cubes. Finely chop a quarter of a red onion. Then, dice half a bell pepper. You can choose red or yellow.
Prepping the Dressing
In a small bowl, mix three tablespoons of olive oil. Add one tablespoon of lemon juice. Then, sprinkle in one teaspoon of dried oregano. Finish with a pinch of salt and black pepper. Whisk this mixture until it is smooth and well-blended.
Combining Ingredients
Mixing Base Ingredients
In a large mixing bowl, add the chickpeas, cherry tomatoes, cucumber, red onion, bell pepper, and Kalamata olives. This makes the base of your salad colorful and tasty.
Adding Cheese and Herbs
If you like, sprinkle in a quarter cup of crumbled feta cheese. Add a quarter cup of chopped parsley for freshness. This step brings in more flavor and a beautiful look.
Final Steps
Whisking Dressing
Now, take your prepared dressing. Drizzle it over the salad mixture.
Tossing Salad
Using a large fork or salad tongs, gently toss everything together. Make sure every piece is coated in the dressing. This step helps mix all the flavors.
Resting Time for Flavor Blending
Let the salad rest for at least 10 minutes. This allows the ingredients to marinate. The flavors will blend and taste even better!
Tips & Tricks
Perfecting Flavor
Adjusting Seasonings
To make your salad shine, taste is key. Start with the basic salt and pepper. After mixing, you can add more if needed. You may want to add a bit more lemon juice for brightness. Each bite should be full of flavor but not too salty. If you like a kick, try a pinch of red pepper flakes. Adjust the seasonings until it feels just right for you.
Marinating Time
Letting the salad rest is very important. After mixing everything, let it sit for at least 10 minutes. This time helps the flavors mix well. If you have more time, you can let it sit longer. The longer it rests, the more flavor it gains. Just cover it and keep it in the fridge.
Presentation Ideas
Serving Suggestions
How you serve the salad matters. A large, shallow bowl shows off the colors well. You can also use individual plates for a nice touch. This makes each serving feel special. Pair your salad with crusty bread or pita chips for a full meal.
Garnishing Techniques
Garnish can make your dish pop. Use fresh parsley on top for color. You can also add a lemon wedge on the side. This not only adds beauty but also lets guests add a bit more lemon if they want. A sprinkle of feta on top can also enhance the look. Each of these small touches makes your Mediterranean Chickpea Salad even more inviting.
Pro Tips
- Fresh Ingredients: Always opt for the freshest vegetables you can find; they enhance the flavor and nutritional value of the salad.
- Chill Before Serving: Refrigerate the salad for about 30 minutes before serving to allow the flavors to meld and the salad to be refreshing.
- Customize Your Dressing: Feel free to experiment with different herbs or vinegars in the dressing to suit your taste preferences.
- Meal Prep Friendly: This salad can last in the fridge for a couple of days, making it a perfect option for meal prepping for the week.

Variations
Ingredient Swaps
When making Mediterranean Chickpea Salad, you can easily swap some ingredients. Here are a few ideas:
– Vegan Alternatives
If you want a vegan salad, use vegan cheese instead of feta. It keeps the creamy texture. You can also skip cheese altogether if you prefer.
– Seasonal Vegetables
Use what is fresh and in season. Try adding diced zucchini in summer or roasted butternut squash in fall. You can also use different colored bell peppers for a fun twist.
Dressing Alternatives
Changing the dressing can give your salad a whole new taste. Here are some options:
– Different Dressings to Try
You can mix things up with a balsamic vinaigrette or a tahini dressing. Both add unique flavors that work well with chickpeas.
– Adjusting Flavor Profiles
If you like it spicy, add a pinch of red pepper flakes to the dressing. For a garlic punch, mix in minced garlic. This way, you can create a salad that suits your taste.
Storage Info
Storing Leftovers
Store your Mediterranean Chickpea Salad in a sealed container. Refrigerate it right away. This keeps the salad fresh and safe. Use a glass or plastic container with a lid.
Recommended Duration
You can keep the salad in the fridge for up to three days. After that, the ingredients may lose their crunch. If you notice any changes in smell or color, it is best to discard it.
Freezing Options
You can freeze the salad, but some ingredients may change texture. It’s best to freeze only the chickpeas and veggies. Avoid freezing feta cheese and fresh herbs.
How to Freeze Salad for Later
To freeze, place the salad in a freezer-safe bag. Remove as much air as possible. Label the bag with the date. Use it within three months for best taste.
Best Practices for Thawing
Thaw the salad in the fridge overnight. This keeps it fresh. Once thawed, toss it gently. Add fresh herbs or feta cheese for extra flavor. Enjoy your salad again!
FAQs
Can I make Mediterranean Chickpea Salad in advance?
Yes, you can make this salad ahead of time. Prepare the salad and store it in the fridge. The flavors blend well and taste great the next day. Just add the dressing before serving for a fresh taste.
What are some good side dishes to serve with this salad?
This salad pairs well with many dishes. Try serving it with grilled chicken, fish, or pita bread. You can also enjoy it with hummus, tzatziki, or a warm flatbread. Each option adds a nice touch to your meal.
How do I customize the chickpea salad for dietary restrictions?
You can easily tweak this salad for different diets. Use vegan cheese instead of feta for a plant-based option. If you are gluten-free, ensure the dressing has no gluten-based ingredients. Always check labels to avoid allergens.
Can I use other beans instead of chickpeas?
Absolutely! You can swap chickpeas for other beans. Black beans, kidney beans, or white beans work well. Each type adds a unique flavor and texture to your salad. Experiment to find your favorite combination.
This blog post detailed how to create a tasty Mediterranean chickpea salad. You learned about the fresh ingredients, step-by-step preparation, and tips for great flavor. We also explored fun variations and storage methods.
Remember, making this salad is simple and flexible. You can adjust ingredients to suit your taste or diet. Enjoy crafting your own version, and share it with others. This salad is sure to impres

Mediterranean Chickpea Salad Delight
Ingredients
- 1 can chickpeas, thoroughly drained and rinsed
- 1 cup cherry tomatoes, halved
- 1 half cucumber, diced into small cubes
- 1 quarter red onion, finely chopped
- 1 half bell pepper, diced
- 1 quarter Kalamata olives, pitted and sliced
- 1 quarter feta cheese, crumbled
- 1 quarter fresh parsley, coarsely chopped
- 3 tablespoons high-quality olive oil
- 1 tablespoon freshly squeezed lemon juice
- 1 teaspoon dried oregano
- to taste salt
- to taste freshly cracked black pepper
Instructions
- In a large mixing bowl, combine the rinsed chickpeas, halved cherry tomatoes, diced cucumber, finely chopped red onion, diced bell pepper, and sliced Kalamata olives.
- If desired, gently sprinkle the crumbled feta cheese into the bowl along with the chopped parsley.
- In a separate small bowl, whisk together the olive oil, freshly squeezed lemon juice, dried oregano, and a pinch of salt and black pepper until well blended.
- Drizzle the dressing over the salad mixture and gently toss everything together, ensuring all ingredients are coated.
- Taste the salad and adjust the seasoning with more salt or pepper if needed.
- Let the salad rest for at least 10 minutes before serving to allow flavors to meld.


![To make the best roasted garlic hummus, gather these key ingredients: - 1 can (15 oz) chickpeas, thoroughly drained and rinsed - 1/4 cup creamy tahini - 1/4 cup high-quality olive oil, plus extra for drizzling - 4 cloves of roasted garlic - 2 tablespoons freshly squeezed lemon juice - 1/2 teaspoon ground cumin - Sea salt, to taste - Water, as needed for desired consistency - Sweet paprika and finely chopped fresh parsley for garnish These ingredients create a rich and creamy dip that bursts with flavor. The roasted garlic adds a sweet, mellow taste that enhances the overall profile of the hummus. You can customize your hummus with these optional ingredients: - Spices like smoked paprika or cayenne for heat - Fresh herbs such as basil or cilantro for added freshness - A splash of balsamic vinegar for depth - Roasted red peppers for a sweet and smoky twist These additions can help you explore new flavors and keep your hummus exciting. Here’s a quick look at the health benefits of the main ingredients: - Chickpeas: High in protein and fiber, they help keep you full. - Tahini: Made from sesame seeds, it provides healthy fats and calcium. - Olive oil: A heart-healthy fat that can lower bad cholesterol levels. - Garlic: Known for its immune-boosting properties and flavor. - Lemon juice: Adds vitamin C and brightens the flavor. This hummus is not just tasty; it’s also packed with nutrients. You can enjoy it guilt-free as a snack or appetizer. For the complete recipe, check out the full recipe section. To roast garlic, first, preheat your oven to 400°F (200°C). Take your garlic cloves and wrap them in aluminum foil. Drizzle a little olive oil over the cloves before sealing the packet. Place the foil packet in the oven and roast for about 30-35 minutes. The garlic should turn soft and golden brown. After roasting, let it cool for a few minutes before you touch it. This step brings out the sweet, rich flavor of the garlic. In a food processor, add the following ingredients: - 1 can (15 oz) chickpeas, thoroughly drained and rinsed - 1/4 cup creamy tahini - 1/4 cup high-quality olive oil, plus extra for drizzling - 4 cloves of roasted garlic - 2 tablespoons freshly squeezed lemon juice - 1/2 teaspoon ground cumin - Sea salt, to taste Blend these ingredients until they become silky smooth. You may need to stop and scrape down the sides to ensure even mixing. This step creates a rich and creamy base for your hummus. If your hummus is too thick, add water a little at a time. Start with one tablespoon and blend again until you reach your preferred creamy texture. Taste your hummus and adjust the seasoning. You might want more sea salt, lemon juice, or roasted garlic to suit your taste. For the full recipe, refer to the provided instructions. Enjoy making this delicious dip! To make your hummus extra creamy, use dry chickpeas. Soak them overnight and cook until soft. This gives a smoother texture. If you use canned chickpeas, rinse them well. It helps remove some of the canning liquid, which can make hummus taste tinny. Always blend your mixture well. Stop and scrape the sides of the bowl as needed. This step ensures every bit gets mixed in. Roasting garlic is easy and adds great flavor. Start by preheating your oven to 400°F (200°C). Wrap the garlic cloves in aluminum foil. Drizzle a little olive oil on top. Seal the foil tightly and bake for about 30-35 minutes. The cloves should be soft and golden brown. Let them cool before you handle them. You can use the roasted garlic in your hummus or on bread for a tasty treat. Roasted garlic hummus is very versatile. You can serve it with fresh veggie sticks like carrots, cucumbers, and bell peppers. Pita bread, toasted or soft, makes a great dipper too. For a fun twist, try pairing it with warm pita chips. Add a sprinkle of sweet paprika and fresh parsley on top for color. This makes your dish look beautiful and tasty. Don't forget to check out the Full Recipe for more details! {{image_4}} You can boost the taste of your roasted garlic hummus with spices and herbs. Try adding paprika for a smoky kick or chili powder for heat. Fresh herbs like cilantro or basil can add a bright touch. A pinch of za'atar brings an earthy flavor, while a dash of black pepper enhances the taste. Mix and match to find your favorite combination! Though chickpeas are classic, other beans and peas work well too. White beans like cannellini add creaminess and a mild taste. Black beans give a rich color and unique flavor. You can even use peas for a sweet twist. Each option brings its own character, so experiment to discover what you love! Roasted garlic hummus shines as a dip, but it can do much more. Spread it on sandwiches or wraps for a flavorful layer. Use it as a base for veggie pizzas or flatbreads. Pair it with crackers or pita chips for a fun snack. You can even dollop it on salads for added creaminess. The options are endless! For the full recipe, check out the detailed steps to make your own roasted garlic hummus. To keep your roasted garlic hummus fresh, place it in an airtight container. Make sure to press a piece of plastic wrap against the hummus before sealing. This helps to keep the air out and maintain its creamy texture. Store it in the fridge for up to one week. Always use a clean spoon when scooping out hummus. This avoids introducing bacteria that can spoil your dip. You can freeze roasted garlic hummus for longer storage. Use a freezer-safe container or a resealable bag. Leave some space at the top, as the hummus may expand when frozen. It can last for about three months in the freezer. To use, thaw it overnight in the fridge before serving. Stir well after thawing to restore its smooth consistency. Homemade hummus can last for about a week when stored correctly in the fridge. If you notice any off smells or changes in color, it’s best to discard it. Always trust your senses. Freshness is key for the best flavor. If you made a big batch, consider freezing a portion for later use. Check the [Full Recipe] for tips on making the perfect hummus. You can easily make roasted garlic hummus vegan. The main ingredients are already plant-based. Just use chickpeas, roasted garlic, olive oil, lemon juice, and seasoning. Ensure your tahini is vegan too. Most brands are, but it’s good to check the label. If you don’t have tahini, don’t worry! You can use sunflower seed butter or almond butter. These will change the flavor a bit, but they still taste great. You can also skip it entirely. Just add a bit more olive oil for creaminess. Check the texture while blending. If the hummus feels hard to mix, it’s too thick. Add water, one tablespoon at a time, until it smooths out. If it’s runny, add more chickpeas or tahini to thicken it. Always taste as you go! For the full recipe and precise steps, check the Full Recipe section. Roasted garlic hummus is simple to make and enjoy. You learned about key ingredients, how to roast garlic, and tips for creamy texture. Variations add excitement to the dish, while proper storage keeps it fresh. This tasty dip fits many diets and pairs well with many foods. Now, it’s time to get creative in the kitchen. Make your version and share it with friends. You’ll love the flavor and fun it brings! Enjoy your hummus journey!](https://goldendishy.com/wp-content/uploads/2025/07/73315b96-5df4-4df6-b272-95a468d12cec-768x768.webp)

![For a delightful Easy Cucumber Slaw, you need simple, fresh ingredients. Here’s what you will gather: - Cucumbers - Carrot - Red bell pepper - Green onions - Fresh cilantro - Dressing components: - Rice vinegar - Honey or maple syrup - Sesame oil - Soy sauce - Seasoning: - Salt - Pepper - Sesame seeds This vibrant mix of veggies adds color and crunch. The dressing ties everything together with its sweet and tangy flavor. Each ingredient plays a role in making this slaw both refreshing and satisfying. You can find the full recipe for preparation details. Enjoy making this easy side dish that complements any meal! To start, gather your fresh veggies. You need 2 large cucumbers, 1 medium carrot, 1 red bell pepper, and 3 green onions. First, slice the cucumbers into thin rounds. Next, julienne the carrot into thin strips. Then, slice the red bell pepper into strips. Finally, chop the green onions into small pieces. Place all the veggies in a large mixing bowl. Next, let’s make the dressing. In a small bowl, combine 1/4 cup of rice vinegar, 1 tablespoon of honey or maple syrup, 1 tablespoon of sesame oil, and 1 teaspoon of soy sauce. Whisk this mixture until it is smooth and well combined. This dressing will add a delightful flavor to your slaw. Now it’s time to put everything together. Pour the dressing over the mixed vegetables in the large bowl. Toss gently to coat all the veggies evenly. Add 1/4 cup of freshly chopped cilantro and season with salt and freshly cracked pepper to taste. Mix it all again with gentle motions. Let the slaw sit for at least 10 minutes. This resting time helps the flavors blend nicely. Just before serving, sprinkle sesame seeds on top for extra crunch. Enjoy your Easy Cucumber Slaw! For the full recipe, please check the link. Letting the slaw sit is key. After you mix the veggies and dressing, rest it for at least 10 minutes. This time helps the flavors blend. The cucumbers soften just a bit, making every bite tasty. The longer you wait, the better the slaw tastes. You can even let it sit for up to 30 minutes if you want a stronger flavor. Presentation makes a big difference. Serve the slaw in a bright, shallow bowl. This way, the colors of the veggies shine. Add a few sprigs of cilantro on top. This adds extra green and freshness. You can also serve the slaw with a side of lime wedges. This gives guests a chance to add a zesty kick. Want to boost the taste? Consider adding lime juice. Just a squeeze before serving brightens the whole dish. You could also add sliced jalapeños for some heat. If you like crunch, try adding chopped nuts like peanuts or cashews. For a sweet twist, mix in some diced mango or pineapple. These small changes can make your Easy Cucumber Slaw unique and exciting. {{image_4}} You can mix in many other vegetables for added crunch and flavor. Try adding shredded cabbage for a nice texture. Radishes also bring a peppery bite that pairs well with cucumbers. You might enjoy diced tomatoes, which can add some juiciness. You can swap in green bell peppers for a milder taste. Even thinly sliced snap peas can add a fun pop! Feel free to experiment based on what you have at home. The dressing can change the whole vibe of the slaw. For a creamier option, mix in some Greek yogurt or mayo. You can also try a zesty citrus dressing with lime or lemon juice. If you want a spicy kick, add some chili paste or Sriracha. A sesame peanut dressing can give a rich, nutty flavor. By changing the dressings, you can create a new dish each time! If you're vegan, simply use maple syrup instead of honey. This slaw is already gluten-free if you choose gluten-free soy sauce. You can also leave out the soy sauce for a fresh taste. If you want a low-carb version, try using spiralized zucchini instead of cucumbers. These options make this slaw friendly for many diets, so everyone can enjoy it! To keep your Easy Cucumber Slaw fresh, store it in an airtight container. This keeps moisture out and prevents sogginess. If you have leftover slaw, ensure it cools to room temperature first. Once cooled, seal it tightly and place it in the fridge. I recommend eating it within three days for the best taste. For the best quality, consume the slaw within three days. After that, the cucumbers can become too soft. If you notice any signs of spoilage, like an off smell or sliminess, it’s best to throw it away. The quicker you eat it, the fresher it will taste. You don’t need to reheat cucumber slaw. It’s best enjoyed cold. If you want to freshen it up after storage, add a little more dressing or a splash of vinegar. This will revive the flavors and keep it crisp. Enjoy it straight from the fridge for a refreshing bite! For the full recipe, check out the [Full Recipe]. For the best slaw, I recommend using English cucumbers. They are long and slender, with thin skin and few seeds. Their taste is mild and crisp, which makes them perfect for salads. You can also use Persian cucumbers. They are smaller, crunchy, and sweet. Avoid regular garden cucumbers, as they can be bitter and watery. The right cucumber gives your slaw a fresh flavor. Yes, you can prep your cucumber slaw the night before. Just cut the cucumbers and other veggies, and store them in an airtight container. Keep the dressing separate until you are ready to serve. Mixing them right before serving keeps the veggies crisp and fresh. This way, you save time and still get great taste. Cucumber slaw can last about 2 to 3 days in the fridge. To keep it fresh, store it in an airtight container. As time passes, the cucumbers may release water. If that happens, just drain the excess liquid before serving. Always check for any off smells or changes before eating. Enjoy your slaw while it’s still at its best! This blog post covered the key ingredients and steps to make a fresh cucumber slaw. I shared tips for storage, serving, and variations that keep it tasty. Remember that resting the slaw boosts its flavor. Whether you use different veggies or dressings, make it your own. Storing leftovers properly helps maintain freshness. Enjoy your slaw as a side dish or snack. It’s easy, fun, and delicious! Happy cooking!](https://goldendishy.com/wp-content/uploads/2025/07/45f43f4c-bd14-4cdb-930e-3d5f55452c18-768x768.webp)


![- 3 medium zucchinis, grated - 200g feta cheese, crumbled - 1 cup Greek yogurt Zucchini brings moisture and a light taste. Feta adds saltiness and creaminess. Greek yogurt keeps the pie rich and tangy. This trio creates a tasty base for the pie. - 1 cup all-purpose flour - 1 teaspoon baking powder - 1 teaspoon dried oregano - 1 teaspoon garlic powder - Salt and pepper to taste The flour gives the pie structure. Baking powder helps it rise and become fluffy. Oregano adds a hint of herb, while garlic powder brings depth. Salt and pepper enhance all the flavors. - 1 tablespoon olive oil (for greasing) - 1 tablespoon sesame seeds (for topping) - 1/2 cup fresh dill, chopped (optional for garnish) Olive oil keeps the pie from sticking. Sesame seeds add crunch and a nutty flavor. Fresh dill makes the dish pop with color and fragrance. You can skip the dill but it really brightens the pie. Explore the full recipe to get all the steps for this delightful dish! 1. Preheat the Oven: Set your oven to 180°C (350°F). This ensures your pie bakes evenly. 2. Grease the Pie Dish: Use 1 tablespoon of olive oil to lightly grease a round pie dish. This helps the pie not stick. 3. Drain the Zucchini: Grate 3 medium zucchinis and sprinkle them with salt. Let them sit for 10 minutes. Gather the zucchini in a clean kitchen towel and squeeze out the extra water. This step is key to avoiding a soggy pie. 1. Combine Wet Ingredients: In a separate bowl, whisk together 1 cup of Greek yogurt and 3 large eggs. Mix until smooth. 2. Add Dry Ingredients: To the wet mixture, add 200g of crumbled feta cheese, 1 cup of all-purpose flour, 1 teaspoon of baking powder, 1 teaspoon of dried oregano, and 1 teaspoon of garlic powder. Stir in the drained zucchini, then season with salt and pepper. 3. Mix Thoroughly: Use a spatula to combine everything well. You want a thick and smooth batter. 1. Transfer the Batter: Pour your zucchini mixture into the greased pie dish. Smooth the top with a spatula for an even layer. 2. Top with Sesame Seeds: Evenly sprinkle 1 tablespoon of sesame seeds across the top. This adds a nice crunch. 3. Baking Time and Temperature: Place the dish in the oven and bake for 35-40 minutes. The top should be golden brown and a toothpick inserted should come out clean. Follow these steps for a tasty Zucchini and Feta Pie! For the complete recipe, check out the [Full Recipe]. Draining Zucchini Effectively Draining zucchini is key for great texture. First, grate the zucchini and sprinkle a pinch of salt on top. Let it sit for 10 minutes. This step draws out excess moisture. Next, gather the zucchini in a clean kitchen towel. Squeeze hard to remove the water. This helps avoid a soggy pie. Avoiding Sogginess To keep your pie firm, use the drained zucchini right away. If you let it sit too long, it can release moisture again. Bake your pie soon after mixing. This keeps the crust crispy and the filling light. Seasoning Tips Zucchini can be mild, so season well. Use salt and pepper generously. Adding garlic powder brings warmth to the flavor. Dried oregano adds a nice herb taste. Feel free to experiment with spices! Optional Ingredients to Add Consider adding chopped onions for extra flavor. Fresh herbs like basil or parsley can brighten the dish. You can also mix in sun-dried tomatoes for a sweet touch. These additions can make your pie even more delicious. Pairing Suggestions Zucchini and feta pie pairs well with fresh salads. A simple green salad with lemon dressing works great. You can also serve it with a yogurt dip for a creamy contrast. Presentation Tips Cut the pie into wedges and place them on a colorful platter. Garnish with fresh dill for a pop of color. For an extra touch, add a dollop of Greek yogurt on the side. This adds creaminess and flavor. Enjoy sharing this tasty dish! {{image_4}} Alternative Cheeses You can easily swap feta cheese. Try goat cheese for a tangy twist. Ricotta adds creaminess and pairs well too. These options keep the dish flavorful and fun. Gluten-Free Options For a gluten-free version, replace all-purpose flour with almond flour or a gluten-free blend. This change maintains the pie's texture and taste, perfect for those avoiding gluten. Adding Fresh Herbs Fresh herbs can enhance your zucchini and feta pie. Basil, parsley, or chives are great choices. These herbs add brightness and depth to your dish. Just chop them finely and mix in before baking. Spices to Consider Consider adding spices for extra flavor. A pinch of cayenne pepper gives heat. Paprika adds smokiness, while cumin lends an earthy note. Experiment with these spices to find your favorite flavor combo. Hot vs. Cold This pie tastes great both hot and cold. Serve it warm right from the oven for a comforting meal. If you prefer, let it cool and serve at room temperature for a lighter option. Appetizer vs. Main Course You can serve zucchini and feta pie as an appetizer or a main dish. Cut it into small wedges for a fun starter. For a main course, pair it with a salad or roasted veggies to make a filling meal. - Refrigeration Tips: Store your zucchini and feta pie in the fridge. Let it cool completely first. Wrap it tightly in plastic wrap. This keeps it fresh for up to three days. You can also place it in an airtight container. This helps prevent moisture loss. - Best Containers to Use: Use glass or plastic containers that seal well. They help keep your pie tasting great. If you have a large piece, a pie dish with a lid is perfect. Just make sure it’s completely sealed to avoid drying out. - Oven vs. Microwave: The oven is best for reheating. Preheat it to 180°C (350°F). Place the pie on a baking sheet to catch any drips. Heat for about 10-15 minutes. This keeps the crust crispy. The microwave is quicker but can make the pie soggy. If you use the microwave, heat in short bursts, checking often. - Maintaining Texture: To keep the pie’s texture, cover it with foil in the oven. This helps it heat evenly. In the microwave, add a cup of water in the microwave. This adds moisture and helps avoid dryness. - How to Freeze Zucchini Pie: To freeze, wrap individual slices in plastic wrap. Then, place them in a freezer bag. Squeeze out the air before sealing. You can also freeze the whole pie. Just wrap it tightly in two layers of plastic wrap. - Thawing and Reheating: When ready to eat, thaw slices in the fridge overnight. For a whole pie, leave it on the counter for a few hours. Reheat using the oven to keep the crust crispy. Enjoy your tasty pie even after freezing! Yes, you can! Other veggies work well in this pie. Try adding spinach for a fresh taste. Bell peppers add a nice crunch. Grated carrots give a touch of sweetness. Just make sure the veggies are not too watery. Drain them like you do with zucchini. Definitely! Zucchini and feta pie is great for meal prep. Once cooled, slice it and store it in the fridge. Use an airtight container to keep it fresh. It lasts up to five days. This pie pairs well with a simple salad. A mixed green salad adds freshness. You can also serve it with a dollop of Greek yogurt. For drinks, try a light white wine or sparkling water. Check the top for a golden brown color. Insert a toothpick into the center. If it comes out clean, your pie is ready. If it’s still wet, bake it a few more minutes. Yes, you can! Prepare the pie and keep it in the fridge. Bake it the next day for fresh flavors. You can also freeze it before baking. Thaw overnight in the fridge before baking. For a complete guide, check the Full Recipe for all the details! Zucchini and Feta Pie is easy to make and full of flavor. We explored key ingredients, step-by-step instructions, and helpful tips for the best results. You can vary the recipe to fit your taste. Enjoy it hot or cold, as a main dish or appetizer. Proper storage keeps it fresh. With these insights, you can serve this dish with confidence. Try it out, and impress your family and friends with your skills. Happy cooking!](https://goldendishy.com/wp-content/uploads/2025/07/7ca7cda4-3dfb-4b99-98f1-545ca5d8f2b3-768x768.webp)