Maple Dijon Roasted Brussels Flavorful and Simple Dish

If you crave a dish that balances sweet and savory, you’re in for a treat! My Maple Dijon Roasted Brussels are easy to make and packed with flavor. In this guide, I’ll walk you through each step, from selecting the right ingredients to achieving that perfect roast. Say goodbye to boring veggies and hello to a side that everyone will love. Let’s dive into this simple yet delicious recipe!You will enjoy the mix of sweet maple syrup and sharp Dijon mustard. It gives the Brussels sprouts a unique flavor that makes them shine.
Essential Ingredients List
To make this dish, you need the following:
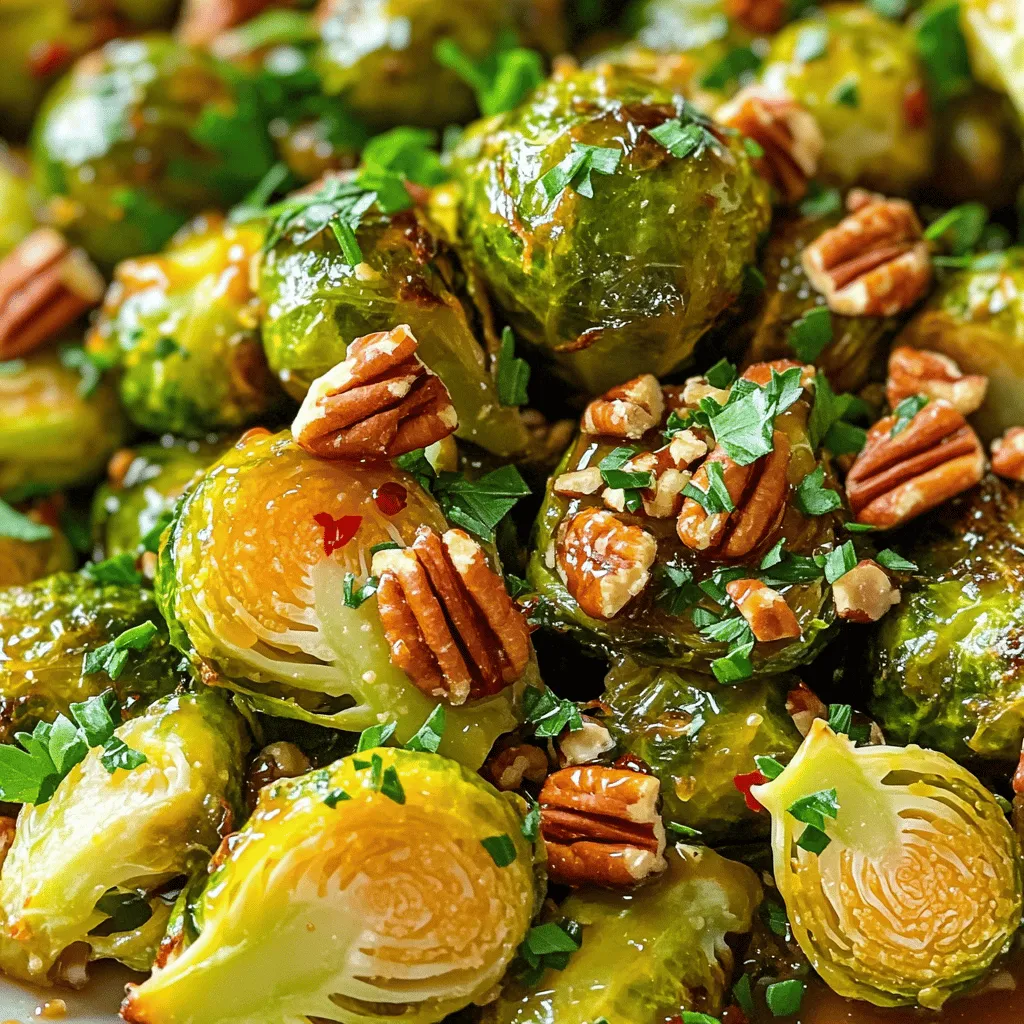
– 1.5 pounds Brussels sprouts, cleaned, trimmed, and halved
– 3 tablespoons extra virgin olive oil
– 2 tablespoons pure maple syrup
– 1 tablespoon Dijon mustard
– 2 cloves garlic, finely minced
– Salt and freshly cracked black pepper, to taste
– ¼ teaspoon red pepper flakes (optional, for a spicy kick)
– ¼ cup chopped pecans (optional, for a delightful crunch)
– Fresh parsley, chopped (for vibrant garnish)
These ingredients come together for a flavorful and exciting dish.
Optional Add-ins for Extra Flavor
You can add a few things to boost the taste. Consider using:
– Lemon zest for brightness
– Balsamic vinegar for tang
– Parmesan cheese for richness
These optional items allow you to customize the dish to your liking. They can make your Maple Dijon Roasted Brussels even more special.
Step-by-Step Instructions
Preparation Steps
First, gather your ingredients. You need 1.5 pounds of Brussels sprouts, cleaned and halved. Next, measure out 3 tablespoons of extra virgin olive oil, 2 tablespoons of pure maple syrup, and 1 tablespoon of Dijon mustard. Don’t forget 2 cloves of finely minced garlic and salt and pepper to taste. If you like spice, add ¼ teaspoon of red pepper flakes. Lastly, have ¼ cup of chopped pecans ready for crunch and some fresh parsley for garnish.
Roasting the Brussels Sprouts
Start by preheating your oven to 400°F (200°C). Line a baking sheet with parchment paper. This helps with easy cleanup. In a large bowl, mix the olive oil, maple syrup, Dijon mustard, minced garlic, salt, and black pepper. Whisk until it’s smooth. Toss the halved Brussels sprouts in the bowl. Make sure they are all well-coated in the tasty mix. Spread the sprouts on the lined baking sheet. If you want, sprinkle the pecans on top for added texture. Roast them for 20 to 25 minutes. Remember to stir them halfway through. They should be golden brown and soft when done.
Garnishing and Serving Suggestions
After roasting, take the baking sheet out of the oven. Let the Brussels cool for a few minutes. Just before you serve them, chop some fresh parsley and sprinkle it on top. This adds a nice touch of color and flavor. Maple Dijon Roasted Brussels are great as a side dish. Pair them with your favorite protein or grain. Enjoy the sweet and tangy taste!
Tips & Tricks
How to Achieve Perfectly Roasted Brussels
To get the best Brussels sprouts, start with fresh ones. Look for firm and bright green sprouts. Trim the ends and cut them in half. This helps them cook evenly. Spread them out on the baking sheet. Avoid crowding, as this leads to steaming instead of roasting. Stir them halfway through cooking for a nice, even brown.
Flavor Enhancements
Maple syrup and Dijon mustard create a sweet and tangy mix. You can add more flavors to boost your dish. Try fresh lemon juice for a zesty kick. If you like heat, add more red pepper flakes. Toasted pecans give a nice crunch. Fresh herbs like thyme or rosemary can add depth too.
Equipment Recommendations
Using the right tools makes cooking easier. A sharp knife helps you cut the Brussels sprouts neatly. A large mixing bowl allows you to combine ingredients well. A whisk helps mix the maple-Dijon sauce smoothly. A sturdy baking sheet lined with parchment makes cleanup simple. Remember, each tool plays a role in your dish’s success.

Variations
Different Sweeteners to Use
You can switch up the sweetener in this recipe. Instead of maple syrup, try honey or agave nectar. Both add a sweet touch. If you want a deeper flavor, use brown sugar or coconut sugar. Each option gives a unique taste to the Brussels sprouts.
Alternative Flavor Profiles
Want to change the flavor? Try using balsamic vinegar instead of Dijon mustard. It adds a tangy twist. You could also mix in some soy sauce for a savory kick. If you love spice, add some chili powder or cayenne pepper to the mix. These changes will give your dish a different vibe.
Seasonal Ingredient Swaps
Seasonal ingredients can enhance your dish. In fall, add roasted pumpkin or butternut squash for extra flavor. In winter, toss in some sliced apples or pears for a sweet touch. During spring, try adding fresh herbs like thyme or dill. Each season brings new tastes to explore.
Storage Info
How to Store Leftovers
After you enjoy your Maple Dijon Roasted Brussels sprouts, store any leftovers in an airtight container. Make sure to let them cool down first. Keep the container in the fridge. They will stay fresh for about three to four days. This dish stays tasty, but it’s best to eat it soon.
Reheating Instructions
To reheat your Brussels sprouts, use the oven for the best taste. Preheat your oven to 350°F (175°C). Spread the sprouts on a baking sheet and bake for about 10 minutes. If you like them warm but not soggy, avoid the microwave. It can make them mushy.
Freezing for Later Use
You can freeze these Brussels sprouts if you want to save some for later. First, let them cool completely. Then, place them in a freezer bag or container. Make sure to remove as much air as possible. They can be frozen for up to three months. When you’re ready to eat them, thaw in the fridge overnight before reheating. Enjoy the deliciousness again!
FAQs
Can I use frozen Brussels sprouts?
Yes, you can use frozen Brussels sprouts. Just remember to thaw them first. Pat them dry before cooking. This helps them roast better. Frozen sprouts may take longer to cook. Keep an eye on them as they roast.
What can I serve with Maple Dijon Roasted Brussels?
These Brussels sprouts pair well with many dishes. Try serving them with roasted chicken or grilled salmon. They also go great with quinoa or wild rice. For a fun twist, add them to a fall salad. The sweet and tangy flavor shines next to savory meals.
How do I make this recipe vegan?
Making this recipe vegan is easy! Simply swap honey or maple syrup for agave syrup. Use plant-based oil instead of extra virgin olive oil. This keeps the dish 100% vegan while still tasty.
This article explored the best way to prepare Maple Dijon Roasted Brussels sprouts. We discussed key ingredients, step-by-step instructions, and tips for perfect roasting. You learned about variations, storage methods, and answered common questions.
Roasted Brussels sprouts can uplift any meal with their rich taste. Don’t be afraid to try new flavors and swaps for different meals. Enjoy your cooking!


. - Heat your skillet over medium heat. - Add the unsalted butter and let it melt. - Once melted, watch for it to bubble gently. - Next, add the minced garlic. - Sauté the garlic for about one minute. - Stir often until it smells great and turns lightly golden. - Now, add the peeled and deveined shrimp to the skillet. - Season the shrimp with salt and pepper. - If you like spice, sprinkle in some red pepper flakes. - Cook the shrimp for 2-3 minutes on one side. - Flip the shrimp to cook the other side evenly. - Add the lemon zest and juice as they cook. - Keep cooking until the shrimp are opaque. - Remove the skillet from the heat. - Stir in the chopped parsley for a fresh taste. - Serve the shrimp over warm pasta or fluffy rice. - Drizzle the leftover lemon-garlic butter sauce on top for extra flavor. - For a lovely presentation, you can garnish with lemon wedges. For more details, check the Full Recipe. - Achieving the perfect shrimp texture: To get tender shrimp, avoid overcooking. Cook them just until they turn pink. This usually takes about 2-3 minutes per side. - Best practices for sautéing garlic: Start with a hot skillet and melted butter. Add minced garlic and stir for about 1 minute. Keep an eye on it so it doesn’t burn; burnt garlic tastes bitter. - Presentation ideas for a beautiful dish: Serve the shrimp in shallow bowls to make it look elegant. Add a sprinkle of parsley on top for color. Include lemon wedges on the side for a fresh touch. - Pairing options with side dishes: Lemon garlic butter shrimp goes well with cooked pasta or fluffy rice. You can also serve it with a side salad for a light meal. - Additional herbs or spices to try: Consider adding fresh basil or thyme for extra flavor. These herbs pair well with lemon and shrimp. - Adjusting spice levels with red pepper flakes: If you like heat, add more red pepper flakes. Start with a teaspoon and adjust to your taste. This will make your dish more exciting! For more details, check the Full Recipe. {{image_4}} You can change the seafood in this recipe. Try scallops or even crab. These swaps add new tastes while keeping the dish simple. If you want a healthier fat, swap butter for olive oil. Olive oil works well and gives a light, fresh flavor. To mix things up, add other citrus flavors. Lime or orange juice can brighten the dish. You can also infuse the recipe with herbs. Try basil or thyme for a different twist. These herbs can make the dish feel more seasonal. If you need a gluten-free option, serve the shrimp over quinoa or zucchini noodles. Both are great gluten-free choices. For a low-calorie meal, cut back on the butter. You can use less or replace it with vegetable broth. This keeps the dish tasty but lighter. After enjoying your lemon garlic butter shrimp, store any leftovers in the fridge. Use an airtight container to keep them fresh. These shrimp will stay good for about 2-3 days. Always check for freshness before eating. To freeze lemon garlic butter shrimp, let them cool completely first. Place them in a freezer-safe bag, removing as much air as possible. They can last for about 2 months in the freezer. When you're ready to eat, thaw the shrimp in the fridge overnight. Reheat them gently in a skillet over low heat. This keeps them tender and tasty. Always ensure your shrimp is safe to eat after storage. Check for any off smells or changes in color. If the shrimp look slimy or smell bad, it’s best to discard them. Trust your senses to keep your meals safe and enjoyable. Cook shrimp for 4-6 minutes. They cook quickly. In a hot skillet, shrimp turn pink when done. Avoid overcooking; it makes them tough. Yes, you can use frozen shrimp. Thaw them first for best results. Place them in cold water for about 15 minutes. This way, they cook evenly and taste fresh. I love serving lemon garlic butter shrimp with: - Cooked pasta - Fluffy rice - Fresh salad - Garlic bread These sides balance the rich flavors well. Check for color and texture. Cooked shrimp turn pink and opaque. They should feel firm but not hard. When in doubt, cut one open. It should be white inside, not translucent. You’ve learned how to make lemon garlic butter shrimp. We covered essential ingredients, easy steps, tips for cooking, and variations to try. Remember to adjust flavors to your taste and pair with your favorite sides. Store leftovers safely for later enjoyment. Cooking shrimp can be simple and satisfying. Enjoy every bite, and don't hesitate to experiment. Whether for a cozy night in or impressing guests, this dish shines every time. Let your kitchen be a place of fun and flavor!](https://goldendishy.com/wp-content/uploads/2025/06/8ad1771e-7d26-4dd4-879b-9e464bbb0647-768x768.webp)


![- Bell peppers and their colors: You can use four large bell peppers. Choose any color you like: red, yellow, green, or orange. Each adds its own taste and look to the dish. - Protein options: For the filling, you can select either ground turkey or beef. Both options will give you a hearty and satisfying meal. - Base ingredients: You will need one cup of cooked rice. You can use either white or brown rice. Additionally, add one cup of black beans, rinsed and drained, and one cup of corn. You can choose fresh, frozen, or canned corn. - Flavor enhancers: To boost the flavor, use one cup of salsa. You can pick your favorite brand or make it homemade. Also, add one tablespoon of taco seasoning. You can use store-bought or make your own. - Toppings: For the top of the peppers, use one cup of shredded cheddar cheese. This cheese gives a nice gooey texture. You can add extra cheese for a more decadent touch. Fresh cilantro is a great garnish, adding color and a bit of fresh flavor. You can find the full recipe in the earlier sections of this article. Happy cooking! Preheat the oven to 375°F (190°C). This helps cook the peppers evenly. While it heats, grab a baking dish. Set it aside for the stuffed peppers. Prepare the bell peppers by slicing the tops off. Remove the seeds and membranes, which can taste bitter. Brush each pepper with olive oil. This adds flavor and helps them roast nicely. Place the peppers upright in the baking dish. Cook the meat in a large skillet over medium heat. Add 1 pound of ground turkey or beef. Break it apart with a spatula as it cooks. Make sure it browns well. Once cooked, drain any excess fat. This keeps the filling lean and tasty. Next, add rice, black beans, corn, salsa, and seasoning to the skillet. Use 1 cup of cooked rice, 1 cup of rinsed black beans, and 1 cup of corn. Pour in 1 cup of salsa and 1 tablespoon of taco seasoning. Sprinkle some salt and pepper too. Mix everything well. Simmer the mixture for about 5 minutes. This lets the flavors meld together, making the filling more delicious. Stir it occasionally to avoid sticking. Now, mix in half of the shredded cheddar cheese. This makes the filling creamy and rich. Remove the skillet from heat. Stuff the peppers by spooning the mixture into each one. Press down gently to pack it in well. This ensures every bite is full of flavor. Top with more cheese by sprinkling the remaining cheddar over each filled pepper. It will melt and brown nicely while baking. Bake the peppers by covering the baking dish with aluminum foil. Place it in the oven for 25-30 minutes. In the last 10 minutes, remove the foil. This helps the cheese bubble and turn golden. Once done, cool the peppers for a few minutes before serving. The filling will be very hot. If you like, garnish with fresh cilantro for extra flavor. Enjoy your taco stuffed bell peppers! Remember, you can find the full recipe above for all the details. How to choose fresh bell peppers: Pick bell peppers that are firm and shiny. Look for smooth skin with no blemishes. A good pepper feels heavy for its size. Colors like red, yellow, and orange are sweeter. Green peppers are a bit more bitter. All colors work well in this dish. Ensuring optimal cooking temperature and timing: Set your oven to 375°F (190°C) before you start cooking. This temperature helps the peppers cook evenly. Bake them for 25-30 minutes. In the last 10 minutes, uncover the dish to let the cheese brown. Suggestions for additional spices or ingredients: Add cumin or chili powder for an extra kick. You can also mix in diced tomatoes or jalapeños for more flavor. If you love heat, try adding some hot sauce to the filling. Offering a vegetarian option: For a vegetarian version, swap the meat for lentils or extra beans. You can use quinoa instead of rice for a healthy twist. This way, everyone can enjoy taco stuffed bell peppers! Plating ideas for presentation: Serve the peppers on a colorful platter. You can place them upright for a fun look. Add a dollop of sour cream on the side. Fresh cilantro on top adds a pop of green. Recommended side dishes for a complete meal: Pair your stuffed peppers with a fresh salad or tortilla chips. A side of guacamole or salsa also works great. These sides make the meal more fun and filling. For the full details, check out the Full Recipe! {{image_4}} You can mix up the protein in taco stuffed bell peppers. If you want a meatless option, try using black beans or lentils. They add great flavor and protein. For a twist, you can also use ground chicken or pork. When it comes to cheese, feel free to get creative. While cheddar is classic, you might try Monterey Jack or pepper jack for extra spice. You can also use cream cheese for a creamier filling. For salsa, any kind works! Chunky salsa adds texture, while smooth salsa blends in. You can even make your own with fresh tomatoes, onions, and peppers. Grilling adds a smoky flavor. Wrap the stuffed peppers in foil and place them on the grill. Cook for about 15 to 20 minutes until tender. You can also use a slow cooker. Place the stuffed peppers in the slow cooker with a bit of sauce. Cook on low for 4 to 6 hours for a hands-off approach. If you need a quick meal, the microwave is your friend. Just place the stuffed peppers in a microwave-safe dish. Cover with a lid or plastic wrap. Heat for about 5 to 7 minutes, checking for doneness. Using seasonal veggies makes your dish brighter. In summer, add fresh zucchini or corn. In fall, consider adding diced sweet potatoes or pumpkin. These add flavor and nutrition. For holidays, you can theme your peppers. For Halloween, use orange peppers and stuff them with spicy fillings. For Christmas, use red and green peppers and add festive spices. It’s a fun way to celebrate! For the full recipe, check out [Full Recipe]. To store leftovers, place the stuffed peppers in an airtight container. This keeps them fresh and tasty. You can keep them in the fridge for up to three days. Make sure they cool down first to avoid steam build-up. If you want to save some for later, freezing is a great option. Wrap each stuffed pepper tightly in plastic wrap. Then, place them in a freezer-safe bag. They can last for up to three months in the freezer. When you’re ready to eat, thaw them overnight in the fridge. To reheat, bake at 350°F (175°C) for about 25 minutes, or until heated through. For easy meal prep, you can cook a big batch in advance. Make the filling and stuff the peppers ahead of time. Store them in the fridge for two days before baking. This way, you can have a quick meal ready on busy nights. You can also use different colors of bell peppers for fun and variety. What can I substitute for rice in the recipe? You can use quinoa or cauliflower rice instead of regular rice. Quinoa adds protein and fiber. Cauliflower rice keeps it low-carb. Both options work well and keep the dish tasty. How do I know when the peppers are fully cooked? The peppers should be tender but not mushy. You can poke them with a fork. If they give easily but hold their shape, they are ready. The cheese should be melted and bubbly on top too! Caloric content and portion sizes Each stuffed pepper is about 300 calories. This includes the filling and toppings. If you use ground turkey, it may be lower in calories. Adjust the portion size based on your hunger. Health benefits of ingredients used Bell peppers are rich in vitamins A and C. They help boost your immune system. Black beans provide protein and fiber, promoting good digestion. Corn adds vitamins and a sweet crunch. What drinks pair well with taco stuffed bell peppers? A refreshing drink like lemonade or iced tea works great. For adults, a light beer or margarita adds fun. Choose drinks that balance the spice of the peppers. Can taco stuffed bell peppers be made in advance for gatherings? Yes! You can prepare the stuffed peppers ahead of time. Just store them in the fridge. Bake them when your guests arrive. They will taste fresh and hot from the oven! For the full recipe, check the earlier section. Taco stuffed bell peppers are fun and easy to make. We covered the key ingredients, steps, and helpful tips for a great dish. You learned how to mix flavors and pack ingredients for maximum yum. With ideas for storage and meal prep, you’re ready to enjoy these peppers anytime. Get creative with variations to keep things fresh. Whether for a family dinner or a gathering, these peppers can impress. Happy cooking!](https://goldendishy.com/wp-content/uploads/2025/06/e36cd186-0c48-4bd5-9184-2d07a9c06671-768x768.webp)