Loaded Sweet Potato Nachos Crunchy and Flavorful Delight

Get ready to dive into the delicious world of Loaded Sweet Potato Nachos! These crunchy, flavorful bites are perfect for game day, movie night, or any day you crave something tasty. I’ll walk you through this quick and easy recipe, filled with sweet potatoes, beans, cheese, and fresh toppings. Let’s transform simple ingredients into a dish that’s not only fun to eat but also healthy and satisfying! Are you hungry yet?
Why I Love This Recipe
- Healthy Twist: These nachos replace traditional tortilla chips with sweet potatoes, adding a nutritious element to your snack.
- Flavor Packed: The combination of smoky paprika and garlic powder brings an irresistible flavor to the dish.
- Customizable: You can easily swap ingredients or add your favorite toppings to make this dish your own.
- Perfect for Sharing: This recipe serves a crowd, making it ideal for parties, game days, or family gatherings.
Ingredients
Main Ingredients
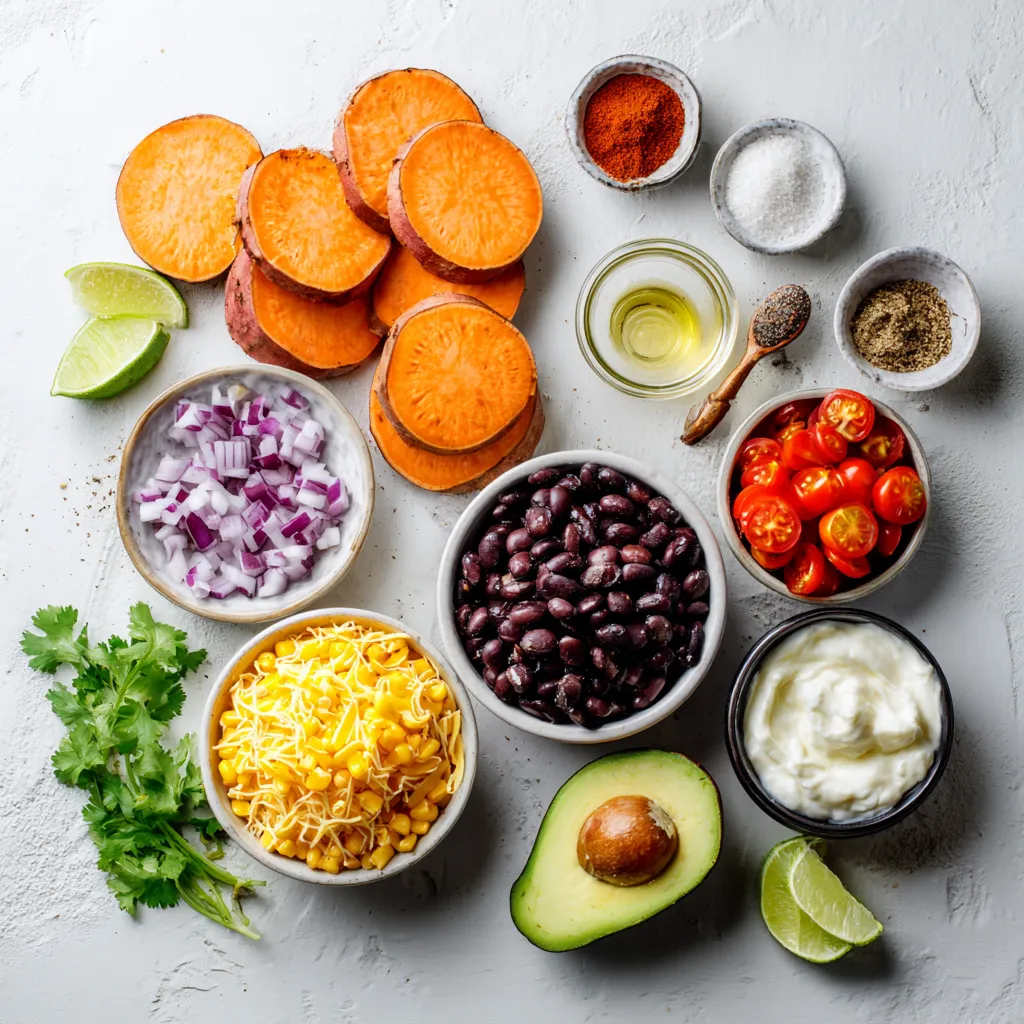
– 2 large sweet potatoes, carefully sliced into 1/4-inch thick rounds
– 1 cup canned black beans, thoroughly drained and rinsed
– 1 cup fresh or frozen corn kernels
– 1 cup shredded cheddar cheese (or a delicious dairy-free alternative)
Seasonings and Spices
– 1 tablespoon extra virgin olive oil
– 1 teaspoon smoky paprika
– 1 teaspoon garlic powder
– Sea salt and freshly cracked black pepper to taste
Toppings
– 1 ripe avocado, diced into bite-sized pieces
– 1/2 cup cherry tomatoes, cut in half
– 1/4 cup red onion, finely diced
– Fresh cilantro leaves for a pop of color and flavor
– Optional: Sour cream or Greek yogurt for serving
– Optional: Lime wedges to brighten the dish
In this recipe, I focus on the sweet potatoes. They are the star of the show. Their natural sweetness pairs well with savory toppings. I slice them thinly to ensure a great crunch. The black beans and corn add protein and texture. This makes every bite satisfying.
Next, I sprinkle on smoky paprika and garlic powder. These spices enhance the flavor of the sweet potatoes. A touch of sea salt and black pepper brings it all together. Use good quality olive oil for roasting. It helps the sweet potatoes crisp up nicely.
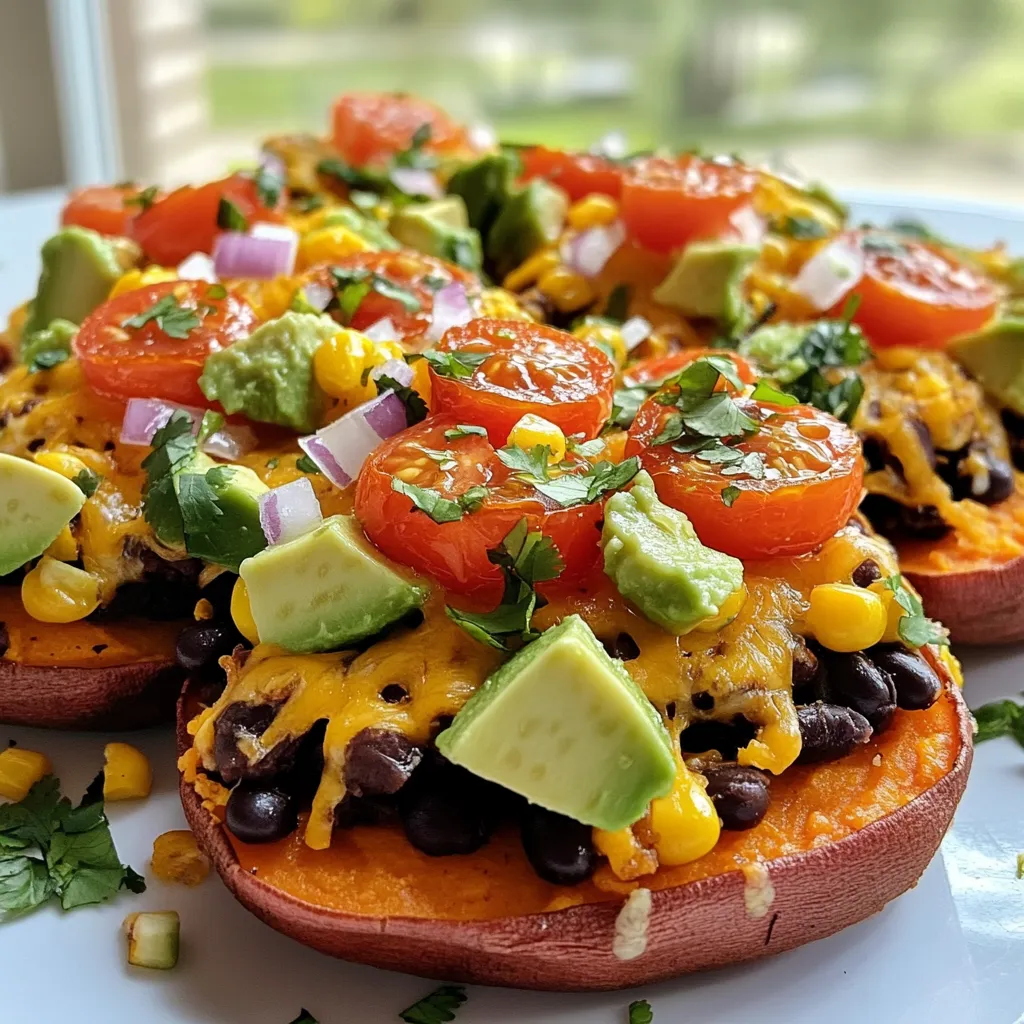
For toppings, I choose fresh ingredients. Diced avocado adds creaminess. Cherry tomatoes offer a burst of juicy goodness. Red onions give a nice crunch and bite. Finishing with fresh cilantro adds a bright note. Optional sour cream or Greek yogurt can give a creamy touch if desired. Lime wedges brighten the taste and make it fun.
Gathering these ingredients makes the nachos colorful and tasty. Each element plays a role in creating a crunchy and flavorful delight.

Step-by-Step Instructions
Prepping the Sweet Potatoes
First, slice the sweet potatoes into 1/4-inch thick rounds. Use a sharp knife for even cuts. Next, place the slices on a large baking sheet. Drizzle with 1 tablespoon of extra virgin olive oil. Then, sprinkle on 1 teaspoon of smoky paprika and 1 teaspoon of garlic powder. Add sea salt and freshly cracked black pepper to taste. Toss the slices gently until they are all coated. This step brings out the flavors.
Roasting the Sweet Potatoes
Now, preheat your oven to 425°F (220°C). This temperature helps the sweet potatoes roast perfectly. Arrange the slices in a single layer on the baking sheet. Roast them for about 20-25 minutes. Flip the slices halfway through to ensure even cooking. They should be tender and slightly crispy when done.
Layering the Nachos
Once the sweet potatoes are roasted, take them out of the oven. Start layering your nachos. First, evenly spread 1 cup of drained black beans over the sweet potatoes. Next, add 1 cup of corn kernels. Finally, sprinkle 1 cup of shredded cheddar cheese on top. Make sure each sweet potato slice gets some toppings. This layering creates a great taste in every bite.
Melting the Cheese
Return the baking sheet to the oven. Bake for an additional 5-7 minutes. Keep an eye on the cheese. You want it to melt and bubble up. This step makes the nachos gooey and delicious.
Adding Fresh Toppings
After the cheese melts, take the nachos out of the oven. Add the fresh toppings next. Start with 1 ripe avocado, diced into bite-sized pieces. Then, scatter 1/2 cup of halved cherry tomatoes and 1/4 cup of finely diced red onion on top. This adds crunch and freshness to your dish.
Final Touches
For the final touch, sprinkle fresh cilantro leaves over the nachos. This adds color and flavor. Serve with lime wedges on the side. A dollop of sour cream or Greek yogurt also adds creaminess. Enjoy your loaded sweet potato nachos!
Tips & Tricks
Achieving Perfectly Roasted Sweet Potatoes
To avoid sogginess, make sure to slice the sweet potatoes evenly. Aim for 1/4-inch thick rounds. This size helps them cook well. Drizzle them with olive oil and seasonings, then toss gently. Lay them out flat on the baking sheet.
To ensure crispiness, roast at 425°F (220°C). Flip the slices halfway through cooking. This helps them brown evenly. Check for a tender inside and a crispy outside when they are done.
Cheese Melting Techniques
For the best melting, I recommend using cheddar cheese. It melts well and tastes great. You can also try Monterey Jack for a creamy texture.
If you need a vegan option, look for dairy-free cheese made from nuts. Some brands melt well and provide a nice flavor. Always check the package for melting tips.
Presentation Tips
Serve your loaded nachos on a large platter for style. Layer them nicely, showing off the colorful toppings.
Garnish with cilantro for a fresh look. Add lime wedges on the side. This gives a bright touch and allows guests to add flavor as they wish.
Pro Tips
- Choose Sweet Potatoes Wisely: Opt for firm, unblemished sweet potatoes for the best flavor and texture.
- Even Slicing is Key: Ensure all sweet potato slices are uniform in thickness for even roasting.
- Layering for Success: Layer your toppings evenly to ensure every bite is packed with flavor!
- Fresh Ingredients Shine: Use ripe, fresh avocado and vibrant tomatoes for the best taste and presentation.

Variations
Dietary Modifications
You can make Loaded Sweet Potato Nachos fit your needs. Here are two easy options:
– Gluten-free options: Sweet potatoes are naturally gluten-free. So, all the toppings work well. Just check labels on beans and any sauces to make sure they are also gluten-free.
– Dairy-free alternatives: To avoid dairy, use a plant-based cheese. There are many great brands available. You can also skip cheese and use a rich avocado sauce instead.
Flavor Variations
Adding new flavors can make your nachos more fun. Here are some ideas:
– Adding spices for heat: Mix in some chili powder or jalapeños to add heat. This can easily make your nachos spicy and exciting.
– Different bean or cheese choices: Try pinto beans or even chickpeas for a twist. For cheese, you can use pepper jack or a smoky cheese for a unique flavor.
Themed Nachos
You can take your nachos to a whole new level with themes. Here are a couple of ideas:
– Mexican-style toppings: Add salsa, sliced radishes, or pickled onions for a fresh taste. These toppings add color and flavor.
– Tex-Mex fusion ideas: Swap the sweet potatoes for tortilla chips. Top with barbecue sauce, pulled pork, and coleslaw for a fun twist. It’s a great way to mix flavors.
Storage Info
Storing Leftovers
To keep your nachos fresh, use airtight containers. Glass or plastic containers work well. Store them in the fridge for up to three days. If you want to freeze leftovers, place them in freezer bags. Squeeze out as much air as you can before sealing. They can last up to three months in the freezer.
Reheating Guidelines
For the best taste, use the oven to reheat. Preheat it to 350°F (175°C). Place the nachos on a baking sheet and cover them with foil. Bake for about 10-15 minutes. This keeps them crunchy. If you use the microwave, heat in short bursts. This method can make them soggy.
Meal Prep Ideas
Prep your sweet potatoes ahead. Slice them and store in water to prevent browning. Cook your black beans and corn in advance. You can also shred cheese and chop toppings early. When it’s time to eat, simply layer and bake. This saves time and makes serving easy!
FAQs
Can I make Loaded Sweet Potato Nachos in advance?
Yes, you can make Loaded Sweet Potato Nachos ahead of time. Here are some tips:
– Prep the sweet potatoes: Slice and season them. Store in the fridge until ready.
– Cook the nachos: Roast the sweet potatoes and layer toppings. Bake right before serving.
– Keep toppings separate: Store fresh toppings like avocado and tomatoes in airtight containers.
What can I substitute for sweet potatoes?
If you don’t have sweet potatoes, here are some tasty alternatives:
– Regular potatoes: Use Yukon gold or russet potatoes for a classic taste.
– Zucchini: Slice zucchini into rounds for a lighter option.
– Butternut squash: Use roasted butternut squash for a sweet twist.
How to make Loaded Sweet Potato Nachos healthier?
You can easily make these nachos healthier with a few swaps:
– Use less cheese: Try a smaller amount of cheese or a dairy-free option.
– Add more veggies: Mix in bell peppers, spinach, or jalapeños for crunch.
– Choose low-sodium beans: Select low-sodium black beans to cut down on salt.
Can I customize the toppings?
Yes! You can personalize your nachos with these topping ideas:
– Protein boost: Add grilled chicken, ground turkey, or tofu.
– Spice it up: Top with jalapeños or hot sauce for heat.
– Creative flavors: Use salsa, guacamole, or pickled onions for added zest.
In this post, we explored how to make Loaded Sweet Potato Nachos. We discussed the main ingredients, seasoning, and toppings for this dish. The step-by-step guide showed how to prep, layer, and cook. I shared tips for perfect roasting and melting cheese. We also covered variations, storage, and FAQs.
Now, you have all the tools to create your own fun and tasty nachos. Enjoy experimenting and make them your ow

Savory Loaded Sweet Potato Nachos
Ingredients
- 2 large sweet potatoes, carefully sliced into 1/4-inch thick rounds
- 1 tablespoon extra virgin olive oil
- 1 teaspoon smoky paprika
- 1 teaspoon garlic powder
- to taste sea salt and freshly cracked black pepper
- 1 cup canned black beans, thoroughly drained and rinsed
- 1 cup fresh or frozen corn kernels
- 1 cup shredded cheddar cheese (or a delicious dairy-free alternative)
- 1 ripe avocado, diced into bite-sized pieces
- 1/2 cup cherry tomatoes, cut in half
- 1/4 cup red onion, finely diced
- to taste fresh cilantro leaves for garnish
- optional sour cream or Greek yogurt for serving
- optional lime wedges to brighten the dish
Instructions
- Preheat your oven to 425°F (220°C) to ensure it's hot and ready for roasting.
- Prepare the sweet potatoes: On a large baking sheet, drizzle the olive oil over the sweet potato rounds. Sprinkle with smoky paprika, garlic powder, sea salt, and freshly cracked black pepper. Toss gently until all the slices are evenly coated.
- Arrange the sweet potato slices in a single layer on the baking sheet. Roast in the preheated oven for about 20-25 minutes, flipping them halfway through the cooking time. They should be tender with a slightly crispy exterior when done.
- Remove the sweet potatoes from the oven. Generously layer the black beans, corn, and shredded cheese over the roasted sweet potato rounds, ensuring an even distribution.
- Return the baking sheet to the oven and bake for an additional 5-7 minutes, or until the cheese has melted and is beautifully bubbly.
- Once out of the oven, immediately top the nachos with the diced avocado, halved cherry tomatoes, and finely chopped red onion for crunch and freshness.
- Sprinkle fresh cilantro on top for an aromatic touch. Serve the nachos with lime wedges on the side and a dollop of sour cream or Greek yogurt if desired for added creaminess.


![To make Cranberry Orange Energy Bites, you need the right mix of flavors and textures. Here’s what you will need: - 1 cup rolled oats - 1/2 cup almond butter - 1/4 cup honey or maple syrup - 1/2 cup dried cranberries, finely chopped - Zest of 1 medium orange - 1/4 cup freshly squeezed orange juice - 1/4 cup chia seeds - 1/2 teaspoon ground cinnamon - Pinch of sea salt - Optional: 1/4 cup chopped nuts or seeds These ingredients come together to create a tasty and healthy snack. The oats provide fiber and energy. Almond butter adds protein and a creamy texture. Honey or maple syrup gives a touch of sweetness, while dried cranberries add a chewy burst of flavor. The zest and juice of the orange brighten the bites, making them refreshing. Chia seeds add crunch and healthy omega-3s. You can also mix in nuts or seeds for extra texture. They can make your bites even more filling. You can find the full recipe for the perfect energy bites in the recipe section above. - Mixing the Base Ingredients Start by taking a large bowl. Add 1 cup of rolled oats, 1/2 cup of almond butter, and 1/4 cup of honey or maple syrup. Mix with a sturdy spoon until everything blends well. This base forms the heart of your energy bites. - Adding Flavorful Components Next, stir in 1/2 cup of finely chopped dried cranberries, the zest of 1 medium orange, and 1/4 cup of freshly squeezed orange juice. Also, add 1/4 cup of chia seeds, 1/2 teaspoon of ground cinnamon, and a pinch of sea salt. Keep mixing until you see a uniform color and texture. - Achieving the Right Texture Use your hands or a spatula to mix the ingredients thoroughly. You want a sticky but manageable consistency. If it feels too dry, add a bit more orange juice. If it’s too wet, sprinkle in extra oats until it feels just right. - Rolling Into Balls After you’ve mixed everything, cover the bowl with plastic wrap or a lid. Chill the mixture in the fridge for about 30 minutes. Once chilled, take portions and roll them into 1-inch balls. You should get about 15 to 20 bites. - Optional Coating with Nuts or Seeds For added crunch and flavor, roll some of the balls in chopped nuts or seeds. This step is optional, but it gives a nice touch to each bite. - Chilling the Mixture After rolling, arrange the energy bites on a plate. You can chill them for an extra 10 to 15 minutes to firm them up even more. This makes them easier to eat. - Presentation Tips For a pretty display, stack the energy bites or place them in a rustic jar. You can sprinkle some extra orange zest on top for color and aroma. Enjoy your tasty, nutritious snack! Check the [Full Recipe] for more details. - Best Practices for Freshness: Store energy bites in an airtight container. This keeps them moist and tasty. - Duration of Shelf Life: These bites last up to 1 week in the fridge. After that, they may dry out. - Freezing Energy Bites for Later Use: You can freeze these bites. Place them in a single layer on a tray. Once frozen, store them in a bag. They can last for up to 3 months. - Preparing in Bulk: Make a double batch! This way, you always have a quick snack ready. - Overmixing or Undermixing: Mix just enough to combine all ingredients. Too much mixing can make them tough. - Adjusting Consistency: If the mixture is too dry, add more juice. If too wet, mix in more oats. Always aim for a sticky but manageable mixture. For the full recipe, check out Cranberry Orange Energy Bites. {{image_4}} You can mix things up by adding different nuts. Walnuts, almonds, or pecans give a nice crunch. Just chop them finely and fold them into the mix. You can use about 1/4 cup of your choice. Incorporating other fruits can also change the flavor. Try using dried apricots, raisins, or figs. They add sweetness and texture. Just chop them to match the size of the cranberries. If you want a vegan option, swap honey for maple syrup. This keeps the bites sweet without using animal products. Almond butter is already vegan, so you’re set there! For gluten-free substitutions, choose certified gluten-free oats. Most oats are naturally gluten-free but can get cross-contaminated. Make sure to check the label. Using different nut butters can change the taste and texture. Peanut butter or cashew butter works great. Just use the same amount as almond butter. Adjusting crunchiness with seeds is another fun option. Add chia seeds or flaxseeds for some extra bite. You can also toss in sunflower seeds for a nut-free crunch. The cranberry orange energy bites are packed with nutrients. Each ingredient brings unique health benefits. - Rolled oats offer fiber, which helps digestion and keeps you full. - Almond butter is a great source of healthy fats and protein. - Dried cranberries add antioxidants that fight free radicals. - Chia seeds are rich in omega-3s and help with heart health. - Orange juice boosts your immune system with vitamin C. These bites provide energy and nutrients to fuel your day. They are perfect for a quick boost before a workout or during a busy afternoon. How many bites should you eat for a snack? I suggest two to three bites. This gives you enough energy without overdoing it. Each bite is satisfying. Dietary recommendations may vary. Listen to your body. If you feel hungry after two bites, enjoy another! Balance is key. Each bite contains about 70 calories. This makes it easy to track your snack intake. If you want fewer calories, consider adjusting the recipe. You can reduce the honey or use less nut butter. This way, you can fit these bites into your dietary goals without losing flavor. For more details, check the full recipe. Enjoy these tasty energy bites while staying mindful of your nutrition! Cranberry orange energy bites can last up to one week in the fridge. Store them in an airtight container to keep them fresh. If you want to keep them longer, you can freeze them. They can last up to three months in the freezer. Just thaw them in the fridge before enjoying. Yes, you can substitute almond butter with other nut butters. Peanut butter, cashew butter, or sunflower seed butter work well. Each will give a unique taste. Make sure to choose one that fits your dietary needs. You can use the mixture for various snacks. Try spreading it on toast or mixing it into yogurt. You can also make energy bars by pressing the mixture into a pan and slicing it. This way, you have more options for your snack. To make them sweeter, you can add more honey or maple syrup. You can also mix in some chocolate chips or dried fruits like dates. Adjust the sweetness based on your taste. This way, you can create a snack that you love. Yes, there are many alternatives for honey or maple syrup. You can use agave nectar, brown rice syrup, or coconut nectar. Each of these will add a different sweetness. Just make sure to adjust the amount based on how sweet you want your bites to be. For the full recipe, check out the recipe section above. These Cranberry Orange Energy Bites are simple to make and taste great. You mix healthy ingredients, shape them into bites, and enjoy a tasty snack. Remember to store them properly to keep them fresh. You can also tweak ingredients for your tastes or diet. With these tips and flavor ideas, you’ll enjoy these bites any time you need a quick boost. Get creative and make this snack your own!](https://goldendishy.com/wp-content/uploads/2025/06/5774e534-56b3-4e6d-8a48-215f930e3d22-768x768.webp)
![To make the best roasted garlic hummus, gather these key ingredients: - 1 can (15 oz) chickpeas, thoroughly drained and rinsed - 1/4 cup creamy tahini - 1/4 cup high-quality olive oil, plus extra for drizzling - 4 cloves of roasted garlic - 2 tablespoons freshly squeezed lemon juice - 1/2 teaspoon ground cumin - Sea salt, to taste - Water, as needed for desired consistency - Sweet paprika and finely chopped fresh parsley for garnish These ingredients create a rich and creamy dip that bursts with flavor. The roasted garlic adds a sweet, mellow taste that enhances the overall profile of the hummus. You can customize your hummus with these optional ingredients: - Spices like smoked paprika or cayenne for heat - Fresh herbs such as basil or cilantro for added freshness - A splash of balsamic vinegar for depth - Roasted red peppers for a sweet and smoky twist These additions can help you explore new flavors and keep your hummus exciting. Here’s a quick look at the health benefits of the main ingredients: - Chickpeas: High in protein and fiber, they help keep you full. - Tahini: Made from sesame seeds, it provides healthy fats and calcium. - Olive oil: A heart-healthy fat that can lower bad cholesterol levels. - Garlic: Known for its immune-boosting properties and flavor. - Lemon juice: Adds vitamin C and brightens the flavor. This hummus is not just tasty; it’s also packed with nutrients. You can enjoy it guilt-free as a snack or appetizer. For the complete recipe, check out the full recipe section. To roast garlic, first, preheat your oven to 400°F (200°C). Take your garlic cloves and wrap them in aluminum foil. Drizzle a little olive oil over the cloves before sealing the packet. Place the foil packet in the oven and roast for about 30-35 minutes. The garlic should turn soft and golden brown. After roasting, let it cool for a few minutes before you touch it. This step brings out the sweet, rich flavor of the garlic. In a food processor, add the following ingredients: - 1 can (15 oz) chickpeas, thoroughly drained and rinsed - 1/4 cup creamy tahini - 1/4 cup high-quality olive oil, plus extra for drizzling - 4 cloves of roasted garlic - 2 tablespoons freshly squeezed lemon juice - 1/2 teaspoon ground cumin - Sea salt, to taste Blend these ingredients until they become silky smooth. You may need to stop and scrape down the sides to ensure even mixing. This step creates a rich and creamy base for your hummus. If your hummus is too thick, add water a little at a time. Start with one tablespoon and blend again until you reach your preferred creamy texture. Taste your hummus and adjust the seasoning. You might want more sea salt, lemon juice, or roasted garlic to suit your taste. For the full recipe, refer to the provided instructions. Enjoy making this delicious dip! To make your hummus extra creamy, use dry chickpeas. Soak them overnight and cook until soft. This gives a smoother texture. If you use canned chickpeas, rinse them well. It helps remove some of the canning liquid, which can make hummus taste tinny. Always blend your mixture well. Stop and scrape the sides of the bowl as needed. This step ensures every bit gets mixed in. Roasting garlic is easy and adds great flavor. Start by preheating your oven to 400°F (200°C). Wrap the garlic cloves in aluminum foil. Drizzle a little olive oil on top. Seal the foil tightly and bake for about 30-35 minutes. The cloves should be soft and golden brown. Let them cool before you handle them. You can use the roasted garlic in your hummus or on bread for a tasty treat. Roasted garlic hummus is very versatile. You can serve it with fresh veggie sticks like carrots, cucumbers, and bell peppers. Pita bread, toasted or soft, makes a great dipper too. For a fun twist, try pairing it with warm pita chips. Add a sprinkle of sweet paprika and fresh parsley on top for color. This makes your dish look beautiful and tasty. Don't forget to check out the Full Recipe for more details! {{image_4}} You can boost the taste of your roasted garlic hummus with spices and herbs. Try adding paprika for a smoky kick or chili powder for heat. Fresh herbs like cilantro or basil can add a bright touch. A pinch of za'atar brings an earthy flavor, while a dash of black pepper enhances the taste. Mix and match to find your favorite combination! Though chickpeas are classic, other beans and peas work well too. White beans like cannellini add creaminess and a mild taste. Black beans give a rich color and unique flavor. You can even use peas for a sweet twist. Each option brings its own character, so experiment to discover what you love! Roasted garlic hummus shines as a dip, but it can do much more. Spread it on sandwiches or wraps for a flavorful layer. Use it as a base for veggie pizzas or flatbreads. Pair it with crackers or pita chips for a fun snack. You can even dollop it on salads for added creaminess. The options are endless! For the full recipe, check out the detailed steps to make your own roasted garlic hummus. To keep your roasted garlic hummus fresh, place it in an airtight container. Make sure to press a piece of plastic wrap against the hummus before sealing. This helps to keep the air out and maintain its creamy texture. Store it in the fridge for up to one week. Always use a clean spoon when scooping out hummus. This avoids introducing bacteria that can spoil your dip. You can freeze roasted garlic hummus for longer storage. Use a freezer-safe container or a resealable bag. Leave some space at the top, as the hummus may expand when frozen. It can last for about three months in the freezer. To use, thaw it overnight in the fridge before serving. Stir well after thawing to restore its smooth consistency. Homemade hummus can last for about a week when stored correctly in the fridge. If you notice any off smells or changes in color, it’s best to discard it. Always trust your senses. Freshness is key for the best flavor. If you made a big batch, consider freezing a portion for later use. Check the [Full Recipe] for tips on making the perfect hummus. You can easily make roasted garlic hummus vegan. The main ingredients are already plant-based. Just use chickpeas, roasted garlic, olive oil, lemon juice, and seasoning. Ensure your tahini is vegan too. Most brands are, but it’s good to check the label. If you don’t have tahini, don’t worry! You can use sunflower seed butter or almond butter. These will change the flavor a bit, but they still taste great. You can also skip it entirely. Just add a bit more olive oil for creaminess. Check the texture while blending. If the hummus feels hard to mix, it’s too thick. Add water, one tablespoon at a time, until it smooths out. If it’s runny, add more chickpeas or tahini to thicken it. Always taste as you go! For the full recipe and precise steps, check the Full Recipe section. Roasted garlic hummus is simple to make and enjoy. You learned about key ingredients, how to roast garlic, and tips for creamy texture. Variations add excitement to the dish, while proper storage keeps it fresh. This tasty dip fits many diets and pairs well with many foods. Now, it’s time to get creative in the kitchen. Make your version and share it with friends. You’ll love the flavor and fun it brings! Enjoy your hummus journey!](https://goldendishy.com/wp-content/uploads/2025/07/73315b96-5df4-4df6-b272-95a468d12cec-768x768.webp)