Loaded Buffalo Chicken Nachos Savory Game Day Treat

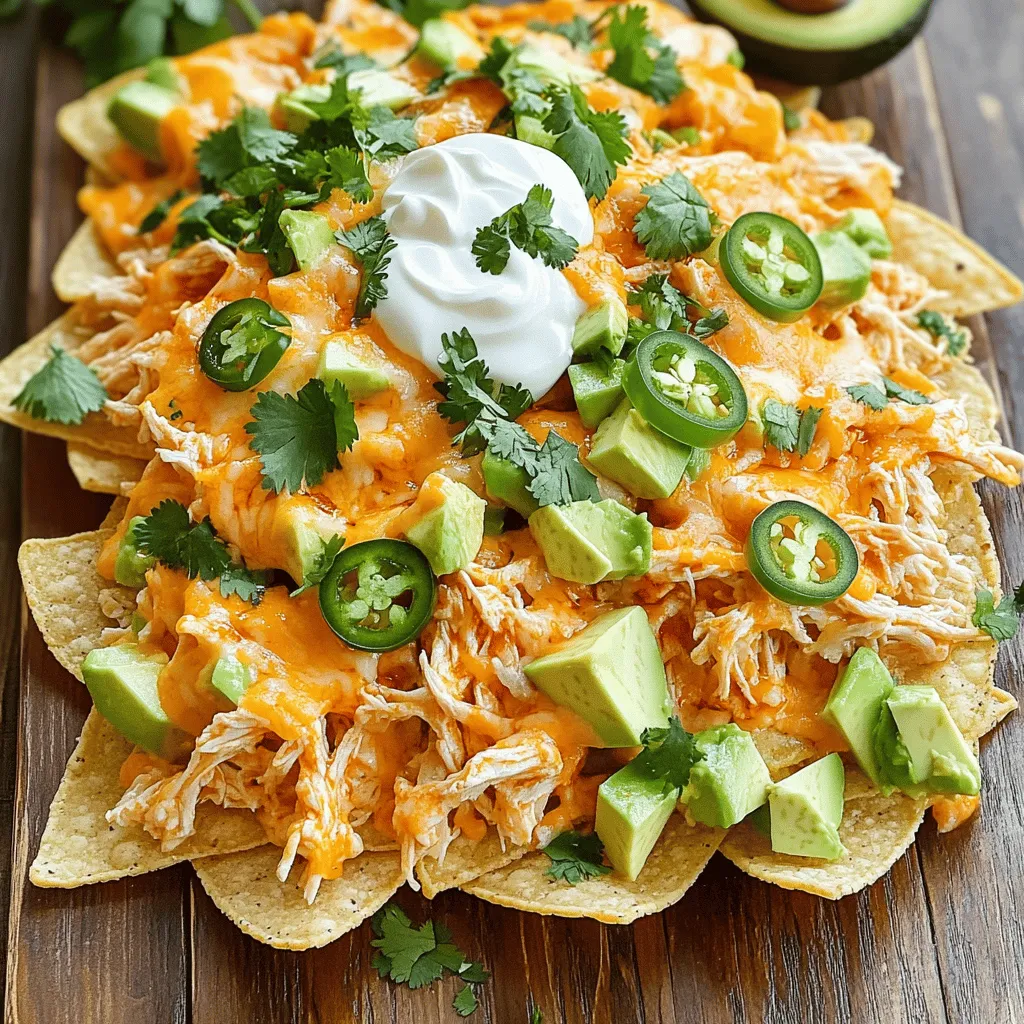
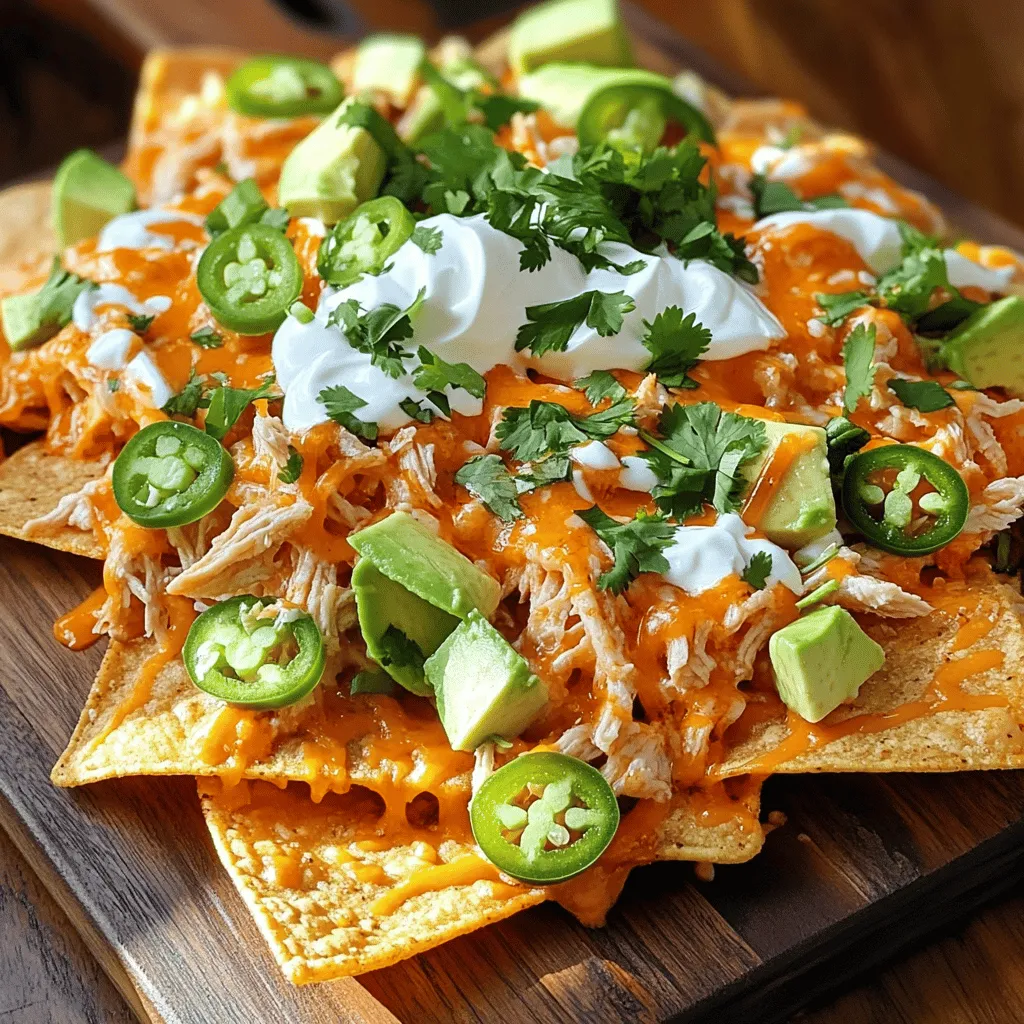
Get ready for game day with these Loaded Buffalo Chicken Nachos! They pack a punch with spicy, tangy flavor that will make your taste buds cheer. In this post, I’ll share all the ingredients you need and reveal tips for perfect cheese melting. Plus, I’ll cover variations and storage tips, so you can enjoy these nachos long after the game ends. Let’s dive into this savory treat!
Ingredients
List of Ingredients for Loaded Buffalo Chicken Nachos
– 2 cups cooked chicken, shredded
– ½ cup buffalo sauce (adjust for desired spice level)
– 1 bag (13 oz) tortilla chips
– 1 cup shredded sharp cheddar cheese
– 1 cup shredded Monterey Jack cheese
– ½ cup sliced jalapeños (fresh or pickled)
– ½ cup sour cream (for drizzling)
– ½ cup green onions, chopped
– 1 ripe avocado, diced
– Fresh cilantro leaves, for garnish
– Salt and pepper, to taste
Ingredient Tips for Best Flavor
Use fresh ingredients for the best taste. Fresh chicken has better flavor than frozen. Shredding it yourself gives the right texture. Choose a buffalo sauce that fits your spice level. A sharper cheddar adds depth, while Monterey Jack provides creaminess. Use fresh jalapeños for a crisp bite. Diced avocado and chopped green onions brighten the dish. Sour cream adds richness and balances the heat. Lastly, fresh cilantro brings a burst of freshness.
Recommended Substitute Ingredients
If you want to switch things up, try these substitutes:
– Use rotisserie chicken for a quick option.
– Swap buffalo sauce for a spicy barbecue sauce for a twist.
– Replace tortilla chips with pita chips or nacho-flavored chips.
– Try pepper jack cheese if you like more heat.
– Use Greek yogurt instead of sour cream for a lighter touch.
– For a veggie option, replace chicken with black beans or chickpeas.
By choosing the right ingredients, you can make your Loaded Buffalo Chicken Nachos incredibly tasty. Enjoy experimenting with flavors!
Step-by-Step Instructions
Preparation Overview
To start, gather all your ingredients. You need cooked chicken, buffalo sauce, tortilla chips, and cheese. Make sure you have toppings ready like jalapeños, sour cream, and green onions. This will make your cooking smooth and fun.
Complete Cooking Steps
1. First, preheat your oven to 350°F (175°C). This sets the stage for baking.
2. In a bowl, mix shredded chicken with buffalo sauce. Toss them well until the chicken is fully coated.
3. Next, grab a large baking sheet. Lay out tortilla chips in a single layer. This helps ensure even topping.
4. Spread the buffalo chicken mix evenly over the chips. Make sure each chip gets some chicken.
5. Now, sprinkle a mix of shredded cheddar and Monterey Jack cheese atop. Every chip should have cheesy goodness.
6. Add sliced jalapeños on top of the cheese for extra flavor and heat.
7. Bake in the oven for 15-20 minutes. Look for melted and bubbly cheese. That’s your cue they are ready.
8. Carefully take the baking sheet from the oven. Let it cool for a few minutes.
9. Drizzle sour cream over the nachos. Add diced avocado and chopped green onions, spreading them out for balance.
10. Top with fresh cilantro leaves for a pop of color and flavor. Serve hot and enjoy!
Tips for Ensuring Perfectly Melted Cheese
To achieve melty cheese, use a mix of sharp cheddar and Monterey Jack. This combination melts well and adds flavor. Spread cheese evenly, so every chip gets its share. Bake until cheese is bubbly, but avoid overcooking. Keep an eye on it! For a richer taste, try adding a bit of cream cheese to the mix. This makes the cheese even creamier.
Tips & Tricks
Common Mistakes to Avoid
When making loaded buffalo chicken nachos, a few common mistakes can ruin your dish. First, don’t overcrowd the chips. If you pile on too much chicken and cheese, the chips will get soggy. Second, be careful with the buffalo sauce. If you use too much, it can overpower everything. Start with half a cup and add more if needed. Lastly, don’t skip the cooling step after baking. Letting nachos cool for a few minutes helps the cheese set.
Enhancing Flavor and Texture
To boost flavor, mix in spices with the chicken. Garlic powder or onion powder can add depth. For texture, try using different types of chips. Blue corn tortilla chips add a nice crunch and flavor. You can also add more toppings, like diced tomatoes or black olives, to create layers. A squeeze of lime juice right before serving brightens the dish and adds freshness.
Serving Suggestions for Maximum Enjoyment
Serve loaded buffalo chicken nachos right after making them. This keeps everything warm and gooey. Pair them with sides like celery sticks or carrot sticks for a crunchy contrast. You can also offer extra buffalo sauce or ranch dressing on the side. This way, everyone can customize their nachos. For the best experience, enjoy them while watching your favorite game or movie. These nachos are a crowd-pleaser that will keep everyone coming back for more!

Variations
Different Protein Options
You can switch up the protein in your nachos. Instead of chicken, try shredded beef or pork. You can also use ground turkey for a lighter option. Each protein brings a unique flavor. Just mix it with buffalo sauce as you would with chicken.
Alternative Toppings and Mix-ins
You can add many toppings to make your nachos special. Consider using black beans for extra fiber. Corn adds sweetness and crunch. If you like it spicy, add more jalapeños or even diced green chilies. For a twist, try switching the cheese. A pepper jack cheese gives a great kick.
Vegetarian and Vegan Adaptations
You can easily make these nachos vegetarian or vegan. Use a plant-based chicken substitute mixed with buffalo sauce. Replace dairy cheese with a vegan cheese alternative. For a creamy touch, use cashew cream or a vegan sour cream. These swaps keep the nachos tasty and satisfying.
Storage Info
Best Practices for Storing Leftovers
After enjoying your nachos, store leftovers in an airtight container. This keeps them fresh and tasty. Let the nachos cool before sealing them. If you mix toppings, separate them to maintain crunch. You can keep them in the fridge for up to three days.
Reheating Suggestions for Optimal Taste
To reheat, use an oven for the best results. Preheat your oven to 350°F (175°C). Spread the nachos on a baking sheet. Heat for about 10 minutes until warm. This helps the cheese melt again and the chips stay crisp. Avoid the microwave; it makes the chips soggy.
Freezing Tips for Longer Storage
You can freeze the buffalo chicken mixture, but not the nachos as a whole. Store the chicken in a freezer-safe bag. It lasts for up to three months. When you’re ready to use it, thaw the chicken in the fridge overnight. Reheat and then top with fresh chips and cheese. This keeps your nachos delicious and fresh.
FAQs
How to Make Loaded Buffalo Chicken Nachos Healthier?
To make these nachos healthier, swap regular chips for baked tortilla chips. Use less cheese or choose low-fat cheese. You can also add more veggies like bell peppers or corn. Try Greek yogurt instead of sour cream for a lighter option. These swaps keep the taste great while cutting calories.
Can I Make These Nachos in Advance?
Yes, you can prepare some parts ahead of time. Shred the chicken and mix it with buffalo sauce a day early. Store it in the fridge. You can also chop veggies and cheese in advance. However, I recommend baking the nachos fresh for the best taste and texture.
What to Serve with Loaded Buffalo Chicken Nachos?
These nachos pair well with a cool drink like soda or iced tea. You can also serve a fresh salad on the side. A tangy coleslaw adds a nice crunch. For a fun twist, offer dipping sauces like ranch or blue cheese.This recipe covers all the steps to make your game day snack a hit!
Loaded Buffalo chicken nachos are a fun and tasty dish. We explored the best ingredients, cooking steps, and tips to enhance flavor. I shared ways to avoid common mistakes and offered storage info so leftovers stay fresh. You can even try different proteins and toppings for variety. This dish is versatile and perfect for any gathering. Remember, the right ingredients and techniques make for the best nachos. Enjoy making your own loaded nachos, and don’t be afraid to experiment!


![To create this vibrant salad, gather these fresh ingredients: - 1 medium zucchini, sliced into half-moons - 1 bell pepper (red or yellow for sweetness), chopped into bite-sized pieces - 1 small eggplant, diced into uniform cubes - 1 cup cherry tomatoes, halved for a burst of sweetness - 1 red onion, cut into wedges for flavor - 3 tablespoons balsamic vinegar for a tangy kick - 2 tablespoons extra-virgin olive oil for richness - 1 tablespoon honey to balance the acidity - Sea salt and freshly cracked pepper to taste - 1 teaspoon dried oregano for an aromatic touch - 1 cup mixed greens (arugula, spinach, or your favorites) - ¼ cup feta cheese, crumbled (optional, for creaminess) - Fresh basil leaves for a fragrant garnish Not all ingredients need to be set in stone. Here are some smart swaps: - Use yellow squash instead of zucchini. The texture remains similar. - Any color bell pepper works well; green adds a more bitter taste. - Swap eggplant for mushrooms for a different texture and flavor. - Try different vinegars, like red wine vinegar, if balsamic is not available. - Maple syrup can replace honey for a vegan option. - For a dairy-free choice, omit feta cheese or use a vegan alternative. Choosing the right veggies makes a big difference. Here’s how to select the best: - Look for firm zucchini with shiny, smooth skin. Avoid soft spots. - Choose bell peppers that feel heavy and have smooth skin. - For eggplant, pick ones that are shiny and feel heavy for their size. - Cherry tomatoes should be plump and free from blemishes. - Pick red onions that are firm and have a vibrant color. - Visit local farmers' markets for the freshest produce whenever possible. These small choices can bring your Balsamic Roasted Vegetable Salad to life. For the complete recipe, check the [Full Recipe]. First, set your oven to 425°F (220°C). This high heat helps the veggies roast nicely. While the oven heats, grab a large mixing bowl. Add your sliced zucchini, chopped bell pepper, diced eggplant, halved cherry tomatoes, and red onion wedges. Mix them well. This step ensures every bite is packed with flavor. Next, take a small bowl. In it, combine 3 tablespoons of balsamic vinegar, 2 tablespoons of extra-virgin olive oil, and 1 tablespoon of honey. Add a pinch of sea salt and freshly cracked pepper. Finally, mix in 1 teaspoon of dried oregano. Whisk these ingredients together until smooth. This vinaigrette will bring a tangy and sweet kick to your salad. Now, line a baking sheet with parchment paper. Spread your mixed vegetables in a single layer. Make sure they are not crowded, as this helps them roast evenly. Place the baking sheet in the oven and roast for 20-25 minutes. Stir the vegetables halfway through. This mix ensures they cook evenly and get that lovely caramelization. Once the veggies are tender and golden, take them out and let them cool for a few minutes. In a large serving bowl, add your fresh mixed greens. Then, toss in the roasted vegetables. Gently mix until the greens and vegetables blend well. If you like, sprinkle ¼ cup of crumbled feta on top. Finally, add fresh basil leaves for a fragrant touch. Enjoy your colorful and tasty salad! For the full recipe, check out the details provided above. To get the best flavor, cut your vegetables into similar sizes. This step helps them roast evenly. Place them in a single layer on the baking sheet. Crowding the pan can cause steaming instead of roasting. Stir the vegetables halfway through cooking. This simple action helps them brown nicely on all sides. Always dress your salad right before serving. This keeps the greens fresh and crunchy. Use just enough dressing to coat the veggies. A light touch prevents sogginess. When mixing, toss gently to avoid bruising the greens. If you prefer more flavor, add more balsamic vinegar or a splash of lemon juice. Fresh herbs can elevate your salad. Try adding chopped parsley or cilantro for a fresh twist. You can also add a pinch of red pepper flakes for a kick. Experiment with spices like cumin or paprika for unique flavors. These additions can make your salad truly special and memorable. {{image_4}} You can mix and match veggies to suit your taste. Try adding carrots for sweetness or broccoli for crunch. Swap in asparagus for a fresh twist. You can even use sweet potatoes for a hearty base. The options are endless! Each veggie brings its own flavor and texture. You can create a new salad every time. Want to make this salad filling? Add proteins like grilled chicken or shrimp. Chickpeas or black beans also work well for plant-based options. They boost the protein without altering the salad's great taste. If you want a creamy touch, add avocado slices. These options turn your salad into a complete meal. This salad is easy to make vegan and gluten-free. Just skip the feta cheese or use a plant-based alternative. Use gluten-free grains like quinoa for added texture. You can also mix in nuts or seeds for crunch. These simple swaps keep your salad tasty while meeting dietary needs. Enjoy the fresh flavors without worry! For the full recipe, check out the Balsamic Roasted Vegetable Salad. Store leftover Balsamic Roasted Vegetable Salad in an airtight container. Make sure the salad is cool before sealing it. This keeps the flavors fresh and prevents sogginess. Try to eat the leftovers within three days for the best taste. I recommend using glass containers for storing your salad. Glass is non-reactive and helps keep the food fresh longer. If you prefer plastic, choose BPA-free containers. Make sure they fit your salad snugly to limit air exposure. To reheat roasted vegetables, place them on a baking sheet. Heat your oven to 350°F (175°C) and roast for about 10-15 minutes. This keeps the veggies crispy and warm. You can also reheat them in a skillet over medium heat for a few minutes. Just stir often to avoid burning. If you want to add a little moisture, a splash of balsamic vinegar can help revive the flavors. Enjoy your meal! Yes, you can make this salad ahead. Roast the veggies and prepare the salad. Keep the roasted veggies and greens separate. Store them in the fridge. Mix them just before serving for the best taste and texture. Mixed greens work great with roasted veggies. I love using arugula, spinach, or kale. They add crunch and a fresh taste. You can choose any greens you enjoy. Just pick ones that won’t wilt fast. Balsamic roasted vegetables last about 3 to 5 days in the fridge. Store them in an airtight container. The flavors will deepen over time, making them even tastier. Just reheat them before serving for a warm dish. You can use frozen vegetables, but fresh is best. Frozen veggies may release more water while cooking. If using frozen, roast them a bit longer. This helps them get nice and crispy. Balsamic roasted vegetable salad is easy and fun to make. We covered the ingredients, step-by-step instructions, and tips for the best results. You can customize this salad with different veggies or proteins. Proper storage keeps leftovers fresh, and I shared FAQs to answer common questions. Try this salad for a tasty and healthy meal. Enjoy making it your own!](https://goldendishy.com/wp-content/uploads/2025/06/26f5156f-9b75-49f6-aa69-260bfc3a782d-768x768.webp)

![To make teriyaki chicken lettuce wraps, you need a few key ingredients. These create the rich flavors and fresh textures. Here’s what you’ll need: - 1 lb (450g) boneless, skinless chicken breast, finely diced - 1 tablespoon canola oil - 1/2 cup bell pepper, finely chopped (choose red or yellow for sweetness) - 1/2 cup carrot, grated (for a touch of crunch) - 3 green onions, beautifully sliced - 2 cloves garlic, minced (for aromatic depth) - 1/4 cup low-sodium soy sauce (to control saltiness) - 2 tablespoons honey (for a hint of natural sweetness) - 1 tablespoon rice vinegar (to balance flavors) - 1 teaspoon sesame oil (for a nutty aroma) - 1 teaspoon fresh ginger, grated (adds a zesty kick) - 1 head of butter lettuce or iceberg lettuce, with leaves gently separated These ingredients come together to create a joyful, tasty meal. Garnishes can elevate your dish. While not required, they add flair and flavor. Here are some great options: - Sesame seeds (for garnish, optional but recommended) - Fresh cilantro or parsley, for garnish (optional) Adding these garnishes can make your wraps look and taste even better. Lettuce is key for wraps. It holds the filling perfectly. Here are tips to choose the best lettuce: - Look for crisp, fresh leaves. Avoid any wilting or browning. - Butter lettuce has a soft, pliable texture, perfect for wrapping. - Iceberg lettuce offers a nice crunch but can be thicker. Choose what you like best for your teriyaki chicken lettuce wraps. To start, gather your ingredients. You need: - 1 lb boneless, skinless chicken breast, finely diced - 1 tablespoon canola oil - 1/2 cup bell pepper, finely chopped - 1/2 cup carrot, grated - 3 green onions, beautifully sliced - 2 cloves garlic, minced - 1/4 cup low-sodium soy sauce - 2 tablespoons honey - 1 tablespoon rice vinegar - 1 teaspoon sesame oil - 1 teaspoon fresh ginger, grated - 1 head of butter or iceberg lettuce, leaves separated - Sesame seeds and fresh herbs for garnish Make sure your chicken is chopped small. This helps it cook evenly. Chop the bell pepper finely for sweetness and color. Grate the carrot for crunch. Slice the green onions thin. Mince the garlic and grate the ginger to release their flavors. Heat the canola oil in a large skillet over medium heat. Wait until the oil shimmers. Add the diced chicken and cook it for 5-7 minutes. Stir often until the chicken is brown and fully cooked. Then, add the minced garlic, grated ginger, and chopped bell pepper. Sauté this mixture for 2-3 minutes. The bell pepper should soften and blend with the chicken. In a small bowl, whisk together the soy sauce, honey, rice vinegar, and sesame oil. When well combined, pour this sauce into the skillet. Now, gently fold in the grated carrots and sliced green onions. Cook for another 2-3 minutes. This helps the sauce coat everything and thicken slightly. Remove the skillet from heat. Let the teriyaki chicken cool for a few minutes. This resting time allows the flavors to meld beautifully. To serve, take a lettuce leaf and place a generous spoonful of the teriyaki chicken mixture in the center. This creates your wrap. For added flavor, sprinkle sesame seeds and fresh herbs on top. Serve the wraps right away. Encourage everyone to wrap them up and enjoy the fresh, vibrant flavors. For the full details on making this dish, check out the Full Recipe. For juicy chicken, choose fresh chicken breast. Cut it into small, even pieces. This helps it cook evenly. Heat your skillet before adding oil. Use medium heat to avoid burning. Stir the chicken often. This keeps it from sticking and ensures even cooking. Add garlic and ginger early. This builds a great flavor base. Cook until the chicken is completely brown and firm. To wrap your lettuce, use large, whole leaves. Butter or iceberg lettuce works best. Place a spoonful of chicken in the center. Fold the sides in first, then roll it up. This keeps the filling secure. Make sure the wrap is tight but not too tight. You want it to hold together without falling apart. Arrange your wraps on a platter. Add extra garnishes like sesame seeds for a beautiful look. You can change the flavor of your wraps easily. Add extra veggies like cucumbers or radishes. They give a nice crunch. For a spicy kick, include sliced jalapeños or sriracha sauce. If you like nuts, add chopped peanuts or cashews. You can also switch the protein. Try ground turkey or tofu for a new taste. Mix and match to find your favorite flavor combo. For the complete recipe, check out the [Full Recipe]. {{image_4}} You can switch up the protein in your wraps. If you like beef, use ground beef or diced steak. For a lighter choice, try shrimp or fish, like salmon. If you prefer turkey, ground turkey works well too. Each protein brings its own flavor and texture. Just adjust the cooking time to ensure everything cooks through. To make these wraps vegetarian or vegan, use tofu or tempeh. Both options absorb flavors well. Press and cube the tofu before cooking to remove extra moisture. For a tasty twist, you can use cooked lentils or chickpeas. These options give a hearty bite while keeping your meal plant-based. Add fun flavors to your wraps! You can mix in crushed peanuts or cashews for crunch. Fresh herbs like basil or mint can add a fresh taste. Spice lovers may enjoy a dash of sriracha or chili flakes for heat. You can also add diced pineapple or mango for a sweet twist. These enhancements make your wraps even more exciting! For the complete recipe, check the [Full Recipe]. After enjoying your teriyaki chicken lettuce wraps, you may have leftovers. To store them, place the wraps in an airtight container. Keep the chicken mixture and lettuce leaves separate. This helps keep the lettuce crisp and fresh. Store in the fridge for up to three days. When you're ready to enjoy your leftovers, simply reheat the chicken mixture. Use a skillet over medium heat. Stir until heated through, about 5 minutes. Avoid microwaving the lettuce, as it may become soggy. Assemble the wraps just before eating for the best taste. Meal prepping makes weeknight cooking easy. You can prepare the chicken mixture ahead and store it in the fridge. Use the Full Recipe to guide your prep. To save time, chop vegetables on the weekend. This way, you have everything ready to go when you need a quick dinner. Enjoy your healthy wraps any night! To make the sauce, start with low-sodium soy sauce for a savory base. Add honey for sweetness and rice vinegar for a tangy kick. Then, mix in sesame oil for a nutty aroma. Combine these in a bowl and whisk until smooth. This sauce balances flavors, making your wraps burst with taste. Yes, you can make this dish ahead of time. Prepare the teriyaki chicken mixture and store it in an airtight container. Keep it in the fridge for up to three days. When ready to eat, reheat the mixture in a skillet over medium heat. Serve it with fresh lettuce leaves for a quick meal. Pair your lettuce wraps with some light side dishes. Here are a few great options: - Steamed jasmine rice for a filling side. - Edamame sprinkled with sea salt for a healthy snack. - A simple cucumber salad for a refreshing crunch. - Miso soup for warmth and depth. These sides complement the flavors of the wraps beautifully. For the full recipe, check out [Full Recipe]. Teriyaki chicken lettuce wraps are fun and tasty. We covered key ingredients, cooking steps, and tips to make them juicy. You learned how to customize and store your wraps for busy nights. This dish fits many diets with easy variations and great sides. Enjoy trying new flavors and sharing with friends. You now have all the tools to create delicious wraps that anyone can love. Keep experimenting and have fun in the kitchen!](https://goldendishy.com/wp-content/uploads/2025/06/72f6a023-630c-4819-9e2f-2135bf5b7418-768x768.webp)
