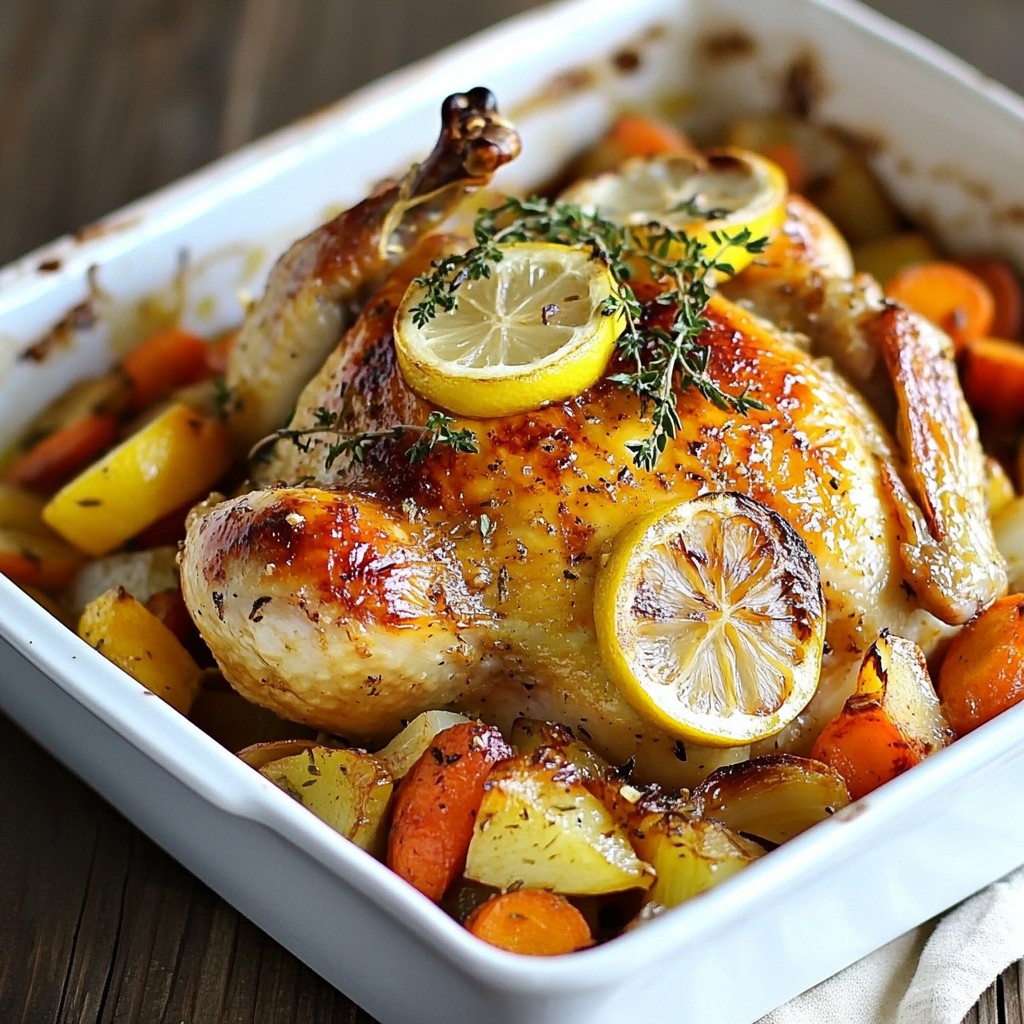
Looking for a simple yet flavorful dinner? Lemon Thyme Roasted Chicken is your answer! This dish combines juicy chicken with zesty lemon and fresh thyme. I’ll guide you through each step, from prepping the chicken to achieving crispy skin. Get ready for a meal that is easy to make and perfect for any occasion. Let’s dive into this delicious recipe that will impress your family and friends!
Why I Love This Recipe
- Fresh and Flavorful: The combination of lemon and thyme delivers a bright, aromatic flavor that elevates the whole chicken to a new level.
- Easy Preparation: With simple ingredients and straightforward steps, this recipe is perfect for both novice and experienced cooks.
- One-Pan Wonder: Cooking the chicken with vegetables in one pan not only simplifies cleanup but also allows the flavors to meld beautifully.
- Perfect for Any Occasion: This roasted chicken is impressive enough for special gatherings yet simple enough for a cozy weeknight dinner.
Ingredients
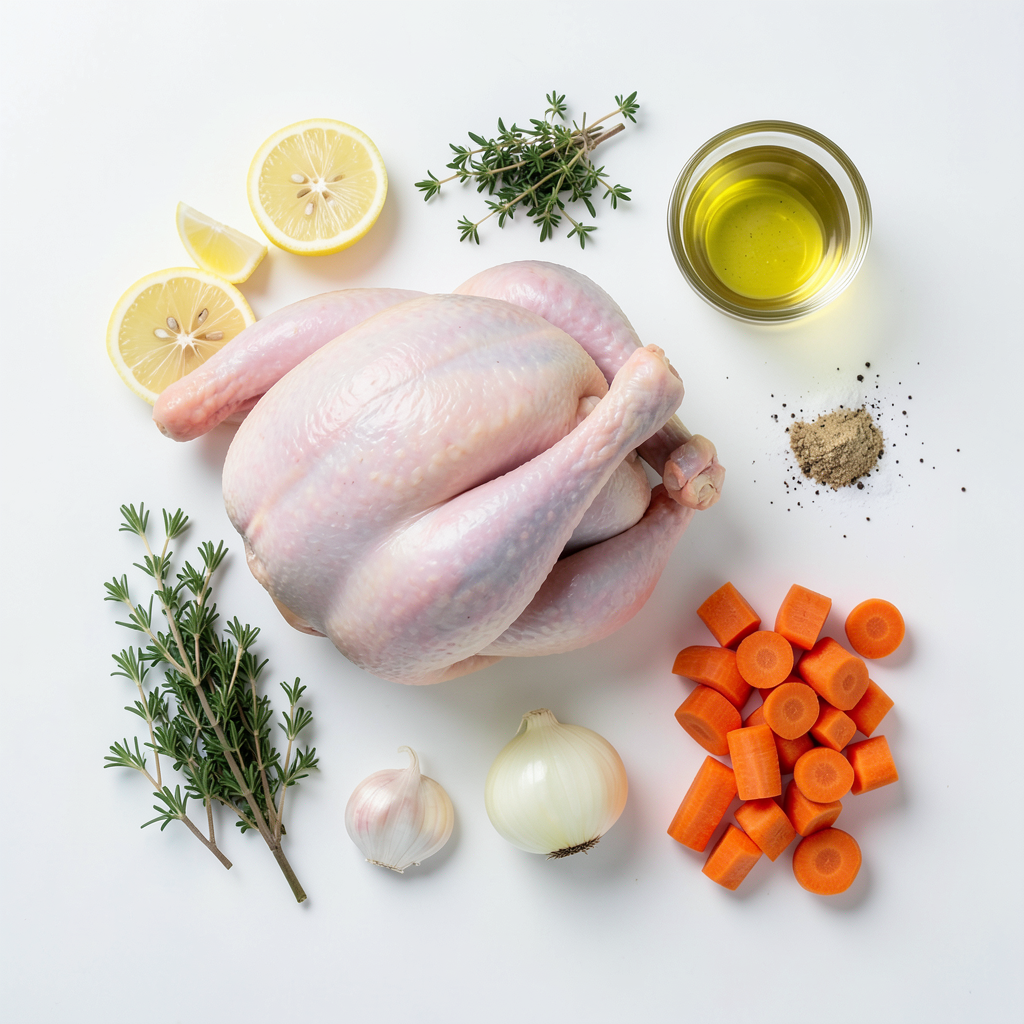
Main Ingredients List
- Whole chicken (4-5 lbs)
- Fresh lemons and thyme
- Garlic and olive oil
- Vegetables (onion and carrots)
You need a whole chicken weighing 4 to 5 pounds. This size ensures the meat stays juicy and tender. Fresh lemons add brightness to the dish. Fresh thyme gives a lovely herbal note. Garlic and olive oil enhance the flavor. For veggies, use a large onion and four medium carrots. They will roast beautifully alongside the chicken.
Seasoning and Other Ingredients
- Salt and pepper
- Low-sodium chicken broth
Don't forget the basics: salt and freshly ground pepper. These will boost all the flavors in your dish. Low-sodium chicken broth keeps the dish moist without being too salty. It also adds depth to the flavor. Using these ingredients will help you create a tasty, juicy Lemon Thyme Roasted Chicken.
Step-by-Step Instructions
Preparing the Chicken
1. Preheat your oven to 425°F (220°C). A high heat gives the chicken a nice golden color.
2. Rinse the chicken under cold water. Make sure to remove any extra bits.
3. Pat the chicken dry with paper towels. This helps make the skin crispy when cooked.
Creating the Flavor Mixture
1. In a bowl, mix minced garlic, olive oil, lemon juice, salt, and pepper.
2. Add half of the fresh thyme leaves into the mix. Stir it well.
3. Rub this mixture all over the chicken. Get underneath the skin for more flavor.
Assembling for Roasting
1. Stuff the chicken's cavity with lemon rounds and the rest of the thyme.
2. In a large roasting pan, spread the quartered onion and carrot chunks on the bottom.
3. Place the seasoned chicken on top of the vegetables. Pour chicken broth around it.
Roasting the Chicken
1. Roast the chicken for about 1 hour and 15 minutes. Check it with a meat thermometer.
2. The chicken should reach an internal temperature of 165°F (75°C).
3. Halfway through, baste the chicken with the pan juices to keep it moist.
Finishing Up
1. After roasting, take the chicken out and let it rest for 15 minutes.
2. Resting helps keep the juices inside, making the chicken tender.
3. Carve the chicken with a sharp knife for clean slices.
Tips & Tricks
How to Achieve Crispy Skin
To get crispy skin, start by drying the chicken well. Use paper towels to absorb moisture. This step is key for that golden-brown finish. Next, set your oven to a high temperature of 425°F (220°C). This heat helps the skin crisp up nicely.
Flavor Enhancements
You can boost flavor by adding herbs or spices. Try rosemary or sage for a twist. For a fruity touch, consider using oranges or limes instead of lemons. These alternatives add a unique taste to the chicken.
Serving Suggestions
When serving, pair the chicken with side dishes like mashed potatoes or green beans. These sides complement the dish well. For presentation, carve the chicken and place it on a large platter. Surround it with the roasted vegetables and drizzle some pan juices on top. Garnish with fresh thyme for an elegant look.
Pro Tips
- Resting the Chicken: Allowing the chicken to rest for 15 minutes after roasting helps retain its juices, ensuring a moist and tender result.
- Use a Meat Thermometer: Check the internal temperature with a meat thermometer to ensure the chicken is cooked perfectly to 165°F (75°C) without overcooking.
- Infuse More Flavor: For an extra flavor punch, marinate the chicken in the garlic and herb mixture for a few hours or overnight before roasting.
- Vegetable Variations: Feel free to swap in other root vegetables like parsnips or potatoes to customize the flavor and texture of the roasted base.
Variations
Different Herb Combinations
You can switch up the herbs to change the flavor. Try rosemary, sage, or oregano. These herbs can add a unique touch. If you have dried herbs, you can use them too. They work well but fresh herbs give more flavor. Just use a little less dried than fresh.
Cooking Method Alternatives
You can cook this dish in different ways. A slow cooker works great for tender meat. Just follow the same steps, and cook on low for about 6-8 hours. If you're short on time, an air fryer is also a quick option. Cook it at 360°F for about 45 minutes for a juicy chicken.
Dietary Modifications
For a gluten-free meal, you can skip any gluten-based broth. Use low-sodium chicken broth for a healthier option. This keeps the dish tasty without too much salt. Always check the labels to ensure everything fits your needs.
Storage Info
Leftover Storage
To store cooked chicken, let it cool to room temperature. Then, wrap it tightly in plastic wrap or foil. You can also place it in an airtight container. This keeps the chicken moist and fresh. Store the chicken in the fridge for up to four days. For reheating, use the oven or microwave. If using the oven, heat it to 350°F (175°C) and cover the chicken with foil. This helps keep it juicy. In the microwave, use a microwave-safe dish and cover it. Heat in short bursts until warm.
Freezing Guidelines
If you have extra cooked chicken, freezing is a great option. Wrap the chicken in plastic wrap, then place it in a freezer bag. Squeeze out the air before sealing. This prevents freezer burn. You can freeze it for up to three months for the best taste. When ready to eat, thaw it safely in the fridge overnight. You can also use the microwave for quick thawing. Just make sure to cook it right away if you use the microwave.
Shelf Life
In the fridge, cooked chicken stays fresh for about four days. If you notice any off smells or changes in color, it's best to throw it away. Check for slimy texture, which is a sign of spoilage. Always trust your senses; when in doubt, discard it. Proper storage helps enjoy your Lemon Thyme Roasted Chicken longer.
FAQs
What is the ideal cooking temperature for roasted chicken?
The best cooking temperature for roasted chicken is 425°F (220°C). This high heat helps to create crispy skin. It also cooks the chicken evenly.
Can I use dried thyme instead of fresh?
Yes, you can use dried thyme instead of fresh. Use 2 teaspoons of dried thyme for this recipe. Dried herbs have a strong flavor. You may want to adjust the amount based on your taste.
How long should I let the chicken rest before carving?
Let the chicken rest for 15 minutes before carving. This step helps the juices stay inside the meat. Resting makes the chicken juicy and tender.
What side dishes pair well with Lemon Thyme Roasted Chicken?
Many side dishes go well with Lemon Thyme Roasted Chicken. Here are a few ideas:
- Roasted potatoes
- Steamed green beans
- Garlic mashed potatoes
- A fresh garden salad
These sides enhance the meal and add color to your plate.
How can I tell when the chicken is fully cooked?
To check if the chicken is fully cooked, use a meat thermometer. Insert it into the thickest part of the thigh. The internal temperature should reach 165°F (75°C). If you don’t have a thermometer, check that the juices run clear when you cut into the chicken.
You’ve learned how to make a delicious Lemon Thyme Roasted Chicken. We covered the key ingredients, step-by-step instructions, and tips for great results. This dish shines with crispy skin and tasty flavors. You can try different herbs, cooking methods, and serve each meal uniquely. Don’t forget how to store leftovers properly. Enjoy this easy and satisfying recipe for many delicious dinners ahead. Happy cooking!