
Looking for a bright, fresh dish that’s easy to whip up? This Lemon Herb Quinoa Salad is a vibrant blend of wholesome ingredients that burst with flavor. Packed with fresh veggies, zesty lemon, and aromatic herbs, it’s perfect for meal prep or a quick weeknight dinner. Join me as we dive into this simple recipe that not only satisfies your taste buds but also nourishes your body. Let’s get started!
Why I Love This Recipe
- Fresh Ingredients: This salad is packed with vibrant, fresh vegetables that not only add color but also a burst of flavor to every bite.
- Easy to Prepare: With minimal cooking and preparation time, this dish is perfect for a quick lunch or a side at dinner.
- Versatile Dish: You can easily customize this salad by adding your favorite proteins or swapping out vegetables based on what you have on hand.
- Health Benefits: Quinoa is a nutritious grain that is high in protein and fiber, making this salad both filling and healthy.
Ingredients
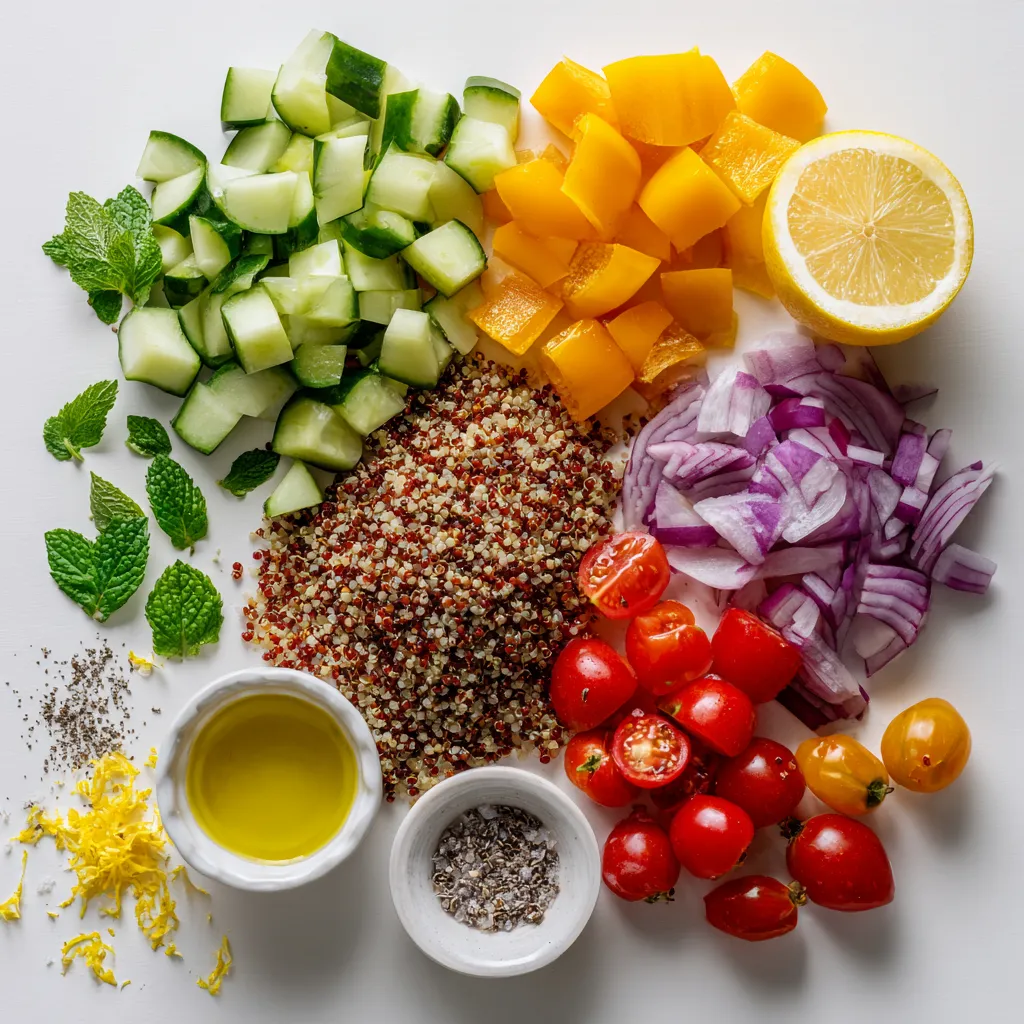
List of Ingredients
– Quinoa and Broth
– 1 cup quinoa
– 2 cups vegetable broth or water
– Fresh Vegetables
– 1 large cucumber, diced
– 1 bell pepper (choose red or yellow), diced
– 1 cup cherry tomatoes, halved
– 1/4 red onion, finely chopped
– Herbs and Dressing
– 1/2 cup fresh parsley, chopped
– 1/4 cup fresh mint, chopped
– Zest and juice of 1 large lemon
– 3 tablespoons extra virgin olive oil
– Salt and freshly ground black pepper to taste
– Optional Ingredients
– 1/4 cup feta cheese, crumbled
When making Lemon Herb Quinoa Salad, each ingredient adds a unique taste. Quinoa serves as the base. It is protein-rich and gluten-free. Vegetable broth or water cooks the quinoa. This step creates a flavorful grain.
Fresh vegetables bring crunch and color. The cucumber adds a cool taste. Bell peppers offer sweetness. Cherry tomatoes provide juicy bursts. Red onion gives a sharp note that balances the salad.
Herbs like parsley and mint add freshness. They enhance the salad’s aroma and flavor. The dressing mixes lemon zest, lemon juice, and olive oil. This tangy and bright blend ties everything together.
For added flavor, you can sprinkle feta cheese. This creamy cheese balances the salad’s freshness. Enjoy the burst of flavors in every bite!
Step-by-Step Instructions
Preparing the Quinoa
– Rinsing the Quinoa
Start by rinsing 1 cup of quinoa under cold water. Use a fine mesh strainer. This step removes any bitterness. Make sure it drains well after rinsing.
– Cooking the Quinoa
In a medium saucepan, add the rinsed quinoa and 2 cups of vegetable broth or water. Bring this mixture to a boil. Once it’s boiling, lower the heat to a simmer. Cover the pot and let it cook for about 15 minutes. The quinoa will absorb all the liquid and become fluffy. After cooking, take it off the heat. Let it sit, covered, for 5 more minutes to steam. Fluff it with a fork and set it aside to cool.
– Fluffing and Cooling
After the quinoa has cooled slightly, it will be ready to mix into your salad.
Mixing the Salad
– Combining Fresh Vegetables
In a large mixing bowl, add the diced cucumber, diced bell pepper, halved cherry tomatoes, finely chopped red onion, chopped parsley, and chopped mint. Toss them gently to mix.
– Adding Quinoa to the Mix
Once the quinoa is cool, add it to the bowl of fresh vegetables. This will build the base of your salad.
Preparing the Dressing
– Mixing Lemon Zest and Juice
In a small bowl or jar, zest 1 large lemon. Then squeeze the lemon to get its juice.
– Whisking the Dressing Ingredients
Add the lemon zest and juice to the bowl. Then, pour in 3 tablespoons of extra virgin olive oil. Season with a pinch of salt and pepper. Whisk until all the ingredients blend well.
Final Assembly
– Drizzling the Dressing
Drizzle the dressing over the quinoa salad mix. This adds bright flavor.
– Tossing the Salad
Toss everything together gently. This helps to coat all the ingredients evenly with the dressing. If you like, you can sprinkle crumbled feta cheese on top. Adjust the seasoning if needed. Enjoy your fresh and flavorful Lemon Herb Quinoa Salad!
Tips & Tricks
Perfecting Quinoa Cooking
Avoiding Bitterness
To avoid bitterness, always rinse your quinoa. Place it in a fine mesh strainer. Run cold water over it for a couple of minutes. This step washes off the saponins, which cause that bitter taste. It’s simple but very important!
Achieving Fluffiness
To get fluffy quinoa, use the right water ratio. For every cup of quinoa, use two cups of liquid. After boiling, simmer it gently. Let it steam for five minutes after cooking. Then, fluff it with a fork. These steps make the quinoa light and airy.
Seasonal Serving Suggestions
Best Times to Enjoy
This salad shines in spring and summer. Fresh veggies are at their best. The bright lemon flavor feels refreshing. Serve it at picnics or barbecues. It’s a perfect side dish or a light meal.
Meal Prep Ideas
You can make this salad ahead of time. It stays good in the fridge for a few days. Pack it for lunches or quick dinners. Just store the dressing separately. Add it right before eating for maximum freshness.
Adjusting Flavor
Seasoning Options
Feel free to play with the seasoning. Add more salt or pepper if you like. A pinch of garlic powder can enhance the taste. You can also add a splash of hot sauce for some heat.
Alternative Dressings
If you want a different dressing, try balsamic vinegar. It gives a sweet twist. You can also use yogurt for creaminess. Experiment with your favorite flavors to make it your own!
Pro Tips
- Rinse the Quinoa: Always rinse quinoa under cold water before cooking to remove its natural coating, called saponin, which can impart a bitter taste.
- Cooling the Quinoa: Allow the cooked quinoa to cool slightly before mixing it with the vegetables to prevent wilting and ensure the salad stays fresh and crisp.
- Fresh Herbs: Use fresh herbs for the best flavor. If possible, chop them just before adding to the salad to maximize their aroma and taste.
- Adjust to Taste: Taste the salad before serving and feel free to adjust the seasoning with more salt, pepper, or lemon juice to suit your preference.
Variations
Ingredient Substitutions
Swap for Different Grains
If you want a twist, try other grains. You can use farro, barley, or even brown rice. Each grain brings a unique texture and flavor.
Adding Protein Options
Boost the protein in your salad. Add chickpeas, black beans, or diced chicken. These options make the salad more filling and tasty.
Flavor Enhancements
Introducing Spices
Want to spice things up? Add cumin, paprika, or chili flakes. A pinch of these spices can elevate your dish and add warmth.
Using Different Herbs
Switch up the herbs for a new flavor. Try basil, cilantro, or dill. Each herb adds its own special taste and aroma to the salad.
Presentation Ideas
Serving Styles
Serve the salad in a big bowl for sharing. You can also put it in individual cups for a fun touch at parties. This makes it easy to grab and enjoy.
Garnishing Options
Garnish with extra herbs or lemon slices. A sprinkle of seeds or nuts adds crunch. These finishing touches make your salad look and taste amazing.
Storage Info
Storing Leftovers
– Ideal Storage Containers: Use airtight containers to keep your salad fresh. Glass or plastic containers work well.
– Duration of Freshness: The salad stays good for up to four days in the fridge. After that, the veggies may lose their crunch.
Reheating Tips
– Best Practices for Quality: Since this salad is best served cold, I recommend enjoying it straight from the fridge. If you prefer it warm, heat the quinoa only, then mix it back in.
– Serving Suggestions for Leftovers: Pair the salad with grilled chicken or fish for a hearty meal. You can also add it to wraps or pita pockets for a tasty lunch.
FAQs
How can I make this salad vegan?
You can make this salad vegan by simply omitting the feta cheese. The salad still tastes great without it. You can add extra herbs or nuts for flavor and texture.
What can I use instead of feta cheese?
Instead of feta cheese, you can try using avocado or a dairy-free cheese. These options add creaminess without the dairy. You can also skip cheese entirely for a lighter salad.
How long does the salad last in the fridge?
This salad lasts about three to four days in the fridge. Store it in an airtight container for best freshness. Always check for any off smells before eating.
Can I make the salad in advance?
Yes! You can make this salad a day ahead. Just keep the dressing separate until you are ready to serve. This keeps the salad fresh and crunchy.
Is quinoa healthy and what are its benefits?
Quinoa is a superfood rich in protein and fiber. It helps keep you full and provides energy. It also contains vitamins and minerals, making it a great choice for any meal.
This blog post covered how to make a tasty quinoa salad. We explored the key ingredients, step-by-step instructions, and tips for success. You learned how to cook quinoa, mix fresh veggies, and whip up a zesty dressing. We also discussed variations and how to store leftovers for later.
Incorporating quinoa into your meals offers health benefits and delightful flavors. Don’t be afraid to experiment with your ingredients and adjust flavors. Enjoy your salad adventur


