Lemon Herb Couscous Salad Fresh and Flavorful Delight

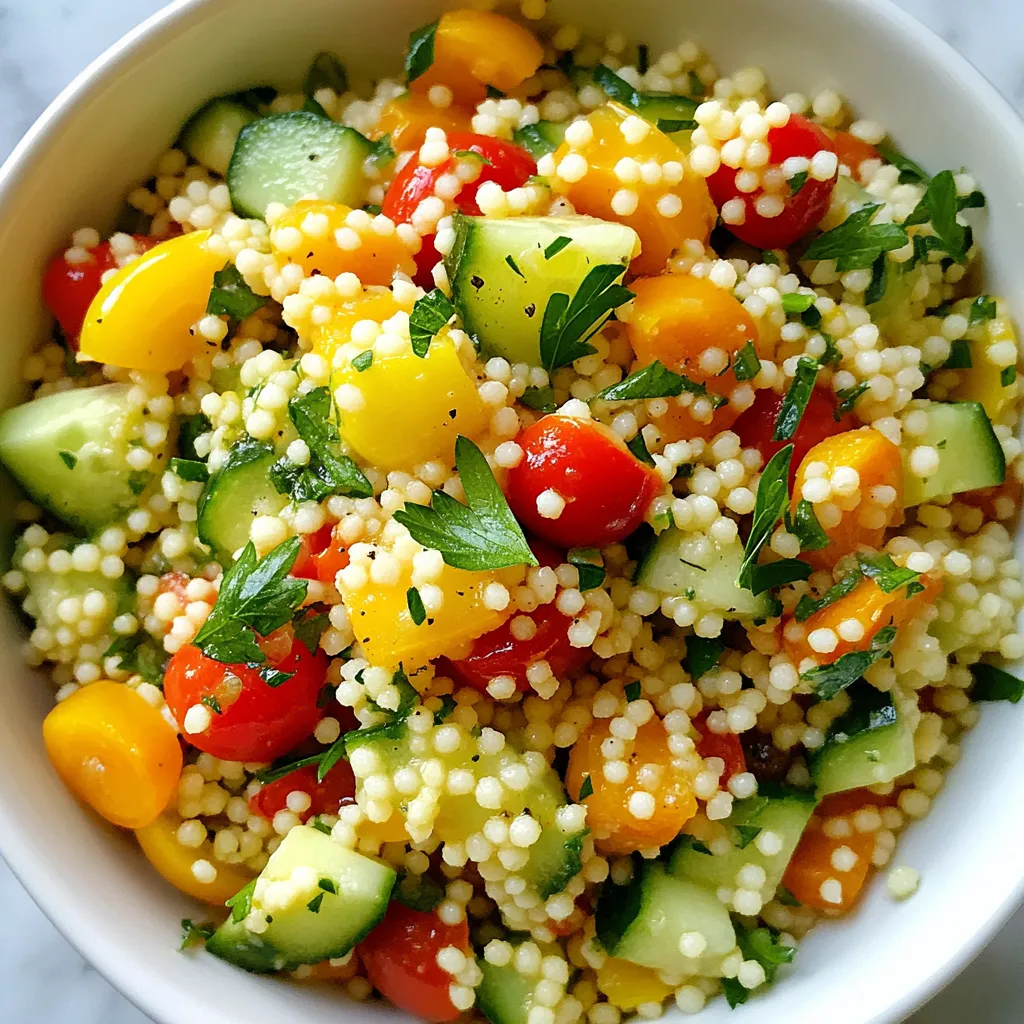
Welcome to a burst of flavor in every bite! This Lemon Herb Couscous Salad is fresh, vibrant, and simple to make. With crunchy veggies, zesty lemon, and fragrant herbs, it’s a perfect dish for any occasion. Whether you’re looking for a light lunch or a side for dinner, this salad will delight your taste buds. Let’s dive into the ingredients and create a delightful experience together!
Why I Love This Recipe
- Fresh and Vibrant: This couscous salad bursts with fresh flavors from the herbs and vegetables, making it a refreshing dish perfect for any occasion.
- Quick and Easy: With just 15 minutes of prep time, this salad is a breeze to throw together, making it ideal for busy weeknights or last-minute gatherings.
- Versatile Ingredients: The salad can easily be customized with seasonal vegetables or proteins, allowing you to make it your own.
- Nutritious and Light: This dish is packed with vitamins and nutrients, providing a healthy option that doesn’t compromise on flavor.
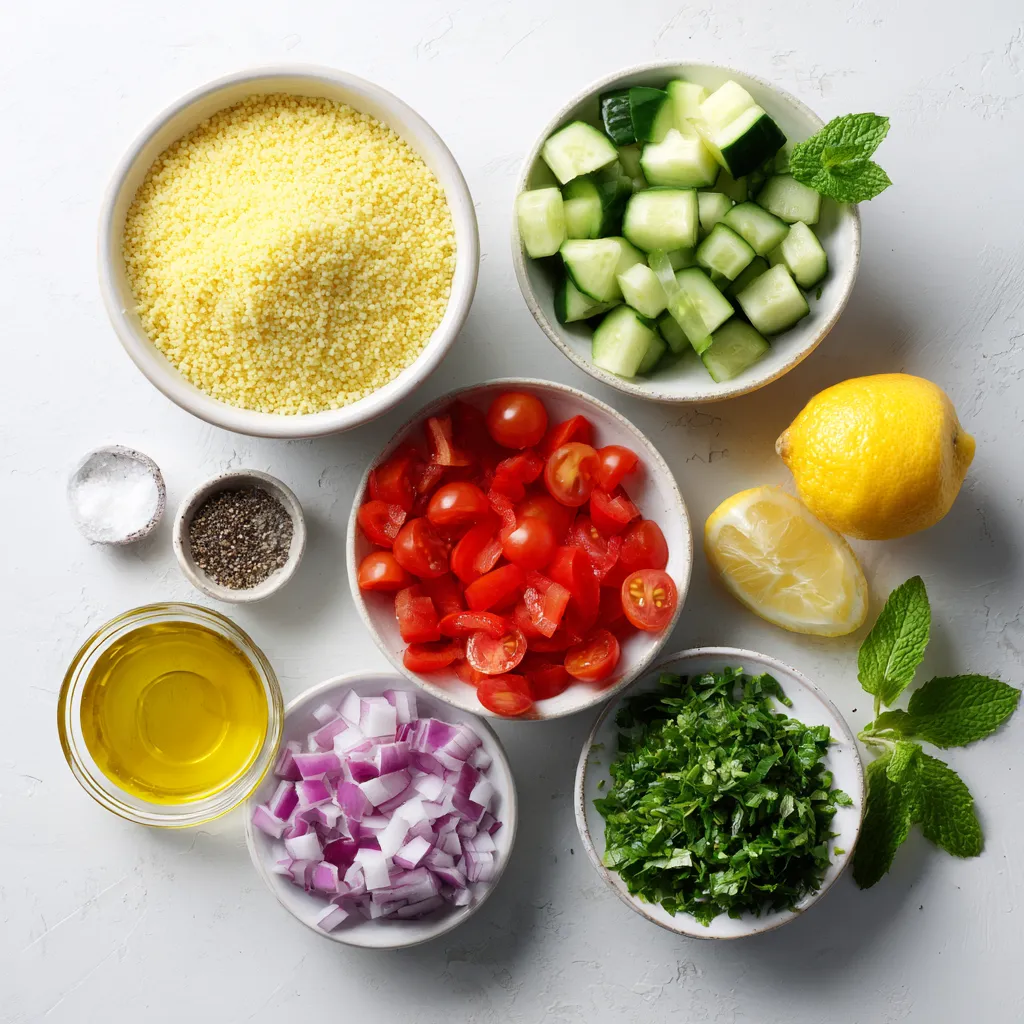
Ingredients
List of Fresh Ingredients
– 1 cup couscous
– 1 1/4 cups vegetable broth or water
– 1 cucumber, diced
– 1 cup cherry tomatoes, halved
– 1 bell pepper (red or yellow), diced
– 1/4 red onion, finely chopped
For this salad, I love using fresh, crisp vegetables that bring color and flavor. The cucumber adds a refreshing crunch. Cherry tomatoes provide sweetness, and bell peppers add a nice pop. Red onion gives a mild bite, balancing the flavors.
Herbs and Seasonings
– 1/2 cup fresh parsley, chopped
– 1/4 cup fresh mint, chopped
– Zest and juice of 1 large lemon
– 3 tablespoons olive oil
– Salt and pepper to taste
Herbs are key in this dish. Fresh parsley and mint add brightness and depth. The lemon zest and juice give a zesty kick that lifts the whole salad. Olive oil ties everything together with richness. I always season with salt and pepper to enhance the flavors.
Optional Ingredients
– 1/2 cup feta cheese
If you want to add creaminess, consider using feta cheese. It adds a tangy flavor that complements the fresh ingredients. You can skip it for a lighter salad or if you prefer a vegan option.

Step-by-Step Instructions
Cooking the Couscous
First, bring 1 1/4 cups of vegetable broth or water to a boil in a medium saucepan over high heat. This is a key step to ensure the couscous cooks perfectly. As soon as the liquid starts to bubble, pour in 1 cup of couscous. Give it a quick stir, then remove the saucepan from the heat. Cover it with a lid and let it sit for 5 minutes. This resting time allows the couscous to absorb all the liquid. After 5 minutes, fluff the couscous with a fork. This separates the grains and helps it cool slightly.
Preparing the Salad Mixture
While the couscous rests, take a large mixing bowl. Chop 1 cucumber, 1 bell pepper, and 1/4 of a red onion into small pieces. Halve 1 cup of cherry tomatoes. Add all these fresh veggies to the bowl. Next, chop 1/2 cup of fresh parsley and 1/4 cup of fresh mint. Stir these herbs into the bowl with the veggies. Mixing them well ensures every bite is packed with flavor.
Making the Lemon Dressing
Now, let’s make the zesty lemon dressing. In a small bowl, whisk together the zest and juice of 1 large lemon with 3 tablespoons of olive oil. Add a pinch of salt and pepper. Whisk until the mixture is smooth and well combined. This dressing adds a bright and fresh flavor to the salad.
Combining Ingredients
Once the couscous has cooled, it’s time to combine everything. Add the fluffy couscous to the bowl with the veggies and herbs. Pour the lemon dressing over the top. Using a large spoon, gently toss all the ingredients together. Make sure the dressing coats everything evenly. If you like, sprinkle in 1/2 cup of feta cheese for extra creaminess and flavor. Taste the salad and adjust the seasoning if needed. Add more salt, pepper, or lemon juice to match your taste.
Tips & Tricks
Achieving Perfect Couscous
To get fluffy couscous, start by bringing the broth or water to a boil. Once it boils, add the couscous and stir. Cover it and let it sit for five minutes. This lets the couscous absorb all the liquid. After five minutes, use a fork to fluff it gently. This separates the grains and stops it from clumping. Let it cool slightly before mixing it with the salad.
Flavor Adjustments
You can boost the taste of your salad by adding more lemon juice or zest. If you like it spicy, consider adding a pinch of red pepper flakes. Salt and pepper are also key. Taste as you go. If it needs more flavor, don’t hesitate to add a bit more seasoning. Fresh herbs like parsley and mint add a bright flavor, so use them generously.
Presentation Ideas
For a beautiful presentation, serve your salad in a large bowl. Chill the salad for a refreshing touch. Garnish with extra lemon wedges and a sprinkle of fresh herbs. This not only looks good but also adds more aroma. A colorful display makes the dish more inviting. Enjoy your salad as a side or a light main dish!
Pro Tips
- Use Fresh Ingredients: Opt for fresh herbs and vegetables to enhance the flavor of your couscous salad. Fresh ingredients not only taste better but also add vibrant colors to your dish.
- Let it Chill: For the best flavor, allow the salad to chill in the refrigerator for at least 30 minutes before serving. This allows the flavors to meld beautifully.
- Customize Your Add-ins: Feel free to add other ingredients like olives, avocado, or chickpeas for extra texture and nutrition. This salad is versatile and can be tailored to your preferences.
- Perfectly Fluff Couscous: Always fluff your couscous gently with a fork after cooking to prevent it from becoming sticky. This will ensure a light and airy texture in your salad.

Variations
Ingredient Substitutions
You can change the veggies for this salad to fit your taste. Here are some ideas:
– Zucchini: Instead of cucumber, add diced zucchini for a softer bite.
– Carrots: Grated carrots can bring a nice crunch and sweetness.
– Radishes: Sliced radishes add a peppery flavor and a pop of color.
– Broccoli: Chopped broccoli florets give a nutritious twist and extra crunch.
Feel free to mix and match based on what you have at home. The key is to keep it fresh and colorful!
Vegan Options
If you want a vegan dish, it’s easy to adjust. Just leave out the feta cheese. You can use these plant-based swaps instead:
– Nutritional yeast: This adds a cheesy flavor without any dairy.
– Avocado: Diced avocado brings creaminess that many people love.
– Tofu: Crumbled tofu can add texture and protein to your salad.
These options keep the dish rich and satisfying while staying plant-based!
Protein Additions
To make your salad more filling, try adding some protein. Here are a few great options:
– Grilled chicken: Sliced grilled chicken breast pairs well with the bright flavors.
– Chickpeas: Canned or cooked chickpeas add protein and a nice bite.
– Shrimp: Grilled shrimp can add a lovely seafood touch.
These additions will make your Lemon Herb Couscous Salad a hearty meal!
Storage Info
Storing Leftovers
To keep your Lemon Herb Couscous Salad fresh, place it in an airtight container. If you have leftovers, make sure to refrigerate them right away. This keeps the flavors bright and the veggies crisp. The salad will stay good for about 3 to 4 days in the fridge. Before serving again, stir it gently to mix the ingredients. You might want to add a splash of lemon juice to refresh the taste.
Freezing Couscous Salad
You can freeze this salad, but some ingredients do not freeze well. To freeze, place the salad in a freezer-safe container. Leave some space at the top for expansion. Avoid adding fresh herbs or feta cheese before freezing. When you’re ready to eat, thaw the salad in the fridge overnight. After it thaws, mix it well. Add fresh herbs and feta cheese for the best taste.
Shelf Life
The salad tastes best when fresh, but it can last. In the fridge, it stays fresh for 3 to 4 days. If frozen, it can last for up to 2 months. After this time, the flavors may fade. Always check for any off smells or changes in texture before enjoying your salad.
FAQs
Can I make this salad in advance?
Yes, you can make this salad in advance. Here are my best tips for preparing ahead of time:
– Cook the couscous: Prepare the couscous and let it cool. Store it in an airtight container.
– Chop the veggies: Dice the cucumber, tomatoes, and bell pepper. Keep them in separate containers in the fridge.
– Mix the dressing: Whisk the lemon juice, zest, and olive oil. Store it in a jar or small bowl.
– Combine before serving: When ready to serve, mix the couscous, veggies, and dressing. This keeps everything fresh.
Is couscous gluten-free?
No, traditional couscous is not gluten-free. It’s made from wheat. If you need a gluten-free option, try these alternatives:
– Quinoa: This seed cooks quickly and has a nice texture.
– Rice: Both white and brown rice work well in this salad.
– Cauliflower rice: A low-carb option that adds great flavor.
– Gluten-free couscous: Some brands offer gluten-free versions, so check your local store.
How can I make the salad spicy?
If you want to add some heat to your Lemon Herb Couscous Salad, try these ideas:
– Red pepper flakes: Sprinkle a pinch into the salad for a mild kick.
– Chili powder: Mix a little into the dressing for added warmth.
– Jalapeños: Finely chop fresh jalapeños and add them to the mix.
– Hot sauce: Drizzle your favorite hot sauce over the salad before serving.
What can I serve Lemon Herb Couscous Salad with?
This salad pairs well with many dishes for a complete meal. Here are some ideas:
– Grilled chicken: The flavors of lemon and herbs complement the chicken nicely.
– Fish: Baked or grilled fish adds protein and pairs well with the salad.
– Vegetable skewers: These add more veggies and a fun touch to your meal.
– Hummus and pita: A tasty side that brings more Middle Eastern flavors.
This blog post showed you how to create a flavorful Lemon Herb Couscous Salad. You learned about fresh ingredients, herbs, and a simple dressing. We covered the cooking steps and tips for perfect couscous. You can try variations like adding protein or using different veggies. Proper storage keeps leftovers fresh, too. Enjoy experimenting with this easy, tasty recipe that fits any meal and meets your dietary needs. Prepare ahead, and serve it with your favorite dish for a delightful experienc

Zesty Lemon Herb Couscous Salad
Ingredients
- 1 cup couscous
- 1.25 cups vegetable broth or water
- 1 whole cucumber, diced
- 1 cup cherry tomatoes, halved
- 1 whole bell pepper (red or yellow), diced
- 0.25 whole red onion, finely chopped
- 0.5 cup fresh parsley, chopped
- 0.25 cup fresh mint, chopped
- 1 large lemon, zest and juice
- 3 tablespoons olive oil
- to taste salt and pepper
- 0.5 cup feta cheese (optional)
Instructions
- Begin by bringing 1 1/4 cups of vegetable broth or water to a rolling boil in a medium saucepan over high heat.
- As soon as the liquid reaches a boil, pour in the couscous and give it a quick stir. Immediately remove the saucepan from the heat, cover it with a lid, and set it aside for 5 minutes, allowing the couscous to absorb all the liquid.
- After 5 minutes, use a fork to fluff the couscous gently, separate the grains, and let it cool slightly.
- Meanwhile, take a large mixing bowl and combine the diced cucumber, halved cherry tomatoes, diced bell pepper, finely chopped red onion, chopped parsley, and chopped mint, stirring to evenly distribute the ingredients.
- In a separate small bowl, whisk together the zest and juice of the lemon, olive oil, and a pinch of salt and pepper until the mixture is well emulsified.
- Once the couscous has cooled, add it to the bowl with the mixed vegetables. Pour the zesty lemon dressing over the top of the couscous and vegetables.
- Using a large spoon, gently toss all the ingredients together until well combined and the dressing coats everything evenly. If desired, incorporate the feta cheese for an added touch of creaminess and flavor.
- Taste the salad and adjust the seasoning as needed—adding more salt, pepper, or lemon juice to achieve your desired flavor profile.


![- 12 oz fettuccine or pappardelle pasta - 2 cups butternut squash, peeled and cubed - 1 tablespoon olive oil The base of this dish is fettuccine or pappardelle pasta. I love these shapes as they hold the creamy sauce well. You will also need fresh butternut squash. It gives the dish a warm color and sweet flavor. Using olive oil helps with roasting and adds richness to the pasta. - 1 small onion, diced - 2 cloves garlic, minced - 1 teaspoon freshly grated nutmeg Onions and garlic add depth to the sauce. Dicing the onion makes it cook evenly. Minced garlic gives a punch of flavor. Nutmeg brings warmth and a hint of spice, making the dish cozy and inviting. - 1 cup vegetable broth - 1 cup coconut milk (or heavy cream for a non-vegan option) - ½ cup grated Parmesan cheese (optional) For the sauce, you need vegetable broth for a savory base. Coconut milk adds creaminess and a hint of sweetness. If you prefer, heavy cream works too. Adding Parmesan cheese can enhance the flavor, but it's optional. - Salt and freshly cracked pepper to taste - Fresh sage leaves for garnish Season with salt and cracked pepper to bring everything together. Fresh sage leaves add a lovely touch. They not only look nice but also add an aromatic flavor that complements the dish well. These ingredients create a lovely balance of flavors in the creamy butternut squash pasta. For the full recipe, check out the detailed instructions to make this delicious meal. - Preheat your oven to 400°F (200°C). - Toss the cubed butternut squash in olive oil, salt, and pepper. - Spread the squash on a baking sheet. Roast for 20-25 minutes. The squash should be tender and have a light caramel color. - Bring a large pot of salted water to a boil. - Add the pasta and cook it as per package instructions. - Before draining, reserve 1 cup of the pasta water. This helps adjust your sauce later. - Heat olive oil in a large skillet over medium heat. - Add diced onion and sauté until soft, about 5 minutes. - Stir in minced garlic and cook for about 1 minute. - Blend the roasted squash with the sautéed onion, garlic, vegetable broth, and coconut milk. Use an immersion blender or a regular blender. - Return the blended sauce to the skillet and heat on low. - Add the cooked pasta and gradually mix in the reserved pasta water. - Stir well until the pasta is coated with the sauce. - If you like, stir in the Parmesan cheese. - Taste and adjust seasoning with salt and pepper as needed. - Plate the pasta in shallow bowls for a nice look. - Garnish with fresh sage leaves and drizzle a little olive oil on top. For a detailed guide, check out the Full Recipe. Enjoy your creamy butternut squash pasta! To get a creamy consistency, blend the roasted butternut squash well. You want it smooth. Use an immersion blender for easy mixing. If it’s too thick, add a splash of pasta water. This helps the sauce cling to the noodles. Want to add more flavor? Try spices like cinnamon or a pinch of chili powder. Fresh herbs, such as thyme or rosemary, can boost taste too. You can also add veggies like spinach or kale for added nutrition. They cook quickly and blend well with the sauce. Pair creamy butternut squash pasta with a simple salad. A mix of greens with a light vinaigrette works well. For drinks, a glass of white wine like Sauvignon Blanc complements the dish nicely. If you prefer non-alcoholic options, try sparkling water with a slice of lemon. These sides enhance the meal and make it even more enjoyable. For the full recipe, check out [Full Recipe]. {{image_4}} You can easily adjust creamy butternut squash pasta to fit different diets. For a vegan option, swap heavy cream with coconut milk and skip the cheese. This change still gives you a creamy sauce that tastes great. If you need gluten-free pasta, use rice or corn-based noodles. These options keep the dish light and tasty. Experimenting with different ingredients can make this dish exciting. Instead of butternut squash, try using acorn or delicata squash. Each type has its unique flavor and texture. For cheese, you can use feta for a tangy twist or goat cheese for a creamy finish. These swaps let you create new flavor combinations that keep things fresh. To make this dish more seasonal, add roasted vegetables like Brussels sprouts or carrots. This not only enhances the flavor but also adds color. Making creamy butternut squash pasta in fall is perfect. You can enjoy the warmth of the season with every bite. Try using spices like cinnamon or cloves for a cozy feel. For the full recipe, check out the complete guide and enjoy the rich flavors! To store leftover creamy butternut squash pasta, let it cool first. Then, place it in an airtight container. Glass or BPA-free plastic containers work best. Make sure to seal them tightly to keep the air out. This helps keep the pasta fresh and tasty. Store the container in the fridge for up to four days. Yes, you can freeze this dish! To do this, use a freezer-safe container. Leave some space at the top for expansion. It is best to freeze the pasta without the cheese added. This helps keep the texture right. When you are ready to eat, move the container to the fridge to thaw overnight. To reheat, use a skillet over low heat. Add a splash of vegetable broth or water to help it warm up evenly. In the fridge, creamy butternut squash pasta lasts for about four days. After that, the taste and quality may drop. Always check for signs of spoilage. If the pasta smells sour or has a strange texture, it’s best to throw it away. Enjoy your creamy butternut squash pasta fresh! For the full recipe, visit [Full Recipe]. It takes about 40 minutes to make creamy butternut squash pasta. The prep time is 10 minutes. Cooking the dish takes about 30 minutes. You will spend 20-25 minutes roasting the squash. Boiling the pasta adds another 10-12 minutes. This dish is quick and easy for a weeknight meal! Yes, you can use many types of pasta. Fettuccine and pappardelle work well for this sauce. You can also try penne or rigatoni for a fun twist. Each shape holds the sauce differently, so feel free to experiment! Absolutely! To make it nut-free, use coconut milk instead of cream. If you want a non-vegan option, use heavy cream instead. You can skip any nuts in the garnish. This keeps the dish creamy and delicious without nuts. You can serve this dish with many sides. A crisp green salad pairs well. Try a side of garlic bread for extra comfort. For dessert, pumpkin pie or apple crisp can be great choices. These options enhance the cozy vibe of the meal. To reheat, use a skillet over low heat. Add a splash of water or broth to the pasta. This helps keep the sauce creamy. Stir until heated through. You can also use the microwave, but stir halfway for even heating. Enjoy your leftovers just as much! This creamy butternut squash pasta combines hearty flavors and texture. We roasted the squash and blended it with garlic and onion to create a rich sauce. You learned how to make it creamy, adjust seasoning, and even swap ingredients. In the end, this dish is versatile and perfect for any meal. Enjoy experimenting with flavors and sharing this delightful recipe with friends and family.](https://goldendishy.com/wp-content/uploads/2025/07/000431ad-92db-4f90-88d6-bb841745a08c-768x768.webp)

![For Lemon Basil Zucchini Orzo, you will need: - 1 cup of orzo pasta - 2 medium zucchinis, diced into bite-sized cubes - 1 cup of vegetable broth - 1 tablespoon of extra-virgin olive oil - 3 cloves of garlic, finely minced - Zest and juice of 1 large lemon - 1/4 cup of fresh basil leaves, chopped roughly - 1/4 teaspoon of red pepper flakes (adjust to taste) - Salt and freshly cracked black pepper, to taste - Grated Parmesan cheese, for garnish (optional) You can make your dish pop with these garnishes: - Extra fresh basil leaves - A sprinkle of lemon zest - A drizzle of olive oil These will add color and flavor to your meal. To make this dish, gather these tools: - A medium-sized pot for cooking orzo - A large skillet for sautéing - A colander for draining orzo - A sharp knife for chopping - A cutting board for prepping ingredients Having these on hand will make your cooking easier and more fun. For the full recipe, follow the steps carefully to enjoy a tasty, fresh meal. Start by boiling water in a medium pot. You need about 4 cups of water. When it boils, add 1 cup of orzo pasta. Cook it for 9 to 11 minutes, following the package instructions. You want it to be al dente, so check it often. Once it's cooked, drain the orzo in a colander and set it aside. This pasta adds a nice texture to your meal. Next, grab a large skillet and heat 1 tablespoon of extra-virgin olive oil over medium heat. Once the oil is hot, add 3 cloves of minced garlic. Sauté for about 1 minute. You want it fragrant, but don’t let it brown. After that, toss in 2 medium zucchinis, diced into bite-sized cubes. Stir them together for 4 to 5 minutes. The zucchinis should soften but still have some crunch. If you like it spicy, add 1/4 teaspoon of red pepper flakes at this point. Now it's time to bring it all together. Pour in 1 cup of vegetable broth and squeeze the juice of 1 large lemon into the skillet. Let it simmer gently for 3 to 4 minutes. This helps the flavors mix well. After that, stir in the cooked orzo pasta, zest from the lemon, and 1/4 cup of roughly chopped fresh basil leaves. Season it all with salt and freshly cracked black pepper to taste. Mix thoroughly. If the dish seems a bit dry, add a splash more vegetable broth for a creamy finish. Finally, let it cook on low heat for another 2 to 3 minutes before serving. For the full recipe, check out the instructions above. To get the best texture in your Lemon Basil Zucchini Orzo, cook the orzo just right. Follow the package time closely, aiming for al dente. This means it should be firm but not hard. After cooking, drain it well. Avoid overcooking the zucchini. Sauté them until they are tender but still have a little bite. This keeps your dish fresh and exciting. You can boost the flavor in this dish easily. Fresh lemon juice gives a bright taste. Adding lemon zest will enhance this citrus flavor even more. For a bit of heat, use red pepper flakes, but adjust to your taste. If you want a richer flavor, sprinkle on some grated Parmesan cheese before serving. Fresh basil is key too; it adds a deep, herbal note that ties everything together. Serve your Lemon Basil Zucchini Orzo in shallow bowls for a lovely look. Add a few extra basil leaves on top for color. A sprinkle of lemon zest makes it pop, adding brightness to the dish. You can also drizzle a little olive oil on top for a nice finish. Don't forget to use your best bowls; good presentation makes the dish even more appealing. For the full recipe, check out the earlier section. {{image_4}} You can make this dish vegan by skipping the cheese. Use nutritional yeast instead for a cheesy taste. This works well with the lemon and basil. You can add more veggies like bell peppers or spinach for extra flavor. To make this dish gluten-free, swap the orzo with gluten-free pasta. Rice or quinoa can also work well. These options keep the dish light and fresh. Always check labels to ensure they are gluten-free. If you want to add protein, consider chickpeas or lentils. They pair nicely with the lemon and basil. Grilled chicken or shrimp are also great choices. Just cook them separately and mix them in at the end. This makes the meal hearty and satisfying. For the full recipe, check the Full Recipe section. Store any leftover Lemon Basil Zucchini Orzo in an airtight container. Place it in the fridge. It stays fresh for up to 3 days. Before serving again, check for any signs of spoilage. If it smells off or has changed color, toss it out. You can freeze Lemon Basil Zucchini Orzo, but with a few tips. Let the dish cool completely before freezing. Use a freezer-safe container or bag. It can last up to 2 months in the freezer. When you're ready to eat, thaw it in the fridge overnight. To reheat, use a skillet over low heat. Add a splash of broth to help it stay creamy. Stir frequently until it's warmed through. You can also use the microwave. Heat in short bursts, stirring in between, until hot. Enjoy your meal just like it was fresh! For the full recipe, check out the original. Yes, you can use other pasta types. Try penne or farfalle for a twist. Both will work well with the flavors in this dish. Just remember to adjust the cooking time as needed. Check the package for the best cooking instructions. To add heat, sprinkle in red pepper flakes. You can also add diced jalapeños or a dash of hot sauce. Start with a small amount and taste as you go. This way, you can find the perfect level of spice that suits your taste. Zucchini is low in calories and full of vitamins. It helps keep you hydrated and is a good source of fiber. Basil has anti-inflammatory properties and is rich in antioxidants. This herb can boost your immune system and enhance your mood. Together, they make a nutritious choice for any meal. For a full recipe, check the [Full Recipe]. This blog post covered the key ingredients and steps to make a tasty dish. You learned about cooking orzo, sautéing garlic and zucchini, and combining flavors. Tips helped achieve great texture and presentation. Variations offered vegan and gluten-free options. Remember to store leftovers properly and reheat them well. Use these insights to create a meal you love. Enjoy the process and make it your own! With some practice, you'll impress everyone with your cooking skills.](https://goldendishy.com/wp-content/uploads/2025/07/61f764e1-906e-4d38-9844-2e2d556314ee-768x768.webp)
![For this vegan creamy pesto pasta, you will need: - 8 oz whole wheat pasta (spaghetti or fusilli) - 2 cups fresh basil leaves, packed - 1/4 cup pine nuts (or walnuts) - 2 tablespoons nutritional yeast - 3 cloves of garlic, minced - 1/2 cup raw cashews, soaked for 2 hours - 1/4 cup extra virgin olive oil - Juice of 1 fresh lemon - Salt and pepper, to taste - 1 cup cherry tomatoes, halved (for garnish) - Extra fresh basil leaves (for garnish) You can adjust the recipe to your taste. Here are some ideas: - Swap pine nuts for sunflower seeds for a nut-free option. - Add spinach or arugula for more greens. - Include red pepper flakes for spice. - Mix in cooked chickpeas for added protein. To get the best flavor, choose fresh basil that is vibrant and fragrant. Look for basil leaves without any yellow or brown spots. For nuts, check that they are fresh and not stale. Store nuts in an airtight container to keep them crunchy. If you can, buy from local sources to get the best quality. For a great flavor, toast the nuts lightly before using them in the pesto. This will bring out their natural oils and enhance the taste. You can find the full recipe in the earlier section. Enjoy your cooking! To start, fill a large pot with water. Add a good amount of salt to the water. Bring the water to a rolling boil over high heat. Once it boils, add 8 oz of whole wheat pasta. Cook the pasta according to the package instructions. It usually takes 8-10 minutes to become al dente. Before draining, reserve 1/2 cup of the starchy pasta water. Drain the pasta in a colander and set it aside. Next, grab a high-speed blender or food processor. Add 2 cups of fresh basil leaves, packed. Then, add 1/4 cup of pine nuts, or walnuts if you prefer. Toss in 2 tablespoons of nutritional yeast for a cheesy flavor. Add 3 cloves of minced garlic and 1/2 cup of soaked raw cashews. Pour in 1/4 cup of extra virgin olive oil and the juice of 1 lemon. Season with salt and pepper. Blend on high until smooth and creamy. If the pesto is too thick, add the reserved pasta water slowly until you reach the right texture. Now, return the drained pasta to the pot over low heat. Pour the creamy pesto sauce over the pasta. Gently toss the pasta in the sauce until all the strands are coated. If the pesto is still thick, stir in more reserved pasta water, 1 tablespoon at a time. Taste the pasta and adjust the seasoning as you like. You can add more salt, pepper, or lemon juice for a brighter flavor. To serve, divide the creamy pesto pasta into bowls. Top with halved cherry tomatoes for color and extra fresh basil leaves for garnish. Enjoy your delicious vegan creamy pesto pasta! For the full recipe, check back to the ingredients section. To make your vegan creamy pesto pasta smooth, you need the right balance. Soak the cashews for at least two hours. This softens them, making it easy to blend. When you blend, start with only a little water. You can add more later if needed. This helps you control the creaminess. If your pesto feels thick, just add the reserved pasta water slowly. This way, you can keep the right texture without losing flavor. One mistake is not seasoning enough. Always taste your pesto before serving. If it lacks flavor, add more salt, pepper, or lemon juice. Another common error is overcooking the pasta. Make sure to check the package time and cook until al dente. This way, the pasta stays firm and absorbs the sauce better. Lastly, don’t skip the nutritional yeast. It gives the dish a cheesy flavor that enhances the whole meal. To boost the taste of your vegan creamy pesto pasta, try adding fresh lemon zest. It brightens the dish and adds freshness. You can also mix in roasted cherry tomatoes or sautéed veggies. They add texture and extra flavor. If you want some heat, sprinkle in red pepper flakes for a spicy kick. Experiment with herbs too! Fresh parsley or arugula can create new flavor layers. For the full recipe, check out the detailed instructions above. {{image_4}} You can easily swap different pasta types in this recipe. Whole wheat pasta gives a nutty taste. However, you can use any pasta you like. Spaghetti and fusilli are great choices for this vegan creamy pesto. You may also try penne, farfalle, or even zoodles (zucchini noodles) for a fun twist. For a protein boost, add chickpeas or tofu. Chickpeas add a lovely texture and flavor. Just rinse and drain a can of chickpeas, then toss them in with the pasta and pesto. Tofu is another great option. Use firm tofu, cut it into cubes, and pan-fry until golden. Stir it into the pasta for a filling meal. If gluten-free is your goal, choose gluten-free pasta. Many brands offer options made from rice or quinoa. These pastas cook well and taste great in this dish. You can also use lentil pasta for an extra protein kick. Just follow the cooking instructions on the package for the best results. For the complete recipe, check out the [Full Recipe]. After enjoying your vegan creamy pesto pasta, store leftovers in an airtight container. Let the pasta cool down before sealing. This keeps the flavor fresh. In the fridge, it lasts up to three days. If you want to keep it longer, consider freezing. When reheating, use a skillet over low heat. Add a splash of water or vegetable broth to keep it moist. Stir gently until warm. You can also use the microwave, but cover the dish to avoid drying out the pasta. Heat in short bursts and stir in between. To freeze homemade pesto, scoop the sauce into ice cube trays. This way, you can take out just what you need later. Once frozen, pop the cubes into a zip-top bag and store in the freezer for up to three months. When ready to use, thaw in the fridge or add directly to hot pasta. This method keeps the flavor vibrant and fresh. Yes, you can make this recipe nut-free. Instead of cashews, use silken tofu. It gives a creamy texture without nuts. You can also skip the pine nuts or use seeds like sunflower seeds. They add a nice crunch and flavor. I recommend whole wheat pasta for this dish. Spaghetti and fusilli are great choices. They hold the creamy pesto well. You can also try gluten-free pasta if needed. Just cook it according to the package instructions for the best results. The creamy pesto sauce lasts 3 to 5 days in the fridge. Store it in an airtight container. If you see any browning, just stir it before using. You can also freeze it for up to 3 months. Just thaw it in the fridge before using. For the full recipe, check the earlier section. This blog post covered how to create a creamy pesto dish. We discussed key ingredients, cooking pasta, and making the sauce. I shared tips for texture and flavor, and we explored variations like using different pasta or adding protein. Finally, I offered advice on storing your leftovers. Keep these ideas in mind for a tasty meal any day. Enjoy your cooking and have fun with your flavors!](https://goldendishy.com/wp-content/uploads/2025/07/fd183fbf-2652-43f5-b73c-64ca9eb8edeb-768x768.webp)
