
Are you ready to whip up a delightful dish that’s both tasty and simple? Lemon garlic shrimp orzo brings together the fresh flavors of shrimp, garlic, and lemon, all in one bowl. This dish is easy to make, yet packed with flavor, perfect for busy weeknights or special gatherings. Join me as I unveil the steps to create this mouthwatering meal that your family and friends will love!
Why I Love This Recipe
- Bright and Zesty Flavor: The combination of fresh lemon juice and zest brings a refreshing brightness that elevates the dish.
- Quick and Easy: With a total time of just 25 minutes, this recipe is perfect for a weeknight dinner without sacrificing flavor.
- Healthy and Nutritious: Packed with protein from shrimp and fiber from orzo and tomatoes, it’s a balanced meal option.
- Customizable: Adjust the spice level and add your favorite vegetables or herbs to make this dish your own.
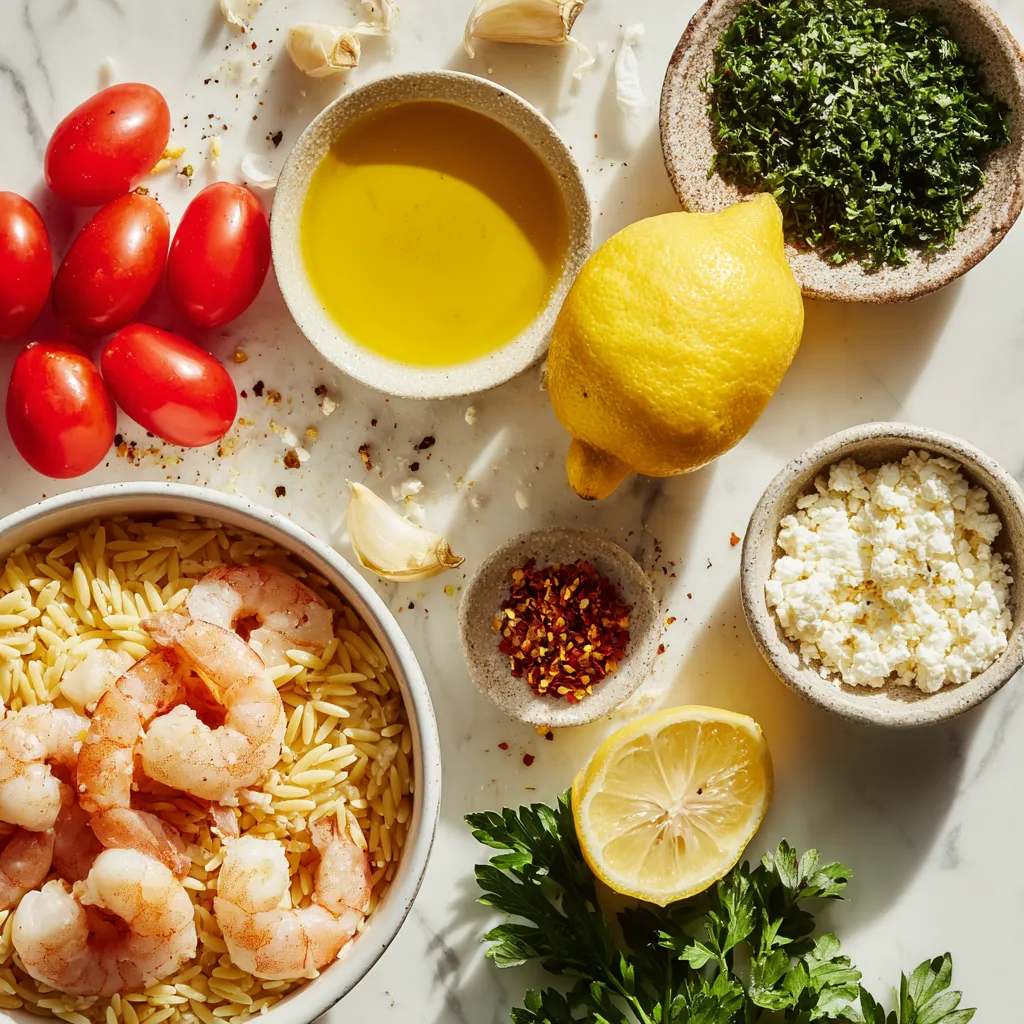
Ingredients
Essential Ingredients List
– 1 cup orzo pasta
– 1 pound medium shrimp, peeled and deveined
– 3 tablespoons extra virgin olive oil
– 4 cloves garlic, finely minced
– Zest and juice of 1 large lemon
– 1 teaspoon red pepper flakes
– Salt and black pepper to taste
– 1/4 cup fresh parsley, chopped
Optional Ingredients
– 1/2 cup cherry tomatoes, halved
– 1/4 cup feta cheese, crumbled
The key to making Lemon Garlic Shrimp Orzo is its fresh and vibrant flavors. You need orzo pasta for the base. It cooks quickly and gives a nice texture. Medium shrimp is the star. Using fresh shrimp makes the dish great. Garlic and olive oil add a rich taste. You get a punch of flavor from lemon juice and zest. For a little heat, add red pepper flakes. Don’t forget salt and black pepper to boost the taste.
For extra color and flavor, consider halved cherry tomatoes. They add sweetness and juiciness. If you enjoy creaminess, sprinkle some feta cheese on top. It pairs well with the shrimp and lemon. Each ingredient plays a role in creating a tasty dish. Make sure to gather everything before you start cooking. This step makes the process smooth and fun!
Step-by-Step Instructions
Cooking the Orzo
– Boil salted water in a large pot.
– Stir in 1 cup of orzo.
– Cook for 8-10 minutes until al dente.
– Drain the orzo, saving 1/2 cup of pasta water.
Sautéing the Aromatics
– Heat 3 tablespoons of olive oil in a skillet over medium heat.
– Mince 4 cloves of garlic and prepare 1 teaspoon of red pepper flakes.
– Add garlic and red pepper flakes to the oil.
– Sauté for about 1 minute, being careful not to burn the garlic.
Cooking the Shrimp
– Add 1 pound of shrimp to the skillet.
– Season shrimp with salt and black pepper.
– Cook for 2-3 minutes per side.
– Shrimp is done when it turns pink and opaque.
Combining the Ingredients
– Add the cooked orzo and halved cherry tomatoes to the skillet.
– Pour in the lemon juice, lemon zest, and reserved pasta water.
– Gently toss everything together until heated through.
Finishing Touches
– Remove the skillet from heat.
– Fold in 1/4 cup of chopped fresh parsley.
– Taste and adjust seasoning as needed.
– Optional: Add 1/4 cup of crumbled feta cheese for creaminess.
Serving Suggestions
– Serve the orzo in a large, shallow bowl for a nice presentation.
– Garnish with extra parsley and lemon wedges on the side.
– Enjoy your tasty and vibrant meal!
Tips & Tricks
Cooking Perfectly Tender Shrimp
– Importance of Timing: Timing matters when cooking shrimp. They cook fast, usually in 2-3 minutes per side. Check them often. Overcooked shrimp turn tough and rubbery.
– Avoiding Overcooking: Remove shrimp from heat when they are pink and opaque. They will continue cooking a bit after you take them off the stove.
Enhancing Flavor Profiles
– Alternatives to Red Pepper Flakes: If you want less heat, try paprika or black pepper. For a kick, use cayenne pepper or fresh chopped chili.
– Additional Herbs and Spices: Fresh herbs like basil, dill, or thyme add depth. You can also experiment with spices like oregano or lemon pepper for extra flavor.
Making It a Complete Meal
– Suggested Side Dishes: Serve with a crisp green salad or garlic bread. Roasted vegetables or steamed broccoli also pair well.
– Adding Protein Variations: Want more protein? Consider adding chicken or scallops. Tofu or chickpeas work great for a plant-based option.
Pro Tips
- Fresh Shrimp is Key: For the best flavor, use fresh shrimp instead of frozen. If frozen is your only option, ensure they are fully thawed and drained before cooking.
- Perfectly Al Dente Orzo: To achieve the best texture, cook the orzo just until al dente. It will continue to cook slightly when mixed with the hot ingredients.
- Enhance with Lemon Zest: Adding lemon zest not only brightens the dish but also amplifies the lemon flavor without adding extra acidity. Don’t skip this step!
- Custom Spice Level: Adjust the amount of red pepper flakes to suit your taste. You can even omit them for a milder dish or add more for an extra kick!
Variations
Lemon Garlic Shrimp Orzo with Vegetables
You can add more color and nutrition to your dish. Incorporating spinach or peas works well. Both ingredients cook quickly and add a fresh taste. Simply toss them in during the last few minutes of cooking. Spinach wilts nicely and peas bring a sweet pop.
You might also want to add bell peppers for a nice crunch. Use red, yellow, or orange peppers to brighten your dish. Chop them into small pieces and sauté them with garlic. This adds a lovely flavor and texture to your orzo.
Creamy Lemon Garlic Shrimp Orzo
For a creamier version, try using heavy cream or Greek yogurt. Adding heavy cream creates a rich sauce that coats every bite. If you prefer a lighter option, Greek yogurt works too. Just stir it in at the end to keep it creamy without cooking it too much.
Adjust your cooking techniques when using cream. You may want to lower the heat to prevent curdling. Make sure to mix well for a smooth and creamy finish.
Gluten-Free Options
If you need a gluten-free meal, you can substitute with gluten-free orzo or rice. There are many brands available that taste great. Just follow the package directions for cooking time.
Always check that all your ingredients are gluten-free. This includes your olive oil and any seasonings. With these simple swaps, you can enjoy this dish without worry.
Storage Info
How to Store Leftovers
To keep your Lemon Garlic Shrimp Orzo fresh, use airtight containers. Glass or plastic containers work well. Store the leftovers in the fridge right after they cool down. Do not leave them out at room temperature for more than two hours. This helps prevent bacterial growth.
Reheating Tips
When it’s time to eat your leftovers, I suggest reheating in a skillet. This method keeps the orzo and shrimp from getting mushy. Heat over medium-low, stirring often. If the dish seems dry, add a splash of water or broth. This helps restore moisture. You may want to add a bit more lemon juice for flavor.
Freezing Lemon Garlic Shrimp Orzo
If you want to save it for later, you can freeze Lemon Garlic Shrimp Orzo. First, let it cool completely. Then, scoop it into freezer-safe bags or containers. Remove as much air as possible before sealing. This prevents freezer burn. It will stay fresh for up to three months.
Best Practices for Thawing and Reheating
To thaw, move the container from the freezer to the fridge overnight. This keeps the texture nice. When ready to eat, reheat the orzo in a skillet or microwave. Stir in a little extra olive oil or lemon juice to boost the flavor. Enjoy!
FAQs
Can I use frozen shrimp for this recipe?
Yes, you can use frozen shrimp. Just make sure to thaw them first. To thaw shrimp, put them in a bowl of cold water for about 15-20 minutes. You can also leave them in the fridge overnight. After thawing, pat them dry with a paper towel. This way, they cook evenly and do not release too much water.
What can I substitute for orzo pasta?
If you don’t have orzo, you can use other pasta types. Small pasta shapes like ditalini or acini di pepe work well. You can also use rice if you prefer. Just ensure to adjust the cooking time according to the pasta or rice you choose.
How can I make this recipe less spicy?
To make this dish less spicy, reduce the amount of red pepper flakes. Start with half a teaspoon. You can also skip the flakes altogether. If you want some heat, consider using black pepper instead. It adds flavor without too much spice.
Is this dish suitable for meal prep?
Yes, this dish is great for meal prep! You can make it ahead and store it in the fridge for up to three days. Just keep the shrimp and orzo in a sealed container. When ready to eat, reheat in the microwave or on the stovetop. Add a splash of water or lemon juice to keep it moist.
This blog post covered the tasty Lemon Garlic Shrimp Orzo dish. We explored essential and optional ingredients, detailed step-by-step cooking instructions, and shared tips for perfect shrimp. Variations offer fun ideas, like adding vegetables or making it creamy. Lastly, storage tips help keep your leftovers fresh.
Enjoy making this dish and customizing it to your taste. With simple steps, you’ll impress everyone at the table! Happy cookin


