Lemon Dill Potato Salad Simple and Fresh Recipe

Looking for a fresh and easy side dish? This Lemon Dill Potato Salad is just what you need! With vibrant flavors from lemon and dill, it’s perfect for any meal. I’ll guide you through simple steps to create a creamy, delicious salad using easy-to-find ingredients. Whether you’re hosting a barbecue or just want a tasty snack, this recipe will wow your taste buds. Let’s get started!
Why I Love This Recipe
- Fresh Ingredients: This potato salad features fresh dill and cucumber, bringing vibrant flavors and a delightful crunch to each bite.
- Creamy Texture: The combination of Greek yogurt and mayonnaise creates a rich, creamy dressing that perfectly coats the potatoes.
- Easy to Make: With simple steps and minimal prep time, this recipe is perfect for both novice and experienced cooks alike.
- Perfect for Any Occasion: This lively lemon dill potato salad is a crowd-pleaser, making it ideal for picnics, barbecues, and potlucks.
Ingredients
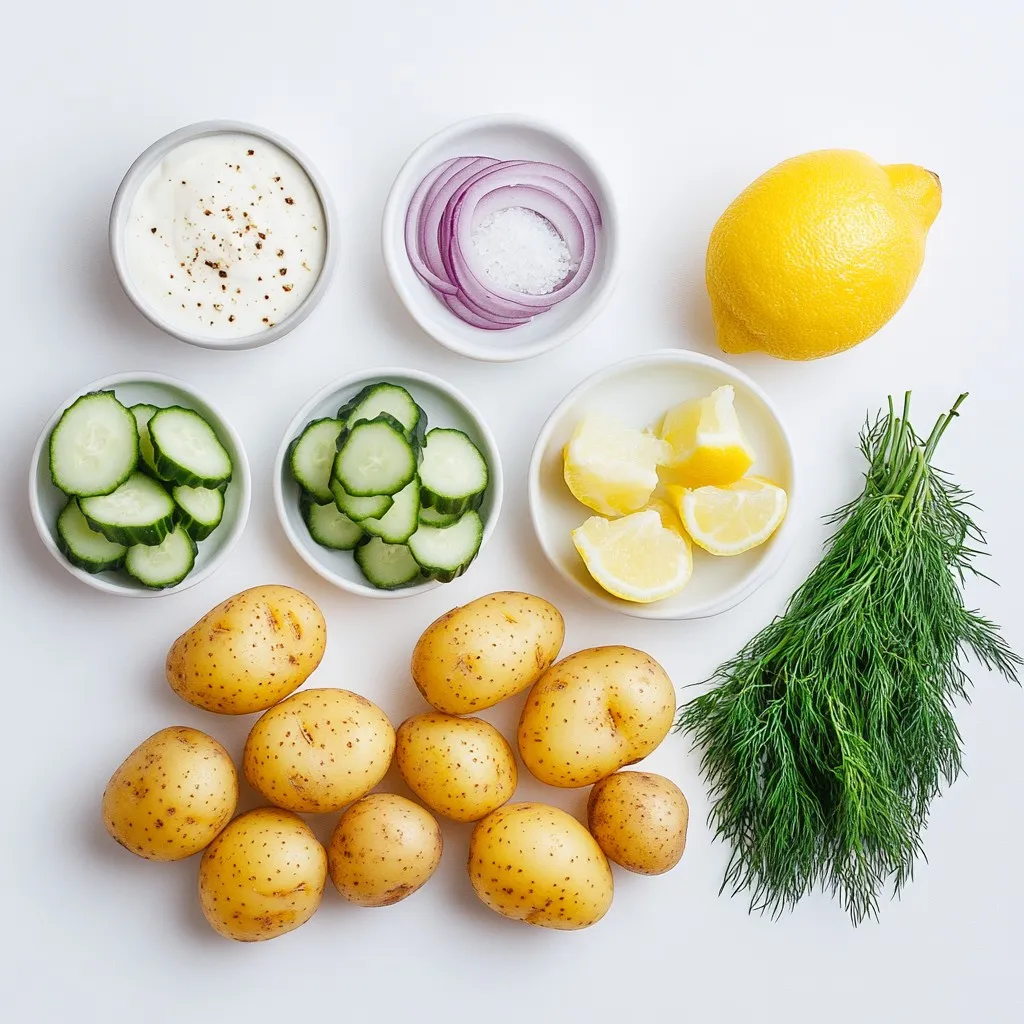
To make a delightful Lemon Dill Potato Salad, gather these fresh ingredients:
– 2 pounds baby potatoes, halved
– 1/4 cup fresh dill, chopped
– 1/2 cup creamy Greek yogurt
– 1/4 cup rich mayonnaise
– 2 tablespoons freshly squeezed lemon juice
– 1 tablespoon zesty lemon zest
– 1 teaspoon Dijon mustard for a tangy kick
– 1/2 teaspoon garlic powder
– Salt and cracked black pepper to taste
– 1/4 cup red onion, finely diced for crunch
– 1/2 cup cucumber, diced for freshness
Each ingredient plays a key role in building flavor and texture. The baby potatoes provide a tender base, while fresh dill adds a bright herb taste. Greek yogurt and mayonnaise create a creamy dressing, making each bite rich and smooth. The lemon juice and zest bring a refreshing zing, and Dijon mustard adds a nice tang. Garlic powder enhances the flavor, while red onion and cucumber add crunch and freshness.
Feel free to adjust any of these ingredients to suit your taste!

Step-by-Step Instructions
Cooking the Potatoes
Boiling Method
Start with a large pot. Fill it with water and add salt. Place the halved baby potatoes into the pot. Turn on the heat and bring the water to a boil. Cook the potatoes for about 15 to 20 minutes. They should be tender but not mushy.
Testing for Doneness
To check if the potatoes are ready, use a fork. If the fork easily pierces the potato, they are done. Drain the potatoes and let them cool for a few minutes.
Preparing the Dressing
Mixing Ingredients
While the potatoes cool, you can make the dressing. In a medium bowl, mix the Greek yogurt and mayonnaise. Add lemon juice, lemon zest, Dijon mustard, and garlic powder. Season with salt and cracked black pepper.
Ensuring Smooth Consistency
Whisk all the ingredients together. You want a smooth and creamy dressing. If it feels too thick, add a splash of water. This will help to blend it better.
Combining Ingredients
Adding Vegetables
Once the potatoes have cooled, cut them into bite-sized pieces. In a large bowl, add the potatoes, chopped dill, diced red onion, and diced cucumber.
Coating with Dressing
Pour the creamy dressing over the potato mixture. Use a spatula to gently fold the ingredients together. Make sure every piece of potato gets coated.
Final Touches
Adjusting Seasoning
Taste your potato salad. If it needs more flavor, add extra salt, cracked pepper, or lemon juice. Adjust to fit your taste.
Chilling Recommendations
For the best flavor, cover the bowl with plastic wrap. Chill the salad in the fridge for at least 30 minutes. This resting time lets the flavors mix well.
Tips & Tricks
Best Practices for Cooking Potatoes
Ensuring Perfect Texture
To get the best texture, use baby potatoes. They cook evenly and stay firm. Boil them for 15-20 minutes. Check with a fork. They should be tender but not mushy. Drain them well and let them cool for a few minutes. This prevents them from breaking apart in the salad.
Peeling vs. Leaving Skins On
Leaving the skins on adds texture and nutrients. Baby potatoes have thin skins that taste great. If you prefer a creamier look, peel them before cooking. Either way is fine, so choose what you like best.
Enhancing Flavor
Additional Seasoning Variations
You can change the taste with extra spices. Try a pinch of paprika for warmth or cayenne for heat. A dash of vinegar or a squeeze of lime can add brightness. Taste as you go to find your perfect blend.
Using Fresh Herbs
Fresh herbs make a big difference. While dill is the star, you can mix in parsley or chives for more flavor. Just make sure to chop them finely. This way, they blend well into the salad.
Serving Suggestions
Presentation Tips
Serve your salad in a nice bowl to impress guests. Garnish with extra dill and lemon slices on top. A sprinkle of paprika adds color and flair. This makes the dish look as good as it tastes.
Pairings with Main Dishes
Lemon dill potato salad pairs well with grilled chicken or fish. It also goes great with burgers or veggie skewers. This salad is a fresh side that complements many main dishes.
Pro Tips
- Use Fresh Ingredients: Fresh dill and vibrant cucumbers will enhance the flavor and texture of your potato salad, making it more lively and inviting.
- Chill for Flavor: Allowing the potato salad to chill for at least 30 minutes before serving helps the flavors meld together, creating a more delicious dish.
- Customize Your Dressing: Feel free to adjust the amount of lemon juice and Dijon mustard to suit your taste preferences, adding more tang or creaminess as desired.
- Garnish Creatively: Enhance the presentation by garnishing with extra dill, lemon slices, or a sprinkle of paprika for a pop of color and added appeal.

Variations
Healthier Substitutions
Greek Yogurt vs. Mayonnaise
Using Greek yogurt is a smart swap. It adds creaminess and protein. Greek yogurt has less fat than mayonnaise. This change keeps your salad light and fresh without losing taste.
Low-Calorie Dressing Options
You can also use low-calorie dressings. Look for ones made with yogurt or vinegar. These options give you zest without extra calories. They keep your potato salad flavorful and guilt-free.
Flavor Add-Ons
Other Herbs to Consider
Add more herbs for extra flavor. Chives, parsley, or basil can work well. These herbs bring new tastes and aromas. You can mix and match to find your favorite.
Adding Protein (e.g., chicken, chickpeas)
Want to make this salad a meal? Add protein! Shredded chicken or chickpeas boost nutrition. They also make the dish more filling. This way, your potato salad can be a main dish.
Seasonal Adjustments
Ingredients for Summer vs. Winter
Change ingredients based on the season. In summer, use fresh tomatoes and bell peppers. In winter, try roasted veggies like carrots and parsnips. Seasonal swaps keep your salad fresh all year.
Incorporating Different Vegetables
You can add other veggies too. Try bell peppers, celery, or shredded carrots. These add crunch and color. Each veggie brings its unique taste to the salad. Be creative and have fun!
Storage Info
Storing Leftovers
To keep your lemon dill potato salad fresh, follow these best practices for refrigeration:
– Store the salad in an airtight container. This helps keep it fresh and free from odors.
– Place a piece of plastic wrap directly on the salad before sealing the container. This extra layer helps maintain moisture.
Shelf Life
In the fridge, your potato salad lasts for about three to four days.
Watch for these signs of spoilage:
– Off smell or sour odor
– Change in color, especially in the potatoes
– Slimy texture or separation of the dressing
If you notice any of these signs, it’s best to toss the salad.
Freezing Options
You can freeze potato salad, but keep in mind that the texture may change.
To freeze:
– Place the salad in a freezer-safe container, leaving some space at the top for expansion.
– Seal tightly and label with the date.
When you’re ready to enjoy it again, here are some reheating tips:
– Thaw in the fridge overnight before serving.
– Stir well to recombine the ingredients after thawing.
– Taste and adjust seasoning as needed, since flavors may dull after freezing.
FAQs
Can I Make This Salad Ahead of Time?
Yes, you can make this salad ahead of time. I recommend preparing it up to a day in advance. This allows the flavors to blend well. Just keep it covered in the fridge. It tastes even better after chilling overnight. If you make it early, be sure to add fresh herbs right before serving for the best taste.
Is This Recipe Gluten-Free?
Yes, this recipe is gluten-free. All the ingredients listed do not contain gluten. The baby potatoes, fresh dill, Greek yogurt, and other items are safe for a gluten-free diet. Always check labels on store-bought mayonnaise and yogurt to ensure they are gluten-free.
How Can I Make It Vegan?
To make this potato salad vegan, swap the Greek yogurt and mayonnaise for non-dairy options. Use vegan yogurt and a plant-based mayo. You can also add a bit of mashed avocado for creaminess. This keeps the salad rich and tasty while being dairy-free.
What Can I Substitute for Dill?
If you don’t have dill, try using fresh parsley or chives. Both herbs add a nice flavor. You can also use tarragon if you like a slightly different taste. Just remember to use fresh herbs for the best results.
This blog post covered a delicious potato salad recipe. We discussed key ingredients, from potatoes to fresh dill, and how to prepare and mix them. You now know tips for cooking and storing the salad, plus variations for health and flavor.
In final thoughts, this potato salad is versatile and easy to make. You can adjust flavors and ingredients to fit your taste. Enjoy creating your unique version of this classic dis

Lively Lemon Dill Potato Salad
Ingredients
- 2 pounds baby potatoes, halved
- 1/4 cup fresh dill, chopped
- 1/2 cup creamy Greek yogurt
- 1/4 cup rich mayonnaise
- 2 tablespoons freshly squeezed lemon juice
- 1 tablespoon zesty lemon zest
- 1 teaspoon Dijon mustard
- 1/2 teaspoon garlic powder
- to taste salt
- to taste cracked black pepper
- 1/4 cup red onion, finely diced
- 1/2 cup cucumber, diced
Instructions
- Begin by placing the halved baby potatoes in a large pot of salted water. Bring to a boil over medium-high heat. Cook the potatoes for approximately 15-20 minutes until they are fork-tender but not falling apart. Drain them well and allow them to cool for a few minutes.
- While the potatoes are cooling, whip up the creamy dressing! In a medium-sized mixing bowl, combine the Greek yogurt, mayonnaise, lemon juice, lemon zest, Dijon mustard, garlic powder, salt, and cracked pepper. Whisk the ingredients together until the mixture is smooth and well unified.
- Once the potatoes are cool enough to handle, cut them into bite-sized chunks if they aren’t already halved.
- In a large mixing bowl, add the cut potatoes, freshly chopped dill, finely diced red onion, and diced cucumber. Stir well to combine.
- Drizzle the luscious dressing over the potato salad mixture. Carefully fold the ingredients together with a spatula until the potatoes are generously coated in the creamy, zesty dressing.
- Taste your salad and adjust the seasoning, adding extra salt, cracked pepper, or additional lemon juice to suit your palate.
- For the best flavor, cover the salad and chill it in the refrigerator for at least 30 minutes before serving. This will allow the flavors to beautifully meld together.


![To create a vibrant Summer Berry Spinach Salad, gather the following ingredients: - 5 cups fresh baby spinach - 1 cup mixed berries (strawberries, blueberries, raspberries) - Β½ cup crumbled feta cheese - ΒΌ cup sliced almonds - ΒΌ red onion - 3 tablespoons olive oil - 2 tablespoons balsamic vinegar - 1 tablespoon honey - Salt and pepper to taste Each ingredient plays a key role in this dish. The fresh baby spinach adds a crisp base. Mixed berries bring natural sweetness and color. Feta cheese provides a creamy texture that balances the sweet berries. Sliced almonds add crunch, while red onion gives a nice bite. For the dressing, high-quality olive oil and balsamic vinegar create a rich flavor. Honey enhances sweetness, making it perfect for summer. Salt and pepper round out the taste. This Summer Berry Spinach Salad is not only easy to make but also a feast for the eyes. You can find the full recipe details above for a step-by-step guide. Enjoy this refreshing dish any sunny day! Start by washing the fresh baby spinach. Place it in a large bowl and rinse it under cold water. Ensure you remove any grit or dirt. After washing, pat the spinach dry with a clean kitchen towel. This helps keep the leaves crisp. Now, place the dried spinach in your salad bowl. This vibrant green will serve as the saladβs base layer. Next, focus on the mixed berries. Rinse them gently under cold running water. Make sure to dry them with a clean kitchen towel. If you have strawberries, slice them into thin rounds or quarters. This step ensures an even distribution of sweetness. Add all the berries to the bowl with the spinach. You will create a colorful mix that looks as good as it tastes. Now, itβs time to build your salad. Evenly sprinkle crumbled feta cheese over the spinach and berry mix. This adds a creamy tang that complements the sweetness of the berries. In a small skillet, heat over medium heat. Add sliced almonds and toast them for about 3-4 minutes. Stir them frequently to avoid burning. Once they are golden brown, take them off the heat and let them cool slightly. For the dressing, mix olive oil, balsamic vinegar, honey, and a pinch of salt and pepper in a small bowl. Whisk these ingredients together until they are smooth. Drizzle the dressing generously over the salad. Toss gently to coat every leaf and berry well. Just before serving, scatter the toasted almonds and thinly sliced red onions on top. This adds crunch and a nice flavor contrast. For the full recipe, refer to the earlier section. To make the best Summer Berry Spinach Salad, start by choosing ripe and juicy berries. Look for berries that are bright in color and free from any bruises. Strawberries should be deep red, blueberries should be plump, and raspberries should have a rich hue. Firm berries taste better and hold up well in your salad. Next, identify fresh spinach leaves. Choose baby spinach with vibrant green color and no signs of wilting. The leaves should feel crisp and firm to the touch. Avoid any spinach that looks yellow or slimy. Fresh spinach provides a nice base for your salad. Adjust the sweetness of your dressing with honey. You can add more or less honey based on your taste. If you prefer a sweeter salad, add an extra tablespoon. This will help balance the flavors in your dish. Vinegar is key for balancing flavors. Balsamic vinegar brings a sweet acidity that pairs well with berries. If you want a tangier taste, try adding a splash of lemon juice. Experiment with the vinegar to find the right balance for your palate. Garnishing your salad adds visual appeal. Scatter a few whole berries on top for a pop of color. You can also sprinkle a bit more feta cheese for extra flair. A light dusting of fresh herbs, like mint, can elevate the look as well. For serving suggestions, consider a large platter for gatherings. This makes it easy for everyone to help themselves. You can also serve individual bowls for a more personal touch. Either way, your salad will look beautiful and inviting. For the full recipe, check out [Full Recipe]. {{image_4}} You can switch out the feta cheese for other options. Goat cheese adds a rich creaminess. If you want a dairy-free option, try avocado. It brings a smooth texture and healthy fats. When it comes to nuts or seeds, feel free to mix it up. Walnuts or pecans can add a nice crunch. Sunflower seeds or pumpkin seeds offer a different flavor and texture. These swaps can make your salad unique. To make this salad more filling, add grilled chicken or shrimp. Both proteins pair well with the berries and spinach. Just cook them with a bit of salt and pepper for flavor. You can also include more vegetables. Chopped cucumbers or bell peppers can add freshness. Carrots or radishes bring extra crunch and color. These add-ins can change the saladβs look and taste. For vegan options, replace the feta with tofu. It soaks up flavors well and adds protein. You can use maple syrup instead of honey for sweetness. If gluten is a concern, this salad is already gluten-free. Just make sure your dressing is gluten-free too. With these simple swaps, everyone can enjoy this vibrant dish. For the full recipe, check out the Summer Berry Spinach Salad. To keep your Summer Berry Spinach Salad fresh, use an airtight container. Glass or plastic containers work well for this purpose. Always make sure the container seals tightly to prevent air from getting inside. The salad will stay fresh for about 1 to 2 days in the fridge. However, the spinach may wilt over time. The berries can last longer, but they may lose some texture. You can prepare parts of the salad ahead of time. Wash and dry the spinach, then store it in a container with a paper towel. This will keep it crisp. You can also rinse the berries and slice the strawberries ahead of time. Just remember to keep them dry and in the fridge. For the dressing, mix all the ingredients in a jar. Seal it and store it in the fridge. You can make the dressing a few days in advance. Just give it a good shake before using it. This way, you can assemble the salad quickly when you are ready to serve. For the full recipe, click here: [Full Recipe]. To make a vegan version, you can swap out the feta cheese. Use avocado for creaminess or a vegan cheese. For the dressing, replace honey with maple syrup. This keeps the sweetness while making it plant-based. Yes, you can use frozen berries. They add great flavor and nutrition. Just remember to thaw them before adding to the salad. This helps avoid extra water in your dish. Frozen berries may not be as firm as fresh, so use them carefully. Store the salad in an airtight container in the fridge. This keeps it fresh longer. If you have leftovers, keep the dressing separate. This way, the salad stays crisp and tasty. The salad lasts about 2-3 days in the fridge. However, the berries and spinach may wilt over time. To enjoy the best taste, eat it within a day or two. This blog post covered a refreshing Summer Berry Spinach Salad. We discussed the ingredients you need, step-by-step prep, and assembly. Tips for choosing fresh items improve your salad's taste. We explored fun variations and how to store leftovers. In conclusion, this salad is easy to make and versatile. You can adjust it to fit your taste. Enjoy creating your healthy and vibrant dish!](https://goldendishy.com/wp-content/uploads/2025/07/d7cbd640-e74d-48cd-91ef-5930b3ae459b-768x768.webp)


![To make teriyaki chicken lettuce wraps, you need a few key ingredients. These create the rich flavors and fresh textures. Hereβs what youβll need: - 1 lb (450g) boneless, skinless chicken breast, finely diced - 1 tablespoon canola oil - 1/2 cup bell pepper, finely chopped (choose red or yellow for sweetness) - 1/2 cup carrot, grated (for a touch of crunch) - 3 green onions, beautifully sliced - 2 cloves garlic, minced (for aromatic depth) - 1/4 cup low-sodium soy sauce (to control saltiness) - 2 tablespoons honey (for a hint of natural sweetness) - 1 tablespoon rice vinegar (to balance flavors) - 1 teaspoon sesame oil (for a nutty aroma) - 1 teaspoon fresh ginger, grated (adds a zesty kick) - 1 head of butter lettuce or iceberg lettuce, with leaves gently separated These ingredients come together to create a joyful, tasty meal. Garnishes can elevate your dish. While not required, they add flair and flavor. Here are some great options: - Sesame seeds (for garnish, optional but recommended) - Fresh cilantro or parsley, for garnish (optional) Adding these garnishes can make your wraps look and taste even better. Lettuce is key for wraps. It holds the filling perfectly. Here are tips to choose the best lettuce: - Look for crisp, fresh leaves. Avoid any wilting or browning. - Butter lettuce has a soft, pliable texture, perfect for wrapping. - Iceberg lettuce offers a nice crunch but can be thicker. Choose what you like best for your teriyaki chicken lettuce wraps. To start, gather your ingredients. You need: - 1 lb boneless, skinless chicken breast, finely diced - 1 tablespoon canola oil - 1/2 cup bell pepper, finely chopped - 1/2 cup carrot, grated - 3 green onions, beautifully sliced - 2 cloves garlic, minced - 1/4 cup low-sodium soy sauce - 2 tablespoons honey - 1 tablespoon rice vinegar - 1 teaspoon sesame oil - 1 teaspoon fresh ginger, grated - 1 head of butter or iceberg lettuce, leaves separated - Sesame seeds and fresh herbs for garnish Make sure your chicken is chopped small. This helps it cook evenly. Chop the bell pepper finely for sweetness and color. Grate the carrot for crunch. Slice the green onions thin. Mince the garlic and grate the ginger to release their flavors. Heat the canola oil in a large skillet over medium heat. Wait until the oil shimmers. Add the diced chicken and cook it for 5-7 minutes. Stir often until the chicken is brown and fully cooked. Then, add the minced garlic, grated ginger, and chopped bell pepper. SautΓ© this mixture for 2-3 minutes. The bell pepper should soften and blend with the chicken. In a small bowl, whisk together the soy sauce, honey, rice vinegar, and sesame oil. When well combined, pour this sauce into the skillet. Now, gently fold in the grated carrots and sliced green onions. Cook for another 2-3 minutes. This helps the sauce coat everything and thicken slightly. Remove the skillet from heat. Let the teriyaki chicken cool for a few minutes. This resting time allows the flavors to meld beautifully. To serve, take a lettuce leaf and place a generous spoonful of the teriyaki chicken mixture in the center. This creates your wrap. For added flavor, sprinkle sesame seeds and fresh herbs on top. Serve the wraps right away. Encourage everyone to wrap them up and enjoy the fresh, vibrant flavors. For the full details on making this dish, check out the Full Recipe. For juicy chicken, choose fresh chicken breast. Cut it into small, even pieces. This helps it cook evenly. Heat your skillet before adding oil. Use medium heat to avoid burning. Stir the chicken often. This keeps it from sticking and ensures even cooking. Add garlic and ginger early. This builds a great flavor base. Cook until the chicken is completely brown and firm. To wrap your lettuce, use large, whole leaves. Butter or iceberg lettuce works best. Place a spoonful of chicken in the center. Fold the sides in first, then roll it up. This keeps the filling secure. Make sure the wrap is tight but not too tight. You want it to hold together without falling apart. Arrange your wraps on a platter. Add extra garnishes like sesame seeds for a beautiful look. You can change the flavor of your wraps easily. Add extra veggies like cucumbers or radishes. They give a nice crunch. For a spicy kick, include sliced jalapeΓ±os or sriracha sauce. If you like nuts, add chopped peanuts or cashews. You can also switch the protein. Try ground turkey or tofu for a new taste. Mix and match to find your favorite flavor combo. For the complete recipe, check out the [Full Recipe]. {{image_4}} You can switch up the protein in your wraps. If you like beef, use ground beef or diced steak. For a lighter choice, try shrimp or fish, like salmon. If you prefer turkey, ground turkey works well too. Each protein brings its own flavor and texture. Just adjust the cooking time to ensure everything cooks through. To make these wraps vegetarian or vegan, use tofu or tempeh. Both options absorb flavors well. Press and cube the tofu before cooking to remove extra moisture. For a tasty twist, you can use cooked lentils or chickpeas. These options give a hearty bite while keeping your meal plant-based. Add fun flavors to your wraps! You can mix in crushed peanuts or cashews for crunch. Fresh herbs like basil or mint can add a fresh taste. Spice lovers may enjoy a dash of sriracha or chili flakes for heat. You can also add diced pineapple or mango for a sweet twist. These enhancements make your wraps even more exciting! For the complete recipe, check the [Full Recipe]. After enjoying your teriyaki chicken lettuce wraps, you may have leftovers. To store them, place the wraps in an airtight container. Keep the chicken mixture and lettuce leaves separate. This helps keep the lettuce crisp and fresh. Store in the fridge for up to three days. When you're ready to enjoy your leftovers, simply reheat the chicken mixture. Use a skillet over medium heat. Stir until heated through, about 5 minutes. Avoid microwaving the lettuce, as it may become soggy. Assemble the wraps just before eating for the best taste. Meal prepping makes weeknight cooking easy. You can prepare the chicken mixture ahead and store it in the fridge. Use the Full Recipe to guide your prep. To save time, chop vegetables on the weekend. This way, you have everything ready to go when you need a quick dinner. Enjoy your healthy wraps any night! To make the sauce, start with low-sodium soy sauce for a savory base. Add honey for sweetness and rice vinegar for a tangy kick. Then, mix in sesame oil for a nutty aroma. Combine these in a bowl and whisk until smooth. This sauce balances flavors, making your wraps burst with taste. Yes, you can make this dish ahead of time. Prepare the teriyaki chicken mixture and store it in an airtight container. Keep it in the fridge for up to three days. When ready to eat, reheat the mixture in a skillet over medium heat. Serve it with fresh lettuce leaves for a quick meal. Pair your lettuce wraps with some light side dishes. Here are a few great options: - Steamed jasmine rice for a filling side. - Edamame sprinkled with sea salt for a healthy snack. - A simple cucumber salad for a refreshing crunch. - Miso soup for warmth and depth. These sides complement the flavors of the wraps beautifully. For the full recipe, check out [Full Recipe]. Teriyaki chicken lettuce wraps are fun and tasty. We covered key ingredients, cooking steps, and tips to make them juicy. You learned how to customize and store your wraps for busy nights. This dish fits many diets with easy variations and great sides. Enjoy trying new flavors and sharing with friends. You now have all the tools to create delicious wraps that anyone can love. Keep experimenting and have fun in the kitchen!](https://goldendishy.com/wp-content/uploads/2025/06/72f6a023-630c-4819-9e2f-2135bf5b7418-768x768.webp)