Lemon Dill Chicken Orzo Soup Flavorful and Easy Recipe

If you crave a warm, tasty meal that’s easy to make, I’ve got you covered! My Lemon Dill Chicken Orzo Soup is a delightful mix of flavors and comfort. In this post, I’ll share the simple steps, tips, and tricks to make this dish shine. Whether you’re a kitchen novice or a seasoned cook, you’ll find everything you need to whip up this delicious soup. Let’s dive in!
Why I Love This Recipe
- Bright Flavors: This soup combines the zesty brightness of lemon with the fresh aroma of dill, creating a refreshing and uplifting bowl of comfort.
- Nutritious Ingredients: Packed with lean chicken, vibrant vegetables, and wholesome orzo, this soup is a balanced meal in a bowl.
- Easy to Make: With simple steps and minimal prep, this recipe is perfect for busy weeknights or when you need a comforting meal without the fuss.
- Versatile and Customizable: You can easily swap in other veggies or herbs based on what you have on hand, making it adaptable to your taste preferences.
Ingredients
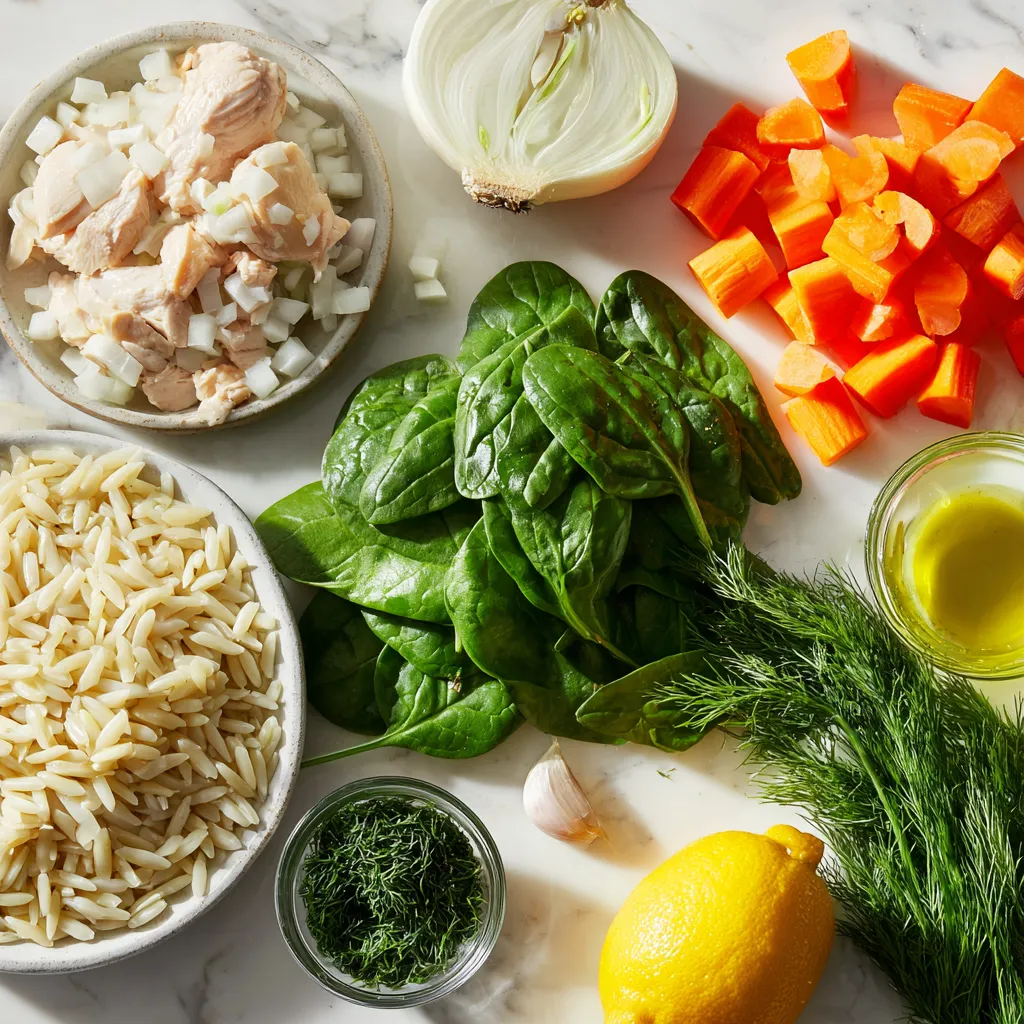
Complete list of ingredients
– 1 lb boneless, skinless chicken breasts
– 1 cup orzo pasta
– 4 cups chicken broth (preferably low-sodium)
– 1 medium onion, finely diced
– 2 cloves garlic, minced
– 2 medium carrots, sliced into thin rounds
– 2 celery stalks, diced into small pieces
– 1 cup fresh spinach, roughly chopped
– 3 tablespoons fresh dill, finely chopped (or 1 tablespoon dried dill)
– Zest of 1 lemon and juice from the same lemon
– Salt and pepper, to taste
– 2 tablespoons olive oil
Ingredient notes and substitutions
For a lighter option, use chicken thighs instead of breasts. If you want a gluten-free meal, substitute orzo with gluten-free pasta. You can also use vegetable broth for a vegetarian version. Fresh dill gives the best flavor, but dried dill works in a pinch.
Nutritional information recap
This soup serves about six people. Each serving is rich in protein from the chicken and provides vitamins from the spinach, carrots, and celery. The orzo adds carbs for energy. The lemon juice boosts vitamin C, while the olive oil offers healthy fats. Each bowl is a comforting choice for a balanced meal.

Step-by-Step Instructions
Detailed cooking steps
1. Start by heating 2 tablespoons of olive oil in a large pot over medium heat.
2. Add 1 diced onion, 2 sliced carrots, and 2 diced celery stalks. Cook for about 5-7 minutes.
3. Stir until the onion looks soft and clear. This gives a good base flavor.
4. Add 2 minced garlic cloves and cook for 1 more minute. You want to smell that garlic!
5. Next, place 1 lb of chicken breasts into the pot. Pour in 4 cups of chicken broth.
6. Bring this mix to a boil, then lower the heat. Let it simmer for 15-20 minutes.
7. When the chicken is cooked, take it out and set it on a cutting board.
8. Use two forks to shred the chicken into small pieces. Set it aside.
9. While the chicken cools, add 1 cup of orzo pasta to the pot. Cook it for about 8-10 minutes.
10. In the last 2 minutes, stir in 1 cup of chopped spinach, the shredded chicken, and 3 tablespoons of fresh dill.
11. Don’t forget to add the zest and juice from 1 lemon for brightness.
12. Taste your soup and season with salt and pepper as you like.
13. Let it rest for a few minutes off the heat. This lets the flavors blend well.
Visual cues for doneness
– The onion should look soft and clear, not brown. This means it’s ready.
– When the chicken is done, it should be white all the way through. No pink at all.
– The orzo will be tender but still firm when it is al dente. Taste a piece to check.
– The spinach should wilt down nicely, adding color to your soup.
Common mistakes to avoid
– Do not rush the sautéing step. It builds flavor, so take your time.
– Don’t skip shredding the chicken well. It helps mix flavors throughout the soup.
– Be careful not to overcook the orzo. It can turn mushy if left too long.
– Adjust salt and pepper after cooking. This makes sure you don’t add too much early on.
Tips & Tricks
How to enhance flavor
To make this soup even better, focus on the herbs. Fresh dill is key here. Add more if you love its taste. You can also try adding thyme or parsley for a twist. A splash of white wine adds depth too. If you want a kick, try a pinch of red pepper flakes. This will bring warmth without overpowering the dish.
Recommendations for leftovers
When storing leftovers, let the soup cool first. Then, place it in an airtight container. It keeps well in the fridge for up to three days. If you have extra orzo, consider keeping it separate. This helps prevent it from getting mushy. You can also freeze the soup for up to three months. Just remember to thaw it overnight in the fridge before reheating.
Serving suggestions
Serve this soup warm in large bowls. A sprinkle of fresh dill on top adds a nice touch. A slice of lemon on the side brightens the flavors too. Pair it with crusty bread for dipping. If you want a fuller meal, add a simple salad on the side. Enjoy the comforting flavors with friends and family!
Pro Tips
- Use Fresh Ingredients: For the best flavor, use fresh dill and spinach. Fresh herbs can significantly enhance the taste of your soup.
- Perfectly Cooked Orzo: Be careful not to overcook the orzo. It should be al dente, as it will continue to cook slightly after being added to the soup.
- Adjust for Acidity: If you prefer a more pronounced lemon flavor, feel free to add more lemon juice or zest according to your taste.
- Make it a Meal: Serve the soup with a side of crusty bread or a fresh salad to make it a complete and satisfying meal.

Variations
Gluten-free options
You can make this soup gluten-free by swapping the orzo with gluten-free pasta. Look for rice or quinoa pasta for great texture. Another option is to use rice. Just add it early to cook in the broth. This keeps the soup tasty and safe for those avoiding gluten.
Vegetarian alternative
To create a vegetarian version, skip the chicken and use vegetable broth. You can add chickpeas or white beans for protein. Toss in more veggies like zucchini or bell peppers for extra flavor. The fresh dill and lemon will still shine through, making it light and fresh.
Customizing with different herbs
You can play with herbs to change the taste. Try parsley or basil for a different twist. Thyme or oregano gives a warm flavor that pairs well with chicken and veggies. Adjust the herbs to your liking. This soup is a great base to explore your favorite tastes.
Storage Info
How to store leftovers
To store your Lemon Dill Chicken Orzo Soup, let it cool first. Use an airtight container. This keeps the soup fresh for up to three days in the fridge. Label the container with the date. This helps you know when to use it.
Freezing instructions
You can freeze the soup if you want to save it longer. Pour the cooled soup into freezer-safe bags or containers. Leave some space at the top for expansion. This soup freezes well for up to three months. When you’re ready to eat it, thaw it in the fridge overnight.
Reheating methods
Reheat the soup on the stove over medium heat. Stir it often to prevent sticking. You can also use the microwave. Place the soup in a microwave-safe bowl and cover it. Heat for two to three minutes, stirring halfway through. Make sure it’s hot all the way through before serving. Enjoy your warm bowl of comfort!
FAQs
Can I use frozen chicken?
Yes, you can use frozen chicken. Just add it directly to the pot. Cook it longer until it is fully cooked. Check that it reaches 165°F inside. This method works well and saves time.
How to make orzo soup creamy?
To make your orzo soup creamy, add a splash of heavy cream. You can also stir in some cream cheese. Another great option is to blend a portion of the soup. This adds a nice texture.
What can I add to make it heartier?
To make the soup heartier, add more vegetables like peas or potatoes. You could also toss in some beans for extra protein. If you want more grains, try adding rice or quinoa. Each option makes the soup more filling.
This blog post covers key ingredients, clear cooking steps, and helpful tips for your dish. We explored ways to enhance flavor, different variations to suit dietary needs, and smart storage methods. By avoiding common mistakes and following our guidelines, you can create a tasty meal every time. Remember, cooking is a skill that improves with practice. Enjoy experimenting and making this dish your ow

Lemon Dill Chicken Orzo Soup
Ingredients
- 1 lb boneless, skinless chicken breasts
- 1 cup orzo pasta
- 4 cups chicken broth (preferably low-sodium)
- 1 medium onion, finely diced
- 2 cloves garlic, minced
- 2 medium carrots, sliced into thin rounds
- 2 stalks celery, diced into small pieces
- 1 cup fresh spinach, roughly chopped
- 3 tablespoons fresh dill, finely chopped (or 1 tablespoon dried dill)
- 1 lemon zest and juice
- to taste salt and pepper
- 2 tablespoons olive oil
Instructions
- In a large pot, heat the olive oil over medium heat. Add the diced onion, sliced carrots, and diced celery to the pot. Sauté the vegetables for about 5-7 minutes until they are softened and the onion is translucent.
- Stir in the minced garlic and cook for an additional minute, until you can smell its fragrant aroma.
- Carefully add the chicken breasts to the pot, then pour in the chicken broth. Bring the mixture to a boil, then reduce the heat to low to allow it to simmer. Cook for 15-20 minutes, or until the chicken is fully cooked and no longer pink in the center.
- Once cooked, remove the chicken from the pot and place it on a cutting board. Using two forks, shred the chicken into bite-sized pieces, then set it aside.
- While the chicken is cooling, add the orzo pasta to the simmering broth. Cook the orzo according to the package instructions, typically about 8-10 minutes, until al dente.
- In the last 2 minutes of the orzo cooking time, stir in the chopped spinach, the shredded chicken, fresh dill, lemon zest, and freshly squeezed lemon juice. Allow everything to meld together as the spinach wilts.
- Taste the soup and season generously with salt and pepper to your liking.
- Remove the pot from heat and let it sit undisturbed for a few minutes before serving, allowing flavors to deepen.


![- 1 cup green or brown lentils, thoroughly rinsed - 1 tablespoon coconut oil - 1 medium onion, finely chopped - 3 garlic cloves, minced - 1-inch piece of fresh ginger, grated - 1 can (14 oz) full-fat coconut milk - 2 ripe tomatoes, diced - 1 tablespoon curry powder - 1 teaspoon ground cumin - 1 teaspoon ground turmeric - 1 cup vegetable broth (use low-sodium if preferred) - 2 cups fresh spinach or kale, chopped - Sea salt and freshly ground black pepper to taste - Fresh cilantro, chopped (for garnish, optional) To make this Easy Vegan Lentil Curry, you need a few key items. The lentils are the base. They bring protein and texture. I prefer green or brown lentils because they hold their shape well. Rinsing them removes dust and ensures you start with clean lentils. Next, the coconut oil adds a rich, creamy taste. It helps sauté the onion, garlic, and ginger. These three ingredients create a fragrant base. They add depth and warmth to the curry. Tomatoes add sweetness and acidity. They balance the creamy coconut milk perfectly. The spices—curry powder, cumin, and turmeric—bring warmth and flavor. They transform the dish into a vibrant, colorful meal. For added nutrition, I recommend spinach or kale. These greens are packed with vitamins. They also bring a lovely color to the curry. Finally, fresh cilantro adds a bright, fresh flavor. You can use it as a garnish or mix it in for extra taste. For the full recipe, check out the detailed instructions. This dish is not only simple but full of flavor! - Heat 1 tablespoon of coconut oil in a medium pot over medium heat. - Once the oil is hot, add 1 finely chopped onion. Sauté for about 5 minutes. The onion should become soft and clear. - Next, add 3 minced garlic cloves and 1-inch grated ginger. Cook for 1 to 2 minutes. You want the kitchen to smell amazing! - Now, add 2 diced tomatoes, 1 tablespoon of curry powder, 1 teaspoon of ground cumin, and 1 teaspoon of ground turmeric. - Stir and cook this mix for about 2 to 3 minutes. This step helps the spices release their lovely flavors and soften the tomatoes. - Add 1 cup of rinsed lentils to the pot. Then, pour in 1 can of full-fat coconut milk and 1 cup of vegetable broth. - Stir well to combine, then bring the mix to a gentle boil. Once it boils, turn the heat down and cover the pot. Let it simmer for 25 to 30 minutes. Check the lentils to see if they are tender and creamy. - After the lentils are cooked, fold in 2 cups of chopped spinach or kale. Cook for about 5 minutes. The greens should be bright and wilted. - Taste the curry and add sea salt and freshly ground black pepper to make it just right for you. For the full recipe, you can check out the details above. Enjoy your cooking! You can adjust spices to suit your taste. If you love heat, add more curry powder. A dash of lime juice brightens the dish. It adds a fresh twist that wakes up the flavors. To save time, use pre-cooked lentils. They cook faster and save you at least 20 minutes. Vegetable broth can boost flavor without much work. It gives your curry a rich taste. Serve your curry in shallow bowls. A sprinkle of cilantro on top creates a nice look. Pair it with fluffy rice or warm naan. This makes your meal more filling and fun to eat. For the full recipe, check out the details above. {{image_4}} You can change the type of lentils in your curry. - Red lentils cook faster and give a smoother texture. - Black or French lentils add more firmness and bite. Using different lentils can change the dish's look and feel. I find red lentils to be a great option for a quick meal. They break down nicely, making the curry creamy. Black lentils keep their shape, adding a nice texture. Spices can make your curry unique. - Try garam masala or chili powder for a spicy kick. - Fresh herbs like cilantro or mint can brighten the flavor. Experimenting with spices can lead to exciting new tastes. Garam masala adds warmth and depth, while chili powder can increase heat. Fresh herbs not only taste great but also add color to your dish. Adding extra vegetables boosts nutrition and flavor. - Carrots or bell peppers add sweetness and crunch. - Swap kale for other leafy greens like Swiss chard. Incorporating more veggies is a fun way to customize your curry. Carrots add a lovely sweetness, while bell peppers bring crunch and color. Swiss chard can be a great substitute for kale and offers a different taste profile. To keep your Easy Vegan Lentil Curry fresh, store leftovers in an airtight container. This method helps maintain flavor and texture. You can keep it in the fridge for up to 4 days. If you want to save it for later, freeze portions for up to 3 months. Just make sure to label the container with the date. When you're ready to enjoy your curry again, reheat it on the stove. Add a splash of vegetable broth to keep it creamy and delicious. Stir it often to ensure even heating. If you're in a hurry, you can microwave it too. Do this in short bursts, stirring frequently to avoid hot spots. Always check for signs of spoilage before eating. Look for any off smells or changes in color. If your curry looks or smells strange, it’s best to discard it. Safety first! Enjoy your meal knowing you stored it well. For the full recipe, check out the earlier sections. - Prep time: 10 minutes, Total time: 40 minutes Making this curry is quick and easy. You will spend about 10 minutes getting ready. Cooking takes an additional 30 minutes. This means you can enjoy a tasty meal in just 40 minutes! - Yes, the flavors meld nicely if made a day ahead You can make this curry in advance. If you prepare it a day before, the flavors will blend well. This makes the dish even tastier when you eat it later. - Great with rice, quinoa, or naan for a hearty meal This curry pairs perfectly with many side dishes. Rice is a classic choice, but quinoa works well too. You can also serve it with warm naan for a filling meal. - Yes, all ingredients are naturally gluten-free You will be glad to know this recipe is gluten-free. All the ingredients, like lentils and coconut milk, do not contain gluten. This makes it a safe choice for anyone avoiding gluten. For the full recipe, check out the [Full Recipe]. This Easy Vegan Lentil Curry is tasty and simple to make. You learned about the main ingredients, step-by-step instructions, flavor tips, and storage info. Customization options, like different lentils and spices, let you make it your own. This dish is perfect for meal prep and serving with rice or naan. Remember to store leftovers properly and watch for spoilage signs. Enjoy this dish that is not only healthy but full of flavor! You will love experimenting with it for your next meal.](https://goldendishy.com/wp-content/uploads/2025/06/33b3e4d2-4af0-4f09-8df6-36adfea2fbd1-768x768.webp)


. {{image_4}} To make your Lemon Basil Pasta Salad heartier, add protein. Grilled chicken is a great choice. Cook it simply with salt and pepper. Shrimp also works well when sautéed until just pink. For a vegetarian twist, use chickpeas or black beans. They add good texture and flavor. You can even sprinkle in some diced tofu for a plant-based option. The key is to balance flavors while keeping it light. Feel free to mix up the veggies in your salad. Instead of cherry tomatoes, try sun-dried tomatoes for a richer taste. Bell peppers can be swapped for zucchini or carrots. You can even toss in some spinach for a nutrient boost. Just remember to use fresh, crisp veggies for the best flavor. The colors will make your dish pop while adding more vitamins. While the lemon vinaigrette shines, other dressings can change the salad's vibe. A balsamic vinaigrette brings a sweet tang, while a creamy dressing adds richness. Consider a pesto for an Italian twist. Just be mindful of the dressing amount; you want to enhance, not overpower. Experimenting with dressings keeps your pasta salad exciting and fresh. For the full recipe, check the details above. After you enjoy your Lemon Basil Pasta Salad, store any leftovers in an airtight container. Keep the salad in the fridge. Make sure it is cool before sealing it. This helps to keep the flavors fresh. If you added feta cheese, cover it with a bit of extra dressing. This keeps it from drying out. Your Lemon Basil Pasta Salad can last up to three days in the fridge. After that, the veggies may lose their crispness. The salad may still taste good, but it won’t be as fresh. Always check for any off smells before eating. This salad is best served cold. If you want to refresh it, add a splash of olive oil and lemon juice. Toss it gently to mix. If you must reheat, do so briefly in the microwave. Heat it for just 15-30 seconds. This will warm it without cooking the veggies. Yes, you can make this pasta salad ahead. It tastes better after sitting in the fridge. I suggest preparing it up to a day in advance. Store it in an airtight container. Just remember to leave out the basil until you serve it. This keeps the basil fresh and bright. If you need gluten-free pasta, there are great choices. Look for pasta made from rice, quinoa, or chickpeas. Brands like Banza or Tinkyada offer tasty options. They hold up well in salads. Cook them according to the package directions for the best results. To make this pasta salad vegan, skip the feta cheese. You can add extra veggies for flavor. Consider using avocado for creaminess. Nutritional yeast can add a cheesy taste, too. Just mix it in with the dressing for a nice touch. For the dressing, all the other ingredients are already vegan-friendly. In this blog post, I shared how to make a refreshing lemon basil pasta salad. We covered key ingredients, step-by-step instructions, and tips for perfecting your dish. You learned how to add variety with proteins and different veggies. Storing leftover salad properly ensures it stays fresh. By answering important FAQs, I aimed to make this recipe easy for you. Enjoy this tasty dish at your next meal or gathering. With these insights, you'll impress everyone with your delicious creation!](https://goldendishy.com/wp-content/uploads/2025/06/6f7717e1-8c71-4a8f-834a-cf8283cfe0e6-768x768.webp)