Lemon Basil Pasta Salad Fresh and Flavorful Delight
. {{image_4}} To make your Lemon Basil Pasta Salad heartier, add protein. Grilled chicken is a great choice. Cook it simply with salt and pepper. Shrimp also works well when sautéed until just pink. For a vegetarian twist, use chickpeas or black beans. They add good texture and flavor. You can even sprinkle in some diced tofu for a plant-based option. The key is to balance flavors while keeping it light. Feel free to mix up the veggies in your salad. Instead of cherry tomatoes, try sun-dried tomatoes for a richer taste. Bell peppers can be swapped for zucchini or carrots. You can even toss in some spinach for a nutrient boost. Just remember to use fresh, crisp veggies for the best flavor. The colors will make your dish pop while adding more vitamins. While the lemon vinaigrette shines, other dressings can change the salad's vibe. A balsamic vinaigrette brings a sweet tang, while a creamy dressing adds richness. Consider a pesto for an Italian twist. Just be mindful of the dressing amount; you want to enhance, not overpower. Experimenting with dressings keeps your pasta salad exciting and fresh. For the full recipe, check the details above. After you enjoy your Lemon Basil Pasta Salad, store any leftovers in an airtight container. Keep the salad in the fridge. Make sure it is cool before sealing it. This helps to keep the flavors fresh. If you added feta cheese, cover it with a bit of extra dressing. This keeps it from drying out. Your Lemon Basil Pasta Salad can last up to three days in the fridge. After that, the veggies may lose their crispness. The salad may still taste good, but it won’t be as fresh. Always check for any off smells before eating. This salad is best served cold. If you want to refresh it, add a splash of olive oil and lemon juice. Toss it gently to mix. If you must reheat, do so briefly in the microwave. Heat it for just 15-30 seconds. This will warm it without cooking the veggies. Yes, you can make this pasta salad ahead. It tastes better after sitting in the fridge. I suggest preparing it up to a day in advance. Store it in an airtight container. Just remember to leave out the basil until you serve it. This keeps the basil fresh and bright. If you need gluten-free pasta, there are great choices. Look for pasta made from rice, quinoa, or chickpeas. Brands like Banza or Tinkyada offer tasty options. They hold up well in salads. Cook them according to the package directions for the best results. To make this pasta salad vegan, skip the feta cheese. You can add extra veggies for flavor. Consider using avocado for creaminess. Nutritional yeast can add a cheesy taste, too. Just mix it in with the dressing for a nice touch. For the dressing, all the other ingredients are already vegan-friendly. In this blog post, I shared how to make a refreshing lemon basil pasta salad. We covered key ingredients, step-by-step instructions, and tips for perfecting your dish. You learned how to add variety with proteins and different veggies. Storing leftover salad properly ensures it stays fresh. By answering important FAQs, I aimed to make this recipe easy for you. Enjoy this tasty dish at your next meal or gathering. With these insights, you'll impress everyone with your delicious creation!](https://goldendishy.com/wp-content/uploads/2025/06/6f7717e1-8c71-4a8f-834a-cf8283cfe0e6.webp)
Looking for a fresh and tasty dish? Lemon Basil Pasta Salad packs a punch with zesty flavors and vibrant colors. Whether you’re hosting a picnic or just want a quick meal, this salad fits the bill. In this article, I’ll share all the essential ingredients, step-by-step instructions, and expert tips to make your salad shine. Let’s dive into this delicious delight that your taste buds will love!
Ingredients
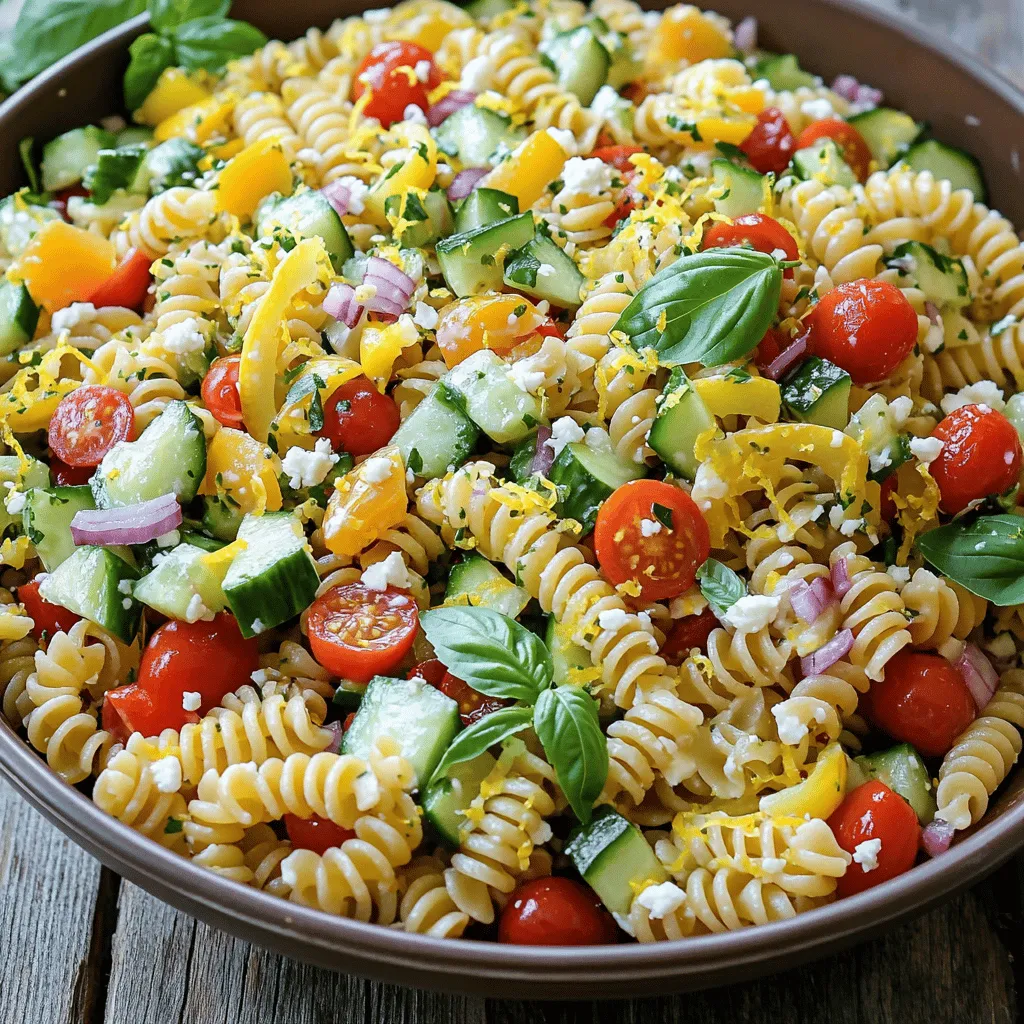
Essential Ingredients for Lemon Basil Pasta Salad
To make a tasty Lemon Basil Pasta Salad, you need some key ingredients. Here’s a list to get started:
– 2 cups fusilli or penne pasta
– 1 cup cherry tomatoes, halved
– 1 cup cucumber, diced
– 1/2 cup red bell pepper, diced
– 1/2 cup red onion, finely chopped
– 1 cup fresh basil leaves, chopped
– 1/4 cup extra virgin olive oil
– 2 tablespoons freshly squeezed lemon juice
– Zest of 1 medium lemon
– Salt and black pepper, to taste
These ingredients create a fresh and zesty flavor. Each bite bursts with the taste of lemon and basil.
Optional Add-Ins for Extra Flavor
You can boost the flavor of your pasta salad with some fun add-ins. Here are a few ideas you might enjoy:
– 1/4 cup feta cheese, crumbled
– 1/4 cup olives, sliced
– 1/4 cup cooked chicken, diced
– 1/4 cup roasted red peppers, chopped
These add-ins will add depth and variety to your salad. Feel free to mix and match based on what you have.
Best Types of Pasta to Use
When it comes to pasta, not all types work the same. For this salad, I recommend using:
– Fusilli: Its spiral shape holds the dressing well.
– Penne: The tube shape adds nice texture.
These pastas soak up the lemon and basil flavors perfectly. Avoid using thin pasta like spaghetti, as it may not hold up as well in a salad. This choice makes your dish more enjoyable.
Step-by-Step Instructions
Cooking the Pasta
Start with a large pot of salted water. Bring it to a boil. Add the pasta and cook for 8-10 minutes. You want it to be al dente, which means it should still have a bit of bite. Once cooked, drain the pasta. Rinse it under cold water to stop cooking. This cools it down and helps with the salad.
Preparing the Vegetables
In a big mixing bowl, combine the cooled pasta with your veggies. Use 1 cup of halved cherry tomatoes, 1 cup of diced cucumber, 1/2 cup of diced red bell pepper, and 1/2 cup of finely chopped red onion. Stir gently to mix everything well. This blend adds freshness and crunch to your salad.
Making the Dressing
In a small bowl, whisk together 1/4 cup of extra virgin olive oil, 2 tablespoons of freshly squeezed lemon juice, and the zest of one medium lemon. Add salt and black pepper to taste. Make sure these ingredients mix well to create a tasty dressing. Drizzle it over your pasta and veggies. Toss everything together with a spatula until well coated.
To finish, gently fold in 1 cup of chopped fresh basil. If you like, sprinkle 1/4 cup of crumbled feta cheese on top before serving. Let the salad chill in the fridge for at least 30 minutes. This lets the flavors blend nicely. Enjoy your delicious Lemon Basil Pasta Salad!
Tips & Tricks
How to Perfectly Cook Pasta
To cook pasta just right, start with a large pot. Fill it with water and add salt. This step helps flavor the pasta. Bring the water to a rolling boil. Add your pasta once the water bubbles. Cook it for about 8-10 minutes, or until it’s al dente. Al dente means it should be firm yet tender. After cooking, drain the pasta and rinse it with cold water. This stops the cooking and cools it down.
Enhancing Flavor with Marinades
For extra flavor, think about marinating your veggies. While the pasta cools, mix olive oil, lemon juice, salt, and pepper in a bowl. Toss in cherry tomatoes, cucumbers, and bell peppers. Let them sit for about 10 minutes. This simple step boosts their taste. It makes every bite more vibrant and fresh.
Serving Suggestions for Optimal Enjoyment
When serving your salad, presentation counts. Use a large bowl or individual dishes. Garnish with fresh basil and lemon wedges for a pop of color. This makes your dish look inviting. Serve it right away, or chill it for at least 30 minutes. Chilling helps the flavors blend. If you want to add a creamy touch, sprinkle feta cheese on top just before serving.

Variations
Adding Protein to Your Salad
To make your Lemon Basil Pasta Salad heartier, add protein. Grilled chicken is a great choice. Cook it simply with salt and pepper. Shrimp also works well when sautéed until just pink. For a vegetarian twist, use chickpeas or black beans. They add good texture and flavor. You can even sprinkle in some diced tofu for a plant-based option. The key is to balance flavors while keeping it light.
Using Different Vegetables
Feel free to mix up the veggies in your salad. Instead of cherry tomatoes, try sun-dried tomatoes for a richer taste. Bell peppers can be swapped for zucchini or carrots. You can even toss in some spinach for a nutrient boost. Just remember to use fresh, crisp veggies for the best flavor. The colors will make your dish pop while adding more vitamins.
Transforming with Different Dressings
While the lemon vinaigrette shines, other dressings can change the salad’s vibe. A balsamic vinaigrette brings a sweet tang, while a creamy dressing adds richness. Consider a pesto for an Italian twist. Just be mindful of the dressing amount; you want to enhance, not overpower. Experimenting with dressings keeps your pasta salad exciting and fresh.
Storage Info
Best Practices for Storing Leftovers
After you enjoy your Lemon Basil Pasta Salad, store any leftovers in an airtight container. Keep the salad in the fridge. Make sure it is cool before sealing it. This helps to keep the flavors fresh. If you added feta cheese, cover it with a bit of extra dressing. This keeps it from drying out.
How Long Will the Salad Last?
Your Lemon Basil Pasta Salad can last up to three days in the fridge. After that, the veggies may lose their crispness. The salad may still taste good, but it won’t be as fresh. Always check for any off smells before eating.
Reheating or Refreshing the Salad
This salad is best served cold. If you want to refresh it, add a splash of olive oil and lemon juice. Toss it gently to mix. If you must reheat, do so briefly in the microwave. Heat it for just 15-30 seconds. This will warm it without cooking the veggies.
FAQs
Can I make Lemon Basil Pasta Salad ahead of time?
Yes, you can make this pasta salad ahead. It tastes better after sitting in the fridge. I suggest preparing it up to a day in advance. Store it in an airtight container. Just remember to leave out the basil until you serve it. This keeps the basil fresh and bright.
What are some gluten-free pasta options?
If you need gluten-free pasta, there are great choices. Look for pasta made from rice, quinoa, or chickpeas. Brands like Banza or Tinkyada offer tasty options. They hold up well in salads. Cook them according to the package directions for the best results.
How can I make this pasta salad vegan?
To make this pasta salad vegan, skip the feta cheese. You can add extra veggies for flavor. Consider using avocado for creaminess. Nutritional yeast can add a cheesy taste, too. Just mix it in with the dressing for a nice touch. For the dressing, all the other ingredients are already vegan-friendly.
In this blog post, I shared how to make a refreshing lemon basil pasta salad. We covered key ingredients, step-by-step instructions, and tips for perfecting your dish. You learned how to add variety with proteins and different veggies. Storing leftover salad properly ensures it stays fresh. By answering important FAQs, I aimed to make this recipe easy for you. Enjoy this tasty dish at your next meal or gathering. With these insights, you’ll impress everyone with your delicious creation!
. {{image_4}} To make your Lemon Basil Pasta Salad heartier, add protein. Grilled chicken is a great choice. Cook it simply with salt and pepper. Shrimp also works well when sautéed until just pink. For a vegetarian twist, use chickpeas or black beans. They add good texture and flavor. You can even sprinkle in some diced tofu for a plant-based option. The key is to balance flavors while keeping it light. Feel free to mix up the veggies in your salad. Instead of cherry tomatoes, try sun-dried tomatoes for a richer taste. Bell peppers can be swapped for zucchini or carrots. You can even toss in some spinach for a nutrient boost. Just remember to use fresh, crisp veggies for the best flavor. The colors will make your dish pop while adding more vitamins. While the lemon vinaigrette shines, other dressings can change the salad's vibe. A balsamic vinaigrette brings a sweet tang, while a creamy dressing adds richness. Consider a pesto for an Italian twist. Just be mindful of the dressing amount; you want to enhance, not overpower. Experimenting with dressings keeps your pasta salad exciting and fresh. For the full recipe, check the details above. After you enjoy your Lemon Basil Pasta Salad, store any leftovers in an airtight container. Keep the salad in the fridge. Make sure it is cool before sealing it. This helps to keep the flavors fresh. If you added feta cheese, cover it with a bit of extra dressing. This keeps it from drying out. Your Lemon Basil Pasta Salad can last up to three days in the fridge. After that, the veggies may lose their crispness. The salad may still taste good, but it won’t be as fresh. Always check for any off smells before eating. This salad is best served cold. If you want to refresh it, add a splash of olive oil and lemon juice. Toss it gently to mix. If you must reheat, do so briefly in the microwave. Heat it for just 15-30 seconds. This will warm it without cooking the veggies. Yes, you can make this pasta salad ahead. It tastes better after sitting in the fridge. I suggest preparing it up to a day in advance. Store it in an airtight container. Just remember to leave out the basil until you serve it. This keeps the basil fresh and bright. If you need gluten-free pasta, there are great choices. Look for pasta made from rice, quinoa, or chickpeas. Brands like Banza or Tinkyada offer tasty options. They hold up well in salads. Cook them according to the package directions for the best results. To make this pasta salad vegan, skip the feta cheese. You can add extra veggies for flavor. Consider using avocado for creaminess. Nutritional yeast can add a cheesy taste, too. Just mix it in with the dressing for a nice touch. For the dressing, all the other ingredients are already vegan-friendly. In this blog post, I shared how to make a refreshing lemon basil pasta salad. We covered key ingredients, step-by-step instructions, and tips for perfecting your dish. You learned how to add variety with proteins and different veggies. Storing leftover salad properly ensures it stays fresh. By answering important FAQs, I aimed to make this recipe easy for you. Enjoy this tasty dish at your next meal or gathering. With these insights, you'll impress everyone with your delicious creation!](https://goldendishy.com/wp-content/uploads/2025/06/6f7717e1-8c71-4a8f-834a-cf8283cfe0e6-300x300.webp)

![To make a delightful vegan sweet potato curry, gather these simple ingredients: - 2 medium sweet potatoes, peeled and diced - 1 can (400ml) coconut milk - 1 can (400g) chickpeas, drained and rinsed - 1 medium onion, finely diced - 3 cloves of garlic, minced - 1 inch piece of fresh ginger, grated - 2 tablespoons of red curry paste - 1 bell pepper, chopped - 2 cups of fresh baby spinach - 1 tablespoon of olive oil - Salt and freshly ground pepper to taste - Fresh cilantro leaves for garnish - Lime wedges for serving Each ingredient plays a key role in the flavor and texture of the dish. The sweet potatoes give a creamy and sweet base, while the coconut milk adds richness. Chickpeas give protein and heartiness, making this dish filling. The fresh ginger and garlic bring a boost of flavor that warms your soul. Don't worry if you want to switch things up! The beauty of this curry is its flexibility. You can mix in other veggies or spices. Just keep the core ingredients for the best results. For the full recipe, check the reference above. Enjoy cooking! 1. Start by heating olive oil in a large pot over medium heat. 2. Add the diced onion and sauté for about 5 minutes. The onion should become soft and clear. 3. Mix in the minced garlic and grated ginger. Let it cook for one minute. This will make your kitchen smell amazing! 4. Next, add the red curry paste. Stir it in well and let it cook for 2 minutes. This helps deepen the flavors. 5. Now, add the diced sweet potatoes and chopped bell pepper. Stir everything well so the veggies are coated with the curry mix. 1. Pour in the creamy coconut milk and add the rinsed chickpeas. Stir everything together. 2. Turn up the heat slightly to bring the mixture to a gentle simmer. 3. Once it's simmering, lower the heat and cover the pot. Let it cook for about 20 minutes. The sweet potatoes should be tender by now. 4. After 20 minutes, gently fold in the baby spinach. Let it wilt into the curry for another 2 to 3 minutes. 5. Season with salt and freshly ground pepper. Adjust to your taste for the best flavor. 1. Serve the curry hot, garnished with fresh cilantro leaves. 2. Add lime wedges on the side for a zesty touch. 3. For a beautiful dish, use shallow bowls. This helps show off the vibrant colors. 4. Drizzle a bit of extra coconut milk on top for a stunning finish. A sprinkle of chopped cilantro looks great, too. For the complete recipe, check out the [Full Recipe]. To make your curry just right, focus on the texture. The curry should be thick but not dry. If it seems too thick, add a splash of water or more coconut milk. Stir often to keep it from sticking to the pot. When it comes to spice, taste is key. Start with a little red curry paste. You can always add more for some heat. If you prefer a milder dish, reduce the paste or add more coconut milk to balance. Want to add more color and nutrition? Toss in some extra veggies! Zucchini, carrots, or peas work great. You can also use frozen mixed veggies for convenience. Looking for protein? Try adding tofu or tempeh. These options soak up the curry flavor well. You can also use lentils for a hearty twist. To elevate the dish, consider adding spices like cumin or turmeric. These spices bring warmth and depth. A squeeze of lime juice can also brighten the flavors. Pair your curry with fluffy rice or warm naan. These sides soak up the sauce and make each bite special. You can also serve it with a fresh salad for a crunchy contrast. For the full recipe, check out the detailed instructions above. {{image_4}} You can easily adjust the spice level in your vegan sweet potato curry. For a mild dish, use less red curry paste. A medium heat works well with the standard amount of paste. If you want spice, add extra paste or mix in cayenne pepper. Different curry pastes offer unique flavors too. Try green curry paste for a fresh twist or massaman paste for a warm, nutty taste. You can play with various vegetables in your curry. Carrots, peas, or zucchini work well. For extra nutrition, add protein sources like tofu or tempeh. These options boost the dish's texture and flavor. If you want a heartier meal, consider adding lentils or quinoa. The right grain or bread makes your curry shine. Serve it with fluffy jasmine rice or warm naan. They soak up the delicious sauce and complement the curry's taste. If you have leftovers, use them in a wrap or as a topping on a salad. This way, you enjoy the flavors in different ways. For the full recipe, check the earlier section. You can keep the vegan sweet potato curry in the fridge for about 4 to 5 days. To store it, let the curry cool down first. Then, transfer it to an airtight container. This keeps the flavors fresh and tasty. When you want to eat it again, just scoop out what you need. If you want to save it for later, freezing is a great option. Pour it into a freezer-safe container. Leave some space at the top because it will expand when frozen. You can freeze the curry for up to 3 months. When you're ready to eat, take it out and place it in the fridge to thaw overnight. To reheat, warm it on the stove over low heat. Stir it well, and if needed, add a splash of coconut milk to bring back its creamy texture. Enjoy this cozy dish anytime! For the full recipe, check out the details above. Can I make this curry ahead of time? Yes, you can make this curry ahead of time. It tastes even better after a day. Just store it in the fridge. Heat it on the stove or in the microwave before serving. What other toppings can I use besides cilantro? You can use many toppings! Try fresh parsley, green onions, or avocado slices. These add color and flavor. Toasted nuts or seeds also bring a nice crunch. Is this dish gluten-free? Absolutely! This vegan sweet potato curry is gluten-free. All the ingredients in the recipe are safe for a gluten-free diet. Overview of caloric content per serving Each serving has about 350 calories. This makes it a hearty meal without being too heavy. Breakdown of key nutrients - Fiber: 10 grams - Protein: 12 grams - Carbohydrates: 45 grams This curry is rich in fiber and plant protein, making it filling and satisfying. What can I use instead of chickpeas? If you want a different protein, use lentils or black beans. Both are great choices and will still taste yummy. Alternative ingredients for coconut milk You can swap coconut milk for almond milk or oat milk. Just make sure to use a full-fat version for creaminess. If you want a richer flavor, try cashew cream. This blog covered how to make a tasty sweet potato curry. We explored essential ingredients, step-by-step cooking instructions, and tips for customizing your dish. I shared ideas for serving and storing your curry, along with answers to common questions. Incorporating these tips will help you create a flavorful meal. Enjoy experimenting with different spices and ingredients to make it your own. Cooking should be fun, and this curry recipe makes it easy to add joy to your table.](https://goldendishy.com/wp-content/uploads/2025/07/0119eb20-3e5b-446c-8228-d1dcea4a67d2-768x768.webp)
![- 2 lbs baby potatoes, halved - 1/4 cup extra virgin olive oil - 1/2 cup vegetable or chicken broth (low sodium recommended) - Juice of 2 large fresh lemons - Zest of 1 lemon - 4 cloves garlic, finely minced - 1 tablespoon dried oregano - Salt and freshly ground black pepper to taste - Fresh parsley, finely chopped (for garnish) To make Easy Greek Lemon Potatoes, you need fresh ingredients. Start with baby potatoes. They are the star of this dish. Their small size makes them cook evenly and taste great. Extra virgin olive oil adds richness and depth. The broth keeps the potatoes moist and adds flavor. Lemon juice and zest give a bright, tangy taste. Fresh garlic brings a bold kick. Dried oregano adds a lovely herb note. Finally, salt and pepper balance all the flavors. Garnish with parsley for a pop of color. This adds freshness and makes the dish look inviting. For the full recipe, check out [Full Recipe]. Enjoy the magic of these simple, yet flavorful Greek lemon potatoes! 1. Preheat the oven to 400°F (200°C). This step helps the potatoes cook evenly and get a nice crust. 2. Mix ingredients in a large bowl. Combine the halved baby potatoes, olive oil, broth, lemon juice, lemon zest, garlic, oregano, salt, and pepper. Stir until all potatoes are coated. 3. Transfer potatoes to baking dish. Spread the potatoes evenly in a single layer. Pour any leftover liquid from the bowl over them for extra flavor. 1. Cover with aluminum foil and bake for 30 minutes. This traps steam, helping the potatoes cook through. 2. Uncover and stir, bake uncovered for 25-30 minutes. This allows the potatoes to brown and become tender. Check for doneness by piercing with a fork. 1. Cool and garnish with parsley before serving. Let the potatoes sit for a few minutes, then sprinkle fresh parsley on top. 2. Presentation tips for serving. Use a rustic wooden bowl or a white platter. Add lemon wedges for a bright touch. Enjoy your Easy Greek Lemon Potatoes! Check the Full Recipe for more details. Using fresh lemon and quality olive oil is key. The lemon gives a bright taste, while good olive oil adds depth. I always choose extra virgin for its rich flavor. When seasoning, I recommend marinating the potatoes in the lemon juice and olive oil mix. This enhances the taste. Let them sit for at least 30 minutes if you can. The longer, the better the flavor. To ensure even cooking and browning, cut the potatoes into similar sizes. This helps them cook at the same rate. Arrange them in a single layer in the baking dish. Avoid crowding them, as this traps steam and keeps them from getting crispy. I often use broth instead of water. Broth adds a savory touch that elevates the dish. These Greek lemon potatoes pair wonderfully with grilled meats, like chicken or lamb. They also complement fresh salads, such as Greek salad or tabbouleh. For a perfect dining experience, serve them with a crisp white wine, like Sauvignon Blanc. The wine matches the lemony flavors well. You can find the full recipe for these tasty potatoes in my collection. {{image_4}} You can change herbs for fun flavors. Try fresh thyme or rosemary instead of oregano. If you want a kick, add some crushed red pepper flakes. For vegan or gluten-free options, swap chicken broth for vegetable broth. This keeps the dish tasty without animal products. Always read labels for gluten-free broth to be safe. Want to make these in an air fryer? Simply set it to 400°F (200°C). Cook for about 20-25 minutes. Shake the basket halfway to get even browning. You can also use a slow cooker. Add all ingredients and cook on low for 6-8 hours. This method makes the potatoes very tender and flavorful. To boost flavor, add crumbled feta cheese or olives on top. This brings a lovely salty touch. You can also mix in seasonal veggies like cherry tomatoes or bell peppers. They roast well and add color. These little tweaks make your dish burst with extra zest and excitement! To keep your Greek lemon potatoes fresh, use an airtight container. Place the cooled potatoes inside. You can store them in the fridge for up to three days. This helps keep the flavor and texture intact. If you see any signs of spoilage, it’s best to toss them out. When reheating, the oven is your friend. Preheat it to 350°F (175°C). Spread the potatoes on a baking sheet. Bake for about 15-20 minutes. This method keeps them crispy. If you use a microwave, place them in a microwave-safe bowl. Heat in 30-second intervals. Stir between intervals. This helps warm them evenly. To freeze your cooked potatoes, let them cool completely. Then, spread them on a baking sheet in a single layer. Freeze for about an hour. This prevents them from sticking together. Once frozen, transfer them to a freezer bag. Be sure to remove as much air as possible. When you want to eat them, just thaw in the fridge overnight. Reheat them in the oven at 350°F (175°C). Bake for 20-25 minutes until heated through. This keeps their flavor and texture nice. Enjoy your tasty Greek lemon potatoes anytime! For the full recipe, check out the [Full Recipe]. You bake Greek lemon potatoes for about 55 to 60 minutes. Start by covering them with foil for the first 30 minutes. This helps them cook well. After that, remove the foil and stir the potatoes. Bake them uncovered for another 25 to 30 minutes. Check if they are soft by poking them with a fork. If the fork goes in easily, they are done! You can use regular potatoes, but cooking times will change. Regular potatoes take longer to cook. Cut them into smaller pieces to match the cooking time of baby potatoes. This helps them cook evenly. The texture may also be different. Baby potatoes have a creamy texture, while regular potatoes can be a bit fluffier. Greek lemon potatoes pair well with many dishes. You can serve them with grilled chicken or lamb for a tasty meal. They also go great with a fresh Greek salad. The bright lemon flavor complements the rich dishes well. For a fun twist, add some tzatziki on the side. It adds a cool, creamy touch to the meal. For the full recipe, check out the Full Recipe section. In this blog post, we covered how to make Greek Lemon Potatoes. We explored the key ingredients, preparation steps, and the baking process. I shared tips for flavor and cooking techniques, plus variations to customize your dish. Proper storage and reheating tips help keep leftovers fresh. Remember, using fresh ingredients greatly enhances the taste. Enjoy these potatoes with your favorite Mediterranean meals. They are tasty and easy to make. Your cooking will impress friends and family alike. Dig in and savor every bite!](https://goldendishy.com/wp-content/uploads/2025/06/8502e506-5824-4799-8038-5c3f7491fce4-768x768.webp)


. To start, you need to mash the chickpeas. Use a fork or a potato masher. Mash until you have a chunky texture. You want to leave some whole chickpeas. This gives your sandwich a nice bite and texture. Next, add the tahini, lemon juice, and Dijon mustard to the chickpeas. Mix everything well. You should have a creamy base. Now, chop the red onion, celery, and grate the carrot. Fold these veggies into the chickpeas. The crunch from the veggies adds great flavor and color to your salad. Now it's time to season your chickpea mixture. Add salt and black pepper to taste. Adjust the flavors to your liking. If you want more tang, add lemon juice. If you prefer creaminess, add more tahini. For the bread, lightly toast it if you want a crunch. Spread a generous amount of the chickpea salad on two slices of bread. Add a few crisp lettuce leaves on top. If you like, add thin slices of tomatoes and cucumbers. Place the other slices of bread on top. Cut each sandwich in half for easy eating. You can serve them right away or wrap them in parchment paper for later. For a nice touch, arrange the sandwiches on a wooden board or plate. Enjoy this fresh and flavorful meal! For the complete recipe, check the Full Recipe above. To prepare chickpeas, start with rinsing and draining. Use a fine mesh strainer for this task. Rinsing removes excess sodium from canned chickpeas. Draining helps avoid excess water that can make your salad soggy. You want the chickpeas dry but not overly crushed. Adjusting seasoning is key for a tasty salad. Start with salt and pepper. Taste your mixture before serving. Add more lemon juice for brightness. If you want creaminess, add more tahini. These simple changes can enhance the dish. Make your meal look nice with a few easy tips. Use a rustic wooden board or a bright plate. This adds charm to your presentation. Garnish with fresh dill on top of the sandwich. Serve with colorful veggie sticks on the side. It makes for an eye-catching and healthy display. For the full recipe, check the section above. {{image_4}} You can change up the chickpeas in this sandwich. Try using black beans or lentils instead. Both options give a different taste and texture. For extra creaminess, swap tahini with vegan mayonnaise. This will make the mix smooth and rich. You can even blend both for a unique flavor. Herbs and spices can change the taste of your sandwich. Instead of dill, use parsley or cilantro for a fresh kick. You can also add garlic powder or smoked paprika for depth. For a spicy twist, throw in some chopped jalapeños or a dash of hot sauce. These additions can bring a fun zing to your meal. When it comes to bread, you have many choices. Whole grain bread is great, but you can also use gluten-free options. Try wraps made from rice or corn for a lighter touch. This makes for a fun, portable meal. Each bread type changes the sandwich's feel, so choose what you love! To keep leftovers fresh, store your chickpea salad in an airtight container. Make sure to refrigerate it right away. This helps keep the flavors intact for up to three days. When ready to eat, just give it a good stir. You can enjoy it cold or make a fresh sandwich. If you want to store the chickpea salad for longer, freezing is a great option. Place the chickpea salad mixture in a freezer-safe container. Leave some space at the top to allow for expansion. It will stay good for about three months. When you're ready to eat it, let it thaw in the fridge overnight. To refresh your sandwich after storage, you can add a bit of olive oil or lemon juice. This helps bring back the moisture and flavor. If you want, you can toast the bread again for a crunchy bite. This simple step makes your sandwich taste fresh and delicious again. Enjoy your meal! To make this sandwich gluten-free, choose gluten-free bread. Many stores offer great options. Look for brands made from rice or almond flour. You can also try lettuce wraps instead of bread. This keeps it fresh and light too! Yes, you can. Make the chickpea salad a day ahead. Store it in an airtight container in the fridge. It stays good for about three days. Just remember to add fresh toppings right before serving for best flavor. Chickpeas are packed with protein and fiber. They help keep you full and satisfied. This sandwich is low in fat and high in vitamins. The veggies add crunch and nutrients. Tahini brings in healthy fats and flavor. Overall, this sandwich is a tasty way to eat healthy! This blog covered how to make a tasty chickpea salad sandwich. We explored main ingredients, step-by-step instructions, and storage tips. You learned how to adjust flavors and choose the right bread. Remember, you can customize the recipe with different herbs or legumes. Enjoy this easy meal any day! It’s healthy, quick, and delicious. I hope you try it soon. Your taste buds will thank you!](https://goldendishy.com/wp-content/uploads/2025/06/7c039c45-1f39-49ec-9b48-b25c6f87980b-768x768.webp)