Honey Mustard Chicken Skillet Flavorful Dinner Recipe

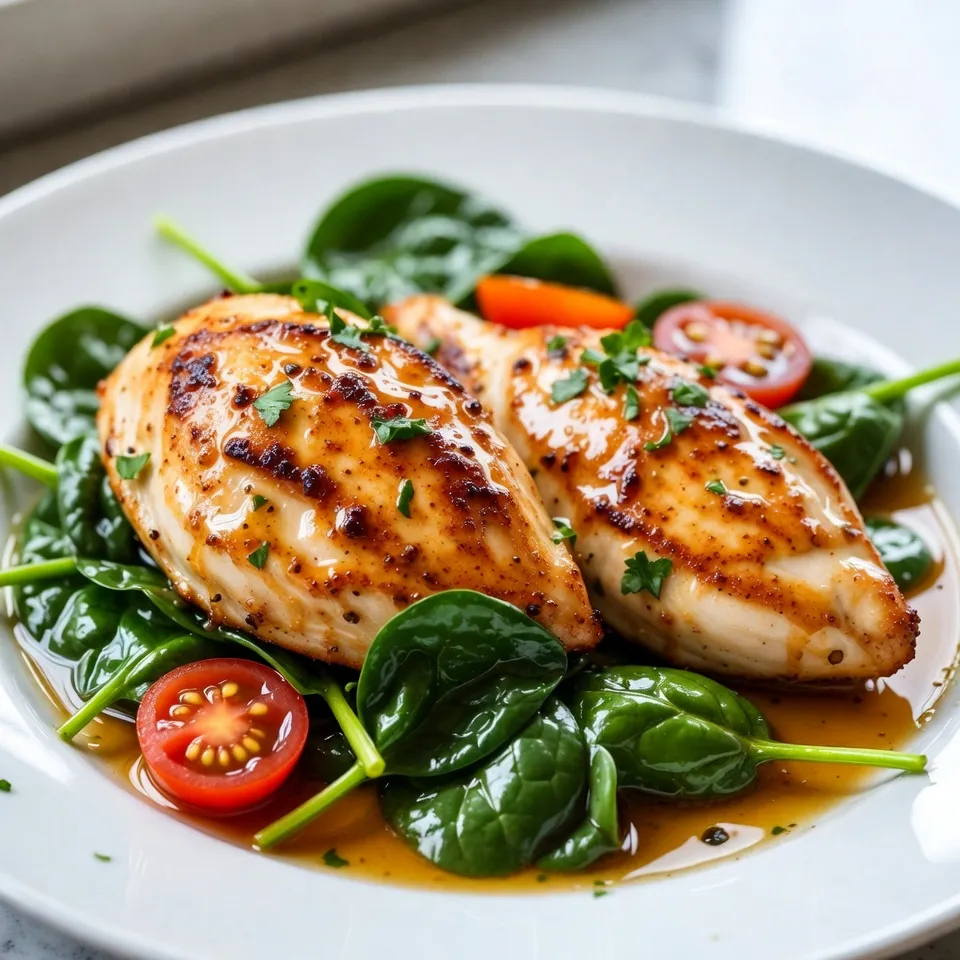
Looking for a quick, tasty dinner idea? My Honey Mustard Chicken Skillet recipe is the answer! With juicy chicken, a sweet-sour sauce, and vibrant veggies, it’s a one-pan wonder you’ll love. Plus, it’s simple to make! Follow my step-by-step guide for a delightful meal that’s ready in no time. Get ready to impress your family with this flavorful dish!
Why I Love This Recipe
- Quick and Easy: This recipe comes together in just 30 minutes, making it perfect for busy weeknight dinners.
- Flavorful Sauce: The combination of honey and Dijon mustard creates a sweet and tangy sauce that enhances the chicken beautifully.
- Nutritious Add-ins: Fresh spinach and cherry tomatoes not only add color but also provide essential nutrients to the dish.
- One-Pan Wonder: With everything cooked in one skillet, cleanup is a breeze, allowing you to enjoy your meal without the hassle.
Ingredients
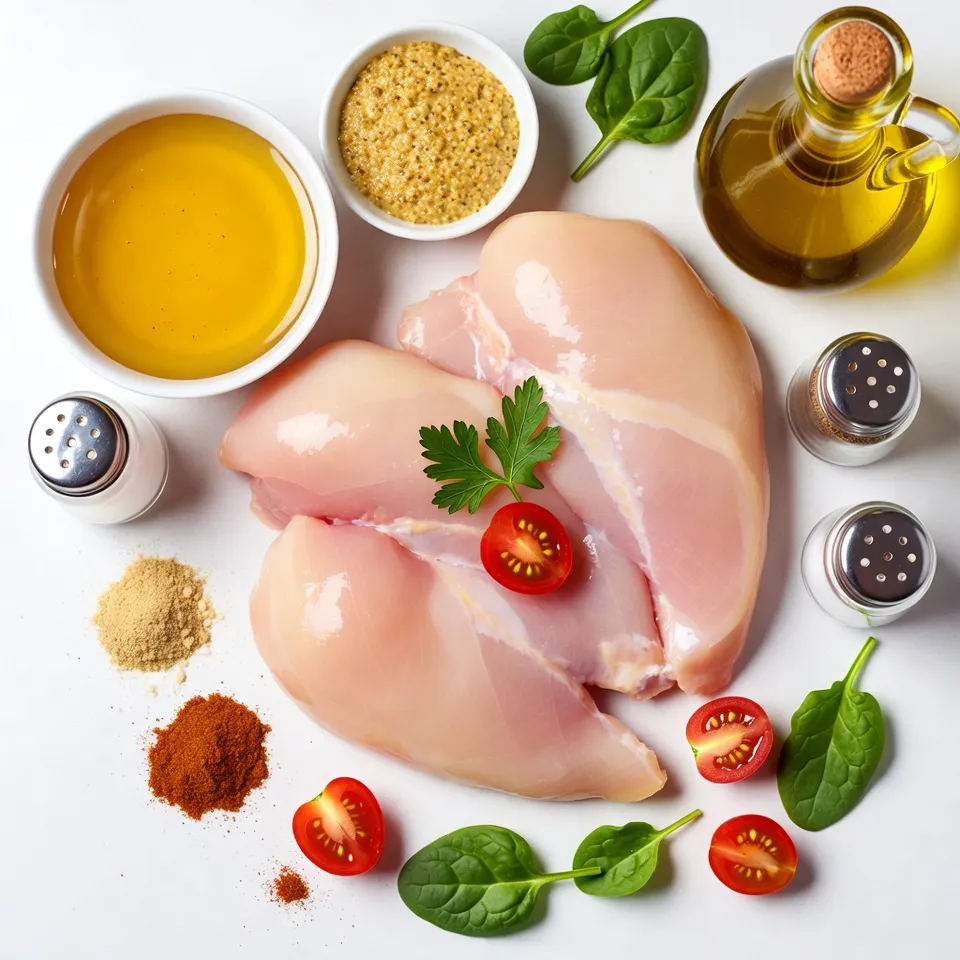
List of Ingredients Required
– 4 boneless, skinless chicken breasts
– 1/4 cup honey
– 1/4 cup Dijon mustard
– 2 tablespoons olive oil
– 1 teaspoon garlic powder
– 1 teaspoon onion powder
– 1/2 teaspoon smoked paprika
– Salt and pepper, to taste
– 2 cups fresh baby spinach
– 1/2 cup cherry tomatoes, halved
– Fresh parsley, chopped for garnish
For this Honey Mustard Chicken Skillet, you need simple yet flavorful ingredients. Start with chicken breasts, as they are the star of the dish. Honey and Dijon mustard create a sweet and tangy sauce. Olive oil helps to sear the chicken to golden perfection. Seasonings like garlic powder, onion powder, and smoked paprika add depth and warmth.
Fresh baby spinach and cherry tomatoes bring color and nutrition to the meal. Finally, fresh parsley not only adds a pop of green but also enhances the flavor. These ingredients work together to make a quick, tasty dinner that everyone will love.

Step-by-Step Instructions
Preparing the Chicken
First, pat the chicken breasts dry with a paper towel. This helps the chicken sear well. Season both sides with garlic powder, onion powder, smoked paprika, salt, and pepper. Even seasoning gives the chicken great flavor.
Making the Honey Mustard Sauce
In a small bowl, mix the honey and Dijon mustard. Stir them until smooth. This sauce adds a sweet and tangy kick to the dish. If you want a thicker sauce, whisk it a bit longer.
Searing the Chicken
Heat the olive oil in a large skillet over medium-high heat. When the oil shimmers, add the seasoned chicken breasts. Cook for about 5-6 minutes on each side. You want a golden brown color and the chicken to be fully cooked.
Incorporating the Sauce and Vegetables
Once the chicken is done, take it out of the skillet. Pour the honey mustard sauce into the same skillet. Stir for 1-2 minutes to thicken it up. Now, add fresh baby spinach and halved cherry tomatoes. Stir until the spinach wilts, which takes about 2-3 minutes.
Final Steps
Put the cooked chicken back in the skillet. Spoon some sauce over each piece. Let everything cook for another minute. This warms the chicken and blends the flavors. Remove from heat and top with chopped parsley for a bright finish. Enjoy your meal!
Tips & Tricks
Cooking Tips for Perfect Chicken
– Temperature considerations: Always cook chicken to an internal temperature of 165°F (75°C). Use a meat thermometer for accuracy.
– Avoiding overcooking: Cook each side for 5-6 minutes. This keeps the chicken juicy and tender.
Enhancing the Honey Mustard Flavor
– Suggested herbs and spices: Add fresh thyme or rosemary for a nice touch. A pinch of cayenne can add some heat.
– Alternative mustard options: Swap Dijon for whole grain or spicy brown mustard. Each gives a unique twist to the sauce.
Presentation Suggestions
– Arranging the dish aesthetically: Place the chicken in the center of a large platter. Surround it with spinach and tomatoes for color.
– Serving ideas with lemon wedges: Add lemon wedges on the side. They add a fresh burst of flavor when squeezed over the dish.
Pro Tips
- Pat the Chicken Dry: Ensuring the chicken breasts are dry before seasoning helps achieve a perfect sear, resulting in a flavorful crust.
- Balance the Flavors: Adjust the honey and Dijon mustard ratio to suit your taste; more honey will sweeten the dish, while more mustard will add tanginess.
- Don’t Rush the Sauce: Allow the honey mustard sauce to thicken slightly in the skillet; this enhances the flavor and ensures it clings to the chicken.
- Garnish for Freshness: Adding freshly chopped parsley not only adds color but also brightens the dish’s flavor, making it more appealing.

Variations
Protein Alternatives
You can switch up the meat in this dish. Try turkey or pork for a change. Both will soak up the honey mustard flavors well. If you want a vegetarian option, go for tofu or tempeh. Just press the tofu to remove water. Then, season and cook it the same way as the chicken. This will give you a tasty and filling meal.
Sauce Variations
Feel free to get creative with the sauce. You can add a pinch of cayenne for heat. This will give your dish a nice kick! If you want a low-sugar option, use a sugar substitute or maple syrup. Both will work and add great flavor without the extra sugar.
Side Dish Pairings
Pair this dish with rice or quinoa for a wholesome meal. These grains soak up the sauce perfectly. You can also serve a fresh salad on the side. A simple mix of greens, cucumbers, and cherry tomatoes will work well. The crunch will balance the soft chicken and sauce.
Storage Info
Refrigeration Guidelines
To store leftovers, let your Honey Mustard Chicken cool first. Place it in an airtight container. This helps keep the chicken fresh. You can store it in the fridge for up to three days. When you’re ready to eat, you can reheat it easily.
For reheating, use a skillet over medium heat. Add a splash of water or broth to keep it moist. Heat for about 5-7 minutes, or until it’s warm throughout. You can also use a microwave. Just cover it to avoid drying out. Heat for 1-2 minutes, checking often.
Freezing Tips
You can freeze cooked chicken and sauce for later use. Let the chicken cool completely before freezing. Wrap it tightly in plastic wrap, then place it in a freezer bag. This helps protect it from freezer burn. Use it within three months for the best taste.
For thawing, move the chicken to the fridge a day before you want to eat. This keeps it safe. If you need it faster, you can thaw it in cold water. Change the water every 30 minutes until it’s ready. Once thawed, reheat the chicken as mentioned above. Enjoy your delicious meal later!
FAQs
How long does it take to cook chicken in a skillet?
It takes about 10-12 minutes to cook chicken breasts in a skillet. You want to cook them for 5-6 minutes on each side. This timing ensures they turn golden brown and reach the right internal temperature. Always check that the chicken reaches 165°F (75°C) for safety.
Can I use other types of mustard?
Yes, you can use different mustards! Honey mustard works great, but you can also try yellow mustard or spicy brown mustard. Each type adds a unique flavor. Experiment to find your favorite combination.
What to serve with Honey Mustard Chicken Skillet?
Popular side dishes include:
– Rice
– Quinoa
– Roasted potatoes
– Steamed broccoli
– Fresh salads
These sides complement the chicken well and add variety to the meal.
How to tell when chicken is fully cooked?
To check if chicken is fully cooked, look for these signs:
– The juices should run clear, not pink.
– The chicken should feel firm to the touch.
– Use a meat thermometer; it should read 165°F (75°C).
These tips help you ensure your chicken is safe and delicious!
You now have all you need to make a tasty Honey Mustard Chicken Skillet. We covered ingredients, cooking steps, and how to store leftovers. Remember to season well and keep an eye on cooking times for perfect results. Don’t shy away from trying different proteins or side dishes to enhance your meal. Enjoy experimenting with flavors and making this dish your own. Happy cookin

Honey Mustard Chicken Skillet
Ingredients
- 4 pieces boneless, skinless chicken breasts
- 0.25 cup honey
- 0.25 cup Dijon mustard
- 2 tablespoons olive oil
- 1 teaspoon garlic powder
- 1 teaspoon onion powder
- 0.5 teaspoon smoked paprika
- to taste salt and pepper
- 2 cups fresh baby spinach
- 0.5 cup cherry tomatoes, halved
- for garnish fresh parsley, chopped
Instructions
- Prepare the Chicken: Begin by patting the chicken breasts dry using a paper towel. This step is crucial for achieving a nice sear. Season both sides generously with garlic powder, onion powder, smoked paprika, salt, and pepper, ensuring an even coating for maximum flavor.
- Make the Honey Mustard Sauce: In a small mixing bowl, combine the honey and Dijon mustard. Whisk them together until the mixture is smooth and well combined. This will be your flavorful sauce. Set the bowl aside for now.
- Sear the Chicken: Heat the olive oil in a large skillet over medium-high heat. Once the oil is shimmering, add the seasoned chicken breasts to the skillet in a single layer. Cook for approximately 5-6 minutes on each side, or until they achieve a beautiful golden brown color and are fully cooked through (internal temperature should reach 165°F/75°C). Once cooked, remove the chicken from the skillet and keep it warm on a plate.
- Add the Sauce: In the same skillet, reduce the heat to medium. Carefully pour the prepared honey mustard sauce into the skillet, stirring constantly for about 1-2 minutes, allowing it to thicken slightly and infuse the skillet with flavor.
- Combine with Vegetables: Add the fresh baby spinach and halved cherry tomatoes to the skillet. Stir these ingredients gently until the spinach wilts down and the tomatoes begin to soften, which should take around 2-3 minutes.
- Return Chicken to Skillet: Place the seared chicken breasts back into the skillet, ensuring to spoon some of the honey mustard sauce over the top of each piece. Allow everything to cook together for an additional minute to ensure the chicken is warmed through and infused with the flavors of the sauce.
- Serve: Remove the skillet from the heat. Garnish the dish generously with freshly chopped parsley for a pop of color and added flavor. Serve immediately, drizzling any leftover honey mustard sauce on top of the chicken and vegetables for an irresistible finish.


![To make maple glazed butternut squash, you’ll need the following items: - 1 medium butternut squash, peeled and cut into 1-inch cubes - 3 tablespoons pure maple syrup - 2 tablespoons extra virgin olive oil - 1 teaspoon ground cinnamon - 1/2 teaspoon freshly grated nutmeg - 1/4 teaspoon cayenne pepper (optional, for a kick) - Sea salt and freshly cracked black pepper, to taste - 1/4 cup pecans, roughly chopped (for garnish) - Fresh parsley, finely chopped (for garnish) When cooking, measuring accurately is key. Use dry measuring cups for solid items like squash and nuts. For liquids, use a liquid measuring cup. Always level off dry ingredients with a straight edge. This step ensures you get the right amount for best results. You can swap ingredients based on your needs. If you prefer a sweeter taste, try honey instead of maple syrup. For a nut-free option, skip the pecans or use seeds like pumpkin seeds. Always check for allergies, especially with nuts and spices. To make maple glazed butternut squash, start by gathering your ingredients. You'll need: - 1 medium butternut squash, peeled and cut into 1-inch cubes - 3 tablespoons pure maple syrup - 2 tablespoons extra virgin olive oil - 1 teaspoon ground cinnamon - 1/2 teaspoon freshly grated nutmeg - 1/4 teaspoon cayenne pepper (optional) - Sea salt and freshly cracked black pepper, to taste - 1/4 cup pecans, roughly chopped (for garnish) - Fresh parsley, finely chopped (for garnish) First, preheat your oven to 400°F (200°C). This step is key for good roasting. Next, peel and cube the butternut squash. Place the cubes in a large bowl. Drizzle the olive oil and maple syrup over the squash. Then, sprinkle the ground cinnamon, nutmeg, cayenne, sea salt, and black pepper. Toss gently until all the pieces are well coated. Now, it's time to roast your squash. Line a baking sheet with parchment paper. This helps prevent sticking and makes cleanup easy. Spread the coated squash in a single layer on the sheet. Place the baking sheet in the oven. Roast the squash for 25-30 minutes. About halfway through the cooking time, stir the squash. This ensures all sides caramelize and cook evenly. When the squash is fork-tender and has a nice golden color, it's done. Remove it from the oven and let it cool for 2-3 minutes. To get that perfect caramelization, watch your cooking time closely. Stirring halfway through helps. The key is to spread the squash out evenly. If it's too crowded, it will steam instead of roast. You can also adjust the maple syrup for sweetness. A little extra can help with caramelization. If you like a kick, add the cayenne pepper. It balances the sweet and savory flavors beautifully. Once cooked, transfer the squash to a serving dish. Top with chopped pecans and parsley for a fresh touch. This dish is sure to impress! For the complete recipe, check out the [Full Recipe]. When making maple glazed butternut squash, avoid cutting the squash too small. Smaller pieces cook too fast and can burn. Also, don’t skip the olive oil. It helps the squash caramelize and adds flavor. Overcrowding the baking sheet is another mistake. Leave space between the cubes to ensure even cooking. To boost the flavor, add a splash of balsamic vinegar before roasting. This adds depth to the sweetness. Try different spices, too. A pinch of smoked paprika can give a nice twist. For a savory touch, mix in garlic powder or fresh garlic. These will elevate your dish. Use a sturdy baking sheet lined with parchment paper. This helps with easy cleanup and prevents sticking. A large mixing bowl is great for tossing the squash and spices. If you have one, a vegetable peeler makes peeling the squash quick and easy. For a perfect roast, an oven thermometer ensures your oven is at the right temperature. For the full recipe, refer to the above instructions. {{image_4}} You can make this dish even better by adding other veggies. Try sweet potatoes for a richer flavor. Carrots add sweetness and color, while red onions bring a slight bite. Just cut them into similar sizes as the squash. Toss them in the same maple glaze for a yummy blend. You’ll create a colorful and flavorful dish that everyone will love. Want to change the taste? You can use different spices. Try ginger for a warm kick. If you like it spicy, add more cayenne pepper. You can also use smoked paprika for a smoky flavor. Experiment with herbs like thyme or rosemary. Just remember to keep it balanced, so no single flavor overpowers the dish. This recipe is naturally vegan and gluten-free. You can enjoy it without worry. If you want to add protein, try chickpeas. They pair well with the flavors and add a nice crunch. For those who need low-carb options, skip the maple syrup and use a sugar substitute. It’s easy to adapt this dish to fit your needs. For the full recipe, check out the detailed instructions above. To keep your maple glazed butternut squash fresh, store it in an airtight container. Let the squash cool down after cooking. Then, place it in the fridge. It will stay fresh for about 3 to 5 days. If you want to keep it longer, consider freezing. Reheat your butternut squash in the oven for the best results. Preheat your oven to 350°F (175°C). Spread the squash on a baking sheet. Heat it for about 10-15 minutes or until warm. You can also use the microwave. Place it in a microwave-safe dish and cover it. Heat in short bursts, checking to avoid overcooking. Freezing is a great way to save this dish for later. First, let the squash cool completely. Then, spread it on a baking sheet in a single layer. Freeze it for about 1-2 hours until firm. Once frozen, transfer the squash to a freezer-safe bag or container. It can last for up to 3 months in the freezer. When ready to eat, thaw overnight in the fridge before reheating. For more details, check the Full Recipe. Yes, you can prepare this dish ahead of time. Cook the butternut squash and let it cool. Store it in an airtight container in the fridge. You can make it up to two days in advance. When you're ready to eat, just reheat it in the oven or microwave. This makes it great for meal prep. Maple glazed butternut squash lasts about 3 to 5 days in the fridge. Make sure it’s in a sealed container. Check for any signs of spoilage before eating. If it looks or smells off, it’s best to toss it. Freshness is key for enjoying this tasty dish. You can pair this dish with many foods. It goes well with roasted chicken or turkey. You can also serve it with quinoa or brown rice for a healthy meal. For a vegetarian option, pair it with a bean salad. The sweet and savory flavors work well with many sides. For more details on how to whip up this incredible dish, check out the Full Recipe. This guide walked you through each step of making Maple Glazed Butternut Squash. We covered ingredients, how to prepare, cook, and store your dish. I shared tips to avoid mistakes and ideas for adding your own twist. Remember, the key to perfect caramelization is patience. Enjoy experimenting with flavors and variations. This dish can be a crowd-pleaser and is easy to adapt. I hope you feel ready to try it out. Enjoy your cooking!](https://goldendishy.com/wp-content/uploads/2025/07/e9e7eb41-1a1b-4d7a-9d20-35ffe8b1aa92-768x768.webp)