Grilled Vegetable Skewers Delightful and Colorful Treat

Looking for a tasty way to enjoy fresh veggies? Grilled Vegetable Skewers are a vibrant, colorful treat that’s easy to make! You’ll love how simple it is to mix and match seasonal vegetables. With a quick marinade and grilling tips, you’ll have a dish that impresses everyone at your next barbecue. Let’s dive into creating these delightful skewers that are bursting with flavor!
Ingredients
Main Vegetable Ingredients
– Zucchini
– Bell Peppers
– Red Onion
– Cherry Tomatoes
– Button or Cremini Mushrooms
Marinade Ingredients
– Extra Virgin Olive Oil
– Balsamic Vinegar
– Garlic Powder
– Dried Oregano
– Sea Salt and Pepper
Optional Garnishes
– Fresh Basil Leaves
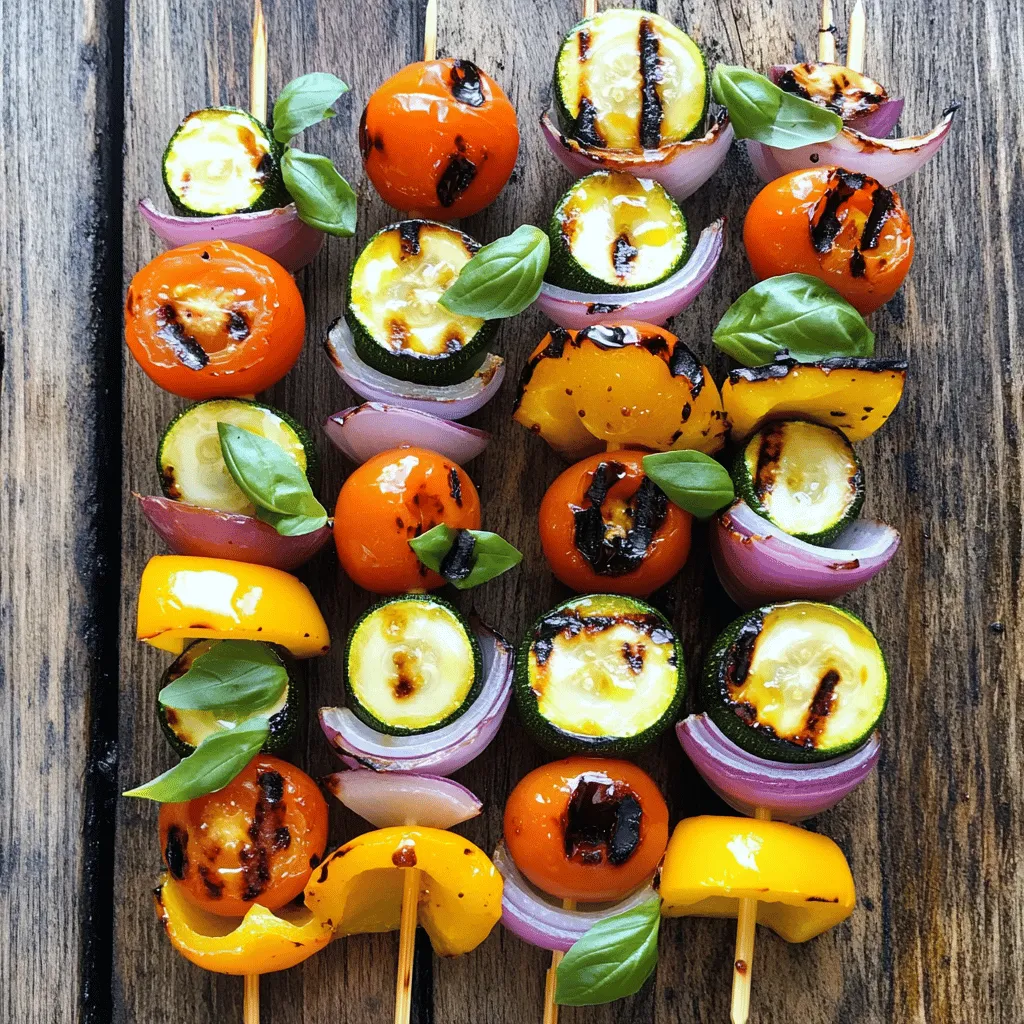
When I make grilled vegetable skewers, I love using fresh, colorful veggies. They not only taste great, but they also make the dish pretty. Here are the main veggies I recommend:
– Zucchini: Cut it into 1/2-inch rounds. It cooks well and adds a nice texture.
– Bell Peppers: Choose your favorite color. Cut them into 1-inch chunks for a juicy bite.
– Red Onion: Cut it into wedges. It brings a sweet flavor when grilled.
– Cherry Tomatoes: Use them whole for bursts of juicy goodness.
– Button or Cremini Mushrooms: Halve these for a rich, earthy flavor.
Next, we need a tasty marinade. It helps the veggies soak up flavor:
– Extra Virgin Olive Oil: This adds richness and helps the marinade stick.
– Balsamic Vinegar: It adds a tangy sweetness that pairs well with grilled veggies.
– Garlic Powder: This gives a savory kick without the fuss of fresh garlic.
– Dried Oregano: This herb adds a lovely, earthy taste.
– Sea Salt and Pepper: These are must-haves to enhance all the flavors.
For a finishing touch, I like to add fresh basil leaves. They add a pop of color and a fresh taste.Enjoy creating this colorful dish!
Step-by-Step Instructions
Preparing the Vegetables
First, let’s mix the raw vegetables.
– In a large bowl, add:
– 1 medium zucchini, cut into 1/2-inch rounds
– 1 colorful bell pepper, cut into 1-inch chunks
– 1 medium red onion, cut into wedges
– 1 cup cherry tomatoes, whole
– 1 cup button or cremini mushrooms, halved
Gently toss the vegetables together. This helps them mix well. Next, we’ll make the marinade.
– In a small bowl, whisk:
– 2 tablespoons extra virgin olive oil
– 1 tablespoon balsamic vinegar
– 1 teaspoon garlic powder
– 1 teaspoon dried oregano
– Sea salt and freshly cracked black pepper to taste
Pour the marinade over the mixed vegetables. Toss them again to coat every piece. Cover the bowl and let it sit for at least 15 minutes. This allows the flavors to soak in.
Prepping the Grill
Now, let’s get the grill ready. Set it to medium-high heat. This is about 375°F to 400°F. A hot grill helps cook the veggies well.
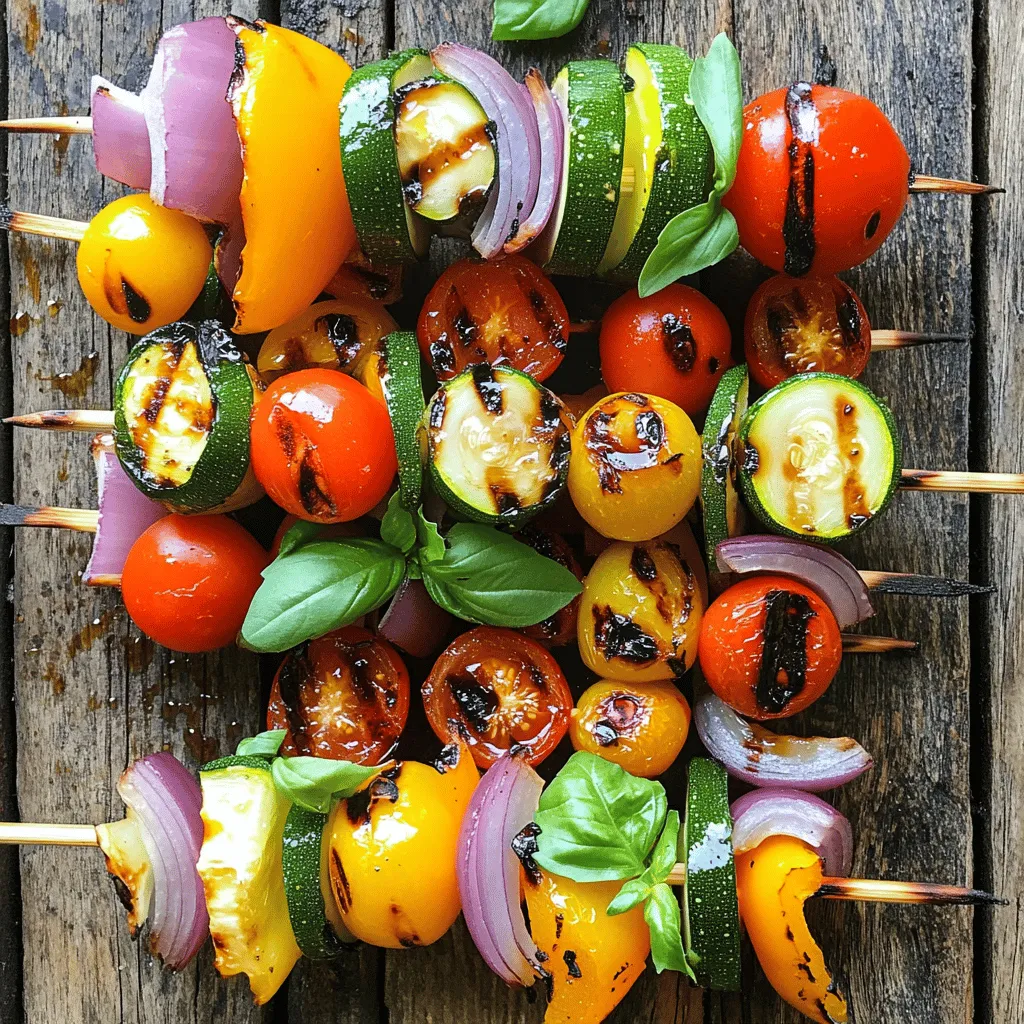
Once the grill is hot, it’s time to assemble the skewers. Use either wooden or metal skewers. Thread the vegetables on the skewers, alternating colors and shapes. Leave a little space between each piece for even cooking.
Grilling Process
Place the skewers on the grill. Grill them for 10-12 minutes. Turn the skewers occasionally. This helps achieve a nice char and keeps them tender. You want the veggies to be slightly caramelized.
After grilling, remove the skewers from the grill. Let them rest for 2-3 minutes. This resting time makes the flavors even better. If you like, garnish with fresh basil leaves. Enjoy your vibrant grilled vegetable skewers warm.
Tips & Tricks
Enhancing Flavor
To boost flavor, try different marinades. You can use lemon juice or soy sauce. A mix of herbs like thyme or rosemary also works well. For seasoning, use sea salt and cracked black pepper. You can add smoked paprika for a smoky taste. Experiment with spices like cumin or chili powder for extra heat.
Skewer Assembly Tips
When you assemble your skewers, mix colors and shapes. This makes them fun and appealing. Alternate veggies like zucchini and bell peppers with mushrooms and tomatoes. You can also add fruits like pineapple or peaches for a sweet twist. If you want, use double skewers for more stability. This keeps everything in place while grilling.
Grilling Techniques
Grilling at medium-high heat is best. It helps veggies cook evenly and get nice grill marks. Avoid common mistakes like overcrowding the grill. Give each skewer space to breathe. Turn them gently to prevent burning. Keep an eye on the time. Grill for 10 to 12 minutes, until tender and slightly charred.Enjoy the art of grilling!

Variations
Vegetable Options
You can swap vegetables based on the season. Try asparagus in spring or squash in summer. You can even add fruits for a sweet twist. Pineapple or peaches on skewers taste great and add flavor.
Protein Additions
Want more protein? Add shrimp or chicken to your skewers. They grill quickly and pack a punch. For plant-based options, try tofu or tempeh. Both soak up flavors well and add texture.
Flavor Profiles
Explore different flavors to spice up your skewers. For Mediterranean vibes, use herbs like rosemary and thyme. A squeeze of lemon adds brightness. For Asian-inspired marinades, try soy sauce, ginger, and sesame oil. Both options will elevate your grilled vegetable skewers.
Storage Info
Storing Leftovers
To keep your grilled vegetable skewers fresh, store them properly. Place the skewers in an airtight container. This helps keep moisture out and flavor in. If you have extra marinade, drizzle a bit on top for added taste. You can keep them in the fridge for up to three days.
Reheating Tips
When you want to enjoy your leftovers, reheating is key. The best way is to use a skillet over medium heat. This method warms them gently without making them soggy. Avoid using a microwave, as it can make them rubbery. Heat just until warmed through, around five minutes should do.
Freezing Options
Can you freeze grilled skewers? Yes, you can freeze them for later! Wrap each skewer in plastic wrap. Then, place them in a freezer-safe bag. This keeps them fresh for up to three months. When you’re ready to eat, thaw them in the fridge overnight. Reheat as mentioned above for the best taste.
FAQs
How long do you cook vegetable skewers on the grill?
Grill vegetable skewers for about 10 to 12 minutes. This gives them a nice char and tenderness. Turn the skewers every few minutes. This helps them cook evenly. You want them to be slightly soft and caramelized.
What vegetables are best for grilling?
The best vegetables for grilling include:
– Zucchini
– Bell peppers
– Red onions
– Cherry tomatoes
– Mushrooms
These vegetables hold up well on the grill. They also taste amazing with a bit of char.
Can I make grilled vegetable skewers in the oven?
Yes, you can make grilled vegetable skewers in the oven. Preheat the oven to 400°F. Place the skewers on a baking sheet. Roast them for about 20 to 25 minutes. Turn them halfway through for even cooking. This method works well when you can’t use a grill.
How do I prevent vegetables from sticking to the grill?
To prevent sticking, follow these tips:
– Preheat your grill well.
– Use oil on the grill grates.
– Brush the vegetables with oil too.
– Avoid moving the skewers too soon.
These steps help keep your veggies from sticking. You’ll get perfect, charred, and tasty skewers every time.
Grilling vegetable skewers offers a fun and tasty way to enjoy healthy food. We covered key ingredients like zucchini, bell peppers, and cherry tomatoes, plus the perfect marinade to enhance their flavor. You learned tips on prepping, grilling, and storing.
As you experiment with different vegetables and flavors, remember to have fun. Grilling is about creativity and enjoying good food with others. Try new combinations and enjoy your delicious, healthy meals!


![To make teriyaki chicken lettuce wraps, you need a few key ingredients. These create the rich flavors and fresh textures. Here’s what you’ll need: - 1 lb (450g) boneless, skinless chicken breast, finely diced - 1 tablespoon canola oil - 1/2 cup bell pepper, finely chopped (choose red or yellow for sweetness) - 1/2 cup carrot, grated (for a touch of crunch) - 3 green onions, beautifully sliced - 2 cloves garlic, minced (for aromatic depth) - 1/4 cup low-sodium soy sauce (to control saltiness) - 2 tablespoons honey (for a hint of natural sweetness) - 1 tablespoon rice vinegar (to balance flavors) - 1 teaspoon sesame oil (for a nutty aroma) - 1 teaspoon fresh ginger, grated (adds a zesty kick) - 1 head of butter lettuce or iceberg lettuce, with leaves gently separated These ingredients come together to create a joyful, tasty meal. Garnishes can elevate your dish. While not required, they add flair and flavor. Here are some great options: - Sesame seeds (for garnish, optional but recommended) - Fresh cilantro or parsley, for garnish (optional) Adding these garnishes can make your wraps look and taste even better. Lettuce is key for wraps. It holds the filling perfectly. Here are tips to choose the best lettuce: - Look for crisp, fresh leaves. Avoid any wilting or browning. - Butter lettuce has a soft, pliable texture, perfect for wrapping. - Iceberg lettuce offers a nice crunch but can be thicker. Choose what you like best for your teriyaki chicken lettuce wraps. To start, gather your ingredients. You need: - 1 lb boneless, skinless chicken breast, finely diced - 1 tablespoon canola oil - 1/2 cup bell pepper, finely chopped - 1/2 cup carrot, grated - 3 green onions, beautifully sliced - 2 cloves garlic, minced - 1/4 cup low-sodium soy sauce - 2 tablespoons honey - 1 tablespoon rice vinegar - 1 teaspoon sesame oil - 1 teaspoon fresh ginger, grated - 1 head of butter or iceberg lettuce, leaves separated - Sesame seeds and fresh herbs for garnish Make sure your chicken is chopped small. This helps it cook evenly. Chop the bell pepper finely for sweetness and color. Grate the carrot for crunch. Slice the green onions thin. Mince the garlic and grate the ginger to release their flavors. Heat the canola oil in a large skillet over medium heat. Wait until the oil shimmers. Add the diced chicken and cook it for 5-7 minutes. Stir often until the chicken is brown and fully cooked. Then, add the minced garlic, grated ginger, and chopped bell pepper. Sauté this mixture for 2-3 minutes. The bell pepper should soften and blend with the chicken. In a small bowl, whisk together the soy sauce, honey, rice vinegar, and sesame oil. When well combined, pour this sauce into the skillet. Now, gently fold in the grated carrots and sliced green onions. Cook for another 2-3 minutes. This helps the sauce coat everything and thicken slightly. Remove the skillet from heat. Let the teriyaki chicken cool for a few minutes. This resting time allows the flavors to meld beautifully. To serve, take a lettuce leaf and place a generous spoonful of the teriyaki chicken mixture in the center. This creates your wrap. For added flavor, sprinkle sesame seeds and fresh herbs on top. Serve the wraps right away. Encourage everyone to wrap them up and enjoy the fresh, vibrant flavors. For the full details on making this dish, check out the Full Recipe. For juicy chicken, choose fresh chicken breast. Cut it into small, even pieces. This helps it cook evenly. Heat your skillet before adding oil. Use medium heat to avoid burning. Stir the chicken often. This keeps it from sticking and ensures even cooking. Add garlic and ginger early. This builds a great flavor base. Cook until the chicken is completely brown and firm. To wrap your lettuce, use large, whole leaves. Butter or iceberg lettuce works best. Place a spoonful of chicken in the center. Fold the sides in first, then roll it up. This keeps the filling secure. Make sure the wrap is tight but not too tight. You want it to hold together without falling apart. Arrange your wraps on a platter. Add extra garnishes like sesame seeds for a beautiful look. You can change the flavor of your wraps easily. Add extra veggies like cucumbers or radishes. They give a nice crunch. For a spicy kick, include sliced jalapeños or sriracha sauce. If you like nuts, add chopped peanuts or cashews. You can also switch the protein. Try ground turkey or tofu for a new taste. Mix and match to find your favorite flavor combo. For the complete recipe, check out the [Full Recipe]. {{image_4}} You can switch up the protein in your wraps. If you like beef, use ground beef or diced steak. For a lighter choice, try shrimp or fish, like salmon. If you prefer turkey, ground turkey works well too. Each protein brings its own flavor and texture. Just adjust the cooking time to ensure everything cooks through. To make these wraps vegetarian or vegan, use tofu or tempeh. Both options absorb flavors well. Press and cube the tofu before cooking to remove extra moisture. For a tasty twist, you can use cooked lentils or chickpeas. These options give a hearty bite while keeping your meal plant-based. Add fun flavors to your wraps! You can mix in crushed peanuts or cashews for crunch. Fresh herbs like basil or mint can add a fresh taste. Spice lovers may enjoy a dash of sriracha or chili flakes for heat. You can also add diced pineapple or mango for a sweet twist. These enhancements make your wraps even more exciting! For the complete recipe, check the [Full Recipe]. After enjoying your teriyaki chicken lettuce wraps, you may have leftovers. To store them, place the wraps in an airtight container. Keep the chicken mixture and lettuce leaves separate. This helps keep the lettuce crisp and fresh. Store in the fridge for up to three days. When you're ready to enjoy your leftovers, simply reheat the chicken mixture. Use a skillet over medium heat. Stir until heated through, about 5 minutes. Avoid microwaving the lettuce, as it may become soggy. Assemble the wraps just before eating for the best taste. Meal prepping makes weeknight cooking easy. You can prepare the chicken mixture ahead and store it in the fridge. Use the Full Recipe to guide your prep. To save time, chop vegetables on the weekend. This way, you have everything ready to go when you need a quick dinner. Enjoy your healthy wraps any night! To make the sauce, start with low-sodium soy sauce for a savory base. Add honey for sweetness and rice vinegar for a tangy kick. Then, mix in sesame oil for a nutty aroma. Combine these in a bowl and whisk until smooth. This sauce balances flavors, making your wraps burst with taste. Yes, you can make this dish ahead of time. Prepare the teriyaki chicken mixture and store it in an airtight container. Keep it in the fridge for up to three days. When ready to eat, reheat the mixture in a skillet over medium heat. Serve it with fresh lettuce leaves for a quick meal. Pair your lettuce wraps with some light side dishes. Here are a few great options: - Steamed jasmine rice for a filling side. - Edamame sprinkled with sea salt for a healthy snack. - A simple cucumber salad for a refreshing crunch. - Miso soup for warmth and depth. These sides complement the flavors of the wraps beautifully. For the full recipe, check out [Full Recipe]. Teriyaki chicken lettuce wraps are fun and tasty. We covered key ingredients, cooking steps, and tips to make them juicy. You learned how to customize and store your wraps for busy nights. This dish fits many diets with easy variations and great sides. Enjoy trying new flavors and sharing with friends. You now have all the tools to create delicious wraps that anyone can love. Keep experimenting and have fun in the kitchen!](https://goldendishy.com/wp-content/uploads/2025/06/72f6a023-630c-4819-9e2f-2135bf5b7418-768x768.webp)


![- 1 can (15 oz) chickpeas, thoroughly drained and rinsed - 1 large cucumber, diced into bite-sized pieces - 1 cup cherry tomatoes, halved for a burst of flavor - 1 red bell pepper, diced for sweetness and crunch - 1 small red onion, finely chopped for subtle sharpness - 1/4 cup fresh parsley, roughly chopped for a fresh aroma - 1/4 cup feta cheese, crumbled (optional; adds creaminess) - Juice of 2 fresh lemons, providing that zesty kick - 3 tablespoons extra-virgin olive oil for richness - 1 teaspoon Dijon mustard for a hint of tang - 1 teaspoon honey (or maple syrup for a vegan option) to balance flavors - Salt and freshly ground black pepper to taste This salad is packed with nutrients. It has about 200 calories per serving. You get protein from chickpeas, fiber from veggies, and healthy fats from olive oil. Plus, it provides vitamins A and C. This makes it not just tasty, but also good for you. Start by gathering a large mixing bowl. Add the chickpeas, diced cucumber, halved cherry tomatoes, red bell pepper, red onion, and parsley. Mix these fresh ingredients well. You want each piece to shine in your salad. If you enjoy cheese, sprinkle in the crumbled feta for a creamy touch. This adds a nice contrast to the crunch of the veggies. For the dressing, take a smaller bowl. Whisk together the lemon juice and olive oil. This forms the base of your zesty dressing. Next, add the Dijon mustard and honey. These ingredients give a perfect balance of flavor. Season with salt and black pepper. Whisk until the mixture looks smooth and well combined. Now it’s time to bring everything together. Drizzle the dressing over your salad mix. Use a spatula or wooden spoon to toss gently. You want all the ingredients to be evenly coated without mashing them. If you added feta, do a light toss to keep the cheese intact. Taste your salad and adjust the seasoning if needed. Cover it and let it chill in the fridge for at least 30 minutes. This helps the flavors meld beautifully. For the full recipe, you can refer back to the recipe card. To make your Zesty Lemon Chickpea Salad shine, focus on seasoning. Start with salt and pepper. Taste as you go. You may want more lemon juice for tang. If you like a sweeter flavor, drizzle more honey. For different dressings, try balsamic vinegar or apple cider vinegar. You can also mix in tahini for creaminess. Each option gives a new twist to the salad. Serving your salad well makes it more enticing. Use a large, colorful bowl for a rustic look. Add fresh parsley on top for a pop of green. You can even place lemon wedges around the bowl for a bright touch. If you want individual servings, use clear cups. This way, the layers show off the bright colors. A light drizzle of olive oil on each cup adds elegance. Prepping this salad in advance is easy. Make it a few hours before serving. The flavors develop more when they sit. For best results, chill the salad for at least 30 minutes. This helps the flavors mix well. You can store leftovers in the fridge for up to three days. Just keep the dressing separate if you want it fresh. For the full experience, check out the Full Recipe. {{image_4}} You can make this salad even better by adding veggies. Try adding avocados. They bring creaminess and healthy fats. Carrots can add a nice crunch. You can also toss in diced mango or apple. These fruits add sweetness and a fun twist. Want to make this salad heartier? Add some protein! Grilled chicken works great for meat lovers. Shrimp is a tasty option too. For a plant-based choice, use tofu. It soaks up flavors well and adds nutrition. Switch up the dressing for a new taste! Try using different vinegars, like balsamic or apple cider. You can also squeeze in more citrus juice for extra zing. For a creamier touch, mix in yogurt or tahini. Both add richness and make the salad more filling. Check out the [Full Recipe] to see how these variations can fit into your meal! Store your Zesty Lemon Chickpea Salad in a sealed container. This keeps it fresh and tasty. It lasts about 3 to 5 days in the fridge. Make sure to check for any signs of spoilage before eating. Freezing this salad is not ideal. The vegetables may lose their crunch. If you want to freeze it, consider freezing just the chickpeas. Place them in an airtight bag. When you want to use them, thaw overnight in the fridge. Leftover salad is great for new meals! You can add it to wraps for a quick lunch. Toss it in grain bowls for added flavor. Or, layer it in sandwiches for a fresh twist. You can even mix it into soups for a hearty touch. Enjoy creating new dishes with your leftover salad! For the full recipe, refer to the [Full Recipe]. Yes, you can make this salad ahead of time. In fact, it often tastes better after chilling. The flavors mix well when you let it sit. I suggest making it a few hours before serving. Just cover it with plastic wrap and place it in the fridge. This way, the lemon juice and olive oil soak into the chickpeas and veggies. You will enjoy a zesty and bright flavor profile! Yes, this salad is gluten-free. Chickpeas, fresh veggies, and the dressing contain no gluten. If you want to check other ingredients, always read the labels. Most items are safe, but it’s best to confirm. This makes the salad a great option for those with gluten sensitivities. You can serve it to everyone without worry! If you can’t eat chickpeas, no problem! You can use other beans like black beans or kidney beans. These will add protein and texture. Another option is to use cooked quinoa or lentils. These alternatives keep the salad hearty and filling. Each will bring a unique taste, so feel free to explore. Get creative based on what you have! This blog post provided a clear guide to making a Zesty Lemon Chickpea Salad. We covered the key ingredients, from fresh veggies to the zesty dressing. You learned how to prepare, dress, and assemble the salad for the best flavor. I shared tips for meal prep, variations to try, and how to store leftovers. Remember, this salad is not just easy to make; it’s also packed with nutrients. Enjoy your creation, explore the variations, and make it your own!](https://goldendishy.com/wp-content/uploads/2025/07/e89bc11c-d040-4055-8bd2-d62839faab5f-768x768.webp)