Grilled Peach Burrata Salad Fresh and Flavorful Recipe

Welcome to my kitchen! Today, I’m excited to share a fresh and vibrant Grilled Peach Burrata Salad recipe. This dish combines the sweetness of grilled peaches with creamy burrata for a salad that bursts with flavor. Perfect for summer picnics or light dinners, it’s easy to make and packed with nutrients. Join me as we explore simple steps, tips, and twists to make your dish stand out! Let’s get grilling!
Why I Love This Recipe
- Seasonal Delight: This salad showcases the best of summer with juicy grilled peaches, making it a refreshing choice for warm weather.
- Creamy Contrast: The creamy burrata adds a luxurious texture that perfectly complements the sweetness of the peaches and the peppery arugula.
- Nutty Crunch: Toasted walnuts provide a satisfying crunch, enhancing the overall flavor profile of the dish.
- Easy to Assemble: This salad is quick to prepare, making it an ideal option for gatherings or a simple weeknight dinner.
Ingredients
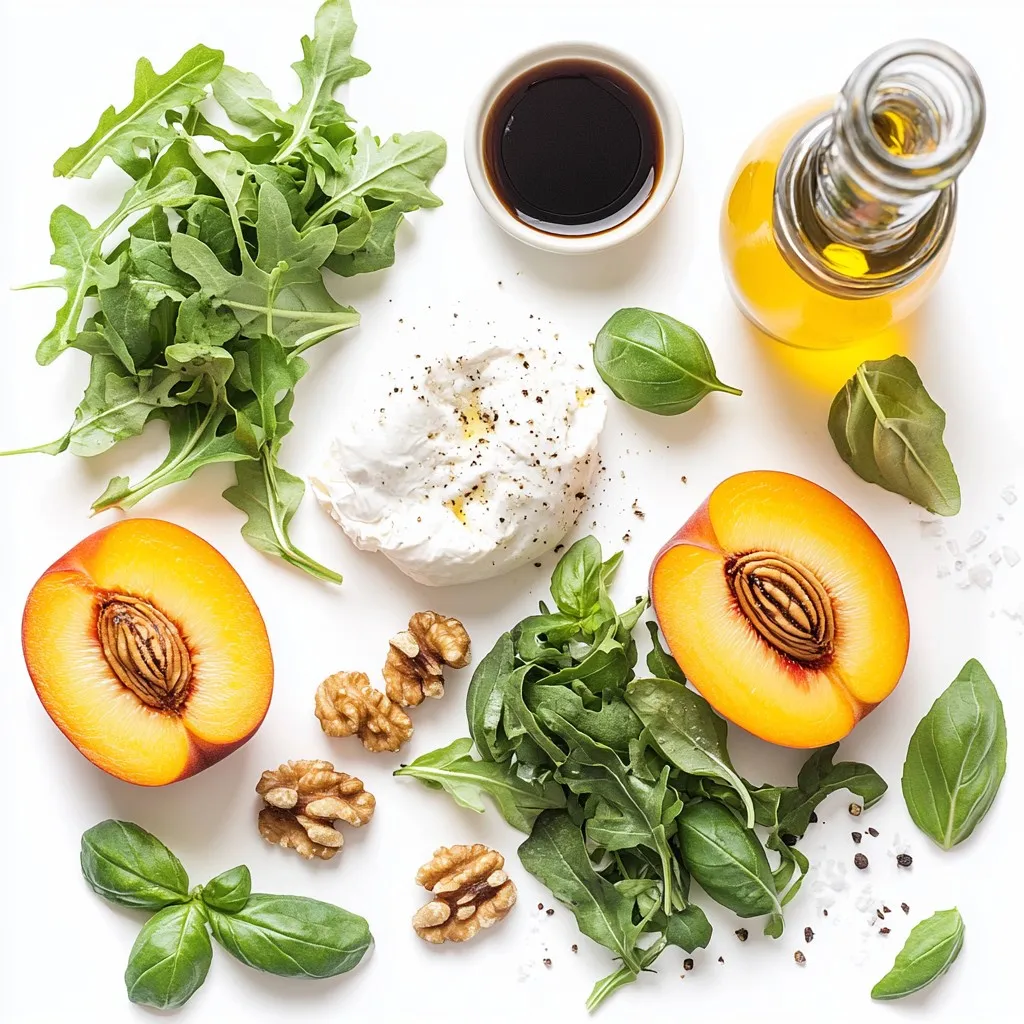
List of Main Ingredients
– 2 ripe peaches, halved and pitted
– 8 ounces creamy burrata cheese
– 4 cups baby arugula or mixed salad greens
– 1/4 cup walnuts, toasted to perfection
– 2 tablespoons balsamic glaze for drizzling
– 2 tablespoons extra-virgin olive oil
– Freshly cracked salt and pepper to taste
Optional Garnishes
– A handful of fresh basil leaves for a fragrant garnish
Nutritional Information
This salad is not only tasty but also healthy. Each serving offers a good mix of vitamins and minerals. The peaches provide vitamin C, while the walnuts add healthy fats and protein. The burrata cheese gives you a creamy texture full of calcium. This dish is low in carbs and fits many diets, making it a great choice for any meal.

Step-by-Step Instructions
Prepping the Grill and Peaches
First, preheat your grill to medium-high heat. This step is key for great grilling. While the grill gets hot, take two ripe peaches. Cut them in half and remove the pits. Brush the cut sides with olive oil. This helps prevent sticking and adds flavor. When the grill is ready, place the peaches cut side down. Grill them for about 4-5 minutes. You want nice grill marks and soft peaches.
Assembling the Salad
While the peaches grill, grab a large salad bowl. Place 4 cups of baby arugula or mixed greens at the bottom. This creates a fresh base. After grilling, let the peaches cool for a moment. Tear 8 ounces of creamy burrata cheese into bite-sized pieces. Spread these pieces over the greens. Next, slice the grilled peaches into wedges. Arrange them artfully around the burrata.
Final Touches to Serve
Now, sprinkle 1/4 cup of toasted walnuts on top for crunch. Drizzle with 2 tablespoons of balsamic glaze and 2 tablespoons of olive oil. This adds depth to your salad. Finish with a sprinkle of freshly cracked salt and pepper to taste. For a fragrant touch, add a handful of fresh basil leaves. Serve this beautiful salad on a large platter for a stunning presentation!
Tips & Tricks
Selecting Ripe Peaches
When picking peaches, look for ones that feel slightly soft. They should have a sweet aroma. The skin should be a nice golden-yellow. Avoid peaches with green or very firm spots. The ripeness impacts the sweetness and juiciness in your salad.
Best Practices for Grilling
To grill peaches well, preheat your grill to medium-high. Brush the cut sides with olive oil. This keeps them from sticking and adds flavor. Grill the peaches for about 4-5 minutes. Watch for nice grill marks. The goal is to soften them while keeping their shape.
Serving Suggestions for a Balanced Meal
Serve this salad with crusty bread or grilled chicken for added protein. The creamy burrata and crunchy walnuts provide good texture. Use the balsamic glaze for a sweet finish. Fresh basil adds a pop of flavor. Present it on a big platter for a family-style meal.
Pro Tips
- Choose the Right Peaches: Look for peaches that are slightly soft to the touch and fragrant. This ensures they are ripe and will grill beautifully.
- Grill Temperature Matters: Keeping the grill at medium-high heat is crucial for achieving those perfect grill marks while ensuring the peaches are tender but not mushy.
- Opt for Fresh Burrata: Always use fresh burrata cheese for the best flavor and texture. Its creaminess enhances the overall dish.
- Enhance with Additional Toppings: Consider adding sliced prosciutto or crumbled feta for an extra layer of flavor that complements the sweetness of the peaches.

Variations
Adding Proteins (Chicken, Shrimp, etc.)
You can easily boost this salad by adding protein. Grilled chicken or shrimp works well. Simply season them with salt, pepper, and a bit of olive oil. Grill them for a few minutes until they are cooked through. Slice the grilled chicken or shrimp and toss them on top of the salad. This adds heartiness and makes the dish more filling.
Alternative Cheese Options
If burrata isn’t available, don’t worry! You can swap it for other cheeses. Fresh mozzarella or goat cheese are great choices. Both bring creamy textures that blend well with grilled peaches. You can even try feta for a tangy twist. Each cheese option changes the flavor but keeps the salad fresh and tasty.
Flavor Infusions (Herbs, Dressings)
Enhance your salad with fresh herbs and dressings. Basil adds a sweet note, but you can try mint or cilantro for a different flavor. For dressings, a lemon vinaigrette or a honey mustard dressing can brighten the dish. Just drizzle your chosen dressing over the salad before serving. This adds depth and makes every bite a delight.
Storage Info
How to Store Leftover Salad
To store leftover grilled peach burrata salad, place it in an airtight container. This will keep the salad fresh. Make sure to separate the salad from the dressing if possible. This prevents sogginess. You can keep it in the fridge for up to two days.
Reheating or Refreshing the Salad
Do not reheat the salad. The creamy burrata and greens taste best fresh. If the salad seems a bit wilted, you can refresh it. Just add a little more olive oil or balsamic glaze. Toss the salad gently to mix in the new dressing.
Shelf Life of Ingredients
– Peaches: Fresh peaches last about 3-5 days in the fridge.
– Burrata: Once opened, burrata stays fresh for about 3 days.
– Greens: Baby arugula or salad greens can last up to a week in the fridge.
– Walnuts: Toasted walnuts stay fresh for about 2 weeks if stored in a cool place.
– Balsamic Glaze: An unopened bottle lasts for years, but once opened, use it within a year.
FAQs
Can I make this salad ahead of time?
Yes, you can prepare parts of the salad in advance. I suggest grilling the peaches and making the balsamic glaze ahead of time. Store the peaches in an airtight container in the fridge. When you’re ready to serve, assemble the salad with fresh greens, burrata, and walnuts. Keep the dressing separate until serving for the best taste.
What are the best substitutes for burrata cheese?
If you can’t find burrata, fresh mozzarella is a great choice. It offers a similar creamy texture. Ricotta cheese can work too, adding a different flavor. Vegan cheese alternatives can also be used for a dairy-free option. Just remember to choose a cheese that melts well for a creamy effect.
How do I know when my peaches are ripe?
To check if peaches are ripe, gently squeeze them in your palm. They should give slightly, indicating softness. Look for a vibrant color and a sweet aroma. Avoid peaches that feel hard or have green patches, as these are not ripe. A ripe peach will be smooth and fragrant, perfect for grilling!
This blog covered how to make a peach salad. We discussed key ingredients, tips for grilling, and ways to customize your dish. Remember to choose ripe peaches and try different proteins or cheeses for unique flavors. Store your leftovers properly to enjoy later. I hope you feel ready to create a refreshing salad that balances taste and health. Enjoy your cooking adventur

Grilled Peach Burrata Salad
Ingredients
- 2 whole ripe peaches, halved and pitted
- 8 ounces creamy burrata cheese
- 4 cups baby arugula or mixed salad greens
- 1 4 cup walnuts, toasted to perfection
- 2 tablespoons balsamic glaze for drizzling
- 2 tablespoons extra-virgin olive oil
- to taste freshly cracked salt and pepper
- 1 handful fresh basil leaves for a fragrant garnish
Instructions
- Begin by preheating your grill to medium-high heat, ensuring it reaches a steady temperature for optimal grilling.
- To prepare the peaches, lightly brush the cut sides with a bit of olive oil. This will help them grill beautifully without sticking to the grill grates.
- Place the peach halves cut side down on the grill. Grill them for about 4-5 minutes until you see beautiful grill marks form and the peaches have softened slightly, releasing their sweet juices.
- While the peaches are grilling, take a large salad bowl and layer the arugula or mixed greens at the bottom, creating a fresh base for your salad.
- Once the peaches are grilled to perfection, carefully remove them from the grill and allow them to cool for a minute or two.
- Tear the burrata cheese gently into bite-sized pieces and evenly distribute it over the bed of greens, allowing the creamy texture to contrast with the freshness of the salad.
- Slice the grilled peaches into wedges and artfully arrange them around the burrata on the salad, enhancing both visual appeal and flavor.
- Sprinkle the toasted walnuts over the top, adding a delightful crunch, and then generously drizzle with balsamic glaze and the remaining olive oil for depth of flavor.
- Finish with a sprinkle of freshly cracked salt and pepper to taste, and garnish with fresh basil leaves, which will add an aromatic touch to the dish.


![- 1 lb ground chicken - 1 tablespoon olive oil - 1 red bell pepper, diced - 1 carrot, grated - 3 green onions, finely chopped - 2 cloves garlic, minced - 1 tablespoon fresh ginger, grated - 3 tablespoons low-sodium soy sauce - 1 tablespoon rice vinegar - 1 tablespoon sesame oil - 1 tablespoon honey - Salt and pepper to taste - 1 head of butter lettuce or iceberg lettuce, leaves carefully separated - Optional toppings: chopped almonds, fresh cilantro, shredded coconut I love cooking with ground chicken. It cooks fast and takes on great flavors. Olive oil helps to keep the chicken moist. Fresh vegetables add color and crunch to the wraps. I use red bell pepper, carrot, and green onions for taste and texture. Aromatics like garlic and ginger bring warmth and depth to the dish. They make the kitchen smell amazing while cooking. For the sauce, I mix low-sodium soy sauce, rice vinegar, sesame oil, and honey. This gives the wraps a sweet and savory kick. I prefer using butter or iceberg lettuce for the wraps. They provide a nice, crisp bite. You can also add toppings like chopped almonds or fresh cilantro. These add extra flavor and crunch. For a touch of sweetness, consider shredded coconut. For the full recipe, check out the details I provided earlier. Enjoy making these tasty, healthy chicken lettuce wraps! 1. Heating the Oil: Start by adding olive oil to a large skillet. Heat it over medium until it shimmers. 2. Cooking the Chicken: Add ground chicken to the skillet. Cook it for about 5-7 minutes, stirring often, until it turns brown. Break up any large clumps with a spatula. 3. Adding Aromatics: Stir in minced garlic and grated ginger. Sauté for 1-2 minutes until the garlic turns a light gold and the smell fills the kitchen. 4. Incorporating Vegetables: Toss in diced red bell pepper and grated carrot. Sauté for 3-4 minutes, or until the veggies soften nicely. 1. Whisking the Sauce Ingredients Together: In a small bowl, whisk together the soy sauce, rice vinegar, sesame oil, and honey. Mix until it's smooth. 2. Combining Sauce with Chicken and Veggies: Pour the sauce over the chicken and veggie mixture in the skillet. Stir well to coat everything. Cook for another 2-3 minutes until heated through. 3. Finishing with Green Onions: Remove the skillet from heat. Gently fold in chopped green onions for a fresh kick. 1. Spoon Chicken Filling into Lettuce Leaves: Take a lettuce leaf and spoon in a generous amount of the chicken mix. 2. Adding Optional Toppings for Extra Flavor: For added flavor, sprinkle chopped almonds, fresh cilantro, or shredded coconut on top. This method creates a fun and tasty meal that’s easy to make. For the full recipe, check the earlier section. To prevent the chicken from becoming dry, cook it over medium heat. Stir often and break up clumps. This helps it brown evenly and stay juicy. For chopping vegetables, use a sharp knife. Dice the red bell pepper and grate the carrot into thin pieces. This makes them blend well in the wraps and adds great texture. For plating, arrange the filled lettuce wraps on a colorful platter. Add some lime wedges and extra cilantro around them. This creates a vibrant look that is sure to impress. Ideal sides for your wraps include brown rice or a light salad. You could also serve a soy dipping sauce for added flavor. To make ahead, cook the chicken filling and store it in an airtight container. You can keep it in the fridge for up to three days. When reheating, use a microwave or a skillet. Heat it slowly to keep the chicken moist. Always check the temperature; it should be hot all the way through. For the [Full Recipe], follow the detailed steps for a delicious meal. {{image_4}} You can switch up the protein in your wraps. Turkey works well instead of chicken. Ground turkey has a similar taste and texture. If you want a plant-based option, use lentils or mushrooms. They add a nice, hearty feel to your dish. Ground beef or shrimp can also shine in these wraps. Just adjust your cooking time for each protein. Adding different sauces can change the whole meal. For a spicy kick, try adding sriracha or chili paste. You can also mix in some hot sauce for extra heat. If you like sweet flavors, swap honey for maple syrup or agave. Different vinegars can change the taste too. Try apple cider vinegar for a fruity twist or balsamic vinegar for a rich flavor. You can explore new veggies in your wraps. Bell peppers, carrots, and green onions are great, but don’t stop there! Try zucchini, shredded cabbage, or even corn. They add color and crunch. Adding spices like cumin or coriander can boost flavor. Fresh herbs, like basil or mint, can add a bright taste. The more you mix and match, the more fun your wraps will be! For the full recipe, check here. To keep your chicken filling fresh, store it in an airtight container. This will lock in flavor and moisture. Place the chicken in the fridge right after it cools. It can stay good for about 3 to 4 days. For the lettuce, wrap the leaves in a damp paper towel. Then, place them in a plastic bag. This helps keep them crisp and fresh for about 2 to 3 days. Yes, you can freeze the chicken filling! It’s best to freeze it in a sturdy container or bag. Make sure to remove as much air as possible. The filling can last up to 3 months in the freezer. When you’re ready to eat, thaw the chicken in the fridge overnight. Reheat it in a skillet over medium heat until hot. This keeps the flavor and texture nice. Cooked chicken can be safely stored in the fridge for 3 to 4 days. Always check for signs of spoilage before eating. If the chicken smells off or has a slimy texture, it’s best to throw it away. Freshness is key to enjoying your Healthy Chicken Lettuce Wraps. For the best taste, eat them as soon as possible! Enjoy the full recipe for more guidance on this dish. You can add heat in several ways. Use crushed red pepper flakes for a kick. Sriracha or chili sauce also works well. If you like fresh heat, add sliced jalapeños. For a smoky flavor, try smoked paprika. Adjust the amount based on your spice level. Each option adds a unique twist to your wraps. Yes, you can use regular soy sauce. However, it has more salt than low-sodium options. This will change the flavor, making it saltier. If you're watching your sodium intake, low-sodium is better. You might need to cut back on other salty ingredients too. Always taste as you go to avoid over-salting. Chicken lettuce wraps have many health benefits. Ground chicken is lean and high in protein. The fresh vegetables add vitamins and minerals. Lettuce is low in calories and high in fiber, which aids digestion. Using low-sodium soy sauce helps keep sodium levels in check. This meal is light yet filling, making it a great choice. To make the wraps vegan, swap ground chicken for plant-based meat. You can use lentils, chickpeas, or tofu as great options. Replace honey with maple syrup or agave for sweetness. Use tamari instead of soy sauce for a gluten-free option. With these changes, you can enjoy a tasty vegan version of the dish. For the complete recipe, check out the Full Recipe. Healthy chicken lettuce wraps are simple and tasty. We covered key ingredients like ground chicken, fresh veggies, and flavorful sauces. The step-by-step guide helps you cook and assemble them perfectly. Tips on meal prep and variations let you get creative. In the end, you can enjoy a delicious dish tailored to your taste. These wraps are healthy, fun, and easy to make. Make them for a light dinner or a snack! Enjoy your cooking adventure!](https://goldendishy.com/wp-content/uploads/2025/06/f37706c1-09e0-4508-86ce-50d139ffc9b7-768x768.webp)


![- 1 pound fresh green beans, trimmed - 4 tablespoons unsalted butter - 4 cloves garlic, finely minced - 1 teaspoon fresh lemon zest - 1 tablespoon fresh lemon juice - 1/2 teaspoon red pepper flakes (optional for heat) - Salt and freshly ground black pepper to taste - 1/4 cup sliced almonds, toasted (for garnish) Fresh green beans are key for this dish. Look for bright, crisp beans without blemishes. The unsalted butter lets you control the salt level. Garlic adds a strong, savory taste, so use fresh cloves when possible. Lemon zest and juice brighten the dish, adding a nice tang. Red pepper flakes give a little kick, but you can skip them if you want a milder flavor. Toasted almonds add a crunchy finish, so don’t skip them! If you can’t find fresh green beans, frozen ones work too. Just thaw and drain them first. For a dairy-free option, use olive oil instead of butter. You can swap garlic for shallots for a milder taste. If you don’t like lemon, try lime juice or vinegar for acidity. Instead of almonds, use walnuts or pine nuts for a different crunch. Feel free to mix and match these options to fit your taste! For the full recipe, check out the step-by-step guide to make these tasty Garlic Butter Green Beans. 1. Boil Water: Start by filling a large pot with water. Add salt and bring it to a boil. 2. Trim Beans: While waiting, trim the ends of the green beans. This simple step makes them easier to eat. 3. Ice Bath Ready: Prepare a bowl with ice water. This will help stop the cooking later. 1. Blanch the Beans: Once the water is boiling, add the green beans. Cook them for 3-4 minutes. They should be bright green and crisp-tender. 2. Cool Down: Quickly move the beans to the ice bath. Let them cool for about 5 minutes. Drain the beans and set them aside. 3. Melt Butter: In a large skillet, add butter over medium heat. Wait until it melts and bubbles. 4. Add Garlic: Put in the minced garlic. Sauté for about 30 seconds. Be careful not to brown the garlic. It can turn bitter. 5. Combine Beans: Add the blanched green beans to the skillet. Toss them gently in the garlic butter. Cook for 4-5 minutes until heated through. 6. Finish with Flavor: Stir in lemon zest, lemon juice, and optional red pepper flakes. Season with salt and pepper. Mix well. 1. Serving Dish: Carefully transfer the green beans to a serving dish. 2. Garnish: Sprinkle toasted almond slices on top. This adds crunch and looks lovely. 3. Presentation: Arrange the green beans neatly. Place lemon wedges on the side for extra flair. Enjoy your Garlic Butter Green Beans! You can find the Full Recipe linked here. To make the best garlic butter green beans, start with fresh green beans. Look for beans that are bright green and firm. Trim the ends for a clean look. Blanching is key. It keeps the beans bright and crisp. Use a large pot of salted water for boiling. An ice bath helps stop the cooking. This gives you that perfect crunch! To add more flavor, try using garlic oil instead of butter. This gives a nice twist to the dish. Adding lemon zest brightens the taste too. If you like spice, sprinkle in red pepper flakes. For extra crunch, toast almond slices before adding them on top. These small steps really boost the flavor and texture. One common mistake is overcooking the beans. They should be crisp-tender, not mushy. Be careful with the garlic; it can burn quickly. If it turns brown, it will taste bitter. Also, don’t skip the ice bath after blanching. It keeps your beans looking fresh and vibrant. Following these tips will help you create a stunning side dish. For a full recipe, check out the complete details above. {{image_4}} You can change the flavor of garlic butter green beans easily. Try adding herbs like thyme or basil for a fresh twist. If you prefer a spicy kick, use diced jalapeños instead of red pepper flakes. For a unique taste, mix in some soy sauce or balsamic vinegar. These additions bring out different flavors and keep the dish exciting. Want to make your green beans a full meal? Consider adding protein. Cooked chicken or shrimp pairs well with the garlic butter. Just toss them in the skillet with the green beans. For a plant-based option, add chickpeas or tofu. These ingredients not only enhance flavor but also make the dish heartier. Switching ingredients based on the season can elevate your green beans. In spring, consider adding fresh peas for sweetness. During summer, cherry tomatoes add a burst of flavor. In fall, roasted butternut squash brings warmth. Winter calls for crispy Brussels sprouts for a crunchy contrast. These swaps keep your dish fresh and interesting all year round. For the complete recipe, check out the [Full Recipe]. To store leftover Garlic Butter Green Beans, place them in an airtight container. Make sure they are completely cool before sealing. This helps keep them fresh. Store the container in the fridge for up to three days. When you want to enjoy your leftovers, you can reheat them easily. You can use the microwave or a skillet. For the microwave, heat for about 30 seconds. Stir and check if they are warm enough. If using a skillet, add a little butter and heat on low. Stir until hot, about 3-4 minutes. You can freeze Garlic Butter Green Beans, but they may lose some crunch. To freeze, first, blanch the beans as in the recipe. Cool them in ice water, then drain well. Place the beans in a freezer-safe bag. Remove as much air as possible before sealing. They can freeze for up to three months. When you are ready to use them, thaw overnight in the fridge before reheating. For the full recipe, check out the details above. To make Garlic Butter Green Beans vegan, swap the butter for vegan butter or olive oil. Use the same amount for a rich flavor. The garlic and lemon will still shine through. This change keeps the dish tasty while meeting vegan needs. The best ways to prepare green beans include blanching, steaming, or sautéing. Blanching keeps them bright and crisp. Sautéing with garlic, like in this recipe, adds great flavor. You can also roast them for a lovely char. Each method brings out the green beans' natural sweetness. Yes, you can make Garlic Butter Green Beans ahead of time. Cook them fully and let them cool. Store in an airtight container in the fridge for up to three days. When ready to serve, reheat in a pan. This keeps the flavors fresh and vibrant. For the full recipe, check out the details above. You learned about the key ingredients for Garlic Butter Green Beans and how to use them. I shared tips to make your dish better, avoid common mistakes, and add variety. You'll know how to store leftovers, reheat, and even freeze them. Remember to tweak the recipe based on your taste or what you have on hand. Cooking should be fun, so feel free to try new things. Enjoy making this dish and impressing your family or friends!](https://goldendishy.com/wp-content/uploads/2025/07/f7ec476a-8ba6-4070-896d-8b390928597f-768x768.webp)
![- 1 can (15 oz) chickpeas, thoroughly drained and rinsed - 1 large cucumber, diced into bite-sized pieces - 1 cup cherry tomatoes, halved for a burst of flavor - 1 red bell pepper, diced for sweetness and crunch - 1 small red onion, finely chopped for subtle sharpness - 1/4 cup fresh parsley, roughly chopped for a fresh aroma - 1/4 cup feta cheese, crumbled (optional; adds creaminess) - Juice of 2 fresh lemons, providing that zesty kick - 3 tablespoons extra-virgin olive oil for richness - 1 teaspoon Dijon mustard for a hint of tang - 1 teaspoon honey (or maple syrup for a vegan option) to balance flavors - Salt and freshly ground black pepper to taste This salad is packed with nutrients. It has about 200 calories per serving. You get protein from chickpeas, fiber from veggies, and healthy fats from olive oil. Plus, it provides vitamins A and C. This makes it not just tasty, but also good for you. Start by gathering a large mixing bowl. Add the chickpeas, diced cucumber, halved cherry tomatoes, red bell pepper, red onion, and parsley. Mix these fresh ingredients well. You want each piece to shine in your salad. If you enjoy cheese, sprinkle in the crumbled feta for a creamy touch. This adds a nice contrast to the crunch of the veggies. For the dressing, take a smaller bowl. Whisk together the lemon juice and olive oil. This forms the base of your zesty dressing. Next, add the Dijon mustard and honey. These ingredients give a perfect balance of flavor. Season with salt and black pepper. Whisk until the mixture looks smooth and well combined. Now it’s time to bring everything together. Drizzle the dressing over your salad mix. Use a spatula or wooden spoon to toss gently. You want all the ingredients to be evenly coated without mashing them. If you added feta, do a light toss to keep the cheese intact. Taste your salad and adjust the seasoning if needed. Cover it and let it chill in the fridge for at least 30 minutes. This helps the flavors meld beautifully. For the full recipe, you can refer back to the recipe card. To make your Zesty Lemon Chickpea Salad shine, focus on seasoning. Start with salt and pepper. Taste as you go. You may want more lemon juice for tang. If you like a sweeter flavor, drizzle more honey. For different dressings, try balsamic vinegar or apple cider vinegar. You can also mix in tahini for creaminess. Each option gives a new twist to the salad. Serving your salad well makes it more enticing. Use a large, colorful bowl for a rustic look. Add fresh parsley on top for a pop of green. You can even place lemon wedges around the bowl for a bright touch. If you want individual servings, use clear cups. This way, the layers show off the bright colors. A light drizzle of olive oil on each cup adds elegance. Prepping this salad in advance is easy. Make it a few hours before serving. The flavors develop more when they sit. For best results, chill the salad for at least 30 minutes. This helps the flavors mix well. You can store leftovers in the fridge for up to three days. Just keep the dressing separate if you want it fresh. For the full experience, check out the Full Recipe. {{image_4}} You can make this salad even better by adding veggies. Try adding avocados. They bring creaminess and healthy fats. Carrots can add a nice crunch. You can also toss in diced mango or apple. These fruits add sweetness and a fun twist. Want to make this salad heartier? Add some protein! Grilled chicken works great for meat lovers. Shrimp is a tasty option too. For a plant-based choice, use tofu. It soaks up flavors well and adds nutrition. Switch up the dressing for a new taste! Try using different vinegars, like balsamic or apple cider. You can also squeeze in more citrus juice for extra zing. For a creamier touch, mix in yogurt or tahini. Both add richness and make the salad more filling. Check out the [Full Recipe] to see how these variations can fit into your meal! Store your Zesty Lemon Chickpea Salad in a sealed container. This keeps it fresh and tasty. It lasts about 3 to 5 days in the fridge. Make sure to check for any signs of spoilage before eating. Freezing this salad is not ideal. The vegetables may lose their crunch. If you want to freeze it, consider freezing just the chickpeas. Place them in an airtight bag. When you want to use them, thaw overnight in the fridge. Leftover salad is great for new meals! You can add it to wraps for a quick lunch. Toss it in grain bowls for added flavor. Or, layer it in sandwiches for a fresh twist. You can even mix it into soups for a hearty touch. Enjoy creating new dishes with your leftover salad! For the full recipe, refer to the [Full Recipe]. Yes, you can make this salad ahead of time. In fact, it often tastes better after chilling. The flavors mix well when you let it sit. I suggest making it a few hours before serving. Just cover it with plastic wrap and place it in the fridge. This way, the lemon juice and olive oil soak into the chickpeas and veggies. You will enjoy a zesty and bright flavor profile! Yes, this salad is gluten-free. Chickpeas, fresh veggies, and the dressing contain no gluten. If you want to check other ingredients, always read the labels. Most items are safe, but it’s best to confirm. This makes the salad a great option for those with gluten sensitivities. You can serve it to everyone without worry! If you can’t eat chickpeas, no problem! You can use other beans like black beans or kidney beans. These will add protein and texture. Another option is to use cooked quinoa or lentils. These alternatives keep the salad hearty and filling. Each will bring a unique taste, so feel free to explore. Get creative based on what you have! This blog post provided a clear guide to making a Zesty Lemon Chickpea Salad. We covered the key ingredients, from fresh veggies to the zesty dressing. You learned how to prepare, dress, and assemble the salad for the best flavor. I shared tips for meal prep, variations to try, and how to store leftovers. Remember, this salad is not just easy to make; it’s also packed with nutrients. Enjoy your creation, explore the variations, and make it your own!](https://goldendishy.com/wp-content/uploads/2025/07/e89bc11c-d040-4055-8bd2-d62839faab5f-768x768.webp)