Garlic Parmesan Shrimp Alfredo 15 Minutes Recipe

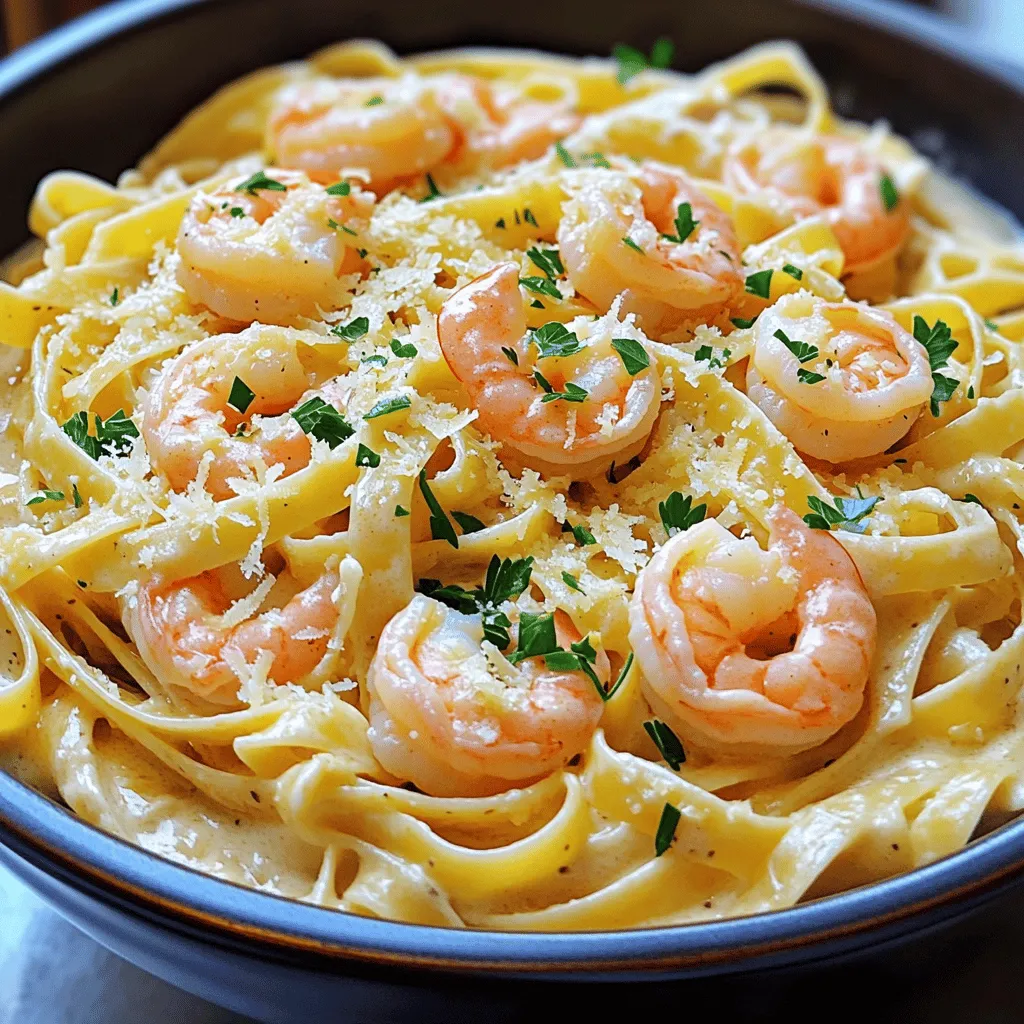
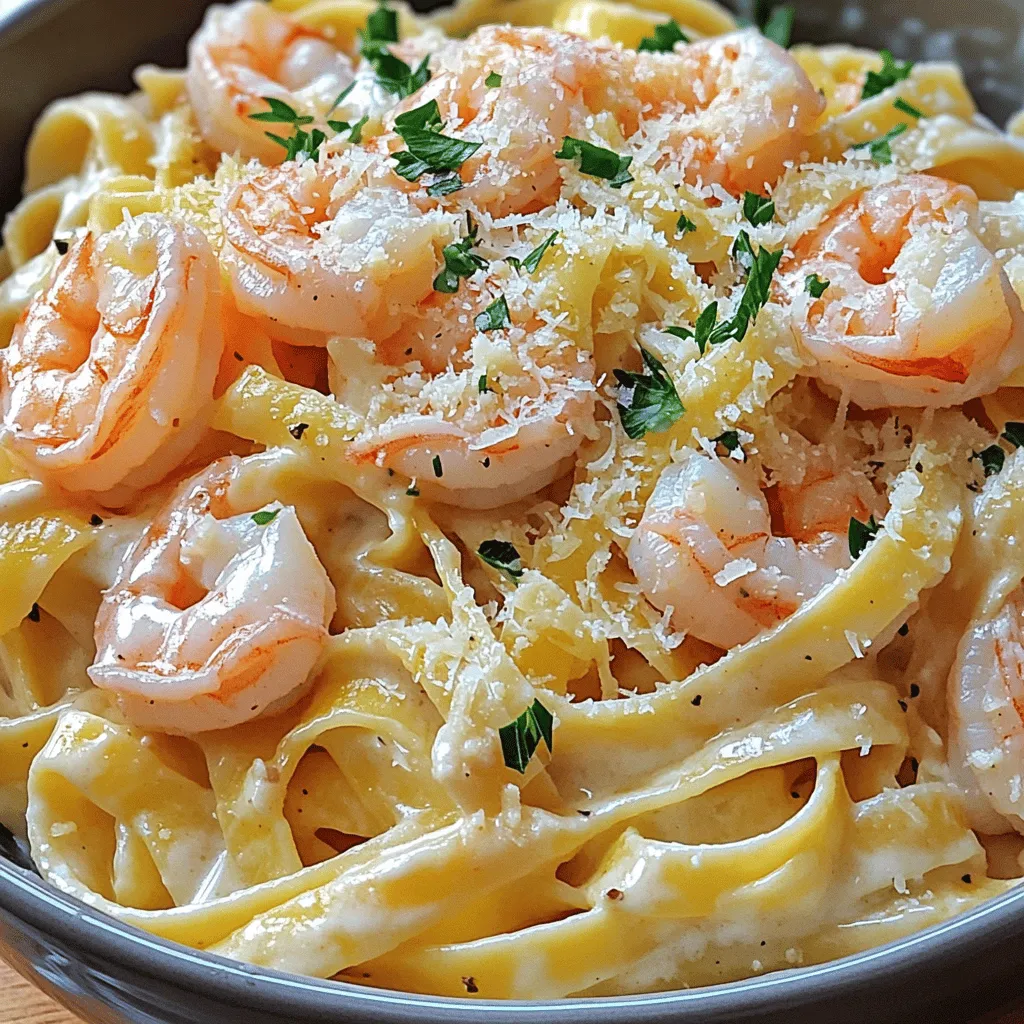
Craving a quick and tasty dinner? This Garlic Parmesan Shrimp Alfredo recipe is your answer! In just 15 minutes, you can whip up a creamy, flavorful dish that impresses. With shrimp, pasta, and a rich sauce, it’s a meal the whole family will love. Follow my step-by-step guide, and you’ll have dinner on the table in no time. Let’s get started!
Ingredients
Main Ingredients
– 8 ounces fettuccine pasta
– 1 pound large shrimp, peeled and deveined
– 4 tablespoons unsalted butter
– 4 cloves garlic, finely minced
The main ingredients define the dish. Fettuccine pasta gives a nice base. I love using large shrimp for a hearty bite. Garlic and butter bring rich flavors and aroma.
Sauce Components
– 1 cup heavy cream
– 1 cup freshly grated Parmesan cheese
The sauce makes this dish special. Heavy cream adds a rich, smooth texture. Freshly grated Parmesan cheese adds depth and flavor.
Seasonings and Garnish
– Salt and freshly ground black pepper, to taste
– 2 tablespoons chopped fresh parsley, for garnish
Seasonings enhance every bite. Salt and black pepper bring balance. Fresh parsley adds a pop of color and freshness. This simple garnish makes the dish look and taste great.
Step-by-Step Instructions
Cooking the Pasta
Boiling Method:
Start by filling a large pot with water. Add a good amount of salt to make it tasty. Bring the water to a rolling boil. Once boiling, add 8 ounces of fettuccine pasta. Cook it for about 8 to 10 minutes. You want it al dente, which means firm but cooked.
Draining Process:
When the pasta is ready, carefully pour it into a colander to drain. Make sure to shake off the extra water. Set the pasta aside while you prepare the rest of the dish.
Sautéing the Garlic
Importance of Timing:
Timing is key when sautéing garlic. You want to add it at the right moment. Too early, and it may burn. Too late, and it won’t have enough flavor.
Achieving the Right Fragrance:
In a large skillet, melt 4 tablespoons of unsalted butter over medium heat. Add 4 finely minced garlic cloves. Sauté for about 30 seconds. You’ll know it’s ready when it smells amazing. Be careful not to let it brown.
Cooking the Shrimp
Searing Technique:
Once the garlic is fragrant, it’s time to add the shrimp. Use 1 pound of large, peeled, and deveined shrimp. Stir them into the skillet. Lightly season with salt and black pepper.
Signs of Doneness:
Cook the shrimp for about 2 to 3 minutes on each side. They should turn a beautiful pink color and curl slightly. This means they are cooked through and ready for the next step.
Creating the Alfredo Sauce
Adding Heavy Cream:
With the shrimp cooked, slowly pour in 1 cup of heavy cream while stirring. This helps to combine everything well. Let the mixture come to a gentle simmer.
Mixing in Parmesan Cheese:
Now, whisk in 1 cup of freshly grated Parmesan cheese. Stir until the sauce is smooth and creamy. It will thicken slightly as it heats.
Combining Pasta and Sauce
Tossing Techniques:
Add the drained fettuccine to the skillet. Use tongs or a large fork to toss the pasta gently. This will help coat the pasta with the creamy sauce and shrimp.
Ensuring Full Coating:
Make sure every strand of pasta is covered in the sauce. You want rich flavor in every bite. If needed, add a splash of pasta water to help the sauce cling.
Final Seasoning
Adjusting to Taste:
Taste your dish and see if it needs more seasoning. Add extra salt or black pepper if needed. Remember, flavors should shine through.
Plating Tips:
When ready to serve, use deep pasta bowls. This keeps the dish warm. Garnish with chopped fresh parsley and a sprinkle of Parmesan cheese. This adds a nice touch and looks great!
Tips & Tricks
Quick Preparation Tips
– Prepping Ingredients in Advance: Gather all your ingredients before cooking. This saves time and makes cooking smoother. Chop garlic, measure cream, and grate cheese. You will feel more organized and less rushed.
– Using Frozen Shrimp: Frozen shrimp work well for this dish. They are easy to store and quick to use. Just thaw them under cold water for about 10 minutes. This can speed up your cooking time.
Ensuring Creamy Sauce
– Whisking Techniques: Whisking is key to a smooth sauce. When you add cream, stir constantly. This helps to blend the cream with the butter and garlic evenly.
– Avoiding Curdling: To prevent curdling, keep the heat low. High heat can make the cream separate. Adding cheese slowly while whisking helps keep the sauce creamy.
Perfecting Shrimp
– Cooking Time Management: Cook shrimp for 2-3 minutes on each side. Watch for their color change. They should turn pink and opaque. This means they are done.
– Checking for Overcooking: Overcooked shrimp become tough. If they curl tightly, they are likely overcooked. Remove them from heat as soon as they turn pink to keep them tender.

Variations
Alternative Pasta Choices
You can switch up the pasta for your Garlic Parmesan Shrimp Alfredo. Here are some options:
– Gluten-Free Options: Use gluten-free fettuccine or rice pasta. Both work well and still taste great.
– Other Pasta Types: You can use spaghetti, penne, or even zoodles for a fun twist. Each type adds a different texture and shape to the dish.
Flavor Additions
Want to spice up your dish? Here are some great ideas:
– Italian Seasoning: Add this mix of herbs for depth. It complements the garlic and shrimp perfectly.
– Red Pepper Flakes: A pinch of these adds a nice heat. Adjust based on your spice preference.
Veggie Additions
Boost the nutrition and color with veggies:
– Spinach: Toss in fresh spinach at the end. It wilts quickly and adds a lovely green touch.
– Cherry Tomatoes: Halve some cherry tomatoes and add them for sweetness. They add a burst of flavor and color.
Storage Info
Storing Leftovers
To keep your Garlic Parmesan Shrimp Alfredo fresh, store it in the fridge. Place the dish in an airtight container. It should stay good for up to three days. Make sure it cools down first before sealing it.
Reheating Tips
When it’s time to enjoy your leftovers, you have two easy ways to reheat.
– Microwave Method: Place your serving on a microwave-safe plate. Cover it with a paper towel and heat for 1-2 minutes. Check and stir halfway through to heat evenly.
– Stovetop Technique: Add a splash of cream to a skillet on low heat. Stir in the pasta and shrimp gently. Heat until warmed through, about 5 minutes.
Freezing Considerations
If you want to save your Garlic Parmesan Shrimp Alfredo for later, freezing is an option.
– Freezing the Dish: Let the dish cool completely. Then, transfer it to a freezer-safe container or bag. This will help prevent freezer burn. It can last for up to two months in the freezer.
– Thawing and Reheating: To thaw, place your frozen dish in the fridge overnight. Reheat using the stovetop method to keep the sauce creamy. If it seems thick, add a bit of cream or milk while reheating.
FAQs
Can I make this recipe without heavy cream?
Yes, you can use alternatives for a lighter sauce. Options include:
– Greek yogurt: It adds creaminess and tang.
– Coconut milk: This gives a smooth texture with a hint of sweetness.
– Milk and flour: Mix equal parts for a creamy base.
These choices keep the dish rich but lighter.
How do I know when shrimp is fully cooked?
You can tell shrimp is fully cooked by looking for these signs:
– Color change: Raw shrimp is gray, while cooked shrimp turns pink.
– Curling shape: Cooked shrimp curls into a “C” shape.
– Opaque flesh: The flesh becomes white and opaque when done.
These cues help ensure safe consumption.
Can I use a different type of cheese?
Absolutely, you can use other suitable cheese options:
– Pecorino Romano: It has a sharp, salty flavor.
– Asiago: This cheese adds a nutty taste.
– Mozzarella: For a milder, creamier texture.
Feel free to experiment with what you like.
What side dishes go well with Garlic Parmesan Shrimp Alfredo?
Complementary side ideas include:
– Garlic bread: It’s perfect for soaking up the sauce.
– Steamed broccoli: This adds color and nutrition.
– Caesar salad: A crisp, fresh contrast to the rich dish.
These sides enhance your meal.
How long can I store leftovers?
You can store leftovers safely for about 3 days.
– Refrigeration: Keep it in an airtight container.
– Freezing: If you want to save it longer, freeze for up to 2 months.
Just remember to reheat thoroughly before eating!
In this post, we covered how to make a tasty Garlic Parmesan Shrimp Alfredo. I shared the key ingredients like fettuccine, shrimp, garlic, and a rich creamy sauce. You learned step-by-step cooking techniques, tips for perfecting the dish, and ways to store leftovers.
Try out different pasta and flavors to make this dish your own. Enjoy cooking and savoring each bite of your delicious meal!


![- 2 boneless, skinless chicken breasts, sliced into thin strips - 8 ounces of fettuccine pasta - 4 cloves of garlic, finely minced - 1 cup of heavy cream - 1 teaspoon of Italian seasoning blend - ½ teaspoon of red pepper flakes (optional, for heat) - ½ cup of freshly grated Parmesan cheese - Fresh parsley, finely chopped, for a vibrant garnish - 1 tablespoon of extra virgin olive oil - 1 cup of chicken broth - Salt and freshly cracked black pepper, to taste When I prepare Creamy Garlic Chicken Pasta, I focus on fresh ingredients. The chicken must be juicy, the garlic fragrant, and the cream rich. I love using fettuccine because it holds the sauce well. The heavy cream makes the dish smooth and creamy, while the garlic brings a lovely flavor. For seasoning, I often use an Italian blend. It gives warmth and depth to the dish. The red pepper flakes add a tiny kick, but you can skip them if you want a milder taste. Fresh parsley not only adds color but also a fresh taste. Grated Parmesan cheese is a must for that cheesy goodness. Gathering these ingredients helps me create a quick and tasty meal. It’s all about balance—rich cream, savory garlic, and hearty chicken come together perfectly. If you want to see the full process, check out the Full Recipe. Start with a large pot. Fill it with water and add salt. Bring the water to a rolling boil. Once boiling, add 8 ounces of fettuccine pasta. Cook the pasta for about 8-10 minutes until it is al dente. When it’s done, drain the pasta in a colander. Remember to save about ½ cup of the pasta water for later. Grab a large skillet and place it over medium-high heat. Pour in 1 tablespoon of olive oil and let it warm up. While the oil heats, season 2 sliced chicken breasts with salt and pepper. Add the chicken strips to the hot skillet in a single layer. Cook them for about 5-6 minutes until golden brown and fully cooked. Once cooked, take the chicken out and keep it warm on a plate. In the same skillet, lower the heat to medium. Add 4 cloves of minced garlic and sauté for 1-2 minutes. Keep an eye on the garlic; you don’t want it to burn. After the garlic is fragrant, pour in 1 cup of chicken broth. Let it come to a gentle simmer. Next, stir in 1 cup of heavy cream, 1 teaspoon of Italian seasoning, and red pepper flakes if you like some heat. Allow this mixture to simmer for about 3-4 minutes until it thickens. Now it’s time to combine everything. Add the cooked fettuccine and the chicken back into the skillet. Toss them gently until they are well coated in the creamy sauce. If the sauce seems too thick, slowly add some reserved pasta water until you reach your desired consistency. Finally, sprinkle in ½ cup of grated Parmesan cheese. Stir it until it melts and blends into the sauce. Taste and adjust seasoning with salt and pepper if needed. For the full experience, check the Full Recipe. To make the cream sauce just right, simmering is key. Simmering helps all the flavors blend well. It also thickens the sauce without burning it. Keep the heat low, and stir often. This way, you can avoid garlic burnout. Garlic can turn bitter if cooked too long. Sauté it just until it smells good and turns light gold. Adjusting your seasonings can elevate this dish. Taste as you go. If you want more flavor, add salt or pepper. You can also use homemade broth for a fresh taste. Store-bought broth works too, but watch for added salt. This can affect your dish's flavor. Always check the label to control the salt level. Plating your creamy garlic chicken pasta can make a big difference. Use shallow bowls for a nice look. Make sure to spread the chicken and sauce evenly. For garnish, sprinkle fresh parsley on top. You can also add more Parmesan for richness. A drizzle of olive oil adds a shiny touch. Your guests will love the look and taste! {{image_4}} You can easily boost the nutrition of your creamy garlic chicken pasta by adding vegetables. I love using fresh spinach or mushrooms for a tasty twist. Spinach wilts nicely, adding color and flavor. Mushrooms bring a rich, earthy taste. To cook these veggies, add them to the skillet right after you sauté the garlic. Stir them in for just a few minutes until they're tender. This way, they soak up the garlic flavor while keeping their crunch. Switching up your pasta can bring new life to this dish. You can use whole wheat or gluten-free pasta if you want healthier options. Different pasta shapes, like penne or rotini, also work well. Just remember, cooking times may change. Whole wheat pasta takes a bit longer, while gluten-free pasta cooks faster. Keep an eye on it, and taste for doneness. If you want to try something new, swap the chicken for shrimp or tofu. Shrimp is quick to cook and adds a nice seafood flavor. Just sauté it for about 3-4 minutes until it turns pink. Tofu is a great plant-based option. Cut it into cubes and sauté it until golden brown. Adjust the cooking times based on what you choose to ensure all proteins are cooked through. Feel free to get creative with your creamy garlic chicken pasta. With these variations, you can make it your own! For a full recipe, check out the [Full Recipe]. To keep your Creamy Garlic Chicken Pasta fresh, store it in the fridge. Place the pasta in an airtight container. This helps prevent it from drying out. Make sure to consume it within three to four days for the best taste. When reheating, use the stovetop for the best results. Add a splash of chicken broth or water to help revive the sauce. Heat over low to medium heat, stirring often. This avoids overcooking the chicken and pasta. If you prefer the microwave, use a microwave-safe dish. Cover it with a lid or a damp paper towel to keep moisture in. Heat it in short bursts, stirring in between. Yes, you can freeze Creamy Garlic Chicken Pasta! However, the cream sauce may change texture. To freeze, let it cool completely. Place it in a freezer-safe container and seal tightly. Use it within one to two months. When ready to eat, thaw it overnight in the fridge. Reheat gently on the stovetop, adding a bit more cream or broth to restore creaminess. Making Creamy Garlic Chicken Pasta is quick and easy! It takes about 10 minutes to prep and 20 minutes to cook. In total, you're looking at around 30 minutes. This dish is perfect for a weeknight meal when you want something tasty without spending hours in the kitchen. Yes, you can easily make this recipe dairy-free! For the cream, use coconut cream or cashew cream instead. Both give a nice texture. Instead of Parmesan cheese, try nutritional yeast or a dairy-free cheese. This way, you still get a creamy dish without any dairy! Creamy Garlic Chicken Pasta pairs well with many side dishes. A simple green salad with a lemon vinaigrette adds freshness. You can also serve garlic bread for a comforting touch. If you prefer vegetables, steamed broccoli or roasted asparagus work well too. These sides balance the richness of the pasta nicely. Absolutely! You can control the spice level by adjusting the red pepper flakes. If you want more heat, add more flakes. For a milder dish, you can skip them entirely. Feel free to experiment until you get the flavor just right for your taste buds. You learned how to make Creamy Garlic Chicken Pasta with key ingredients like chicken, garlic, and cream. We walked through each step, from cooking pasta to making a rich sauce. I shared tips for perfecting flavors, including optional veggie and protein swaps. Storing leftovers was also covered. Remember, this dish is versatile and easy to adapt. Explore your creativity in the kitchen! Enjoy your meal and share the joy of cooking with others.](https://goldendishy.com/wp-content/uploads/2025/06/75e46cf8-cdb7-4cdf-96b4-9ca11b1b9102-768x768.webp)

![To make maple glazed butternut squash, you’ll need the following items: - 1 medium butternut squash, peeled and cut into 1-inch cubes - 3 tablespoons pure maple syrup - 2 tablespoons extra virgin olive oil - 1 teaspoon ground cinnamon - 1/2 teaspoon freshly grated nutmeg - 1/4 teaspoon cayenne pepper (optional, for a kick) - Sea salt and freshly cracked black pepper, to taste - 1/4 cup pecans, roughly chopped (for garnish) - Fresh parsley, finely chopped (for garnish) When cooking, measuring accurately is key. Use dry measuring cups for solid items like squash and nuts. For liquids, use a liquid measuring cup. Always level off dry ingredients with a straight edge. This step ensures you get the right amount for best results. You can swap ingredients based on your needs. If you prefer a sweeter taste, try honey instead of maple syrup. For a nut-free option, skip the pecans or use seeds like pumpkin seeds. Always check for allergies, especially with nuts and spices. To make maple glazed butternut squash, start by gathering your ingredients. You'll need: - 1 medium butternut squash, peeled and cut into 1-inch cubes - 3 tablespoons pure maple syrup - 2 tablespoons extra virgin olive oil - 1 teaspoon ground cinnamon - 1/2 teaspoon freshly grated nutmeg - 1/4 teaspoon cayenne pepper (optional) - Sea salt and freshly cracked black pepper, to taste - 1/4 cup pecans, roughly chopped (for garnish) - Fresh parsley, finely chopped (for garnish) First, preheat your oven to 400°F (200°C). This step is key for good roasting. Next, peel and cube the butternut squash. Place the cubes in a large bowl. Drizzle the olive oil and maple syrup over the squash. Then, sprinkle the ground cinnamon, nutmeg, cayenne, sea salt, and black pepper. Toss gently until all the pieces are well coated. Now, it's time to roast your squash. Line a baking sheet with parchment paper. This helps prevent sticking and makes cleanup easy. Spread the coated squash in a single layer on the sheet. Place the baking sheet in the oven. Roast the squash for 25-30 minutes. About halfway through the cooking time, stir the squash. This ensures all sides caramelize and cook evenly. When the squash is fork-tender and has a nice golden color, it's done. Remove it from the oven and let it cool for 2-3 minutes. To get that perfect caramelization, watch your cooking time closely. Stirring halfway through helps. The key is to spread the squash out evenly. If it's too crowded, it will steam instead of roast. You can also adjust the maple syrup for sweetness. A little extra can help with caramelization. If you like a kick, add the cayenne pepper. It balances the sweet and savory flavors beautifully. Once cooked, transfer the squash to a serving dish. Top with chopped pecans and parsley for a fresh touch. This dish is sure to impress! For the complete recipe, check out the [Full Recipe]. When making maple glazed butternut squash, avoid cutting the squash too small. Smaller pieces cook too fast and can burn. Also, don’t skip the olive oil. It helps the squash caramelize and adds flavor. Overcrowding the baking sheet is another mistake. Leave space between the cubes to ensure even cooking. To boost the flavor, add a splash of balsamic vinegar before roasting. This adds depth to the sweetness. Try different spices, too. A pinch of smoked paprika can give a nice twist. For a savory touch, mix in garlic powder or fresh garlic. These will elevate your dish. Use a sturdy baking sheet lined with parchment paper. This helps with easy cleanup and prevents sticking. A large mixing bowl is great for tossing the squash and spices. If you have one, a vegetable peeler makes peeling the squash quick and easy. For a perfect roast, an oven thermometer ensures your oven is at the right temperature. For the full recipe, refer to the above instructions. {{image_4}} You can make this dish even better by adding other veggies. Try sweet potatoes for a richer flavor. Carrots add sweetness and color, while red onions bring a slight bite. Just cut them into similar sizes as the squash. Toss them in the same maple glaze for a yummy blend. You’ll create a colorful and flavorful dish that everyone will love. Want to change the taste? You can use different spices. Try ginger for a warm kick. If you like it spicy, add more cayenne pepper. You can also use smoked paprika for a smoky flavor. Experiment with herbs like thyme or rosemary. Just remember to keep it balanced, so no single flavor overpowers the dish. This recipe is naturally vegan and gluten-free. You can enjoy it without worry. If you want to add protein, try chickpeas. They pair well with the flavors and add a nice crunch. For those who need low-carb options, skip the maple syrup and use a sugar substitute. It’s easy to adapt this dish to fit your needs. For the full recipe, check out the detailed instructions above. To keep your maple glazed butternut squash fresh, store it in an airtight container. Let the squash cool down after cooking. Then, place it in the fridge. It will stay fresh for about 3 to 5 days. If you want to keep it longer, consider freezing. Reheat your butternut squash in the oven for the best results. Preheat your oven to 350°F (175°C). Spread the squash on a baking sheet. Heat it for about 10-15 minutes or until warm. You can also use the microwave. Place it in a microwave-safe dish and cover it. Heat in short bursts, checking to avoid overcooking. Freezing is a great way to save this dish for later. First, let the squash cool completely. Then, spread it on a baking sheet in a single layer. Freeze it for about 1-2 hours until firm. Once frozen, transfer the squash to a freezer-safe bag or container. It can last for up to 3 months in the freezer. When ready to eat, thaw overnight in the fridge before reheating. For more details, check the Full Recipe. Yes, you can prepare this dish ahead of time. Cook the butternut squash and let it cool. Store it in an airtight container in the fridge. You can make it up to two days in advance. When you're ready to eat, just reheat it in the oven or microwave. This makes it great for meal prep. Maple glazed butternut squash lasts about 3 to 5 days in the fridge. Make sure it’s in a sealed container. Check for any signs of spoilage before eating. If it looks or smells off, it’s best to toss it. Freshness is key for enjoying this tasty dish. You can pair this dish with many foods. It goes well with roasted chicken or turkey. You can also serve it with quinoa or brown rice for a healthy meal. For a vegetarian option, pair it with a bean salad. The sweet and savory flavors work well with many sides. For more details on how to whip up this incredible dish, check out the Full Recipe. This guide walked you through each step of making Maple Glazed Butternut Squash. We covered ingredients, how to prepare, cook, and store your dish. I shared tips to avoid mistakes and ideas for adding your own twist. Remember, the key to perfect caramelization is patience. Enjoy experimenting with flavors and variations. This dish can be a crowd-pleaser and is easy to adapt. I hope you feel ready to try it out. Enjoy your cooking!](https://goldendishy.com/wp-content/uploads/2025/07/e9e7eb41-1a1b-4d7a-9d20-35ffe8b1aa92-768x768.webp)

